
The anodized aluminum finish on the brand new iPhone 17 Pro is gorgeous, right up until it meets your keys or a stray coin bouncing around in your pocket. And yes, reviewers are already calling it “scratchgate.”
For this teardown, we’ve dug deep into why scratchgate is happening, putting the phone under our Evident DSX2000 microscope and calling in a materials scientist to help us run some scratch tests.
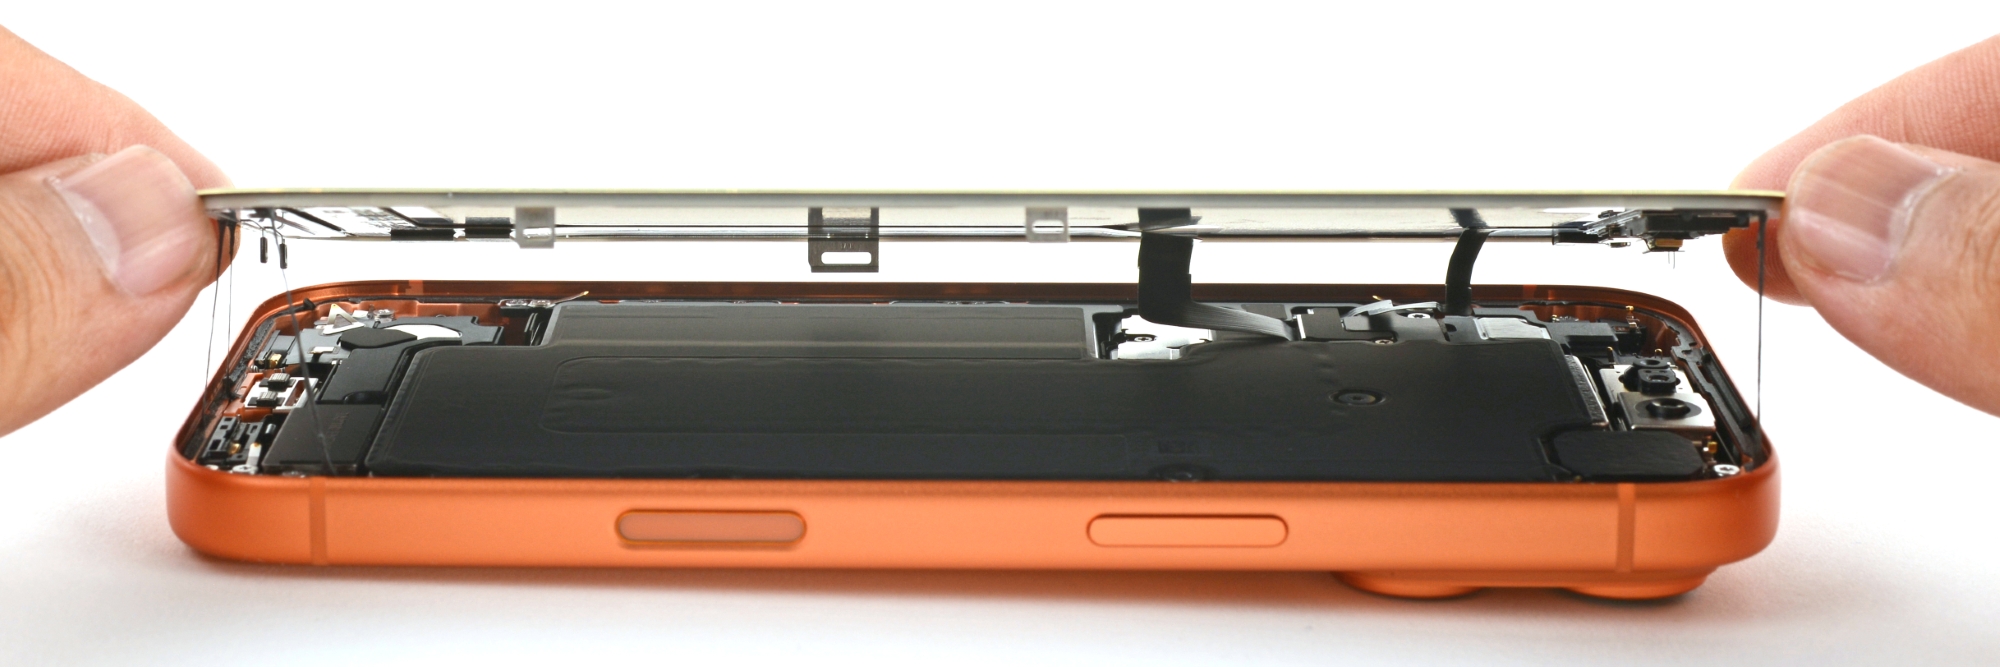
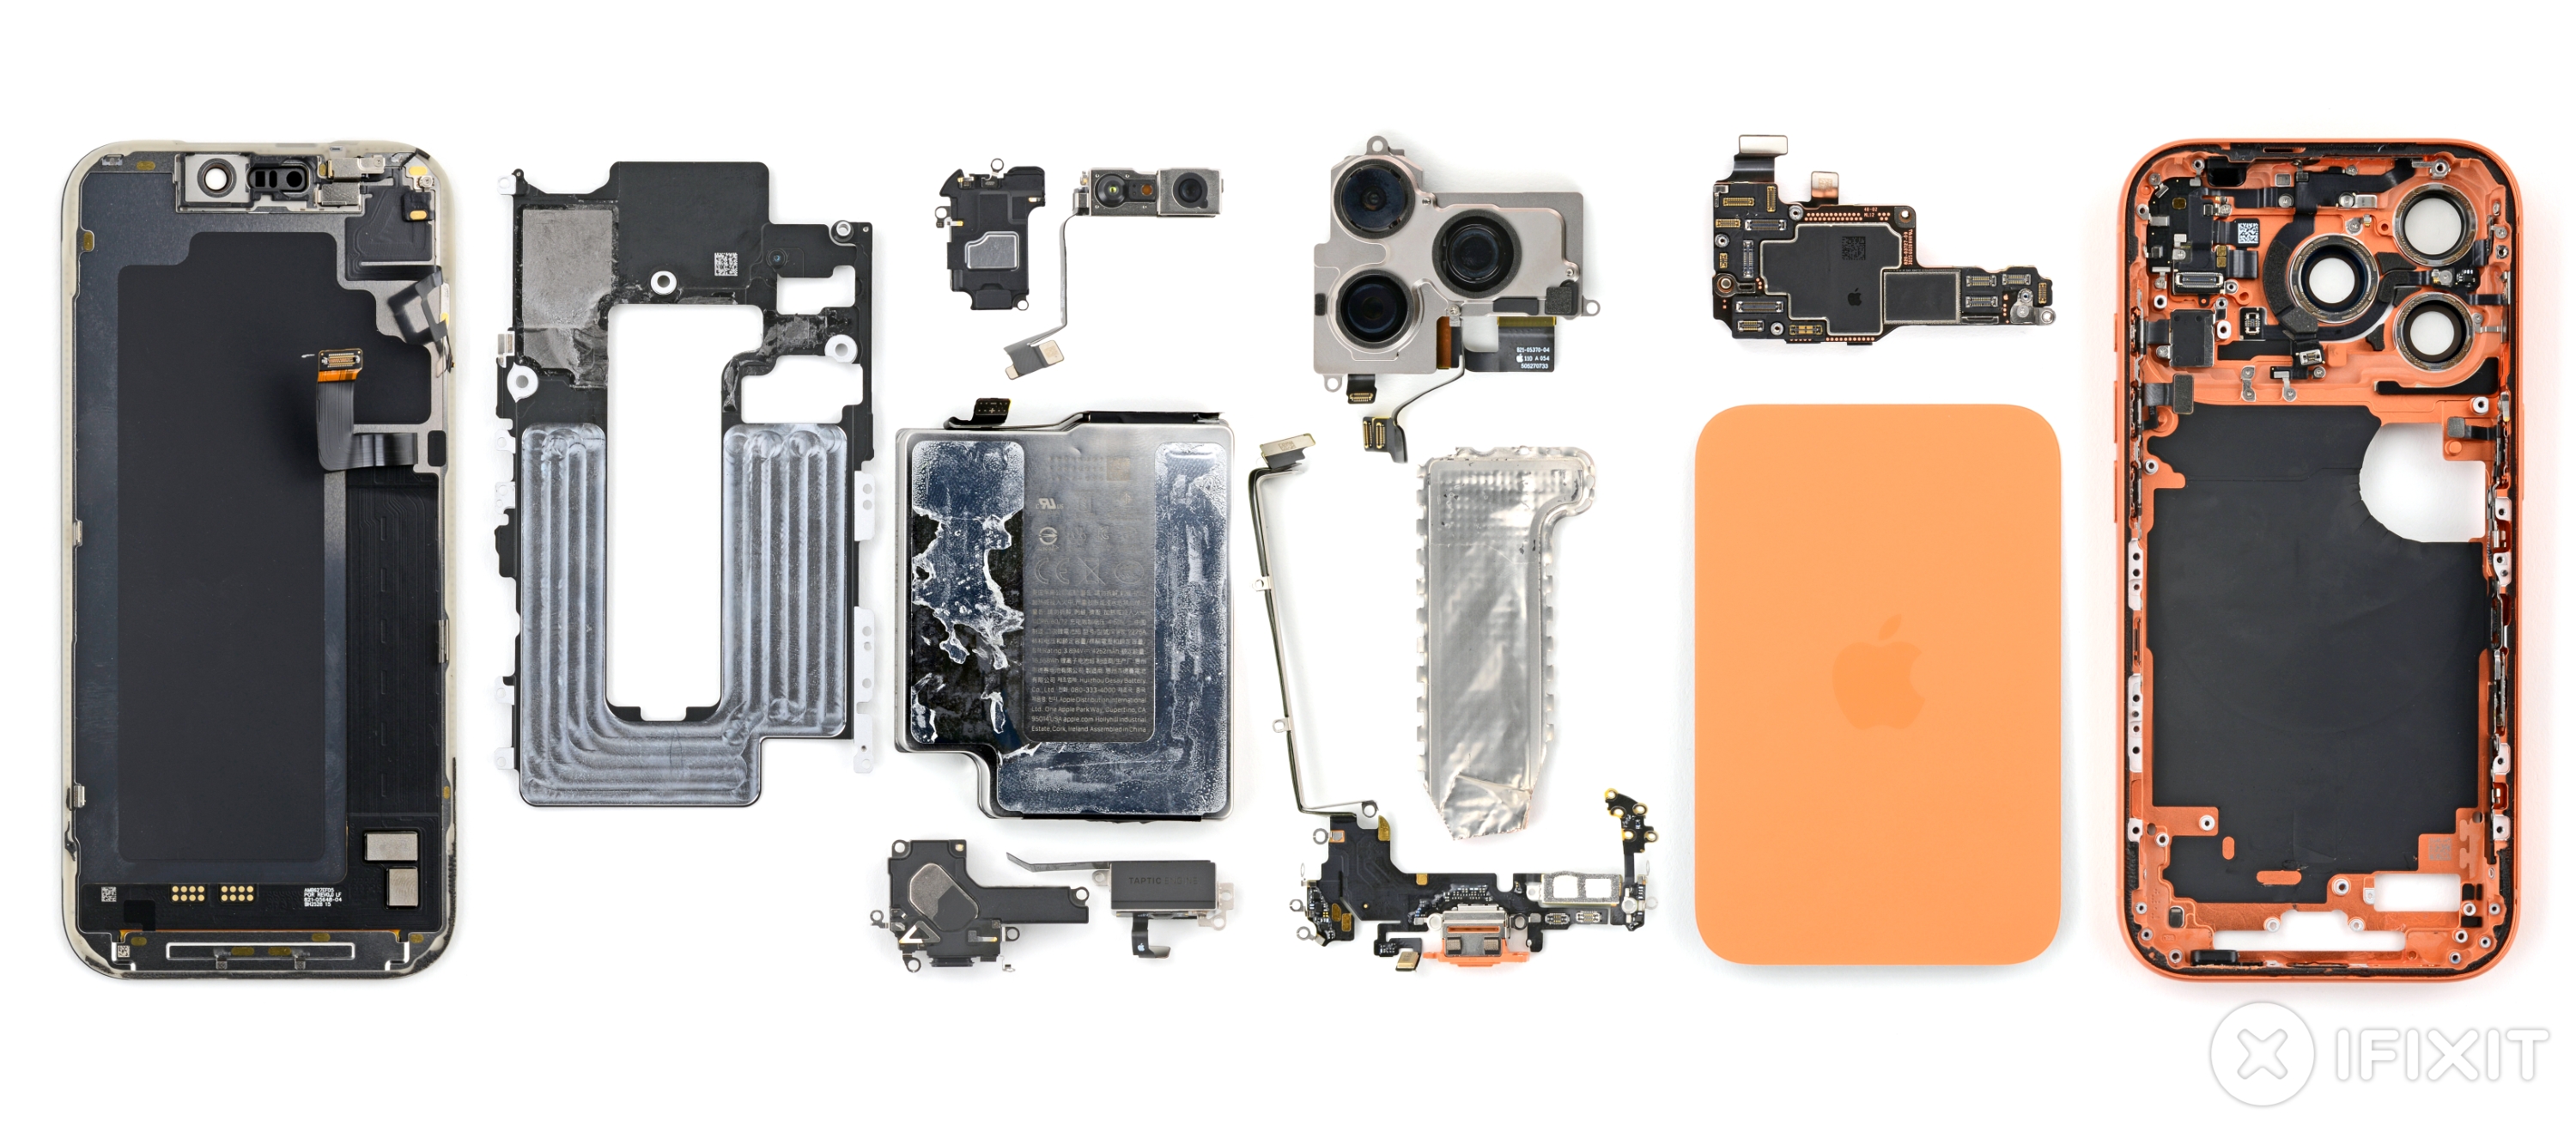
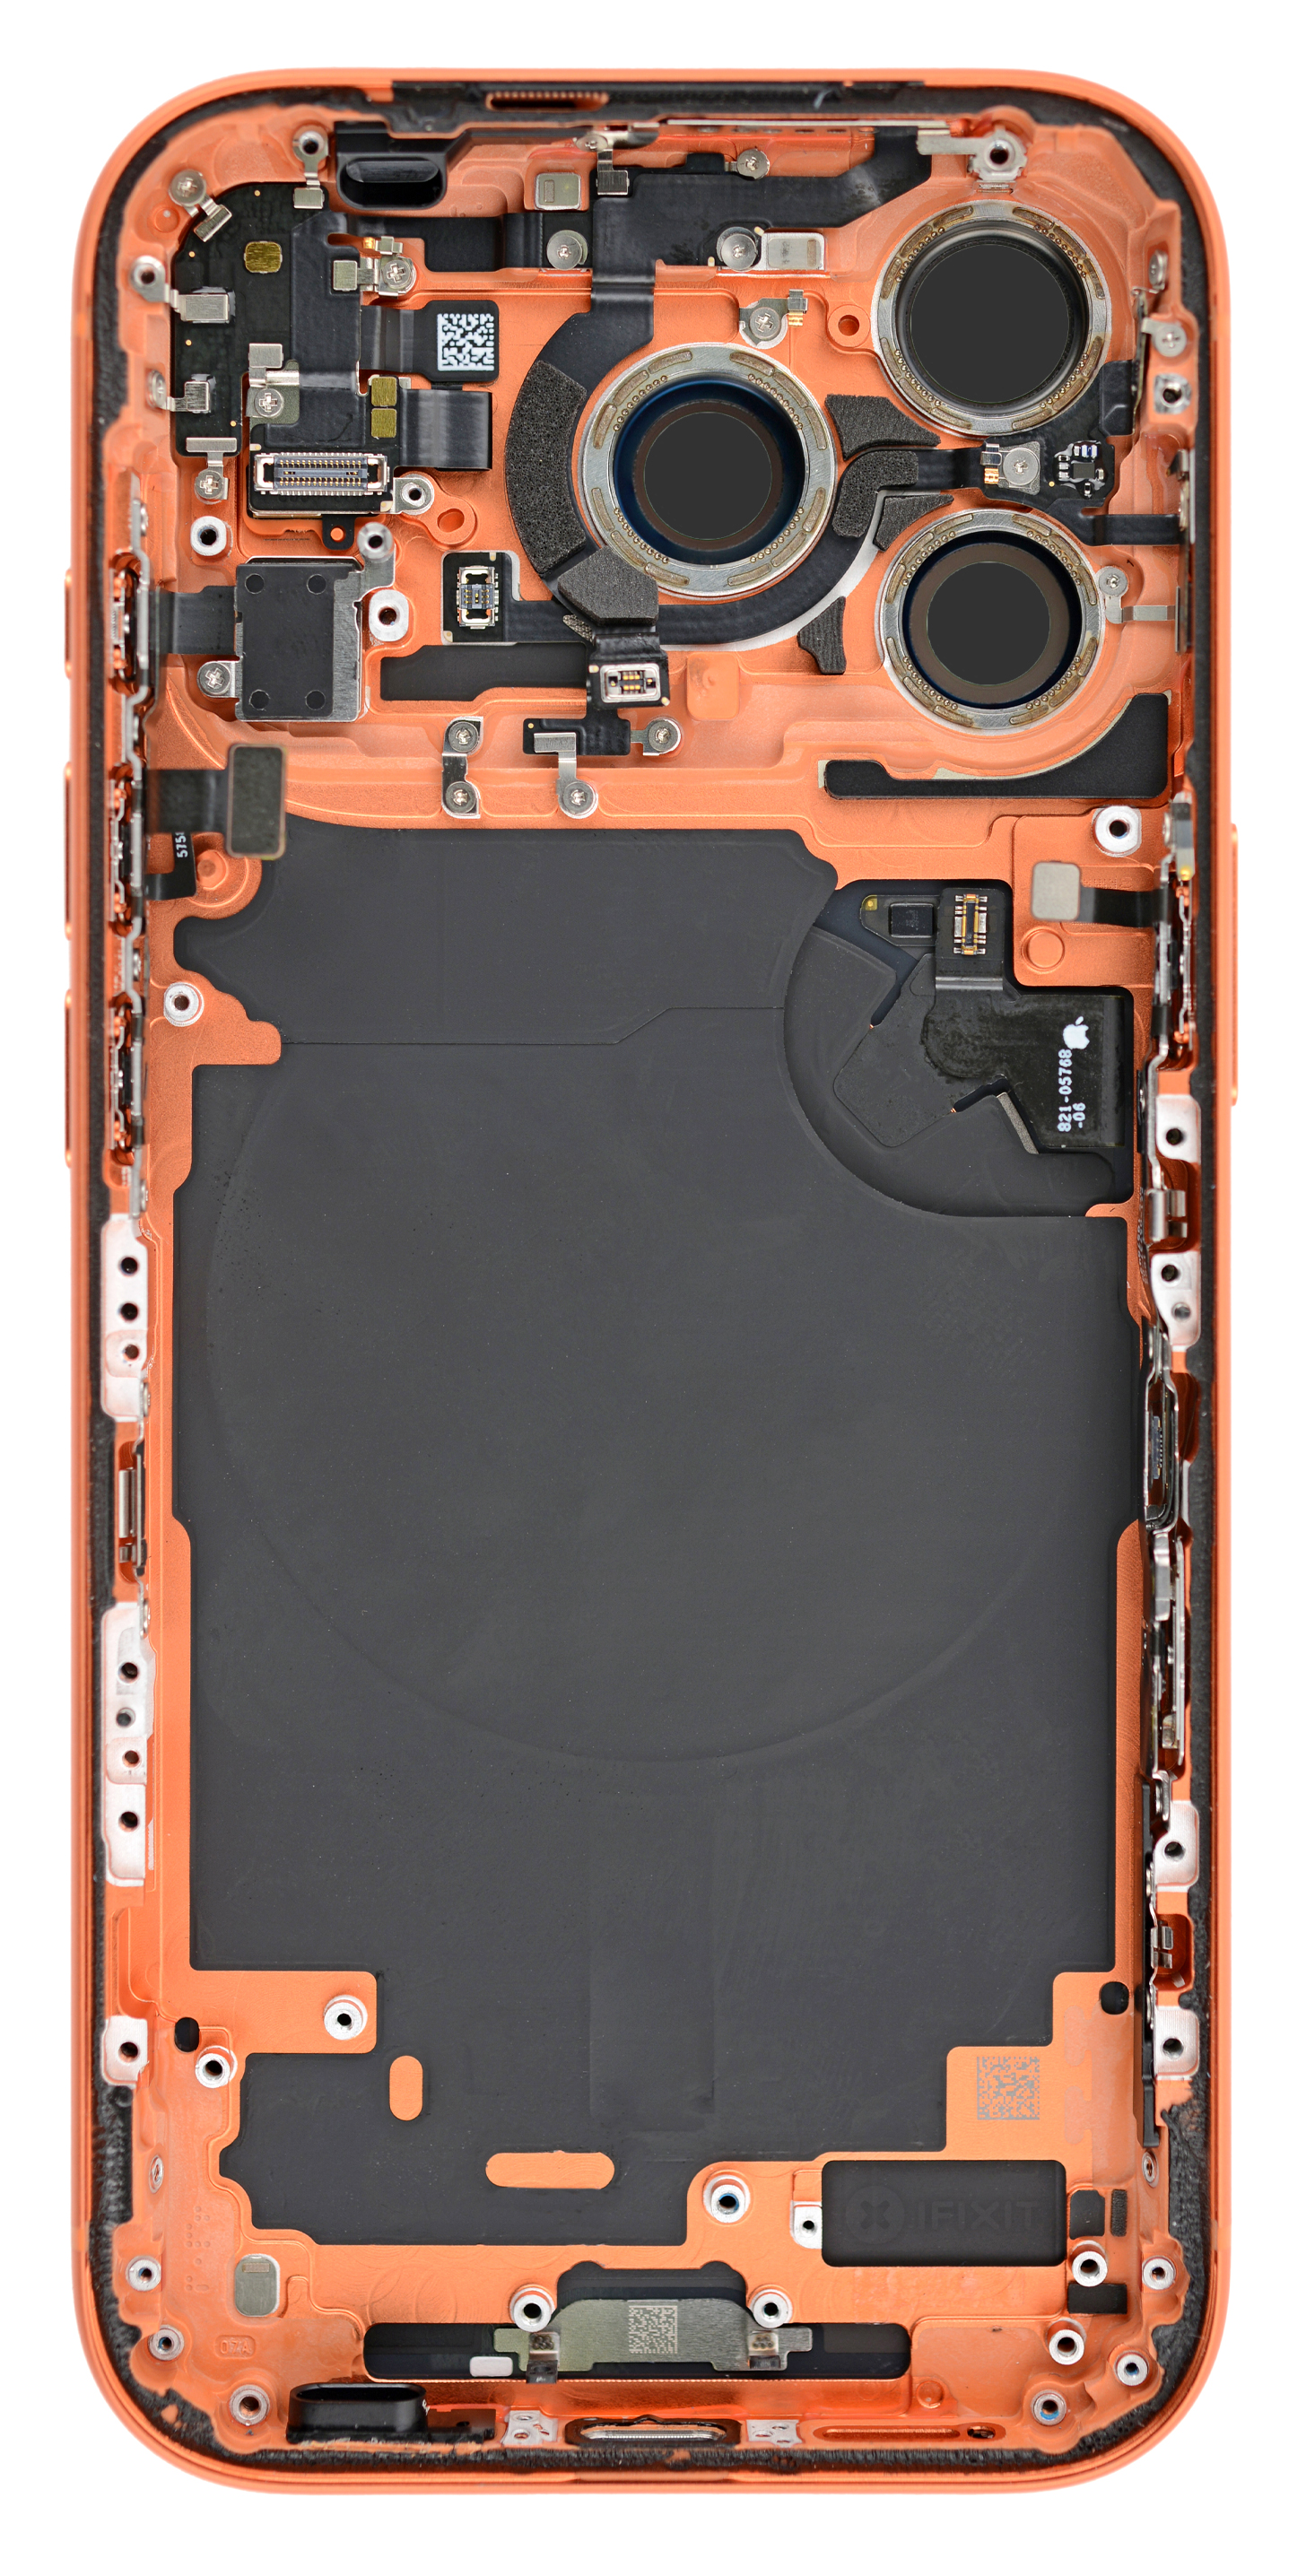
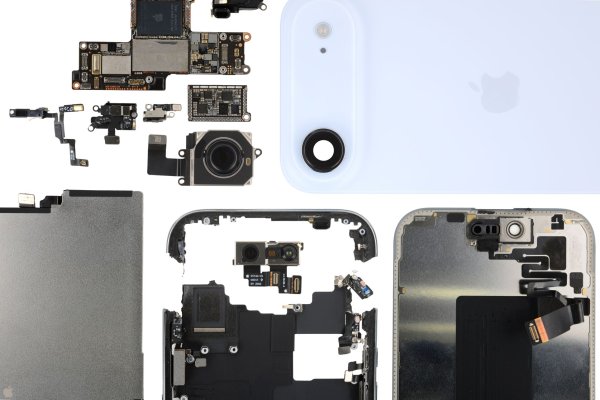
Admittedly, we’re not a durability testing outfit by trade. But don’t worry, plenty to talk about in this phone when it comes to repair: it has a fascinating screwed-in battery, a vapor chamber for heat dissipation, and Torx Plus screws—three things never before seen in any iPhone.
While the iPhone 17 Pro is missing some of the repairability features we loved in the Air when we tore it down over the weekend, Apple’s rearranged internals keep the Pro essentially on par score-wise. This phone isn’t quite as easy to work on as the Air, but the difference is small enough that it earns the same 7 out of 10 repairability score. Why? We’ll explain.
Scratchgate Under the Scope
Before we get to repair, let’s start with the obvious, much-reported durability problem with this phone.
Apple swapped titanium for heat-forged aluminum this year, anodized to get that bright finish. Problem is, the anodized layer is brittle. On flat surfaces, where the anodization can get a better grip, it holds up okay, leaving shallow scratches that don’t cut through to bare metal.
But intrepid durability tester Zack Nelson over at JerryRigEverything points out that on sharp corners, like the edge of the camera bump, the anodized layer flakes away. (By the way, have you preordered one of our collab kits with iFixit screwdrivers and a JerryRig knife yet?)

Phone a Friend: Was Anodizing a Mistake?
We tapped a materials scientist to help us run some scratch tests under our microscope and explain what we’re seeing. David Niebuhr is the owner of Niebuhr Metallurgical Engineering, LLC, a consulting firm focusing on consumer product design and failure analysis, and also teaches mechanical engineering at California Polytechnic State University, down the street from our San Luis Obispo HQ.
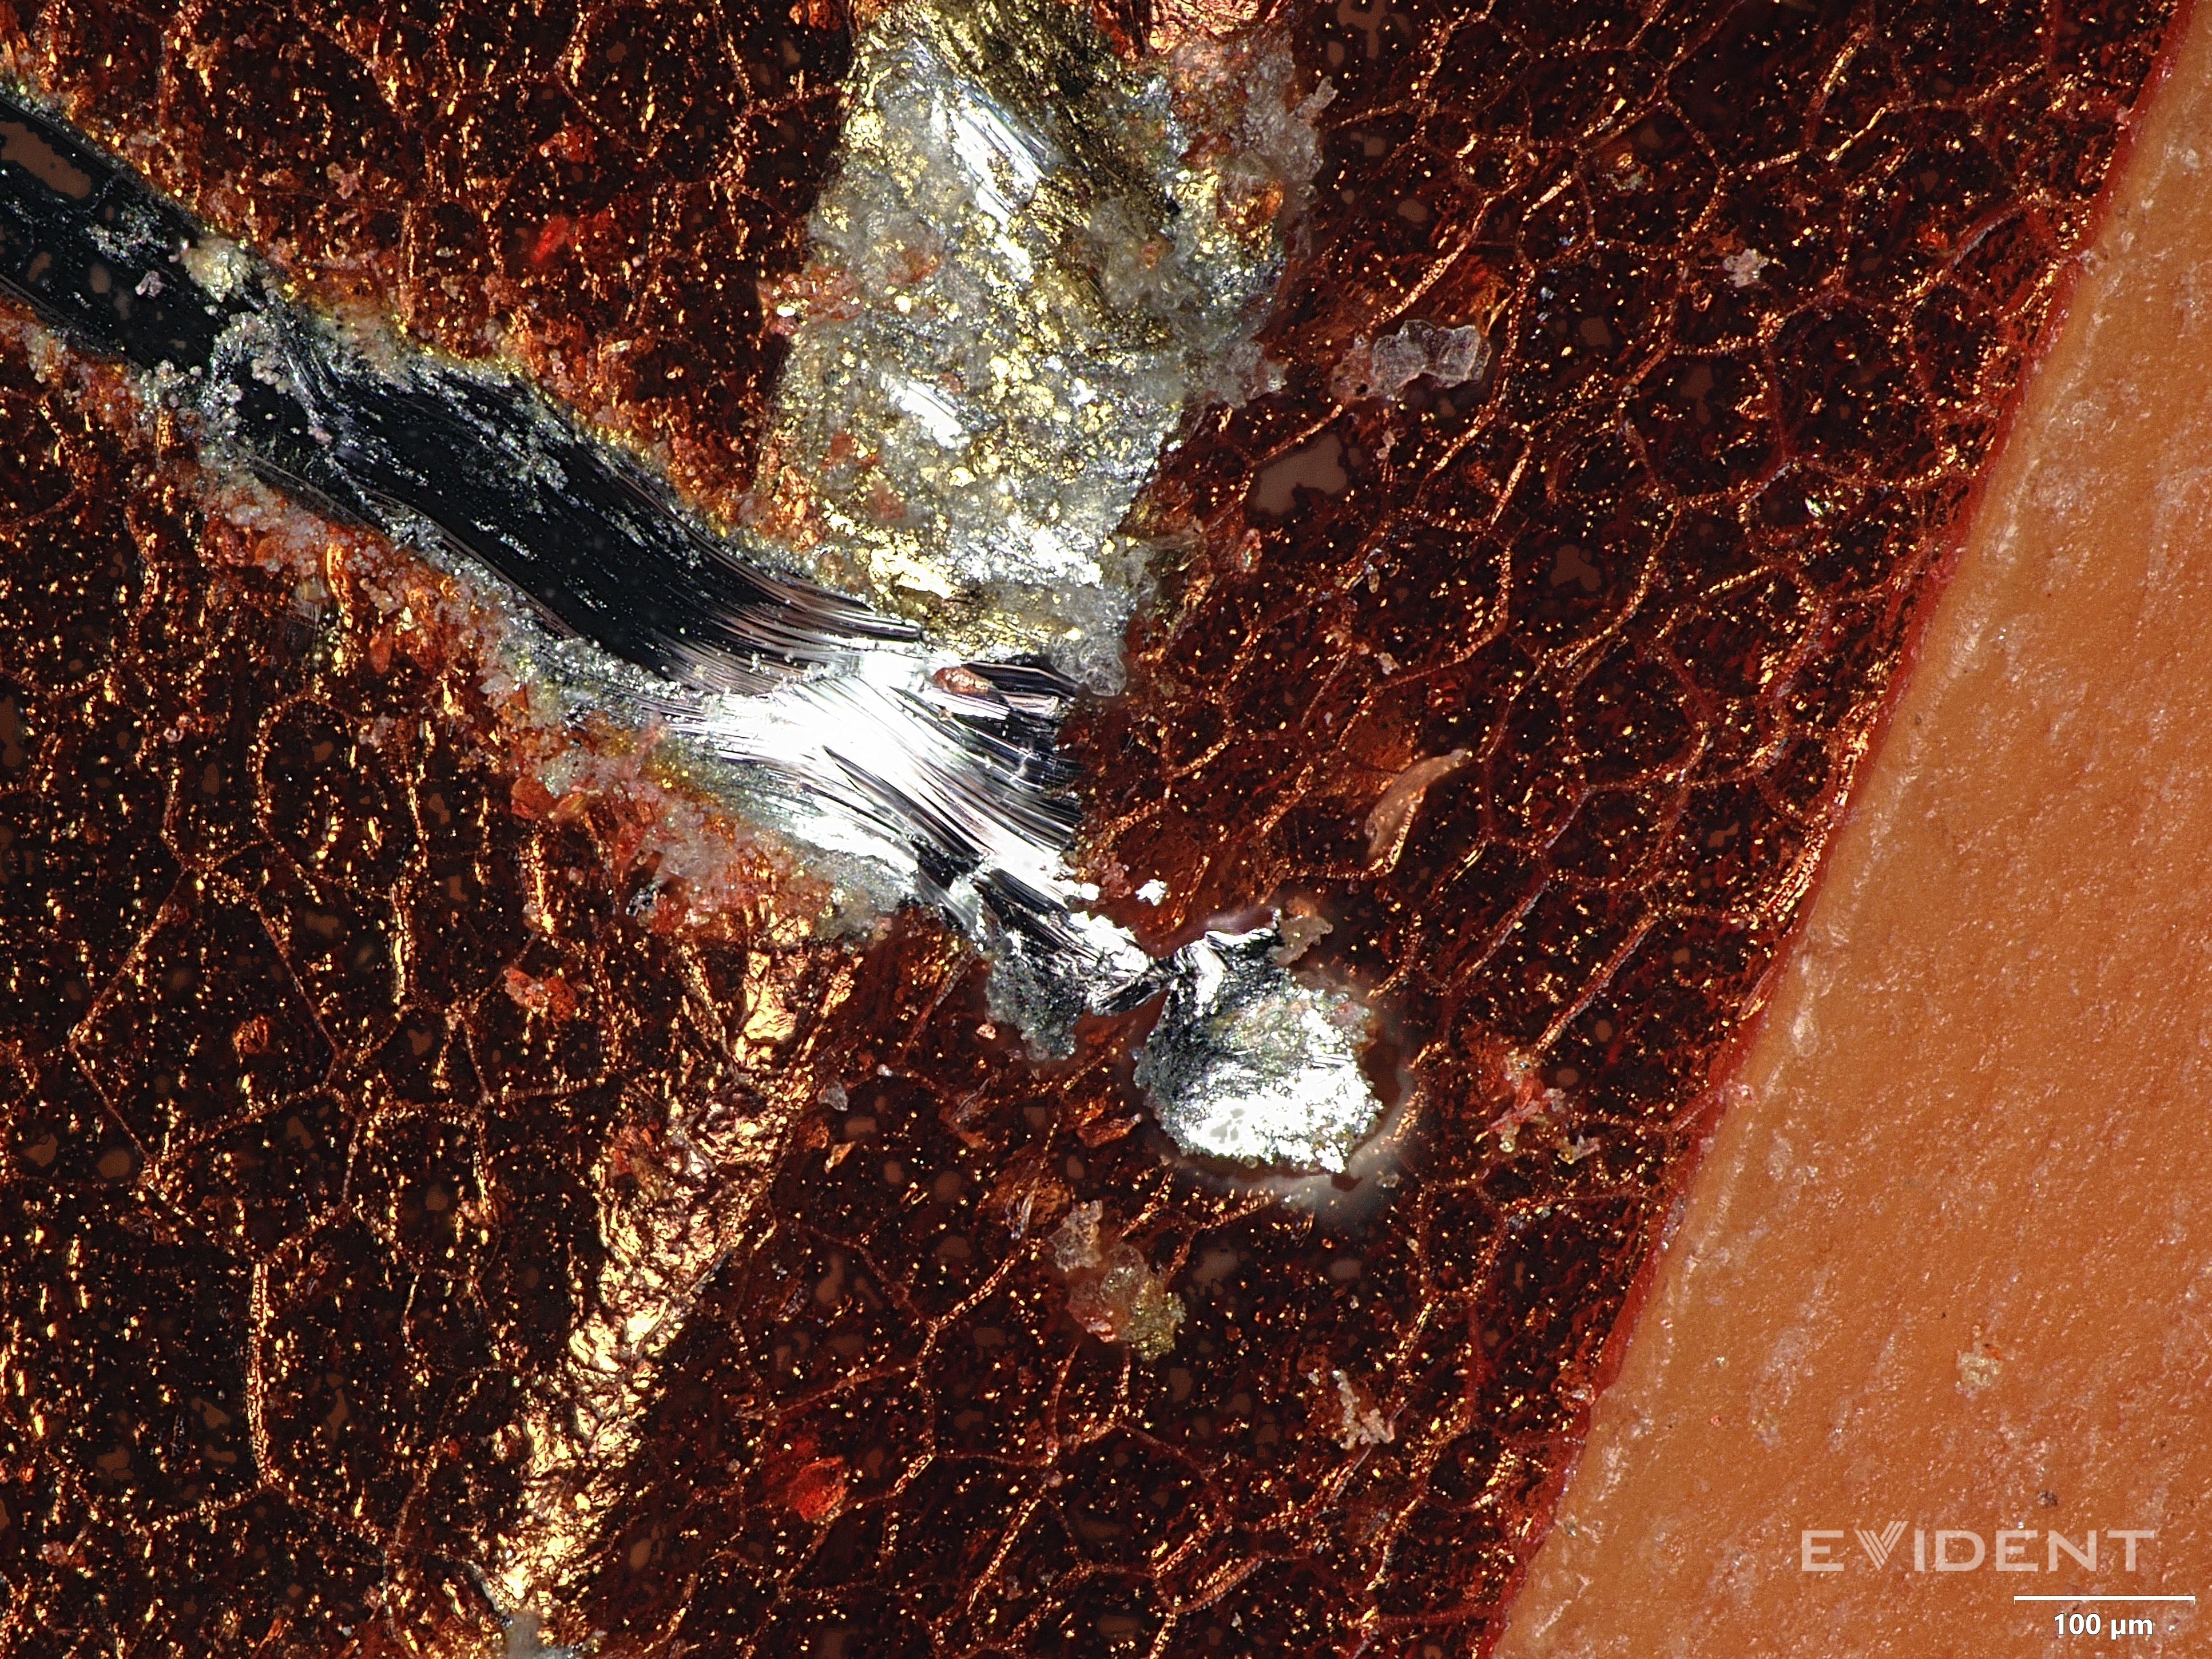
Niebuhr encouraged us to break out our Mohs surface hardness scratch kit. He recommended the level 4 pick, which is about the hardness of copper, so a good proxy for coins and keys.
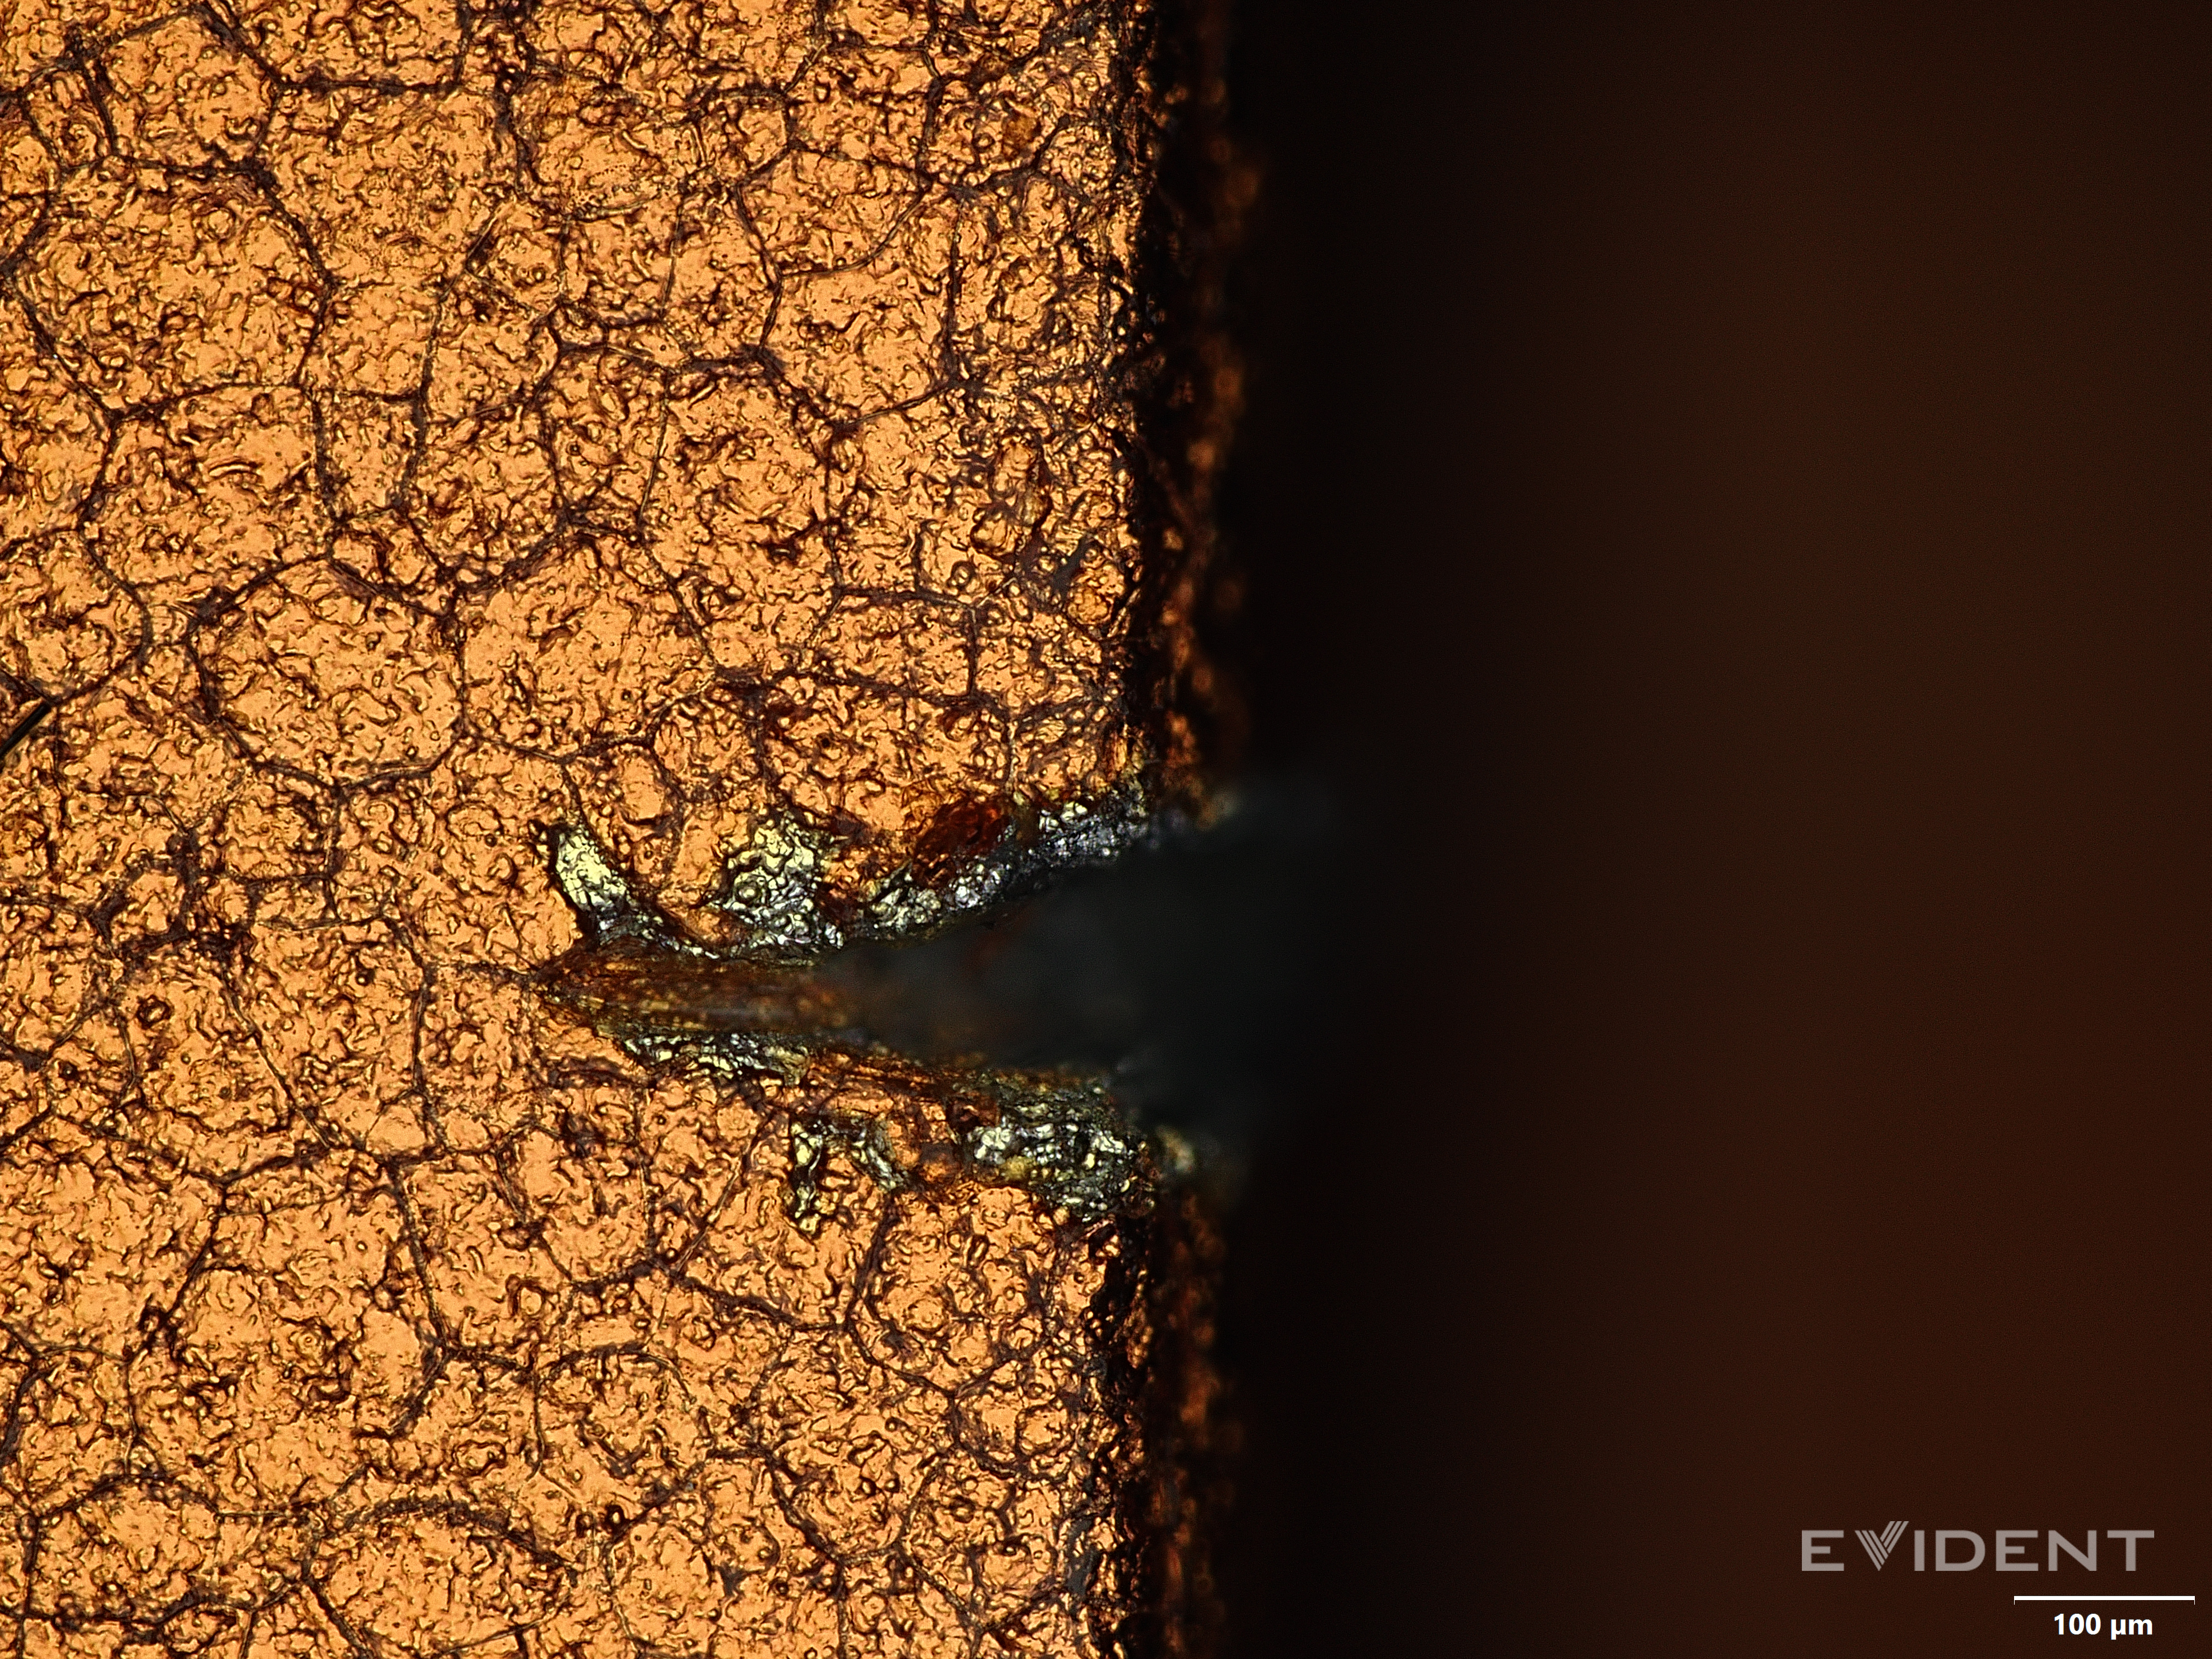
Following Niebuhr’s suggestions, we started with the flat back of the case and confirmed what Zack was seeing: The scratches were only skin-deep, not showing the shiny aluminum underneath. But when we moved to the edge of the plateau, it flaked badly.
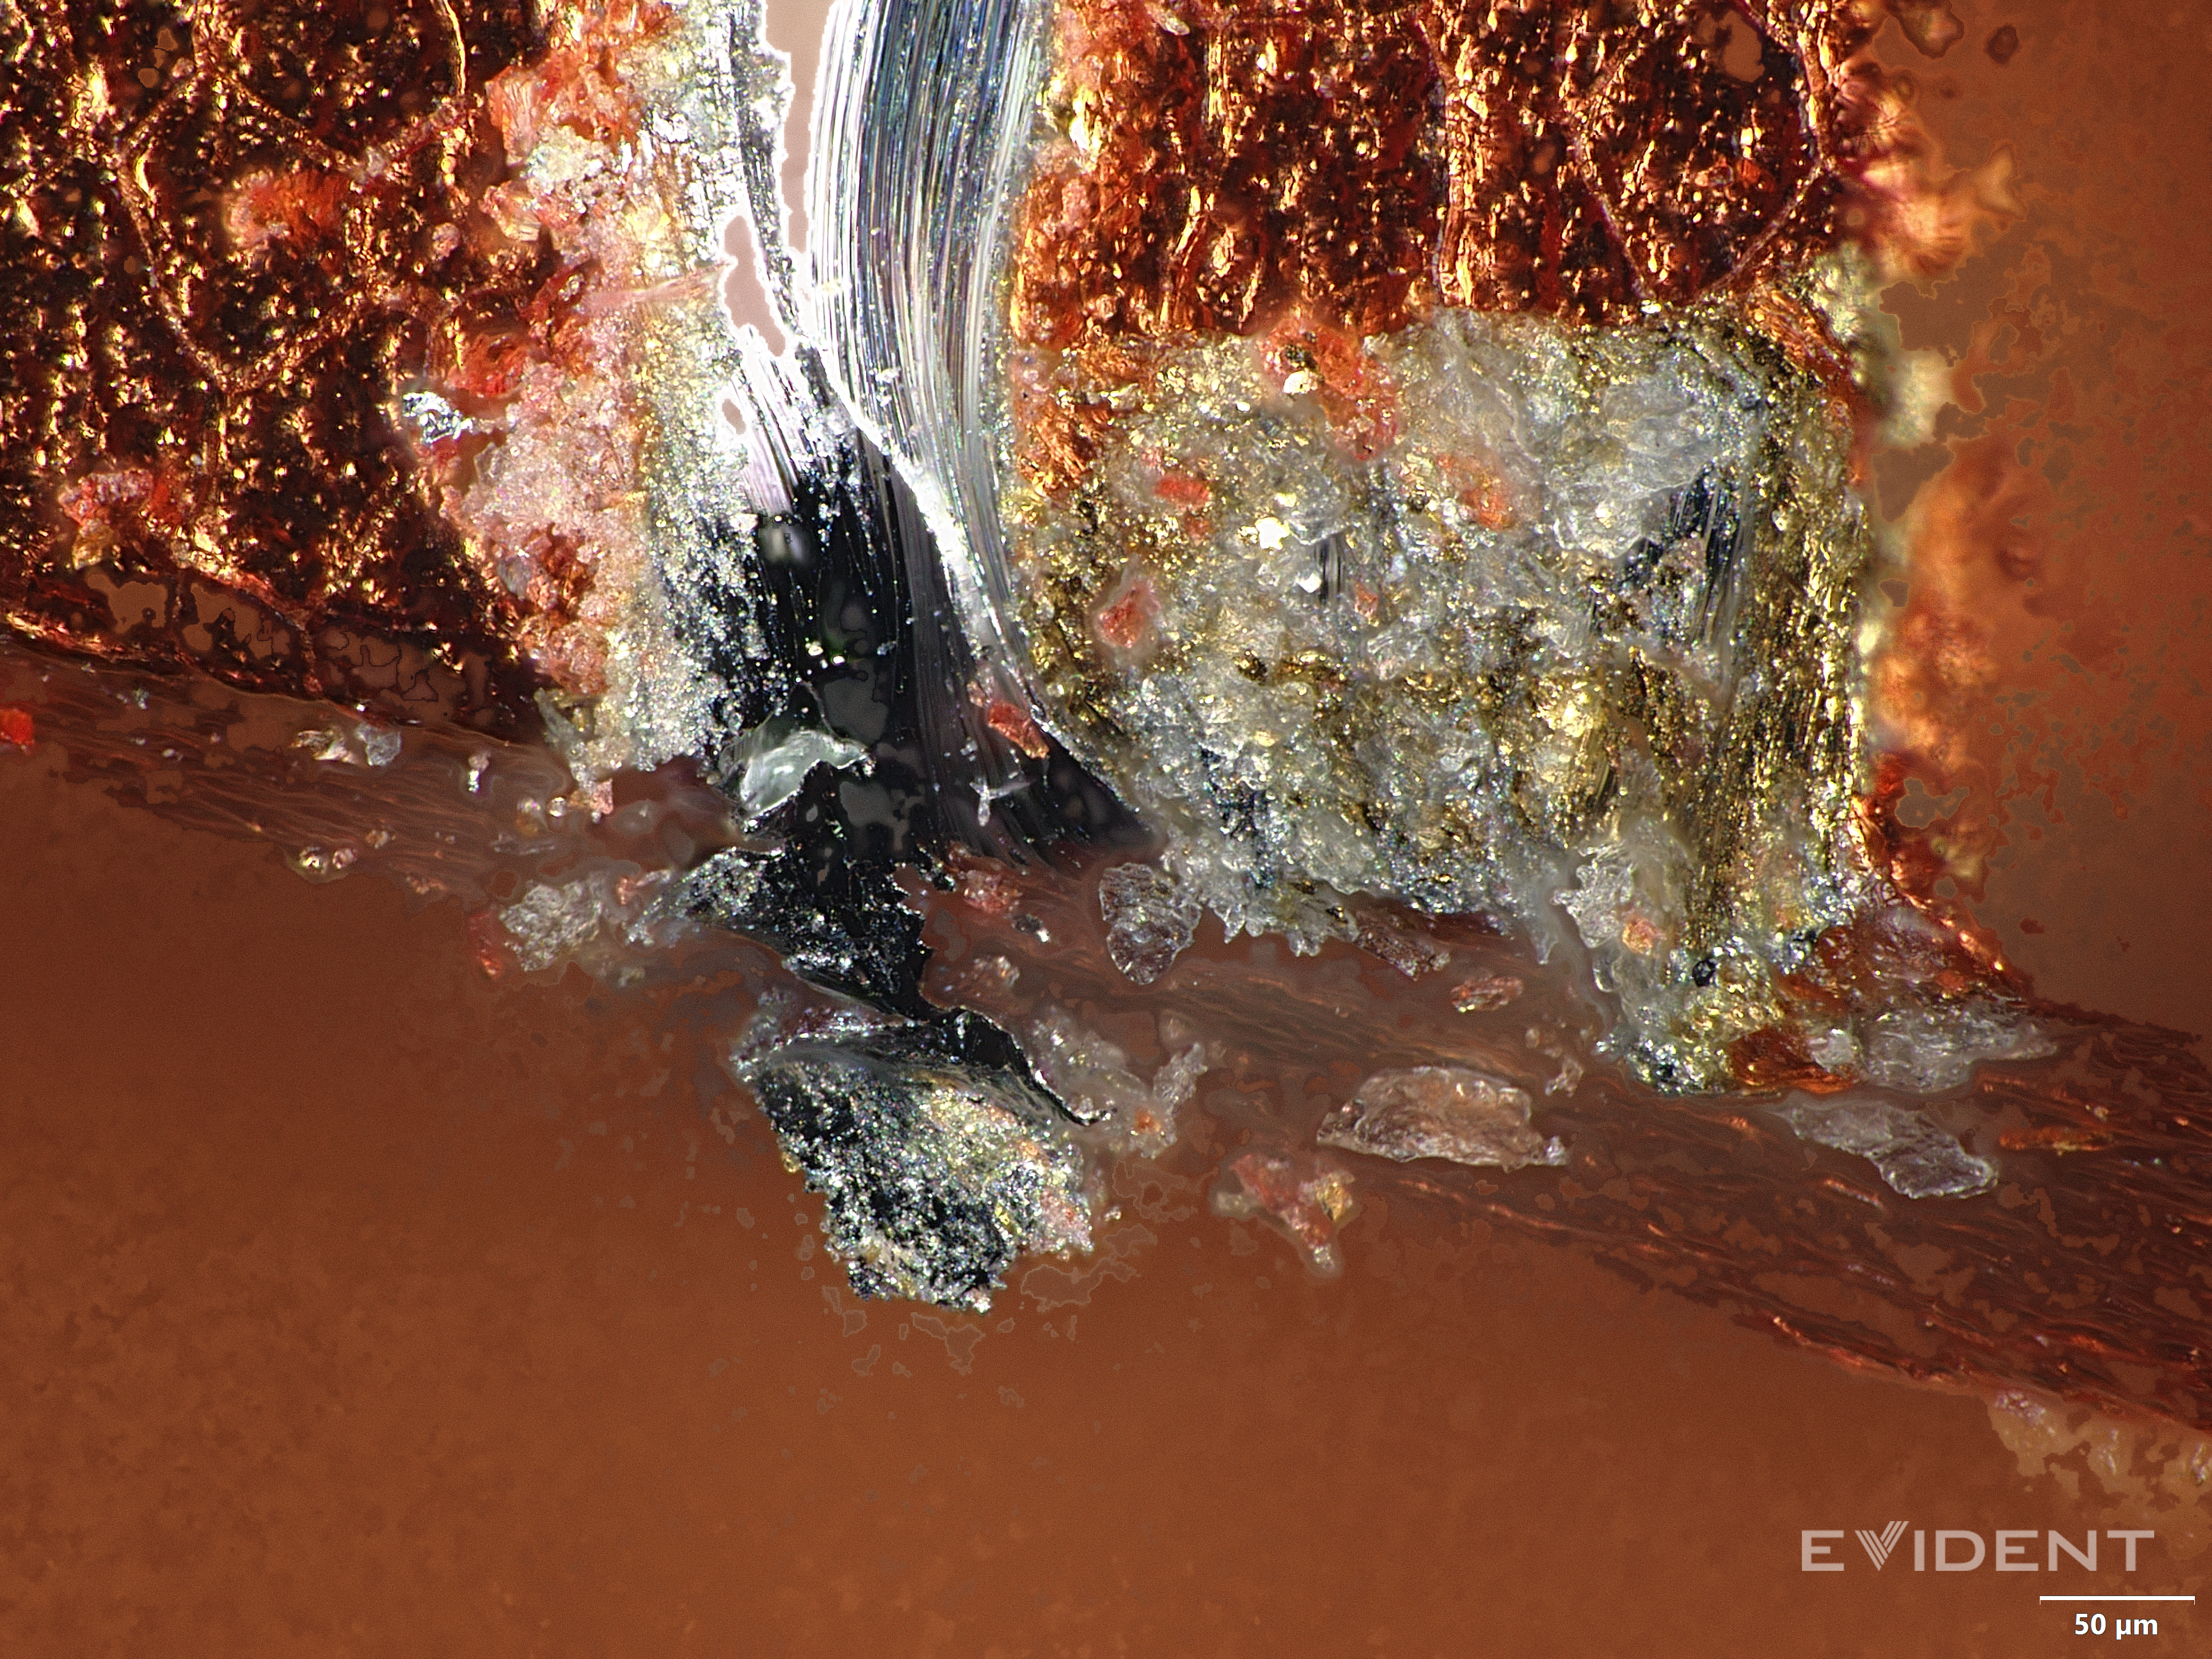
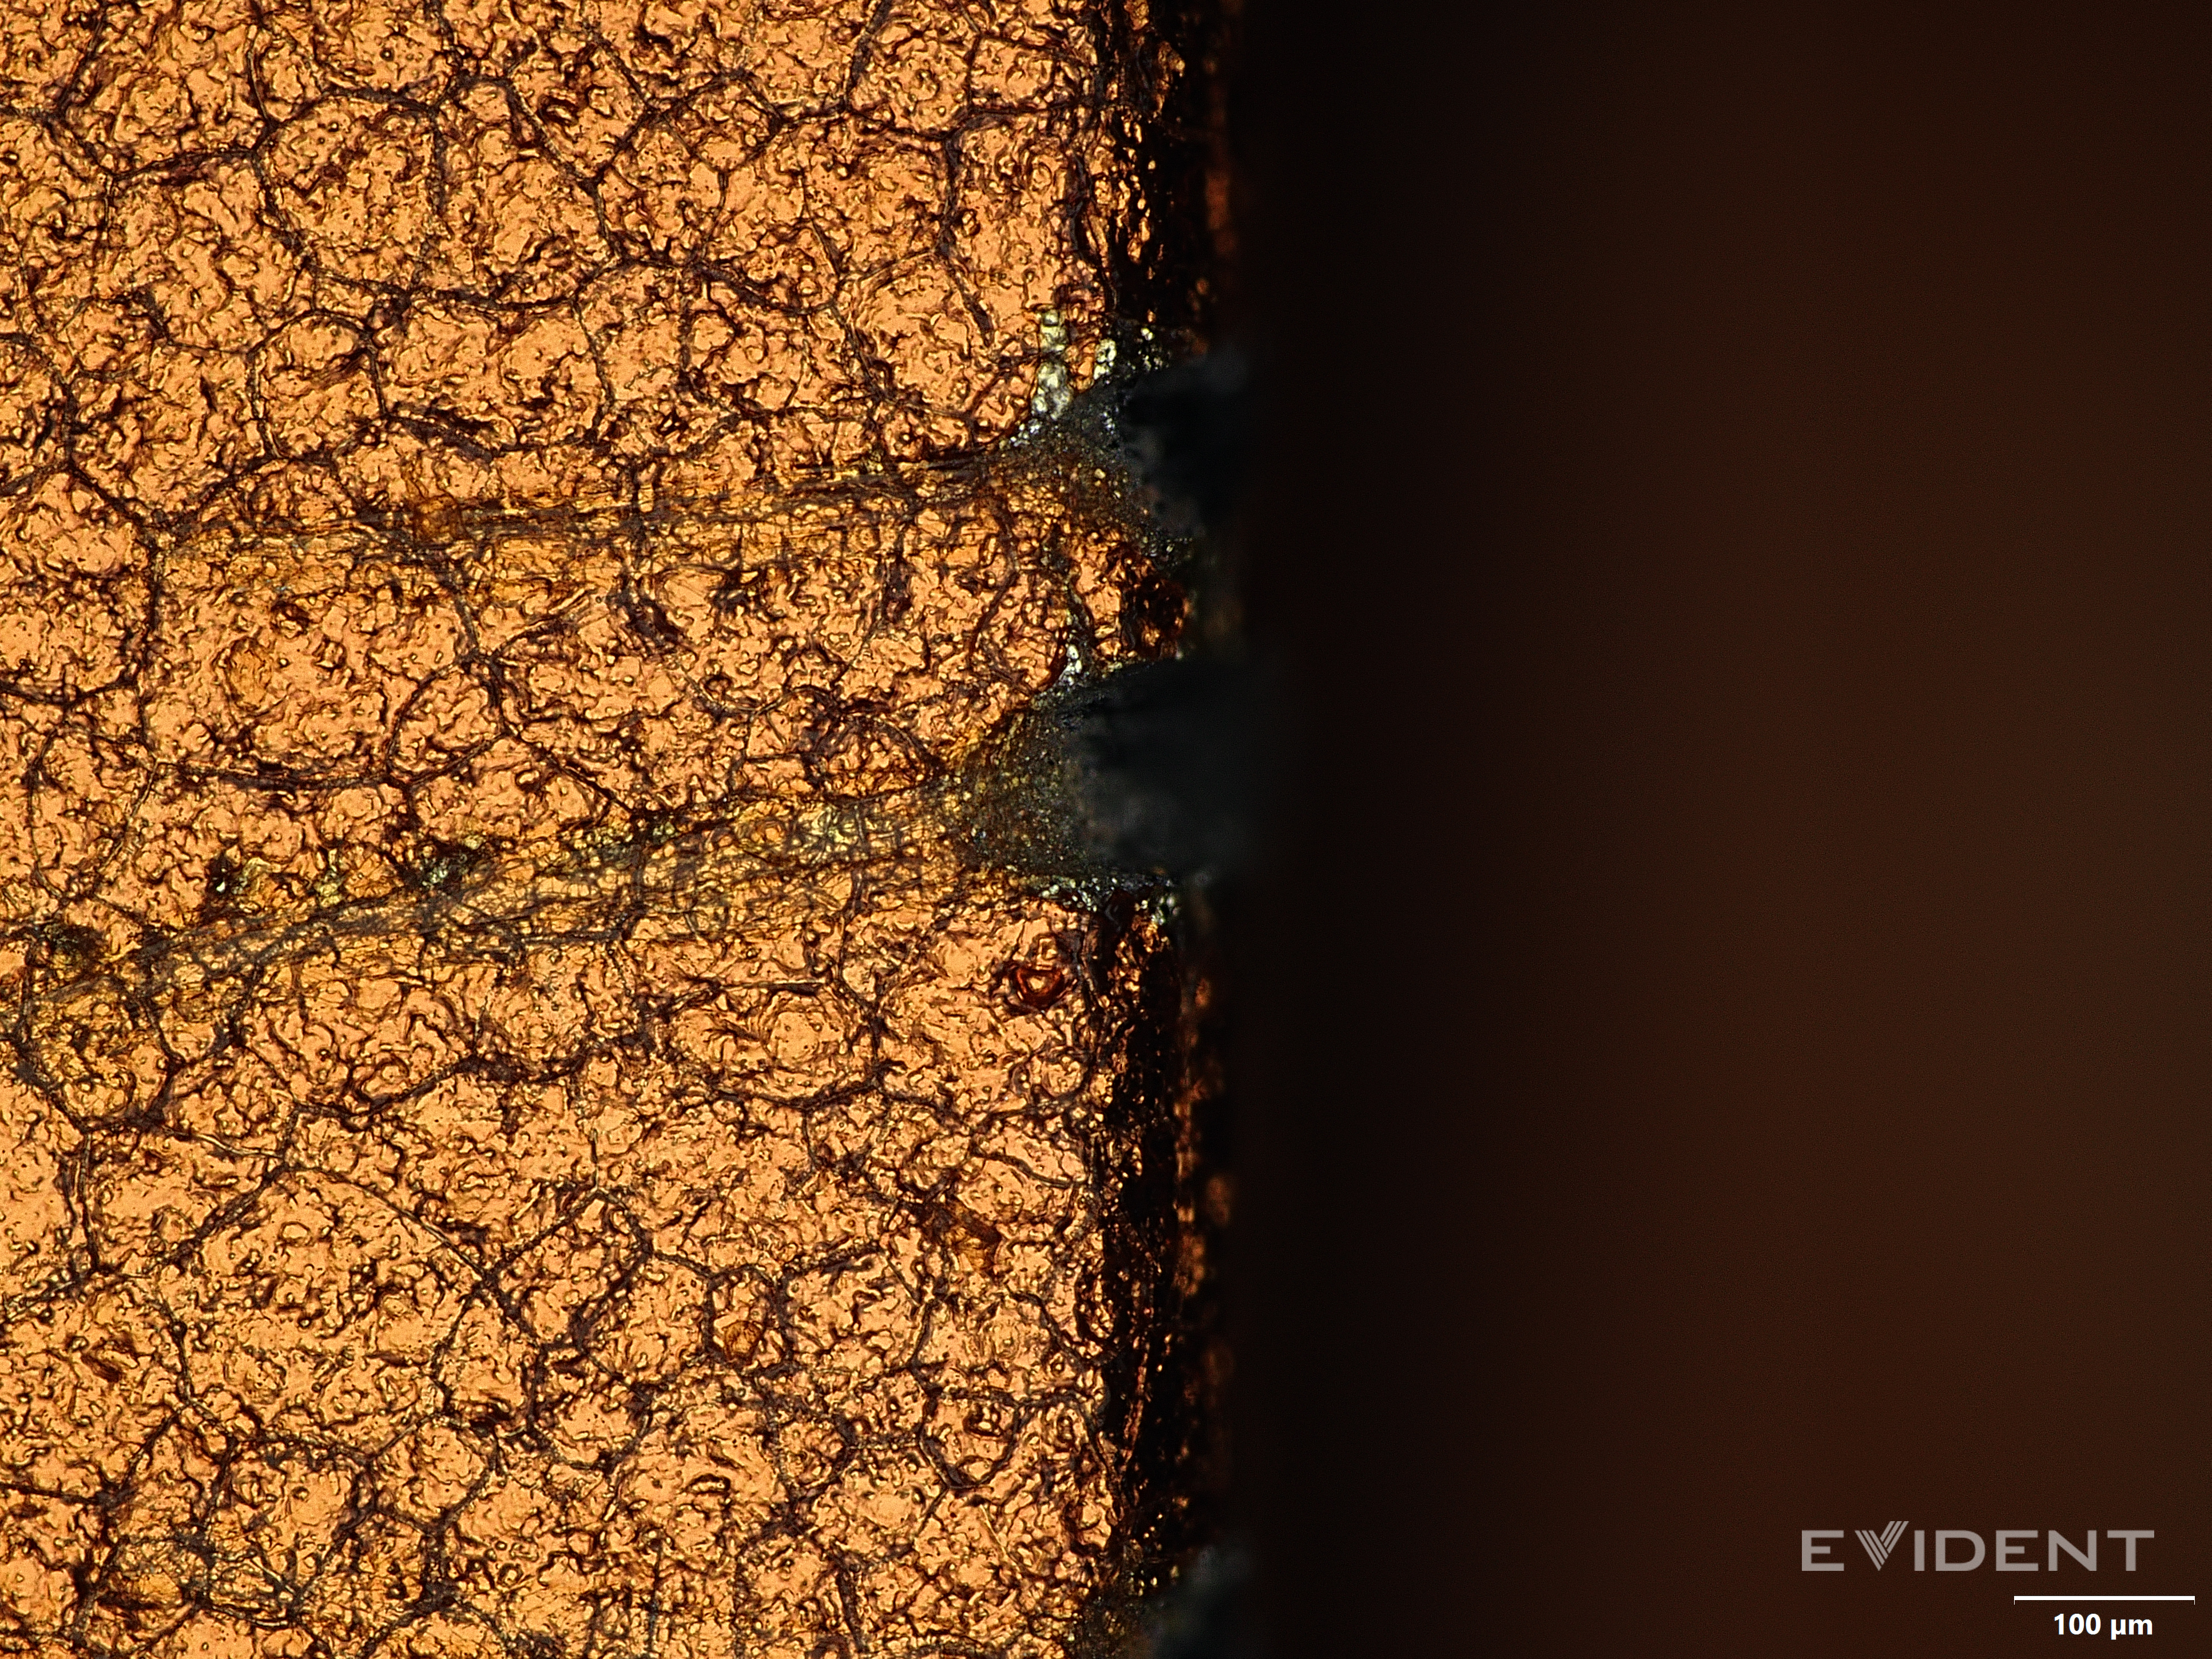
Niebuhr tells us the kind of damage we’re seeing is called “spalling.” To understand why the camera plateau edges are spalling so badly, first we have to understand anodizing.
What the Heck is Anodizing, Anyway?
Anodizing is an electrolytic process that builds a protective oxide layer onto a metal surface. Basically, the metal surface is corroded carefully and the layer of corrosion protects the underlying metal. It’s also widely used as a robust way to add color, like the 17 Pro’s bright Cosmic Orange. The oxide layer is usually grown by submerging the part in an electrolyte bath and passing a current through it.
Two years ago, our M3 MacBook Pro teardown covered this in depth. The controlled corrosion eating away at the surface created the matte Space Black finish. We’re seeing the same bumpy finish on the iPhone 17 Pro, this time infused with an orange dye.
Not all metals can be anodized, but titanium and aluminum both can. In fact, one of our engineers anodized the titanium iPhone 15 Pro last year.
The Problem with Edges
So, is the problem that the phone’s aluminum, not titanium? Titanium oxide is a little harder than aluminum oxide, David Niebuhr tells us, but the difference wouldn’t account for the spalling we’re seeing.
The issue is the shape of the phone. Specifically, the sharp edge of the camera bump, which the anodizing doesn’t adhere to as evenly as across the rest of the phone.
“Even if the oxide layer were made thicker to shore up the edge, the result would be the same or worse,” Niebuhr said. “Thin oxide layers can deform with their substrate to a small degree. A thicker oxide would be more prone to spalling and removing even more substrate when it fractured.”
That’s why the scratches on the flat sections of the phone don’t reveal shiny metal. The colorful contrast of the anodization layer breaking at the edge of the camera plateau, revealing the aluminum underneath, makes those scratches way more obvious to the naked eye.
Is this just a natural consequence of anodizing? No, says Niebuhr: “Apple could have prevented this by making a more gradual curve and avoiding a relatively sharp corner.”
Apple could have prevented this by making a more gradual curve and avoiding a relatively sharp corner.
– David Niebuhr, Niebuhr Metallurgical Engineering
Sharp corners are inherently weaker, prone to shearing off/getting sliced. Think sugar cookie: your star-shaped cookies are liable to lose their points.
Despite some reports of scratching on the iPhone Air and base model iPhone, we haven’t really seen the same level of failure on those phones. For one, those phones both have a glass back panel that is harder than a level 4 Mohs pick.
We knew that the Ceramic Shield 2 camera plateau on the iPhone Air was unlikely to scratch in the same way. Apple has reported to the EU that it’s a 5 on the Mohs scale. But for the sake of comparison, we put it through the same test. There were no scratches or chips in the glass visible under the microscope, even pressing hard on the edge of the camera plateau.

Good Luck Replacing that Scratched Back: No Dual-Entry
Okay, so that’s a lot of durability focus for us, a little out of our repairability wheelhouse. The JerryRig collaboration must be rubbing off! But in this case, the scratching of the camera plateau also has some repair implications. Since Apple redesigned this phone from the ground up, if you want to replace that scratched plateau, there’s no full-coverage back panel for you to replace.
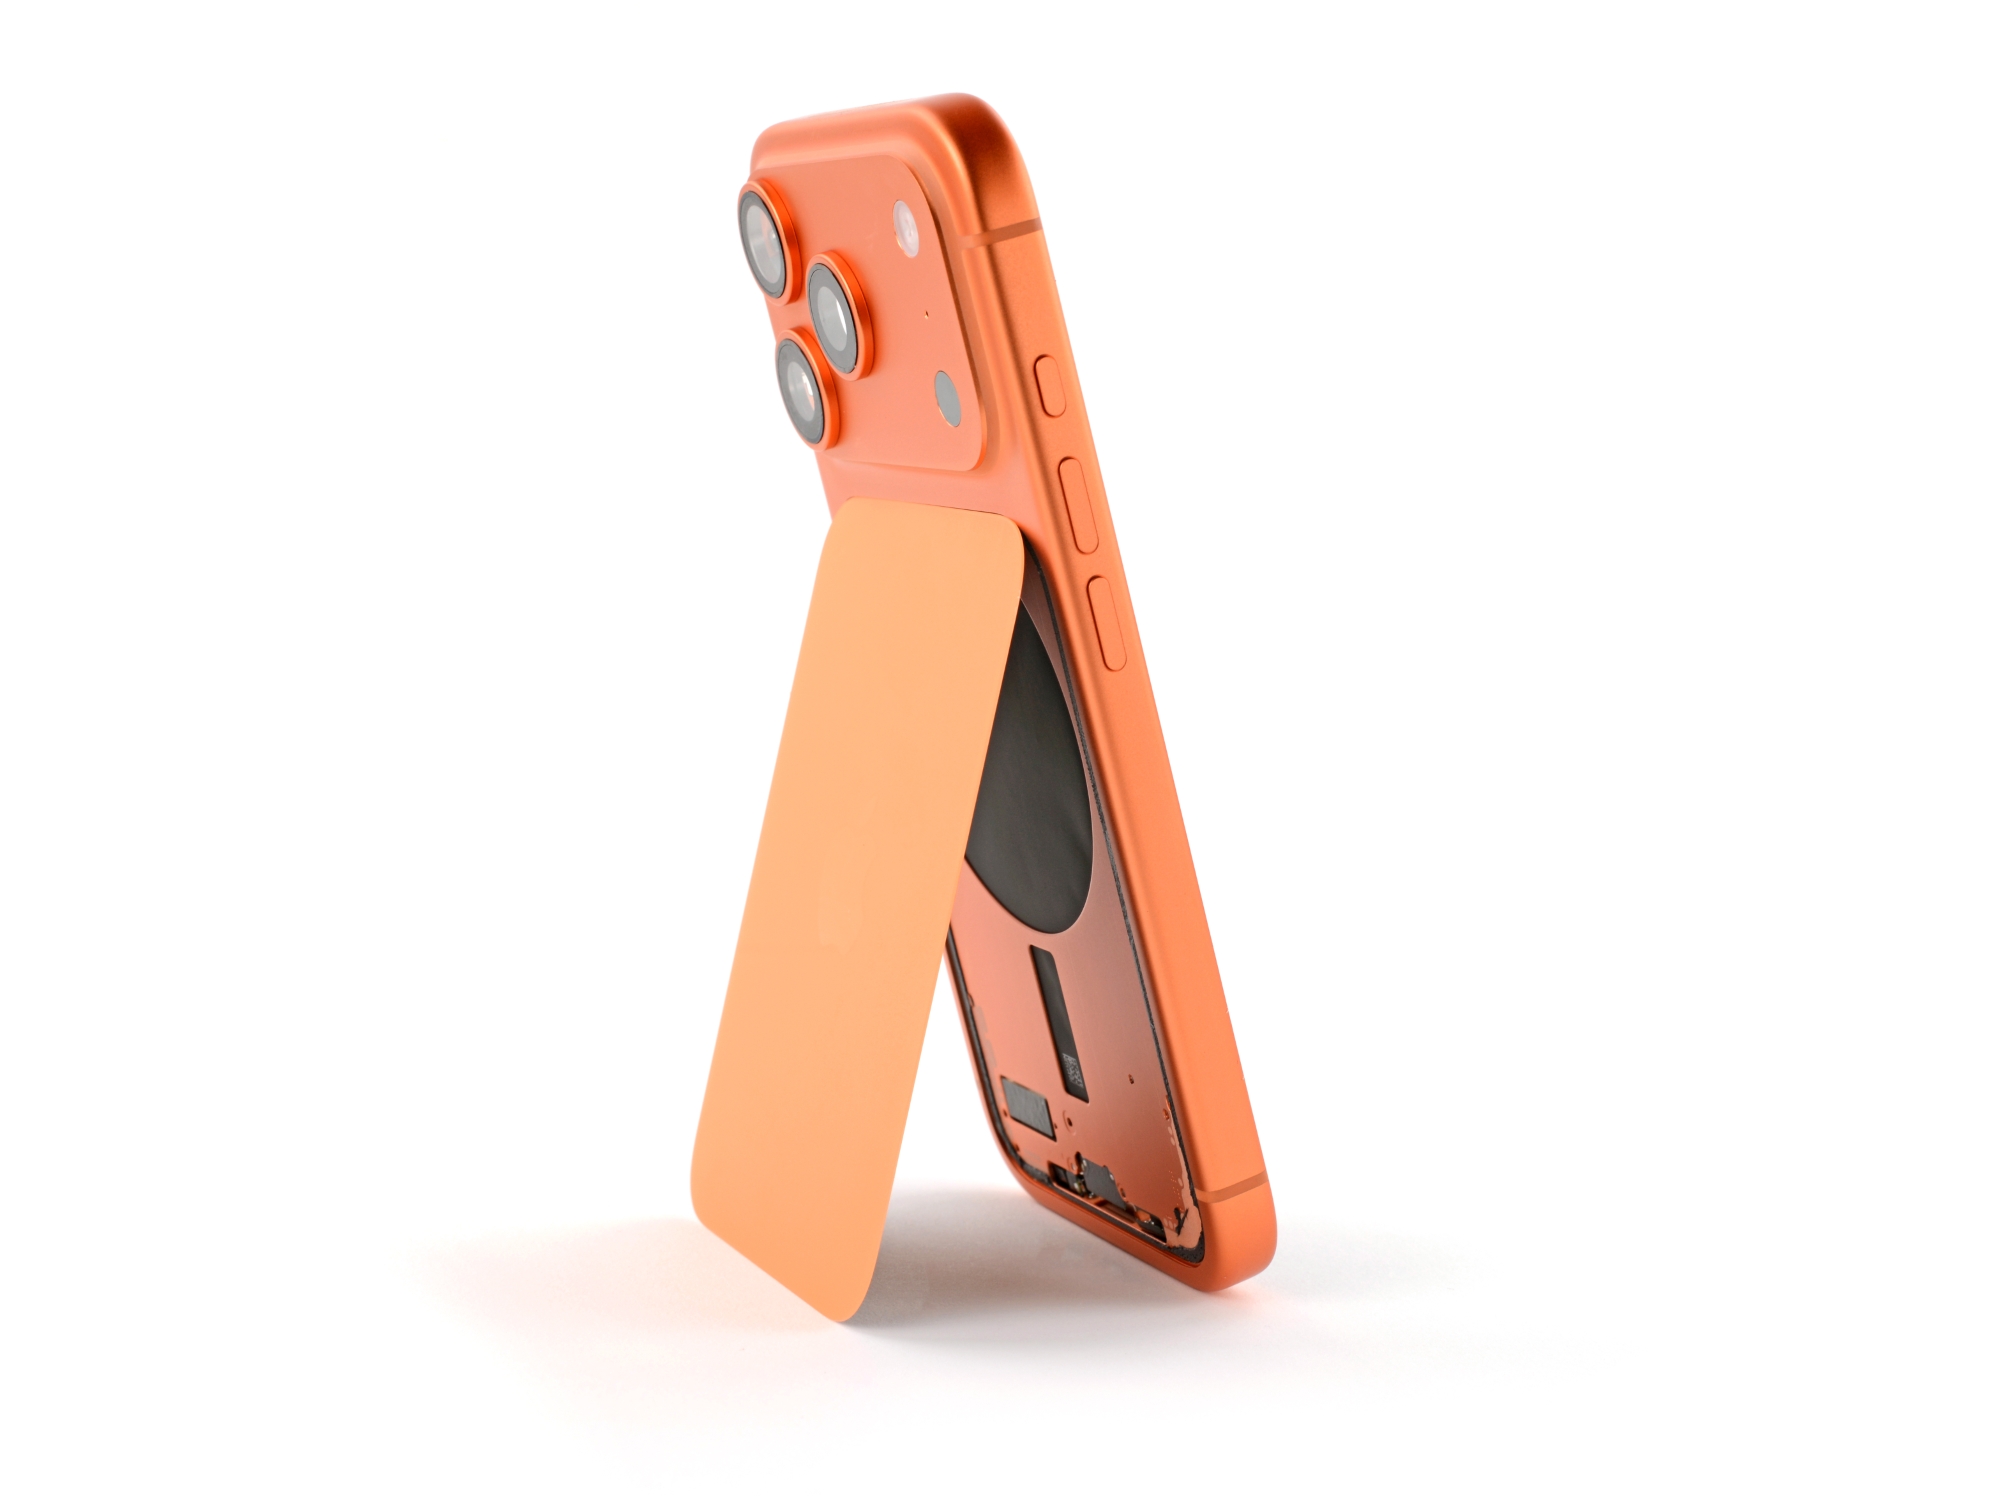
We’ve often applauded Apple’s dual-entry iPhone design, rolled out across the full lineup last year, that enabled repairs from either side of the phone. In those phones, most components are accessible under the back panel instead of requiring would-be repairers to go through the fragile and expensive display. We love it on the iPhone Air.
That’s gone here. (Boo, hiss.) Instead, the back panel of this phone is small, separate from the camera plateau, and it only provides access to the wireless charging assembly, reminiscent of the screws-to-basically-nowhere on the backs of Apple Watch Ultras.
But there are some repair wins that, score-wise at least, help make up for it.
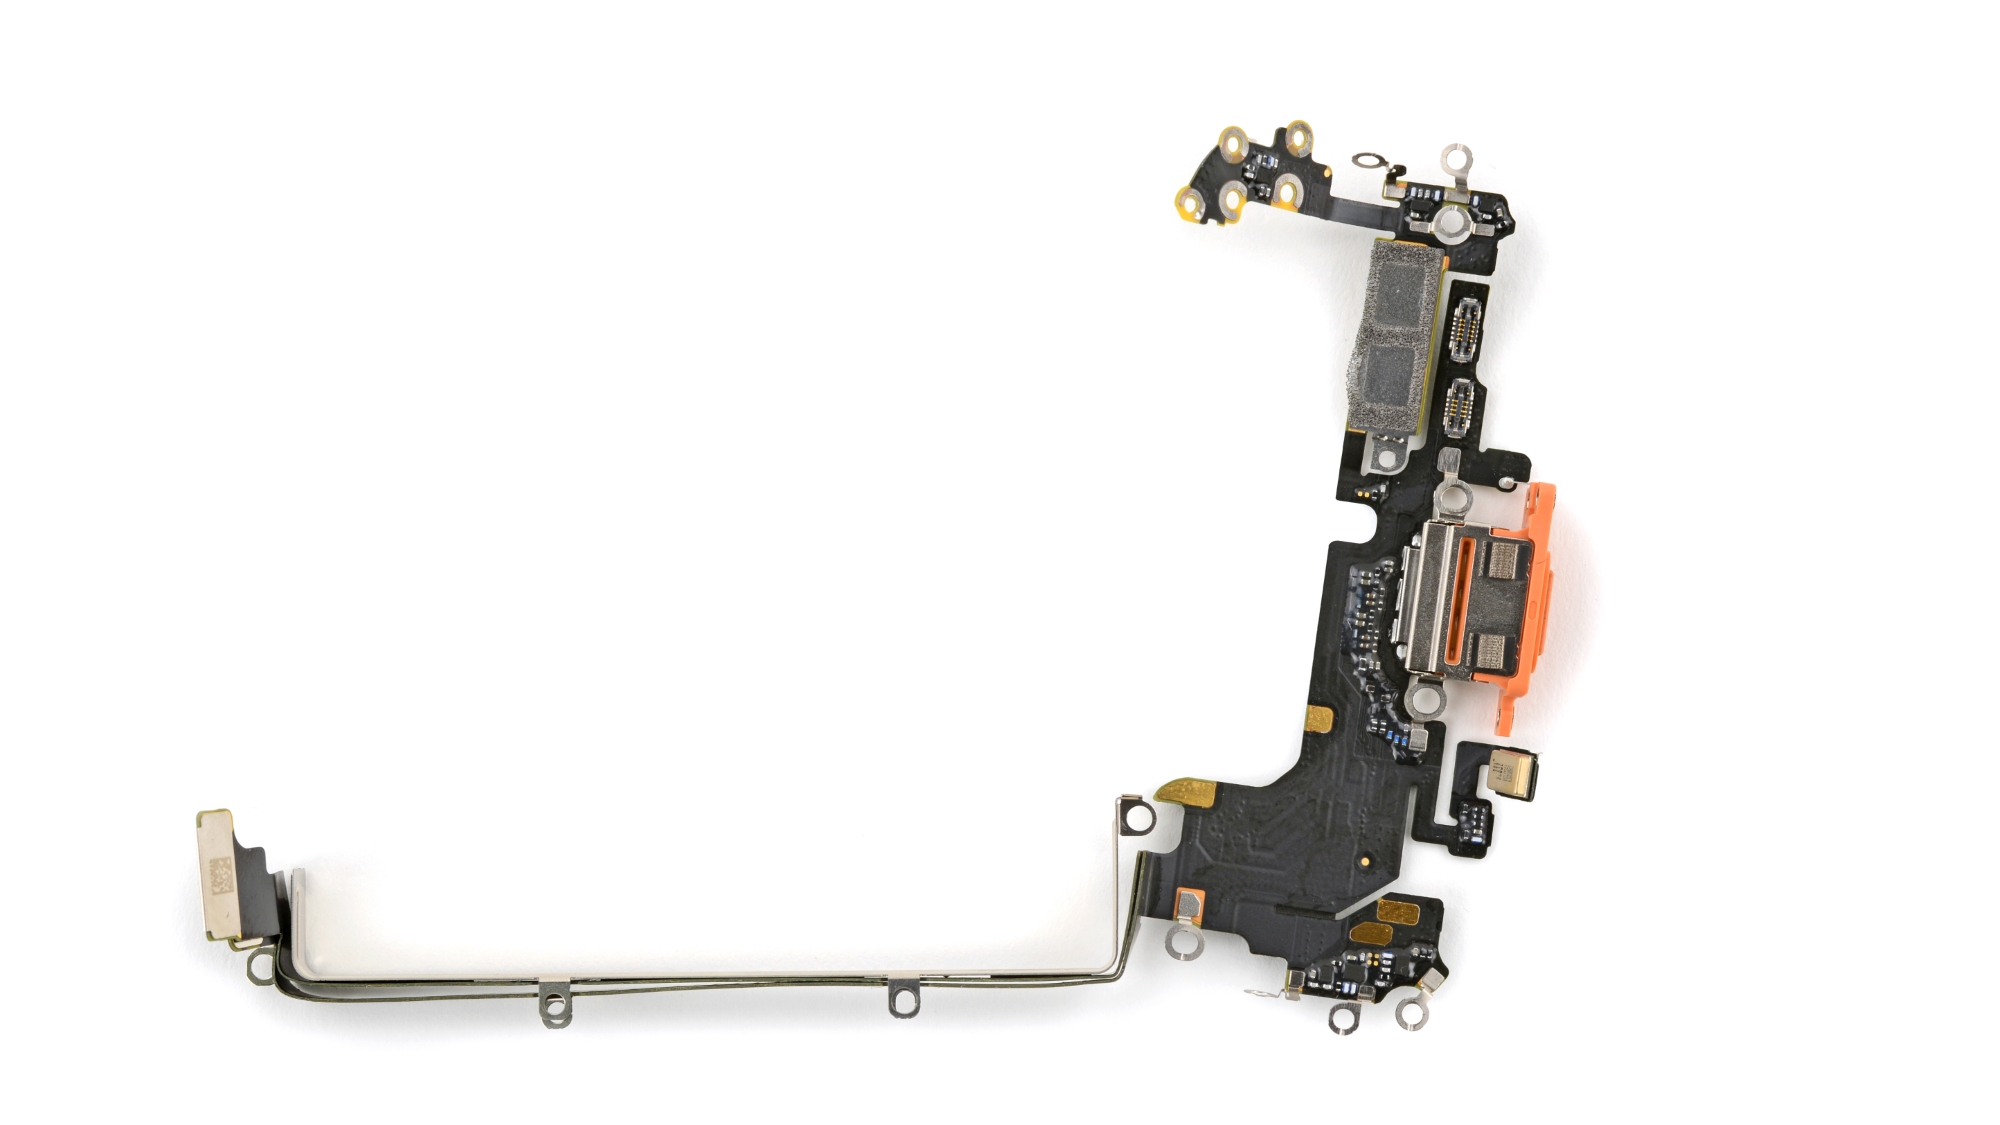
How Many Apple Engineers Does It Take to Screw in a Battery?
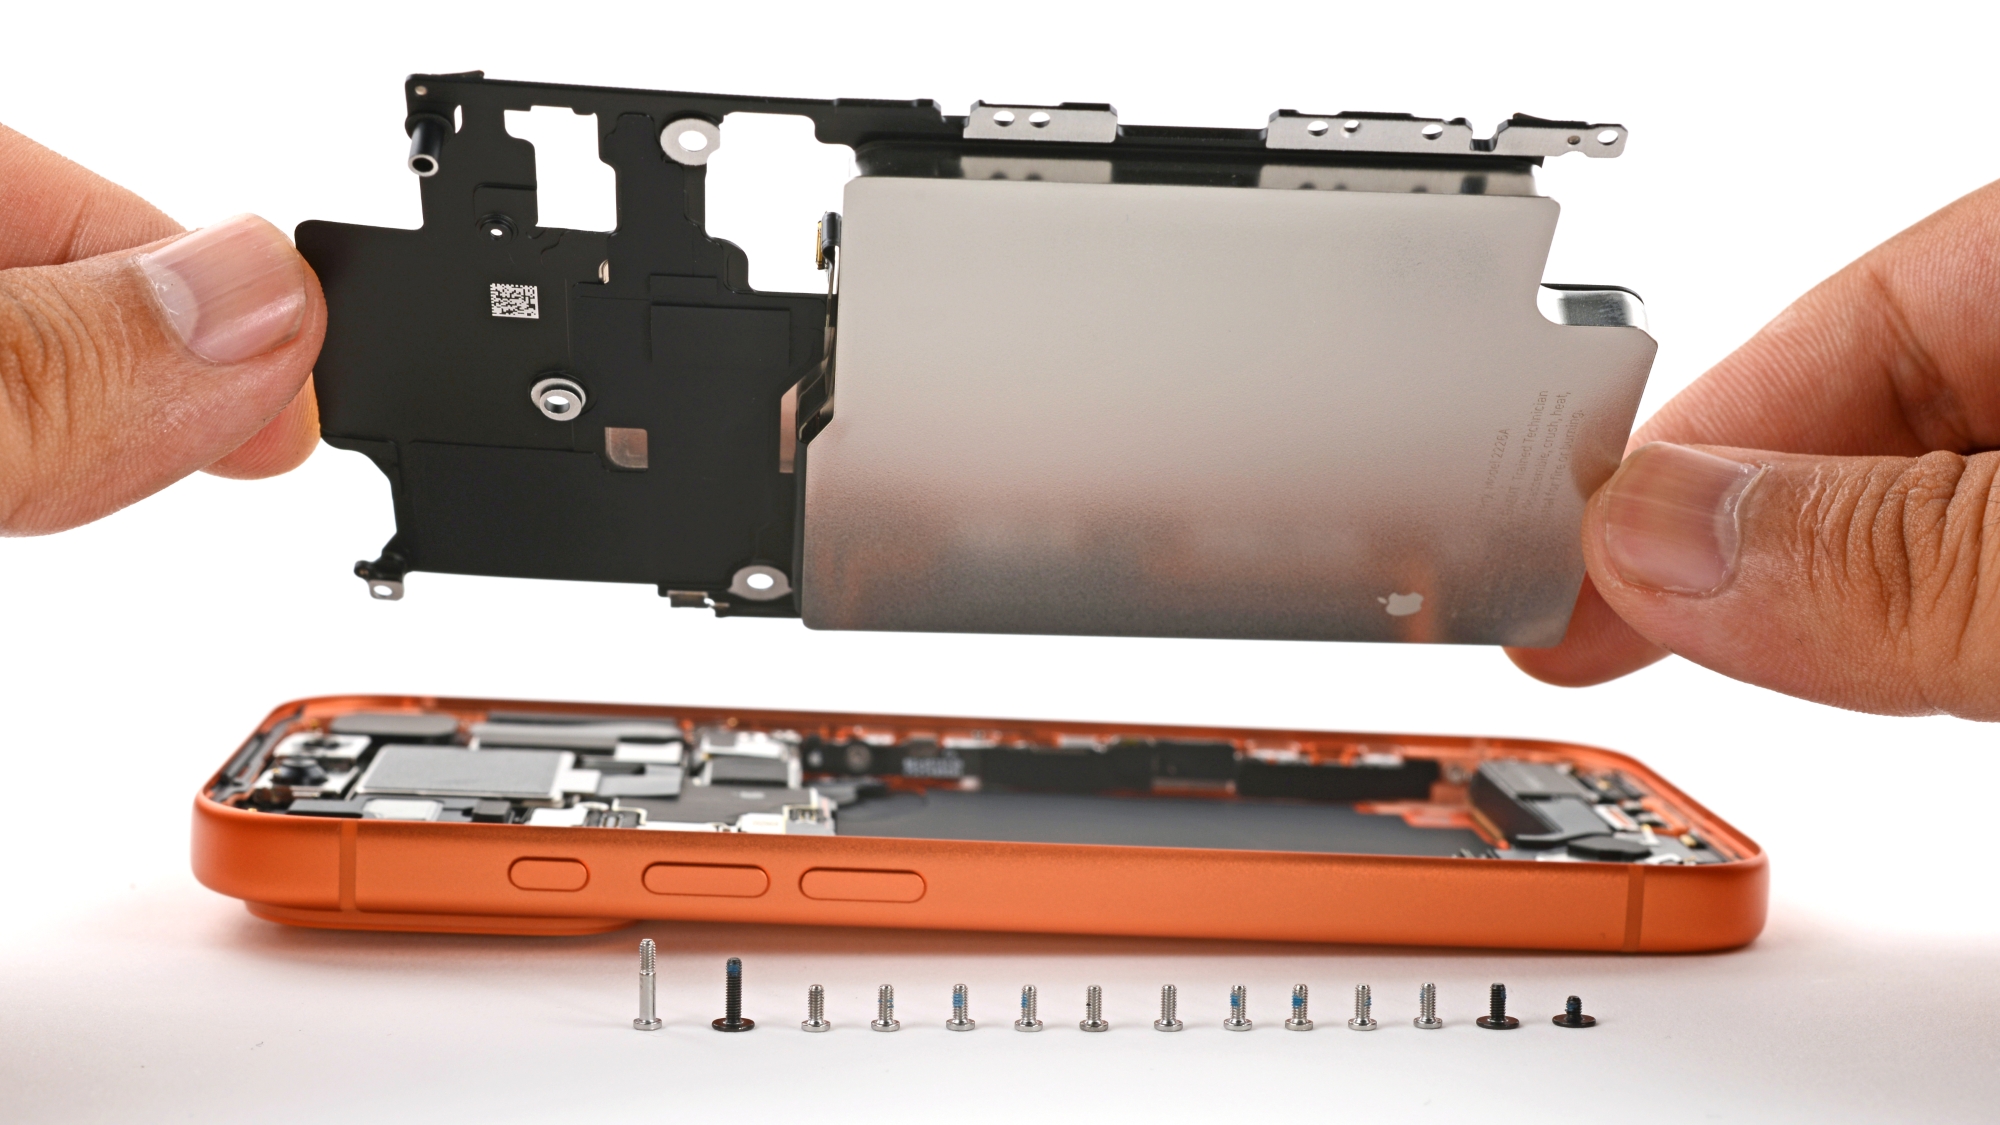
For the first time, the iPhone’s battery comes mounted in a screwed-in tray: new feature number one. Fourteen tight little Torx Plus screws secure it in place. It’s a little tedious to get through all those screws, and we’re internally speculating about why they’re there and why they’re Torx Plus (a cool new-ish screw that we wrote a deep-dive blog post about this summer). Were the manufacturing tolerances so tight that they needed to compress the battery assembly by micrometers? Were they trying to get better contact between the big heatsink of a metal battery and the vapor chamber?
Whatever the reason, we’ve long been saying it’s possible to make a screwed-in battery that meets modern design standards, and here’s the proof. If Apple sells the battery pre-mounted in this tray, most users won’t even need to mess with the adhesive. In an ideal world, a screwed-in battery means no dangerous prying, no chemical mess, and no need to have replacement adhesive on hand.
Apple did keep its electrically-debonding adhesive, adhering the battery to the tray—so we can still apply 12 volts and watch the bond dissolve. Out comes the battery, tray left clean as a whistle. Compared to Samsung’s glue-it-to-the-screen design, this is practically utopian.
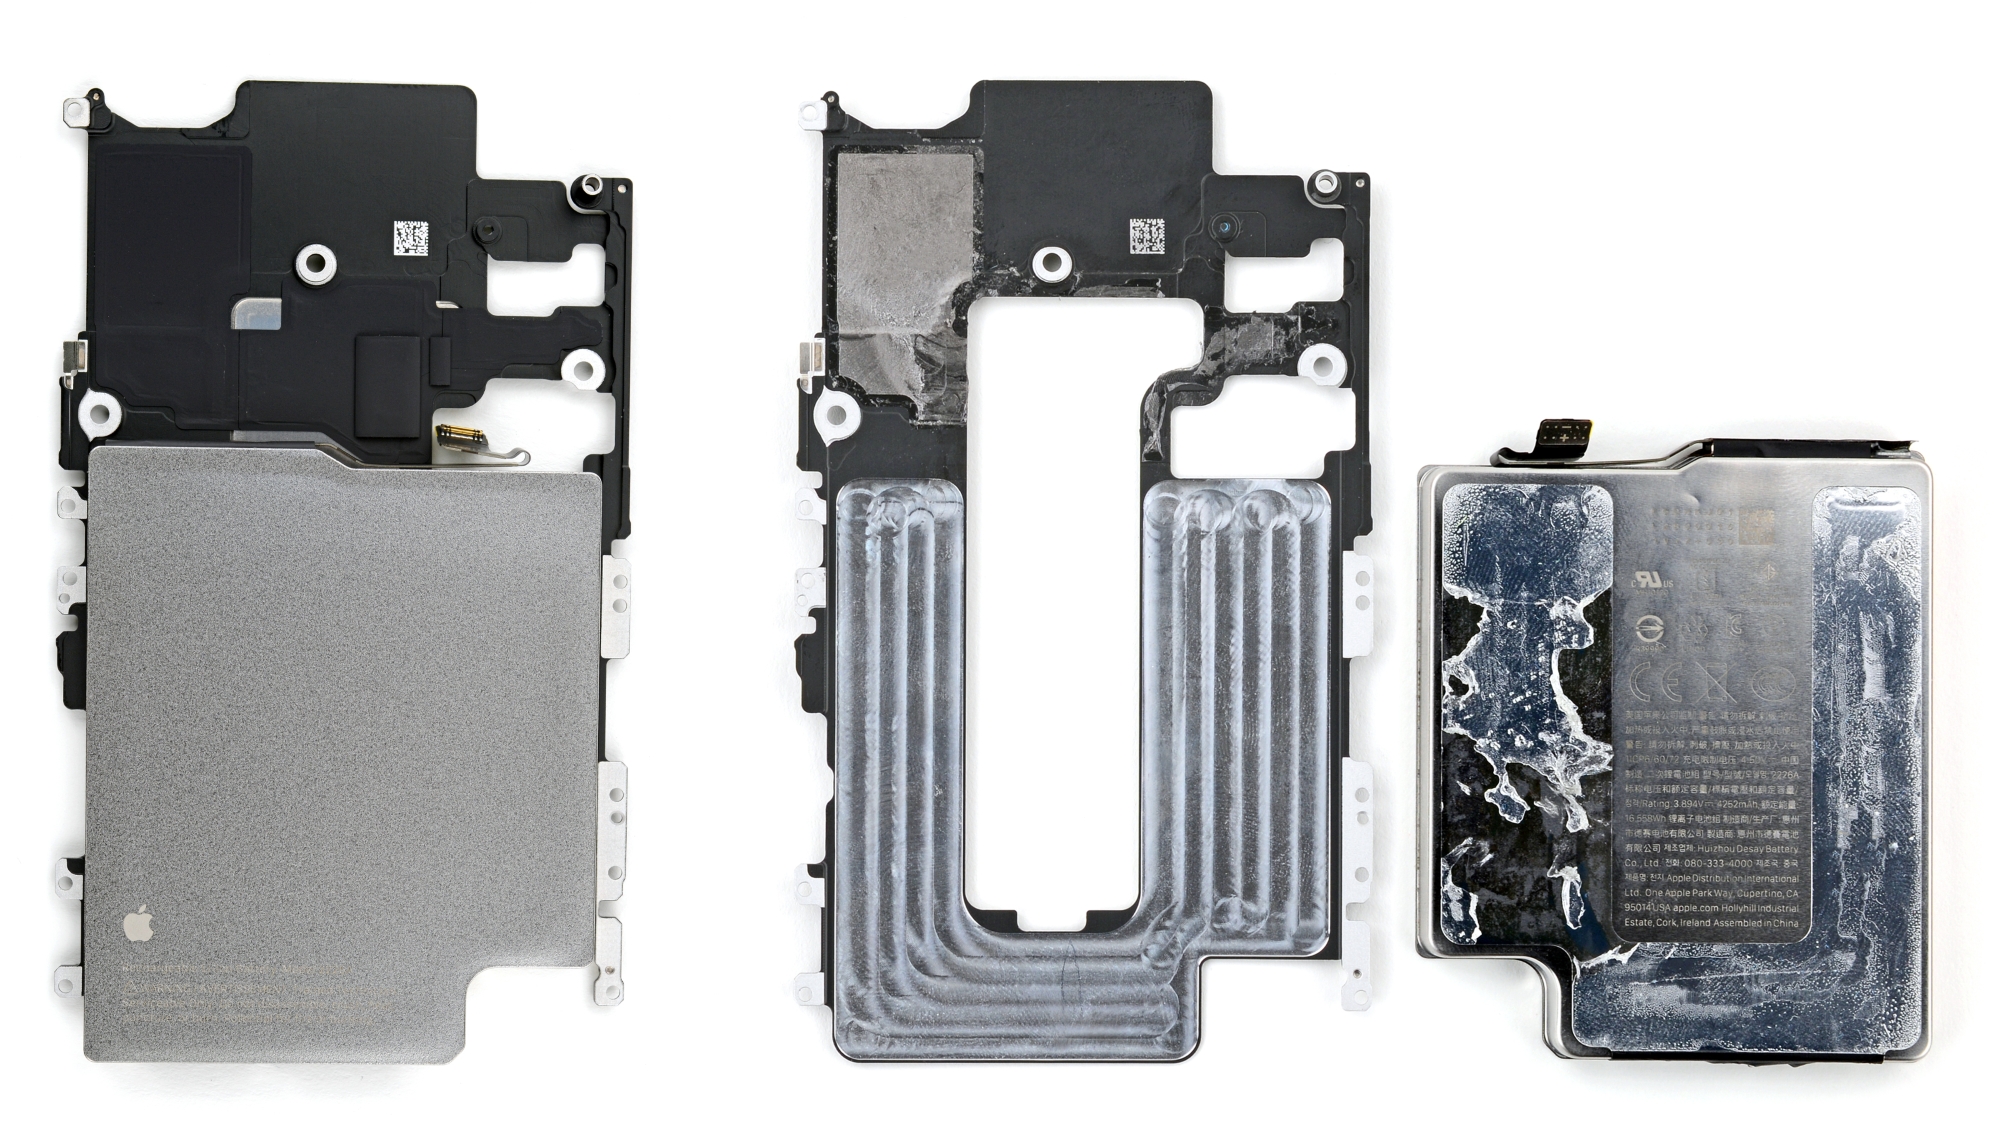
A Cooler Approach
Nestled under that tray is another first for iPhones: a vapor chamber. If you’ve ever noticed your phone throttling during long gaming sessions, you’ll understand why this matters. Heat is bad for phones; liquid is great at mitigating heat.
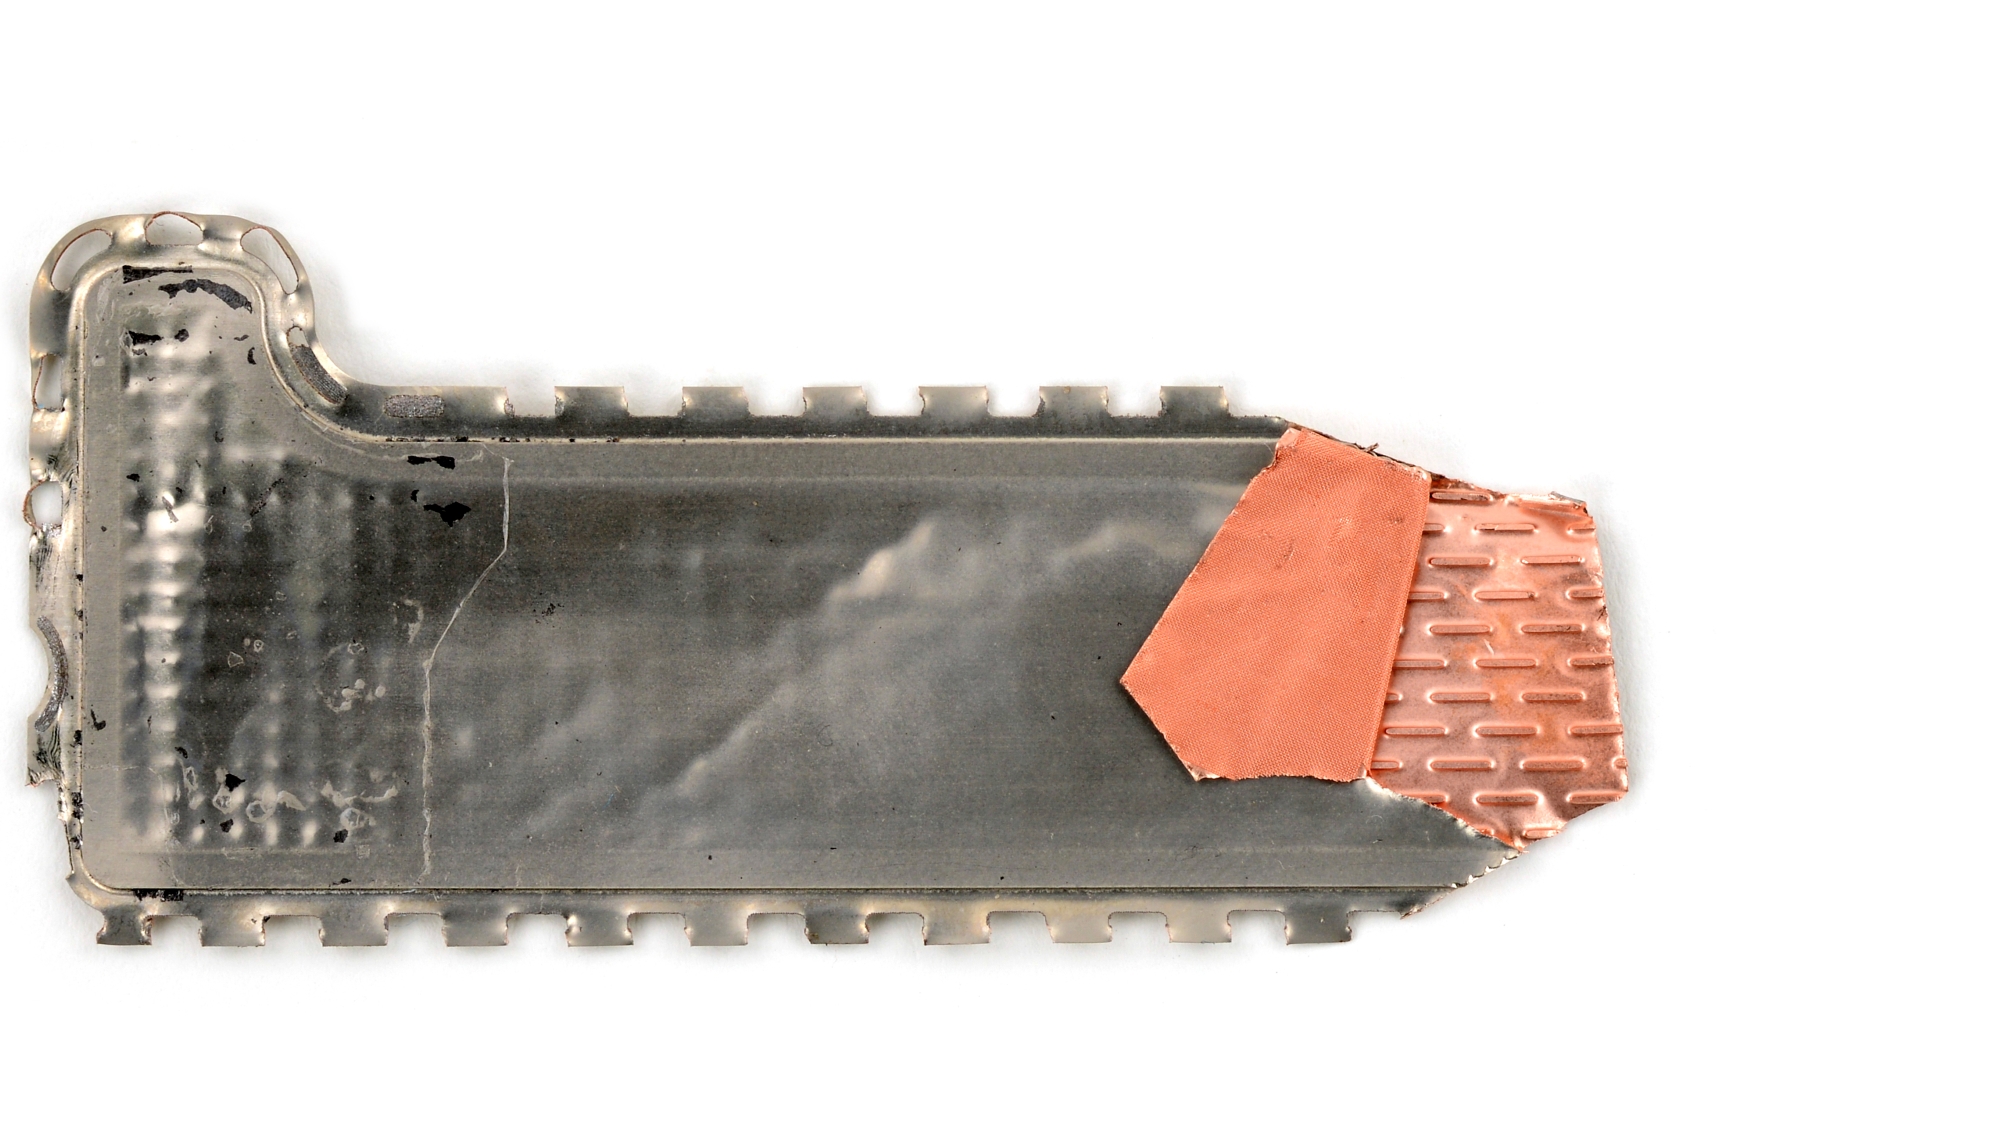
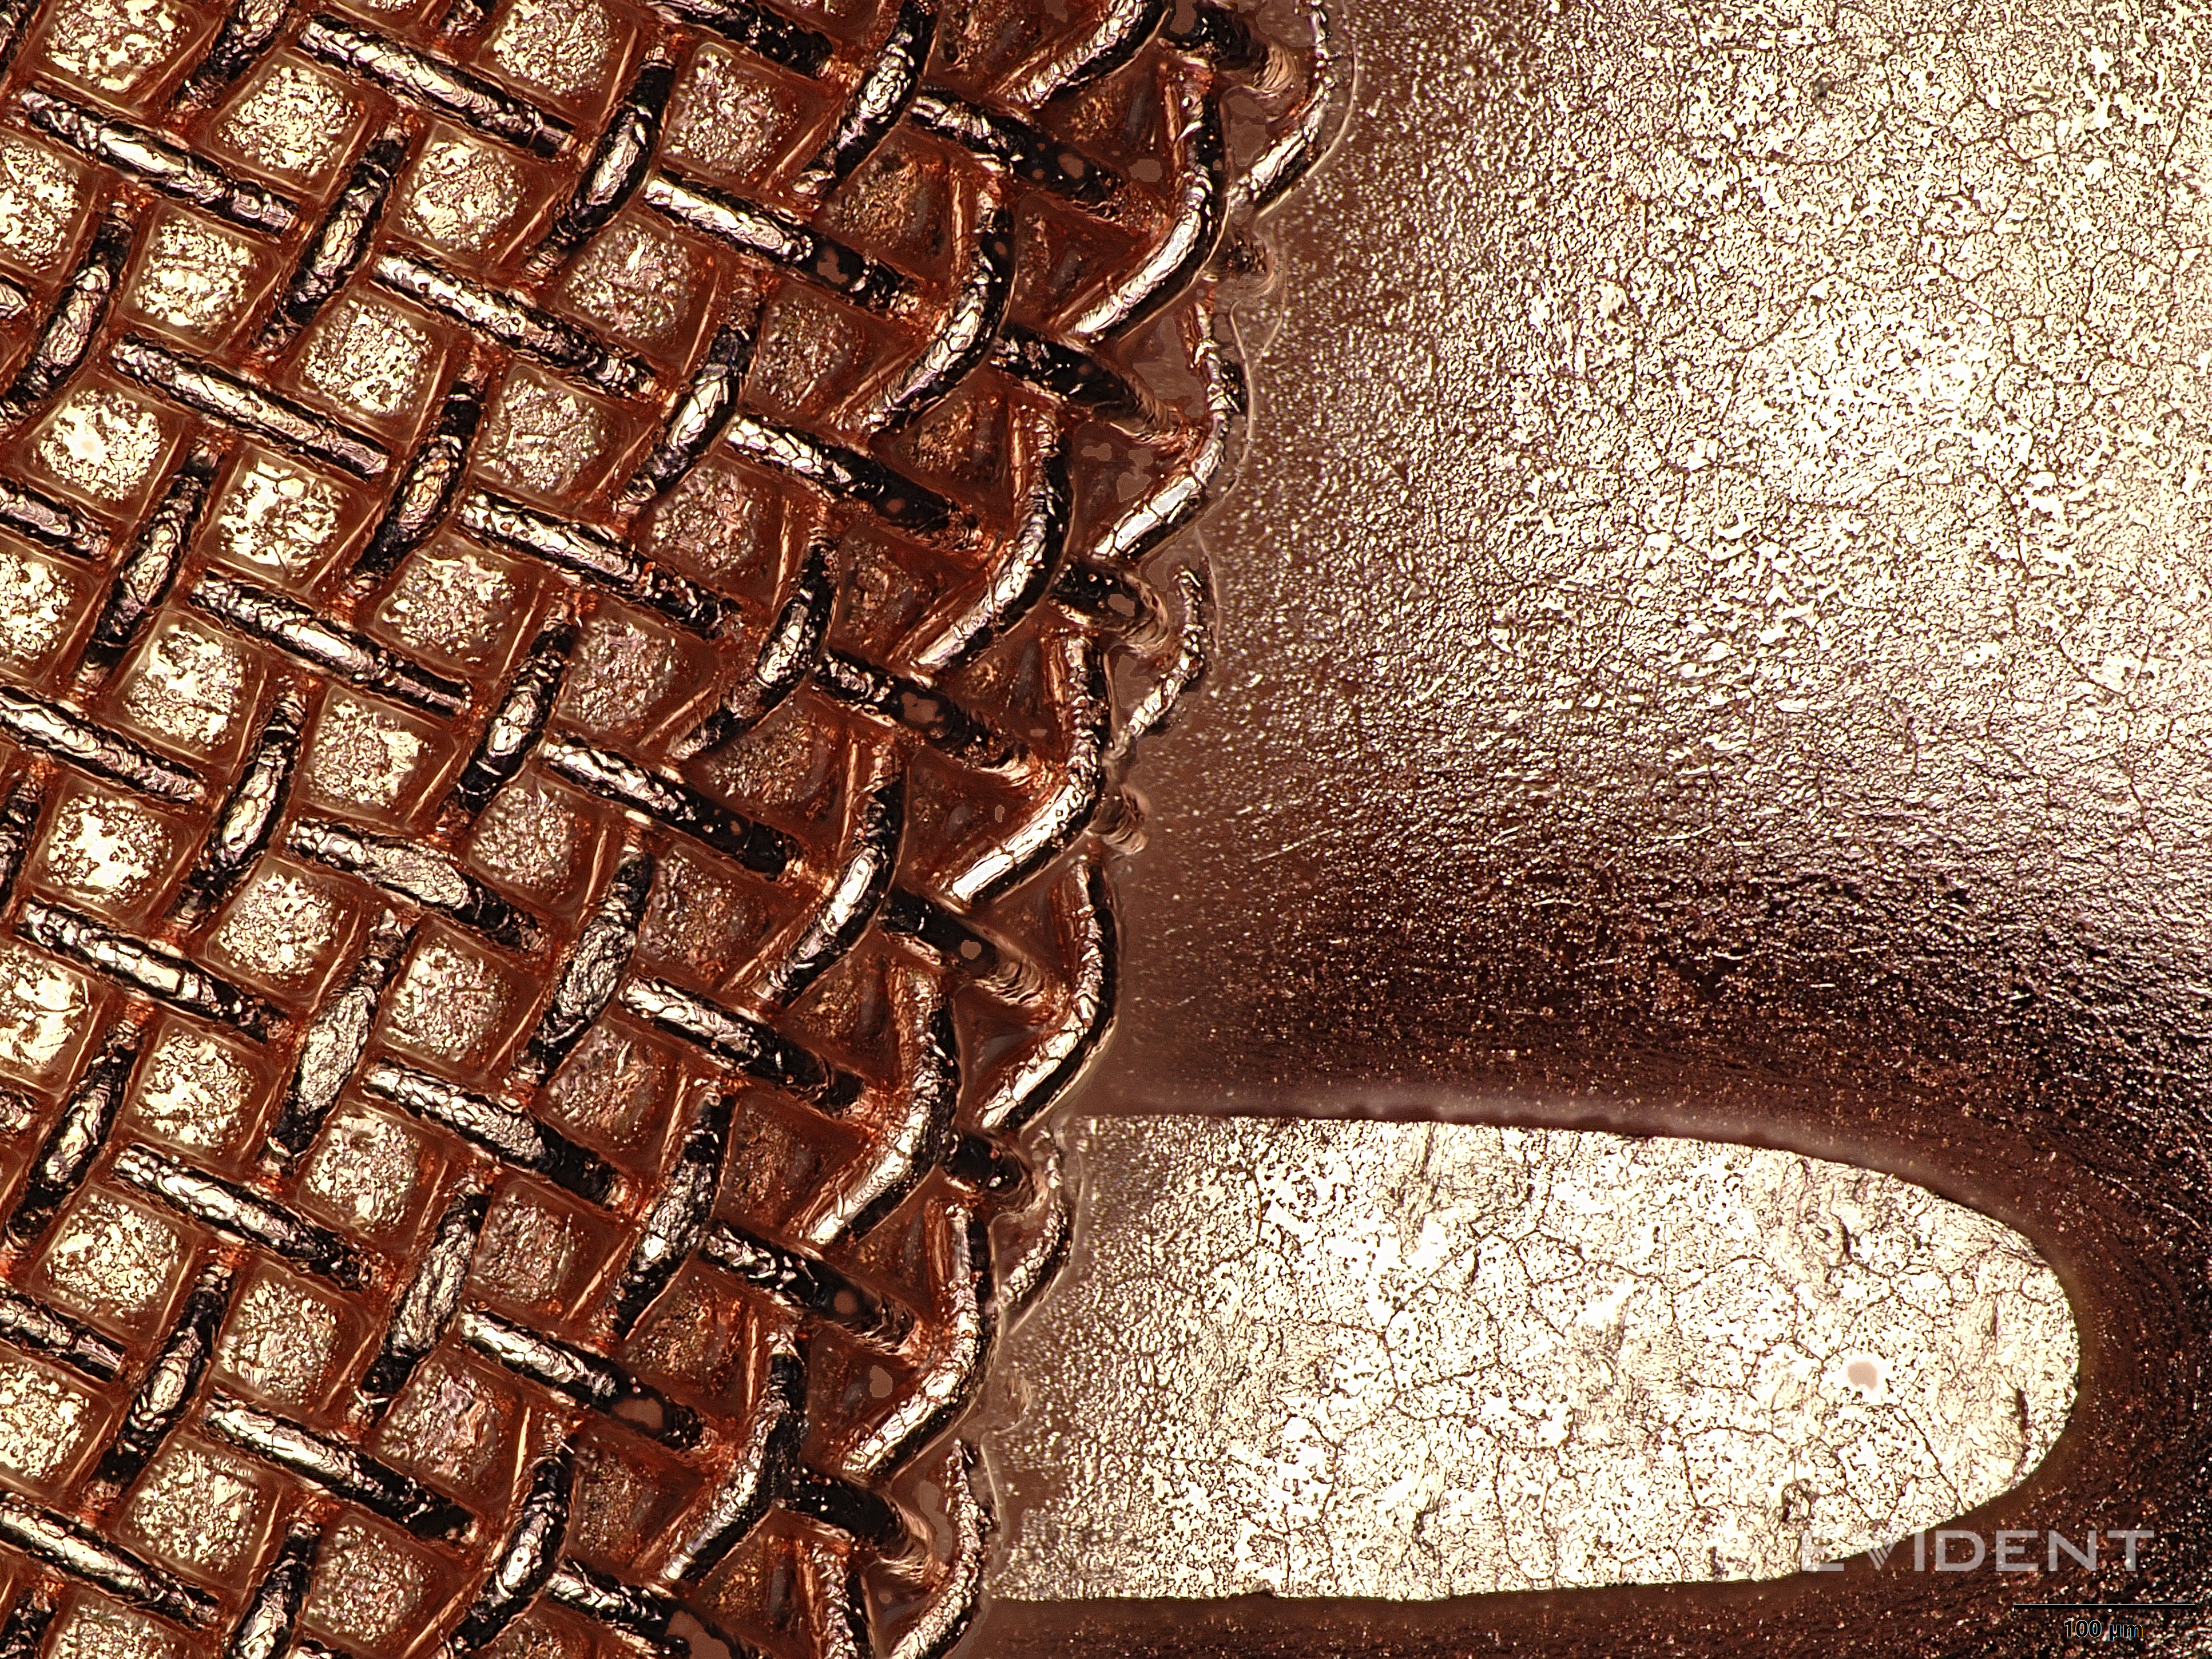
Apple wasn’t remotely first to market with this (Samsung’s been doing it for a while now), and it’s a surprisingly simple system, basically a little copper pouch that wicks water to spread heat. We do like Apple’s implementation better—the vapor chamber is very modular, not glued permanently to the chassis like Samsung’s.
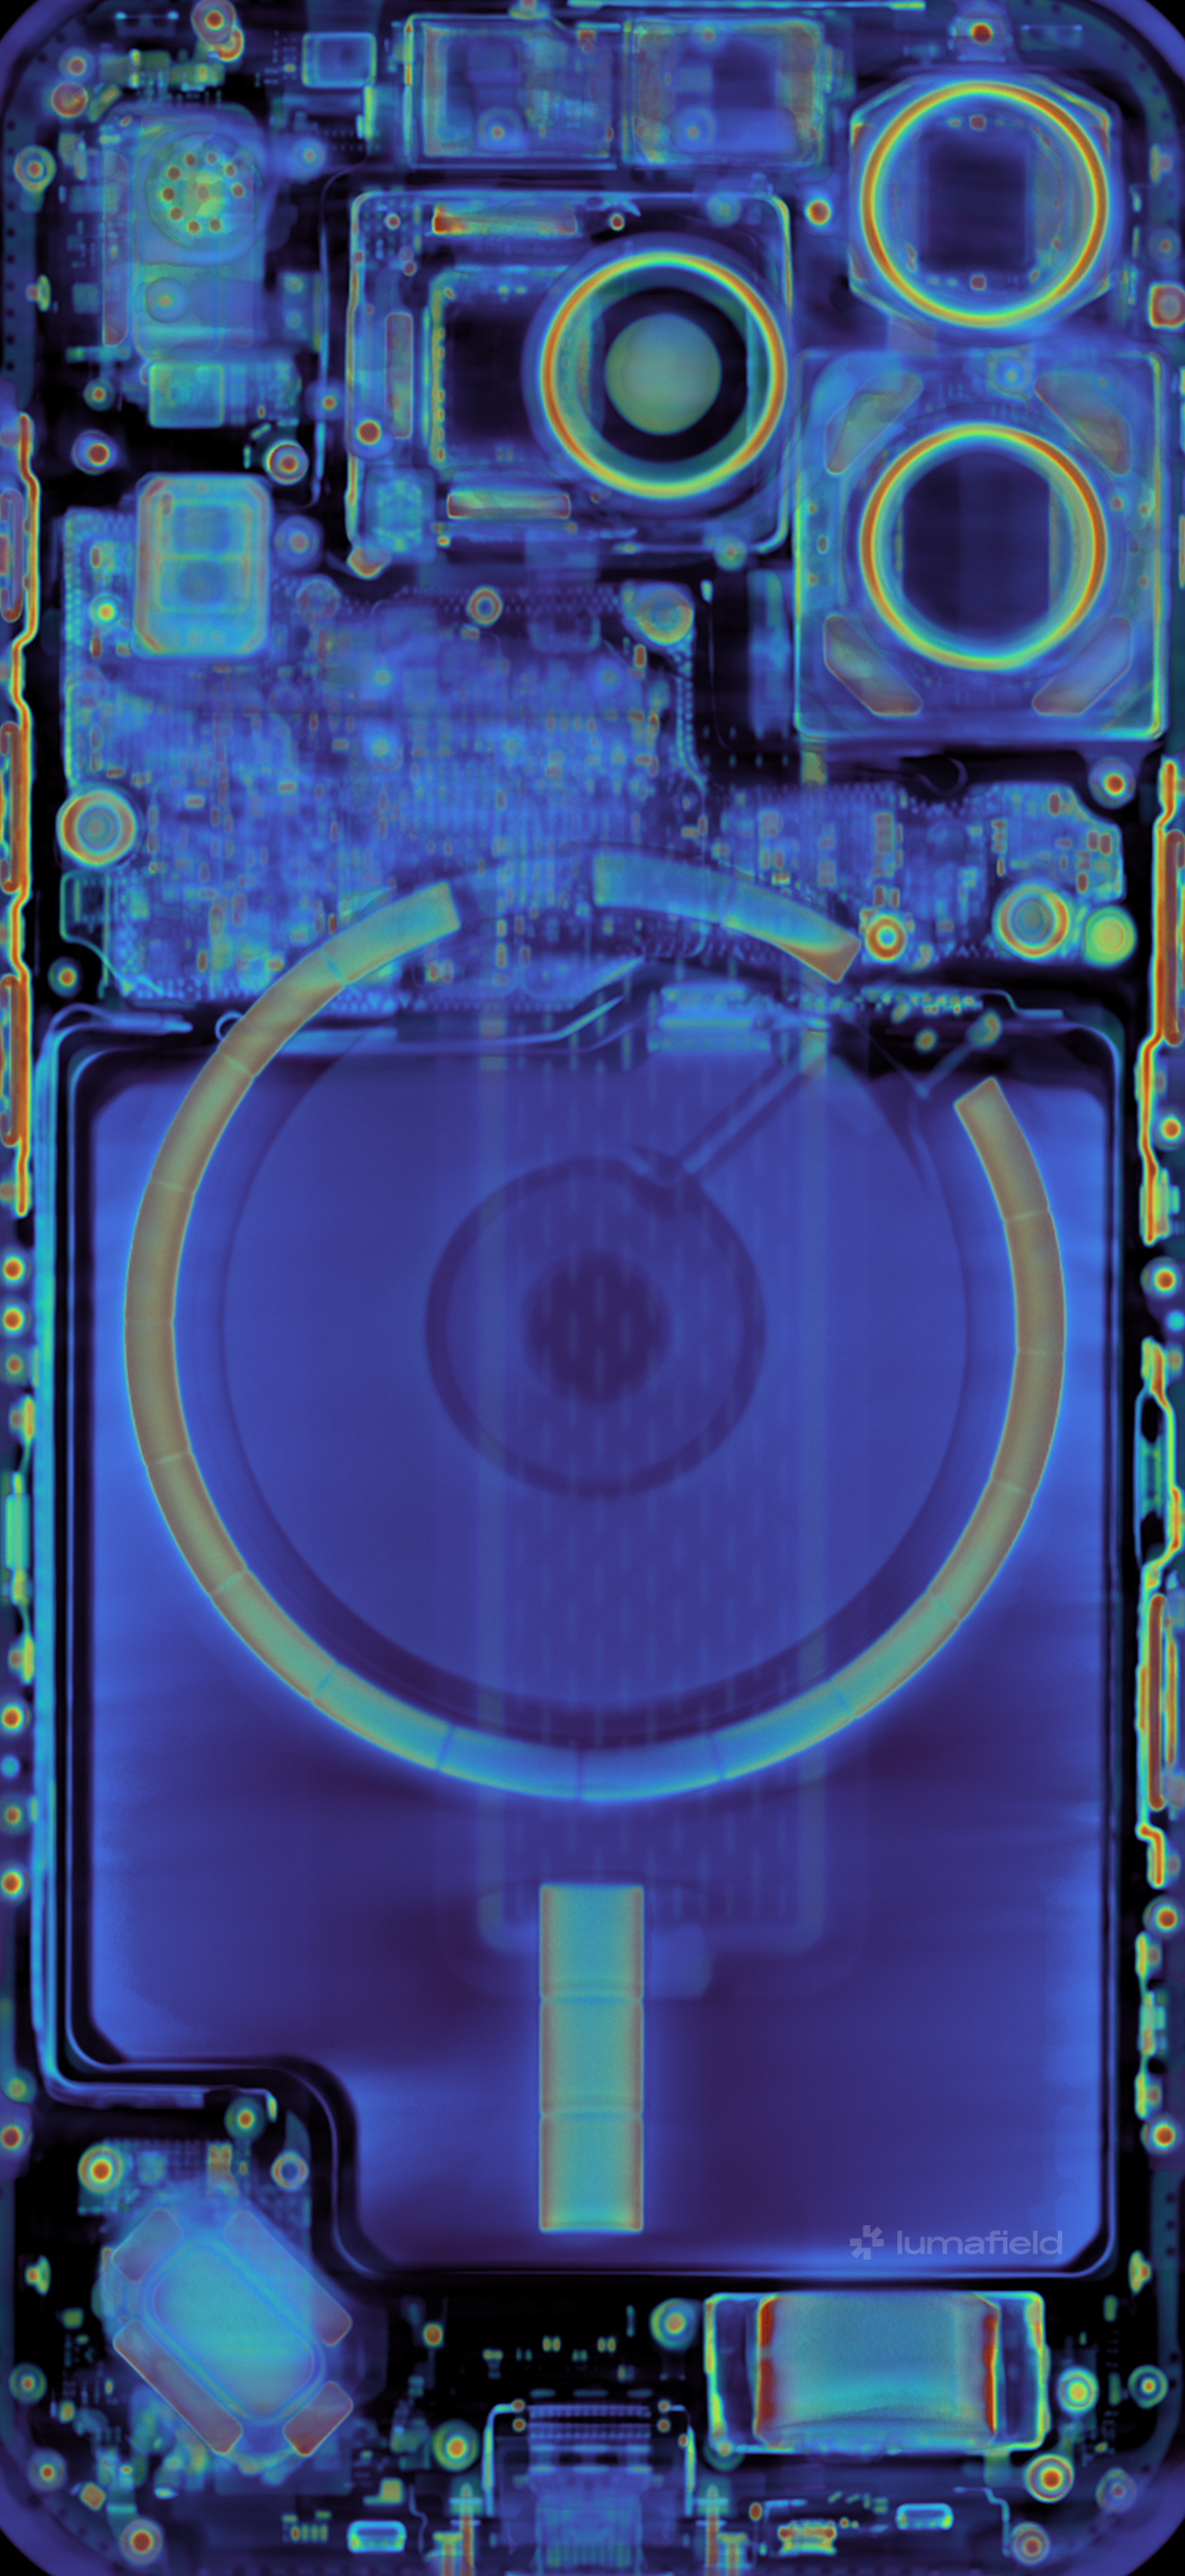
See for yourself, in our CT scan courtesy of our beloved Lumafield Neptune CT scanner, how the vapor chamber sits right between the heat-generating chips and that giant heatsink of a battery:
The chamber spreads heat from the A19 Pro chip into a water-filled copper lattice that boils, evaporates, and condenses in a constant loop. That cycle pulls heat away from the processor and into the phone’s frame. And now that the frame is aluminum, our thermal tests showed that while the 16 Pro Max started to throttle when the external temperature hit 37.8 °C (100 ˚F), the 17 Pro kept humming at a steady 34.8 °C (94.6 °F). That might seem minor, but for anyone editing video or pushing graphics, that’s a meaningful win.

And under the microscope, the vapor chamber looks almost ornamental, with a lattice and copper indentations that help condense the vapor back into liquid. Pretty and practical, and now profoundly Apple.
Cameras, Connectors, and Too Many Screws
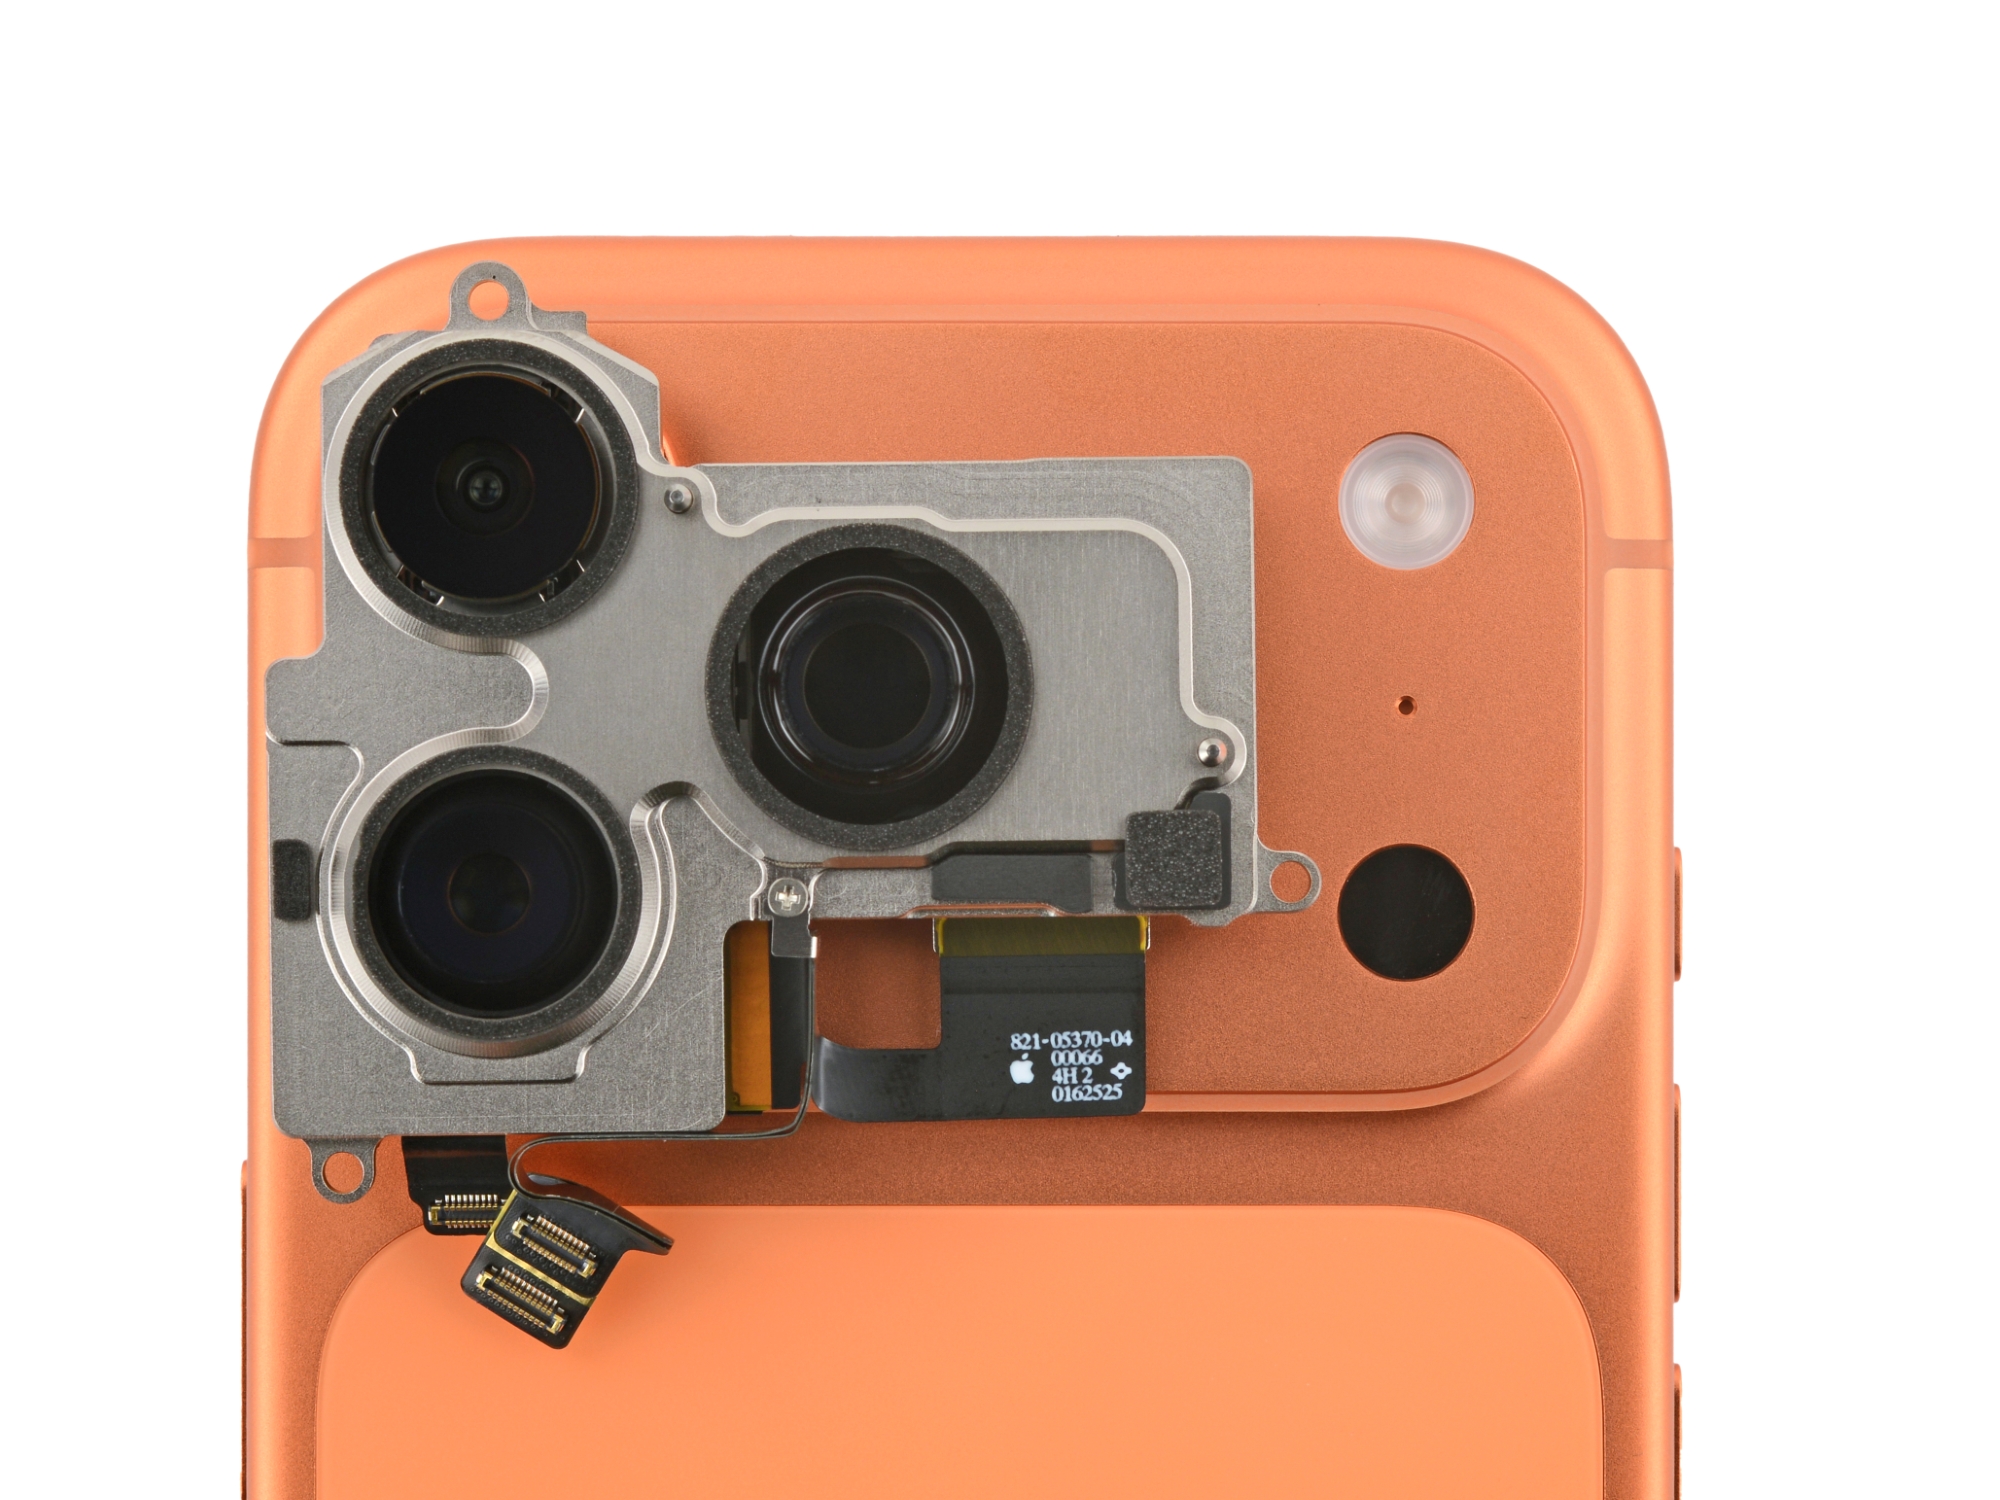
Other components are decently modular, we’re glad to report, including the cameras.
The Pro’s three rear cameras are all 48-megapixel Fusion sensors this year, vertically stacking photodiodes for richer color and sharper low-light shots. Paired with the A19 Pro chip, this is a serious upgrade for photographers. Importantly, you can also swap them out pretty easily.
But if you want to replace a charging port or speaker, ready your bit kit. Apple went wild with screw variety this year. There are five drive types in this phone: tri-point, Phillips, and standoffs, plus the Pentalobe screws at the bottom and the Torx Plus around the battery and rear cameras.
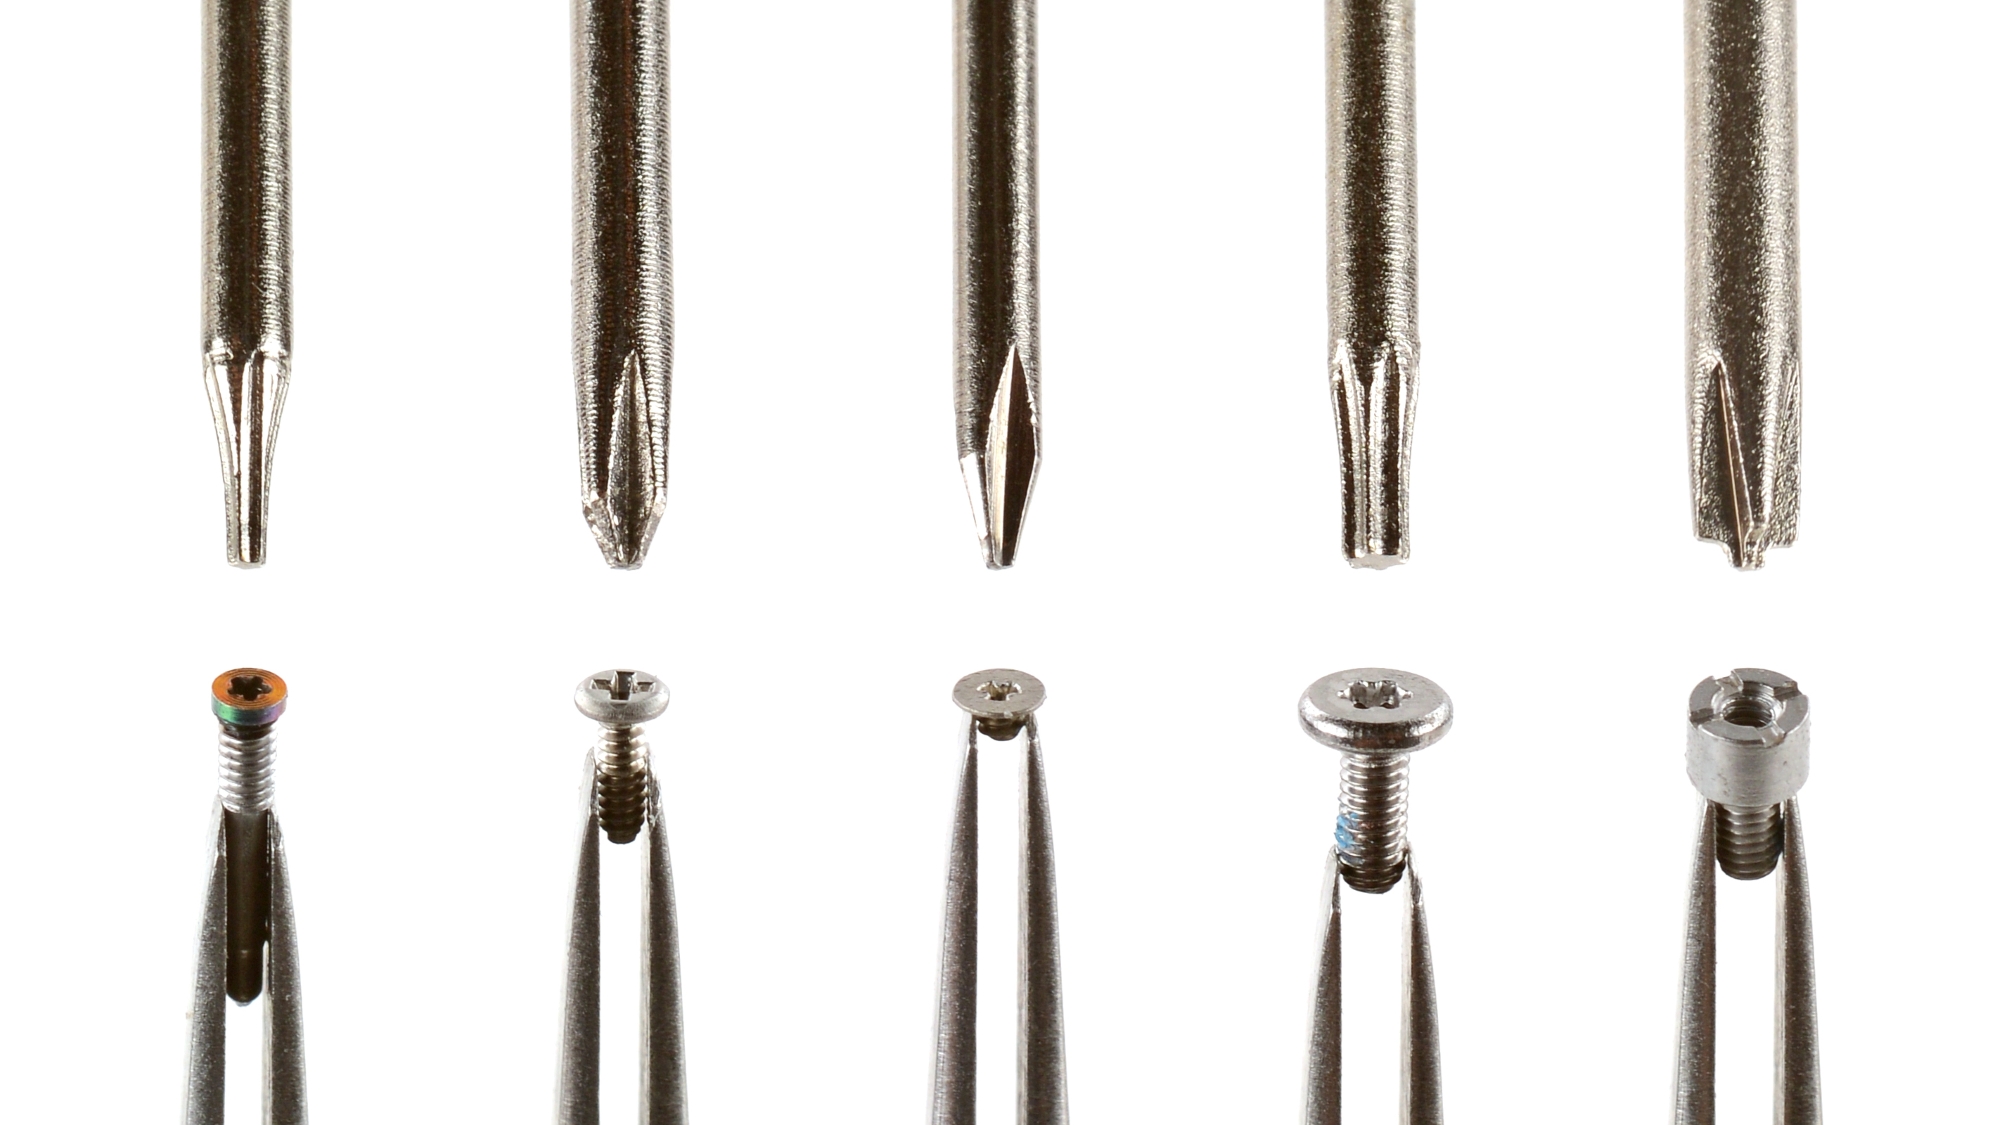
Don’t get us wrong, we love screws (that’s why our logo is a Phillips head screw). We think they’re better than glues. But we don’t love having to change screwdrivers over and over again during the course of a repair. The most elegant repairable designs reduce fastener complexity. Every time you have to change a tool, it slows you down. And for new repairers, or anyone whose mind might wander, there’s also a greater risk of stripping when you come in hot with the wrong screwdriver bit. Plus, not to mention trying to keep all of them straight on your project mat.
There are also just a lot of screws in this thing, including dozens of screws to replace the USB-C port alone (maddening!).
So Where Does That Leave Repairability?
The iPhone 17 Pro is a mixed bag. The screwed-in battery system is a cool repairability upgrade, even though we’re not sure whether Apple will sell batteries solo or attached to the tray or both. Electrically debonding adhesive and a protective metal battery shell sweeten the deal, so if anyone does end up prying, they won’t puncture the battery. But the loss of the dual-entry design means more repairs require removing the display, and the USB-C port procedure is a little annoying.
Overall, this phone is only slightly less repairable than the iPhone Air. With day-one repair manuals and the expectation of parts availability on Apple’s Self Service Repair site, Apple still seems to be considering repair in its design.
So, scratches aside, we’re giving the iPhone 17 Pro a provisional repairability score of 7 out of 10. On the parts pairing front, Repair Assistant continues to be working as promised, allowing us to calibrate new Apple parts without issue. We haven’t tested it with third-party parts, but if it works as we’ve seen in the iPhone 15 and 16 lineups, there shouldn’t be any loss of functionality. This phone is not perfect, but Apple all-in-all is making some big steps in the repairability direction.

And our teardown marathon isn’t over—stay tuned for more Apple gut-checks, parts analysis, and the occasional scratch test under the microscope, coming soon.
Bonus: Here are some fancy iPhone 17 Pro wallpapers! (Tap the image for full resolution.)


crwdns2944067:08crwdne2944067:0
in the future, will it have an x-ray version wallpaper?
Colin Szema - crwdns2934203:0crwdne2934203:0
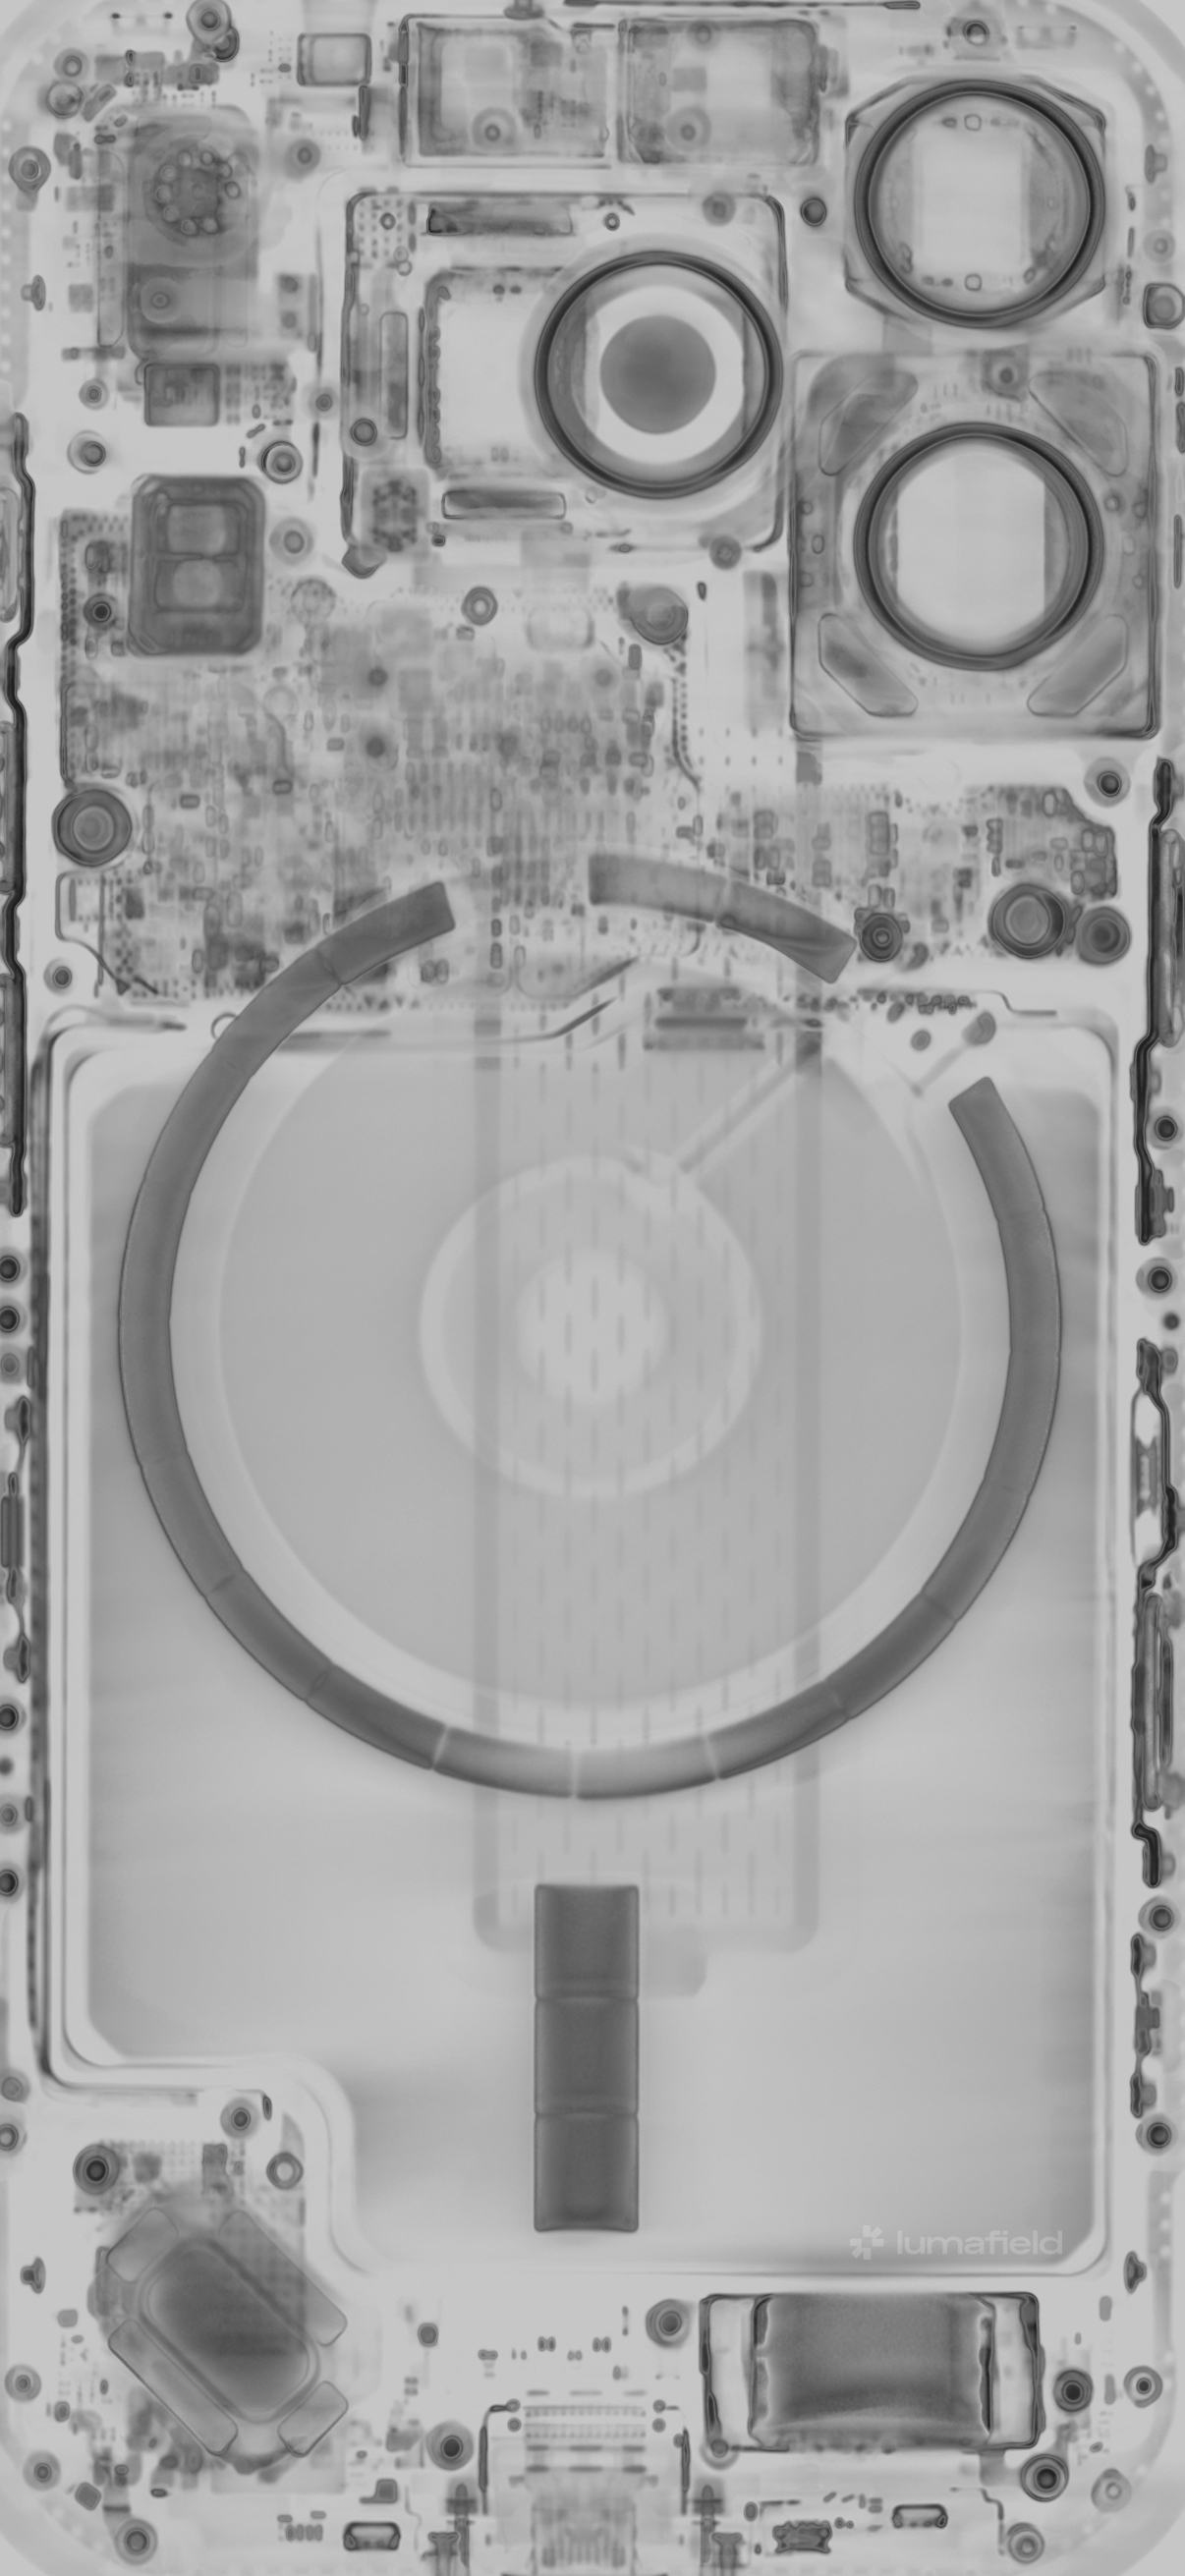
Our CT scan wallpapers at the bottom of this post are a form of X-ray! CT works by taking a bunch of X-ray images at different slices and then using them to construct a 3D model of the object. When we turn them back into 2D images like this, the software uses pretty colors to represent the density of the objects inside.
Elizabeth Chamberlain -
I uploaded a monochrome version of the back, which is more reminiscent of classic radiographs.
Arthur Shi -
Will there be 17promax wallpaper versions also?! Love your work 🫶🏻
Mchl Klngr - crwdns2934203:0crwdne2934203:0
They could have reduced or eliminated this problem simply by making the phone thicker. This would have had the added benefit of providing space for a bigger battery. The iPhone 17 would also be better if the phone was thicker so the cameras were flush with the back. Making the phones unnecessarily thin is itself a compromised design.
Ian - crwdns2934203:0crwdne2934203:0