

Apple has used aluminum and stainless steel phone frames since the iPhone 2G’s introduction in 2007. However, last year’s iPhone 15 Pro got something new. A lightweight metal used in everything from spacecraft to surgical implants with incredible strength and durability: Mighty Titanium!
Does titanium’s durability make the iPhone 15 Pro less susceptible to breaking? There’s some debate—JerryRigEverything was able to crack the back glass of a Pro Max with a single bend, though the same model survived 100 rides in the Consumer Reports drop tumbler. Time will tell if the titanium frame is associated with fewer repairs.
But our ears perked up at “titanium” for another reason that has nothing to do with repair: titanium can be anodized to create awesome colors and patterns. Apple offers the iPhone 15 Pro in four finishes, but we’re going to add our own custom flashy colors. To do this we’re going to mix water, electricity, and some caustic chemicals. How thrilling! Before continuing, we don’t recommend trying this at home unless you know exactly what you’re doing.
The Science Behind Titanium Anodizing
Anodizing is an electrolytic process that grows a protective oxide layer on a metal surface. In simpler terms, the metal surface is corroded in a controlled manner and the layer of corrosion protects the underlying metal. The oxide layer is grown by submerging the part in an electrolyte bath and passing a current through it. Anodizing titanium grows a layer of titanium dioxide on the metal’s surface, which takes on a wide array of colors.
However, not all metals are as amenable to anodization because the process is incompatible, or the natural oxide doesn’t provide any protection. For example, the stainless steel frame used on previous iPhones can’t be anodized because it already has a protective chromium oxide layer that would just dissolve.
The vibrant colors result from the interaction between incoming light waves and the oxide layer through a phenomenon called thin-film interference. When light strikes a surface with a film on it (for anodizing, the thin film is the oxide layer), the light waves reflected at the upper and lower boundaries of the film interfere with each other. The interference is either constructive or destructive depending on the film’s refractive index, thickness, and the wavelength of the incoming light. As a result, certain wavelengths are intensified while others are diminished. If you’ve ever witnessed swirly colors in a soap bubble or rainbow splotches on a wet road from oil stains, that’s thin-film interference in action.


Thin Films and Light Explained
In most cases, light initially travels through the air and then the film. Some of the incoming light is reflected at the film’s surface and some continues through the film. For titanium anodizing, the “film” is a thin layer of titanium dioxide about thirty nanometers to several hundred nanometers thick. If the film’s refractive index is greater than that of the medium it was initially traveling in, the light reflected at the surface will undergo a 180° phase shift. Air has a refractive index of about one and titanium has a refractive index of about 2.8 so the light reflected at the surface will undergo a phase shift.
Light waves that travel through the titanium dioxide layer and reflect off the lower boundary will interfere with waves reflected at the surface, either constructively or destructively, depending on the thickness of the layer. This happens because the wavelength and speed of light change when traveling from one medium to another. When traveling from air to titanium dioxide, the wavelength and speed of light decrease because the refractive index is greater than air. The decrease in wavelength introduces a phase shift to the reflected light at the lower boundary, which causes constructive or destructive interference.
If you want an even more in-depth explanation about thin-film interference, check out this video from Khan Academy. Want a more interactive experience? Check out this cool thin-film interference simulator from oPhysics.
How Titanium Anodizing Works In Practice
That’s all the theory, but how is titanium actually anodized?
The titanium dioxide layer is grown electrochemically by either submerging a titanium part in an electrolyte solution and passing an electric current through it, or by spot anodizing. Spot anodizing uses a sponge or brush soaked in the electrolyte solution connected to a power supply. This allows the anodizing to be “painted” onto the surface. The main benefit is that the titanium part doesn’t have to be submerged at all.
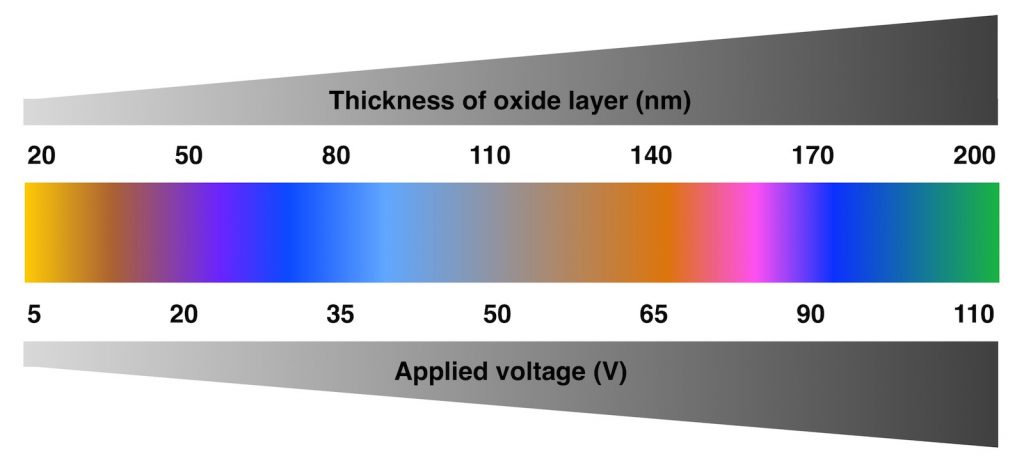
An alternative method to grow the oxide layer is to simply heat the titanium to several hundred degrees Celsius. While this is not technically anodizing because it’s not an electrochemical process, similar results can be achieved. This is as simple as grabbing a blowtorch and blasting the titanium until you’ve got the desired color. However, color consistency and control is difficult unless you’ve got some serious blowtorch skills. Anodizing is the preferred method because the oxide layer thickness, and consequently the color, is directly related to applied voltage.
Surface preparation is very important because any previous oxides, smudges, or contamination will affect the vibrancy and finish of the anodized color. A weak hydrofluoric acid solution or a hot solution of ammonium persulfate and sodium fluoride is commonly used to clean and etch titanium.
Danger: Acid and Electricity!
Hydrofluoric acid is nasty dangerous stuff even in small concentrations. It can cause severe tissue damage and pull the calcium out of your bones. Safe to say, you don’t want to get any on yourself. But it works great as a titanium etchant and is readily available. As for electrolyte solutions, they’re a little safer. Sulfuric acid, trisodium phosphate, and borax are commonly used, but most ionic solutions will work.
The positive or anode wire is connected to the titanium part (hence why it’s called anodization) and the negative or cathode wire is connected to another piece of metal in the electrolyte solution. For spot anodizing, the negative electrode is connected to an electrolyte-soaked sponge or brush. The power supply voltage is varied from about 10 to 100 volts DC to grow the oxide layer. Mixing electricity and water is dangerous, and the electrolyte solution’s increased conductivity makes things more perilous. Wearing insulating gloves, handling the electrodes with care, and cleaning any electrolyte spills are necessary to prevent shocks.
Anodizing Time
As much fun as it would be to get a brand new iPhone 15 Pro and dunk it in an electrolyte tank or blast it with a blowtorch, we wanted to come up with a game plan first. (Note: For those curious about what happens when an iPhone 15 Pro (Max) gets blow-torched, our friend JerryRigEverything did just that.)
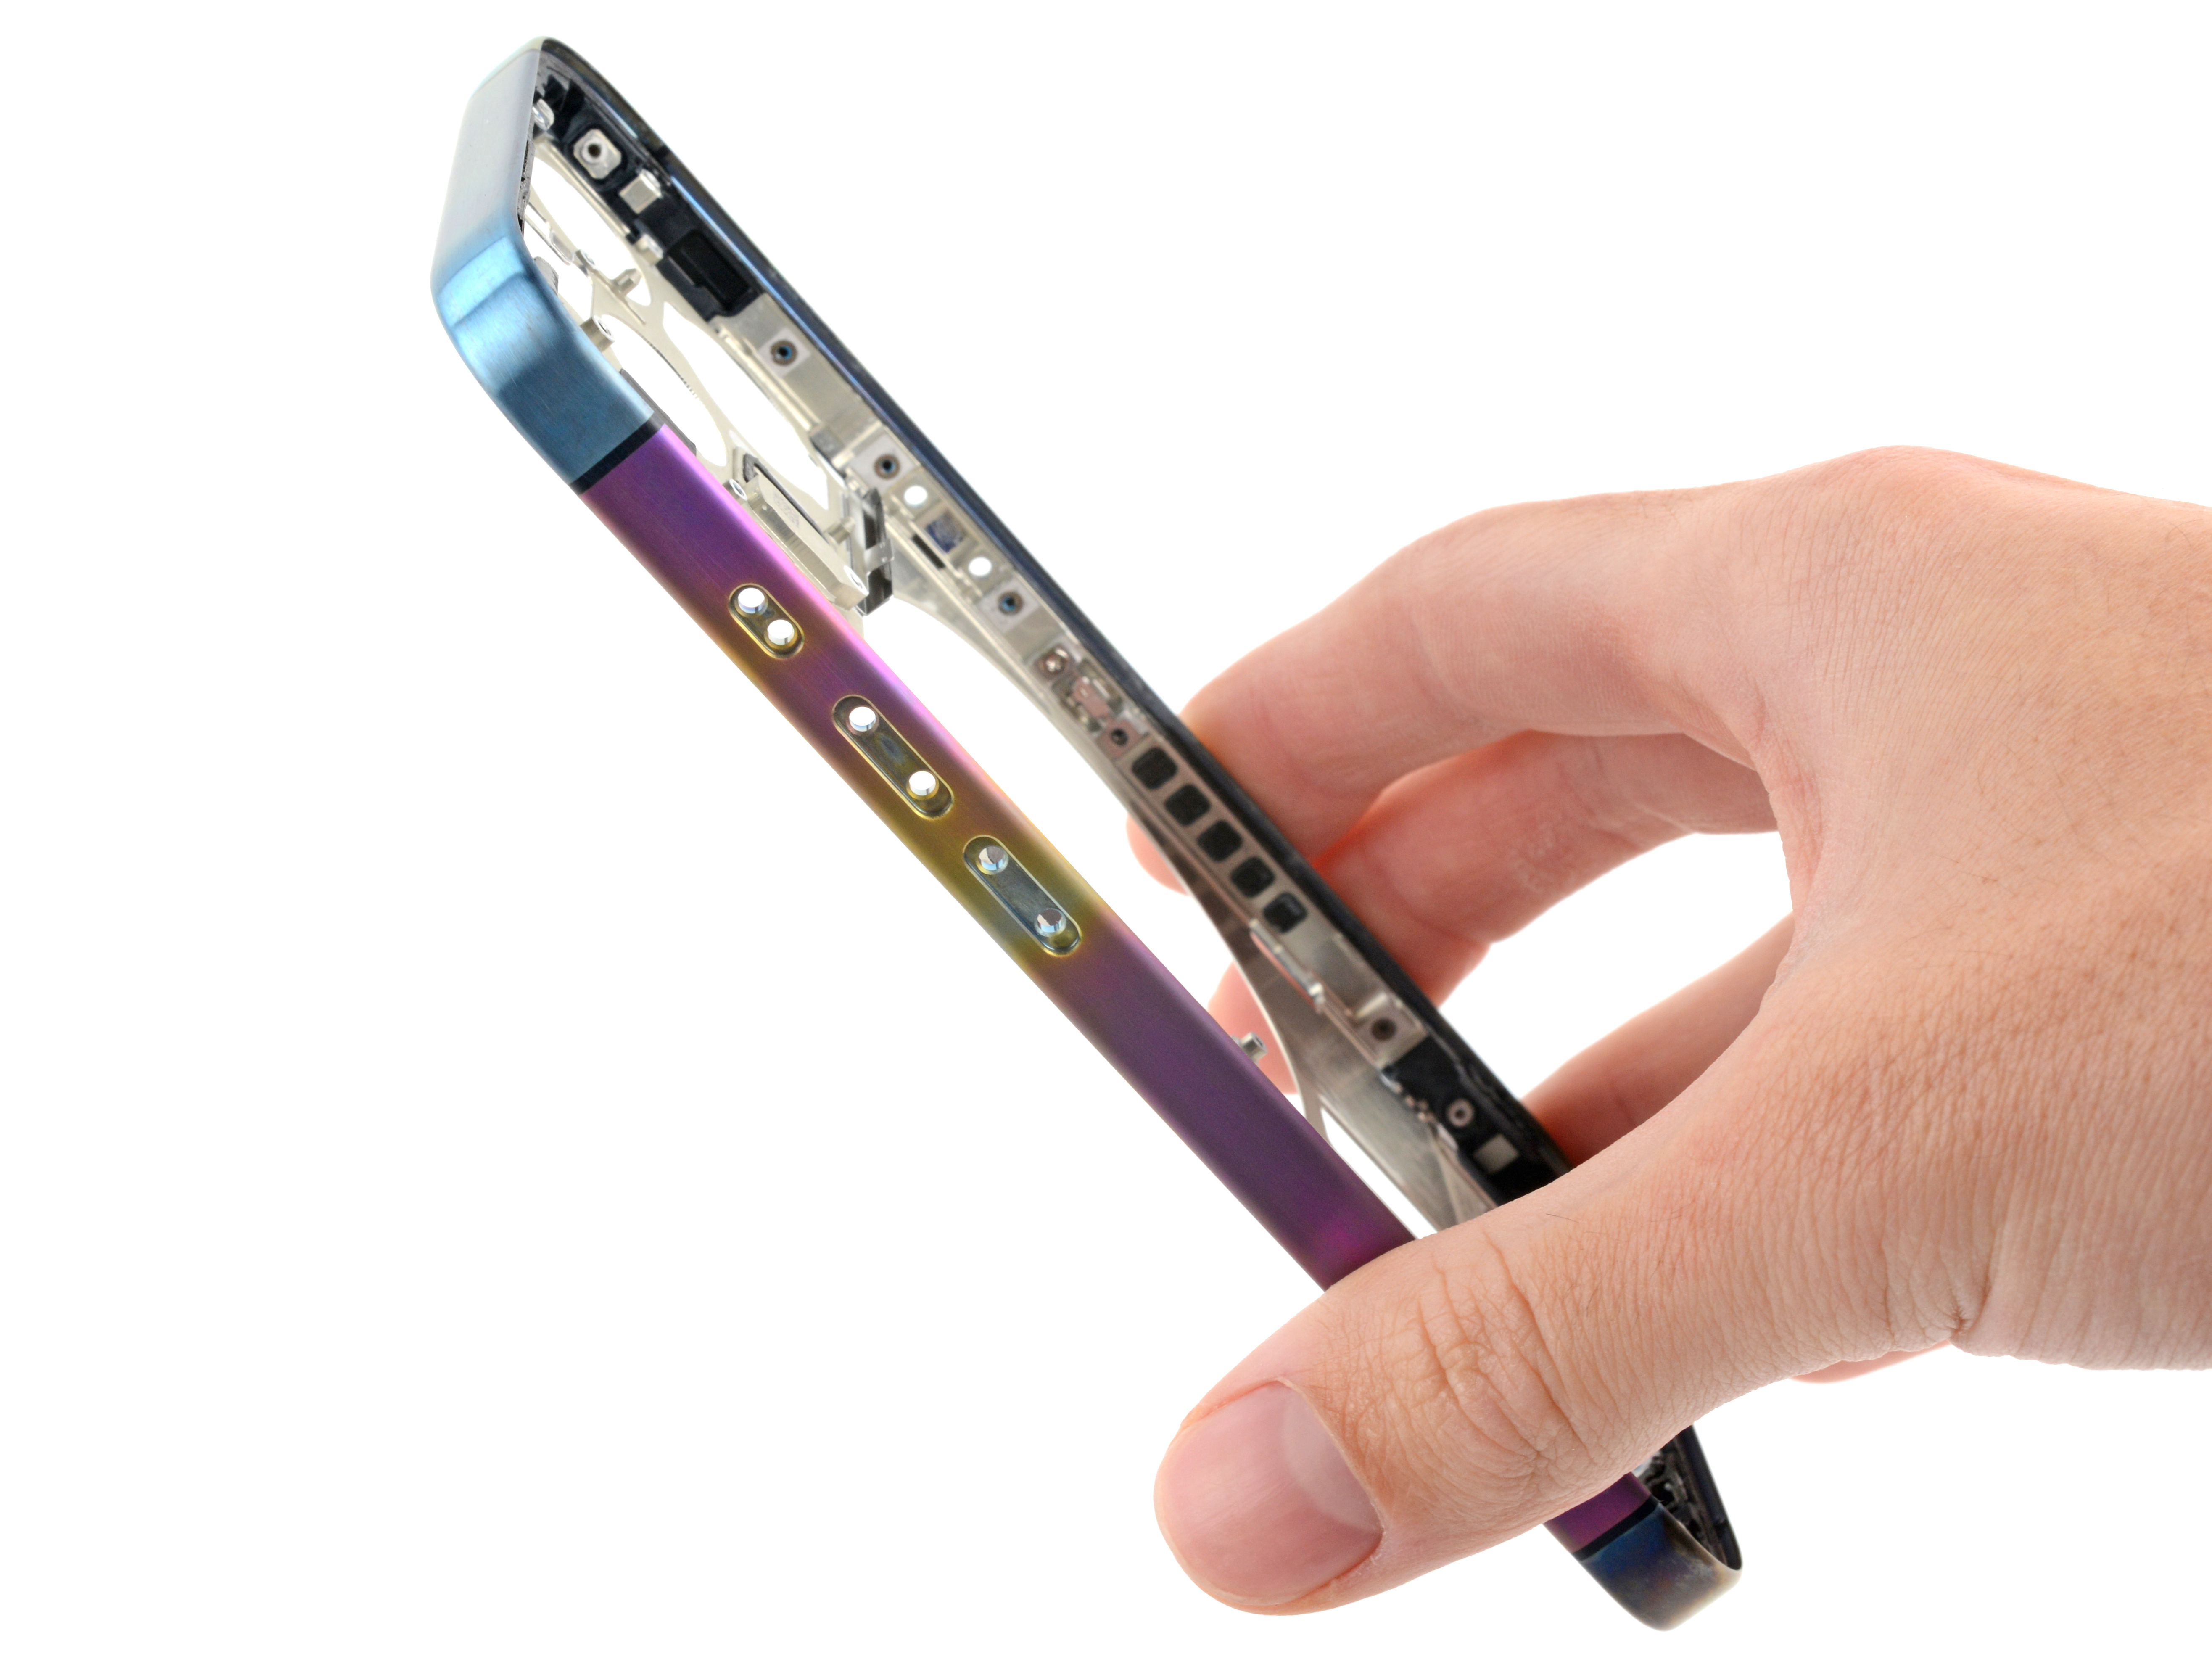
Our first step was disassembling the phone down to the frame to see what we were working with. Looking at the bare frame, the inner aluminum subframe is clearly visible along with several plastic parts bonded to it that create the antenna bands. These bands are electrically isolated from each other and need to be anodized individually.
To avoid corroding the inner aluminum subframe or anything else important, we’re not going to give the frame a hydrofluoric acid or electrolyte bath. Instead, we’re going to etch the frame by wiping it down with an acid-soaked cloth and use the spot anodizing method to minimize any electrolyte splashes. It’s probably possible to etch and spot-anodize the frame without complete disassembly, but we didn’t want to risk corroding or frying anything important.


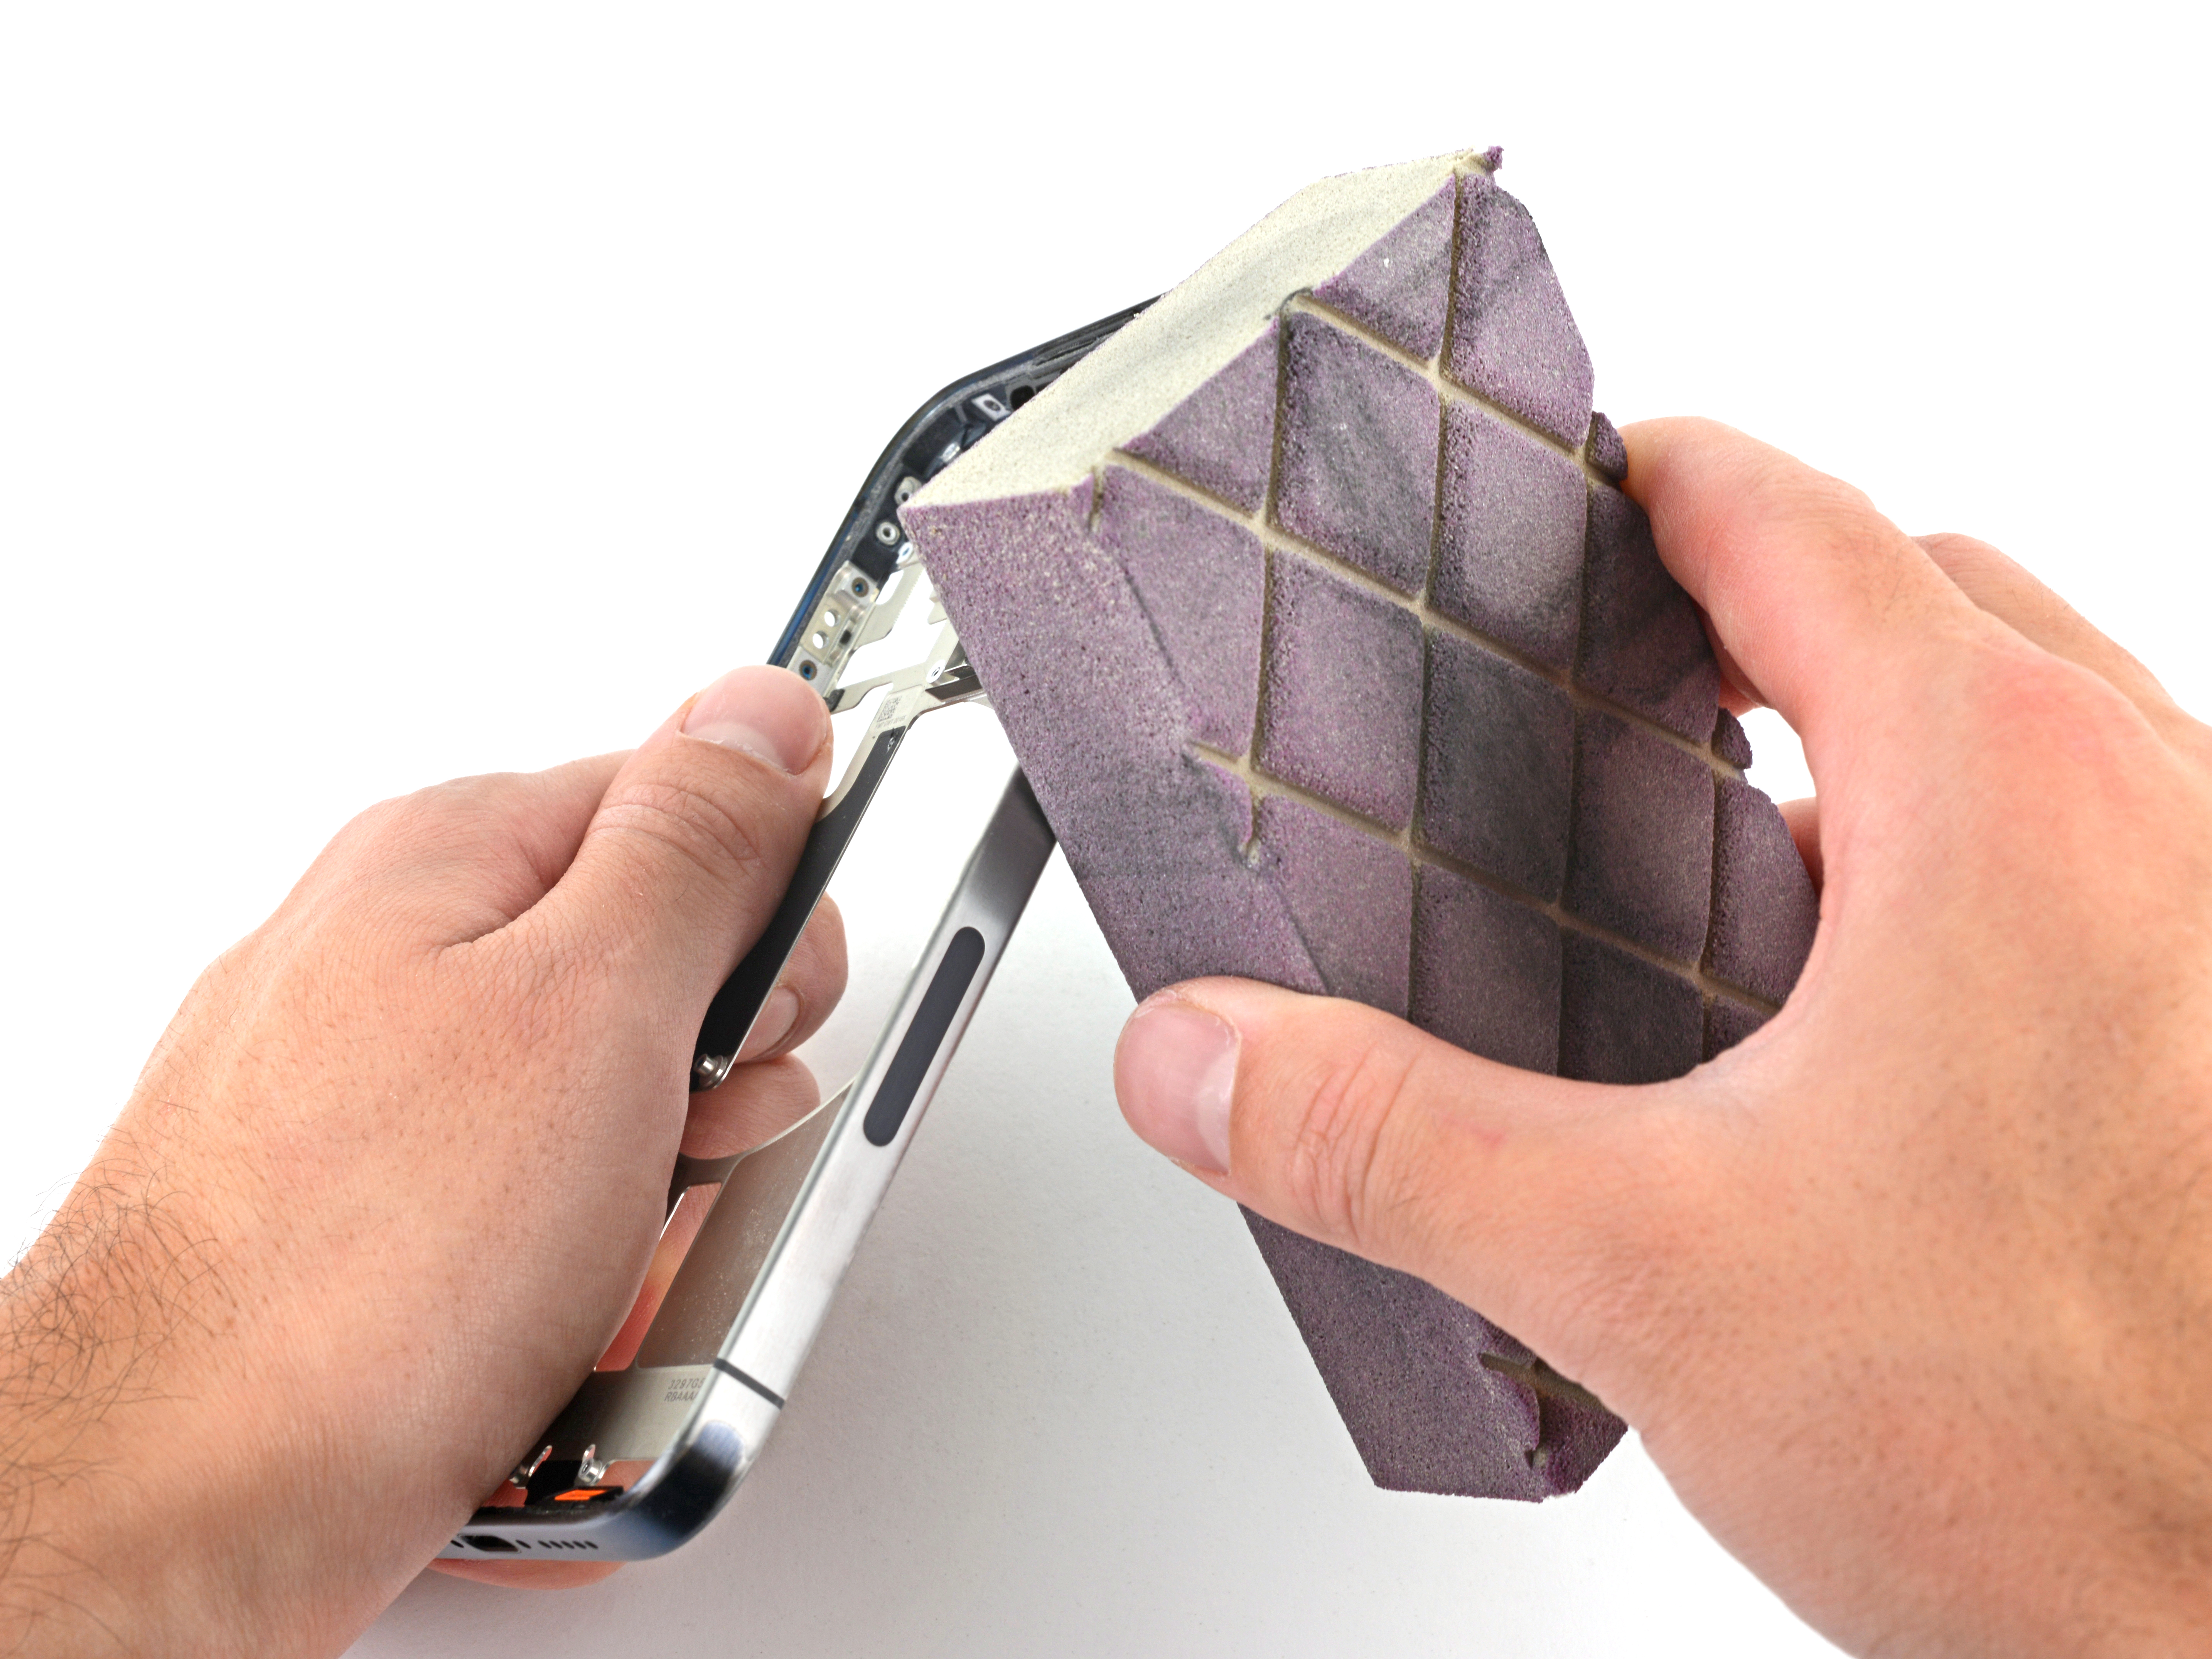
Next up is removing the Blue Titanium PVD (physical vapor deposition) finish already on the frame. Sanding the frame with a 320 grit sanding block easily removed the blue PVD coating, leaving a nice shiny titanium surface. If we had a Natural Titanium iPhone 15 on hand, there would be no need to sand off the finish because its surface is already conductive.
Now onto surface etching prep, so the anodized colors will turn out more vibrant.
This is the most dangerous part of the experiment because we’re going to use hydrofluoric acid. Our acid source is Whink rust remover which has a concentration of about 2%. This cannot be understated enough: hydrofluoric acid is incredibly dangerous even in small concentrations and should only be used if proper safety precautions are taken!
To stay safe, we worked in a well-ventilated area, donned goggles and a face shield, and wore two sets of nitrile gloves. Access to a supply of calcium gluconate gel is a must. In the event of skin exposure, the gel binds with the poisonous fluoride ion to neutralize it.
Proceeding with caution, we wiped down the outer titanium frame with an acid-soaked cloth. Immediately after this, the frame was dunked in a baking soda solution to neutralize the acid. The gloves and cloth were soaked in the baking soda solution prior to disposal as well.
Finally, it’s anodizing time. The anodizing setup consisted of a power supply, some test leads, a bit of sponge, and a trisodium phosphate solution for the electrolyte. Trisodium phosphate or TSP is a strong base and can cause burns, so we goggled and gloved up for safety. A small piece of kitchen sponge was connected to the power supply’s negative terminal to use as an anodizing brush. The positive terminal was connected to the frame. A 100mA current limit was set so things wouldn’t get too exciting. The sponge electrode and electrolyte solution must be handled with care when anodizing to prevent shocks. We wore nitrile gloves to insulate ourselves from the circuit and held the sponge side by the wire insulation to minimize shock risk. But please, don’t try this at home.
Don’t try this at home.
— Us. And we almost never tell you that, so you know we mean it.
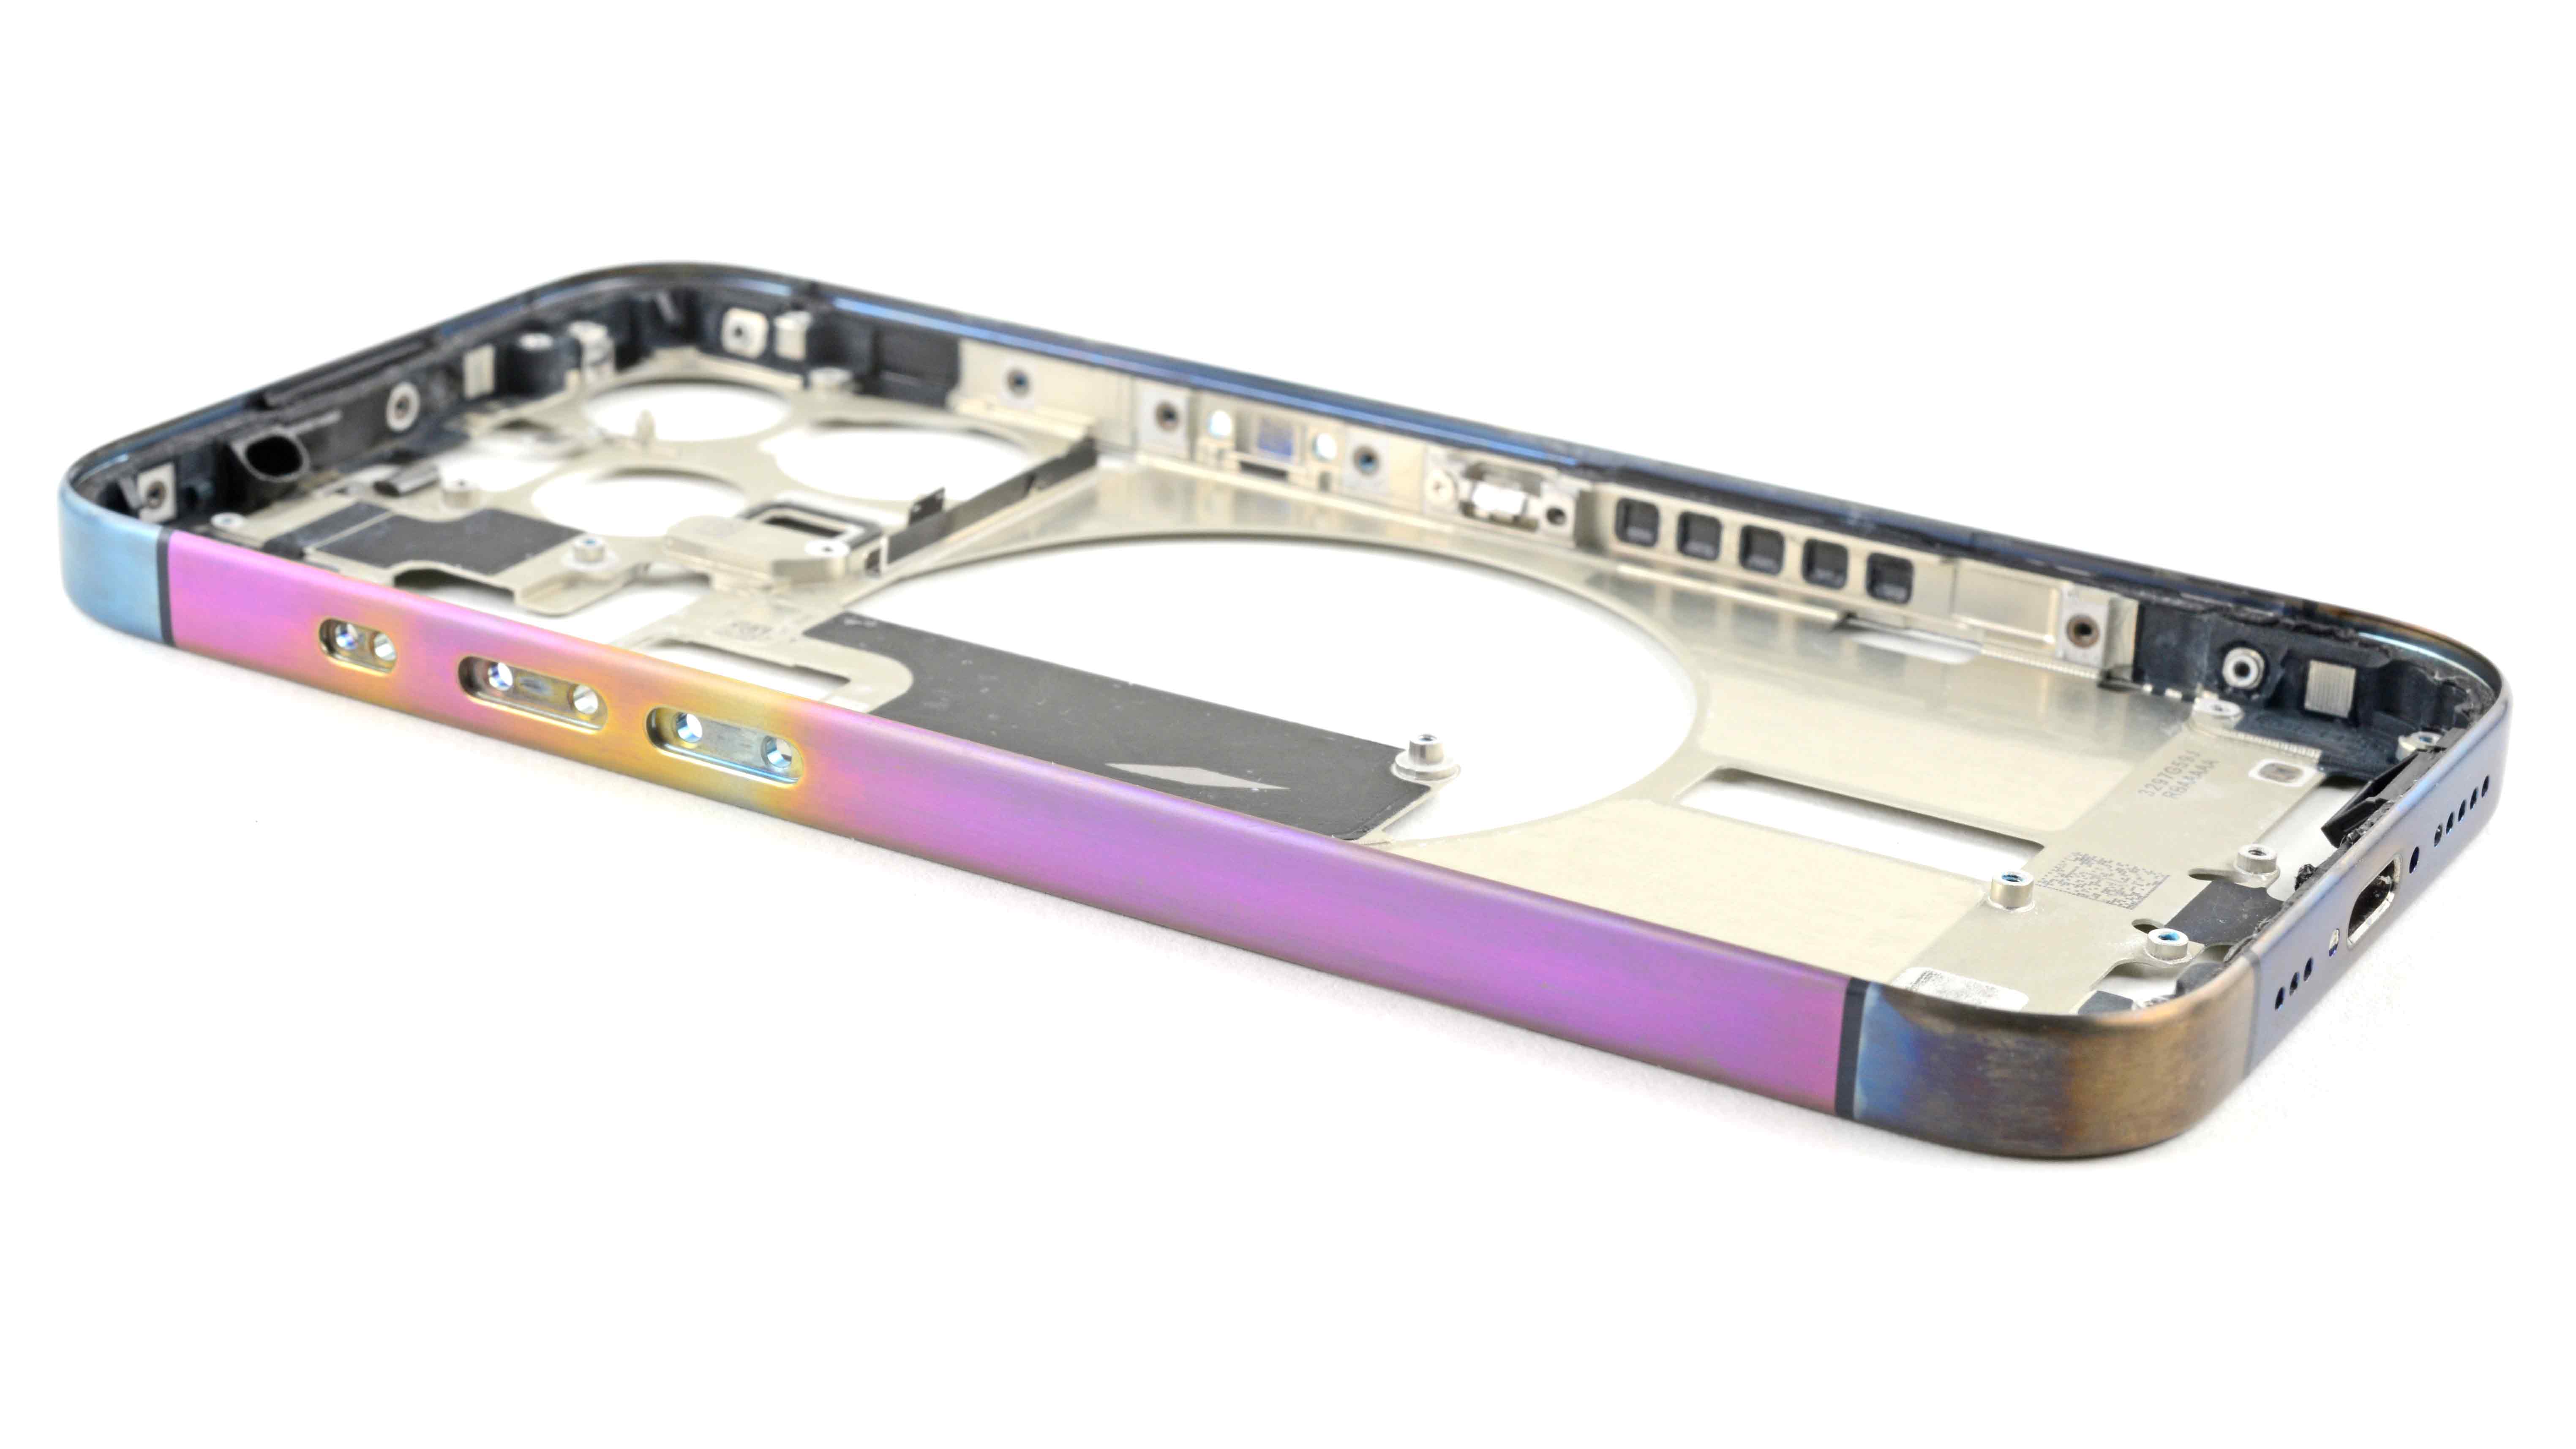
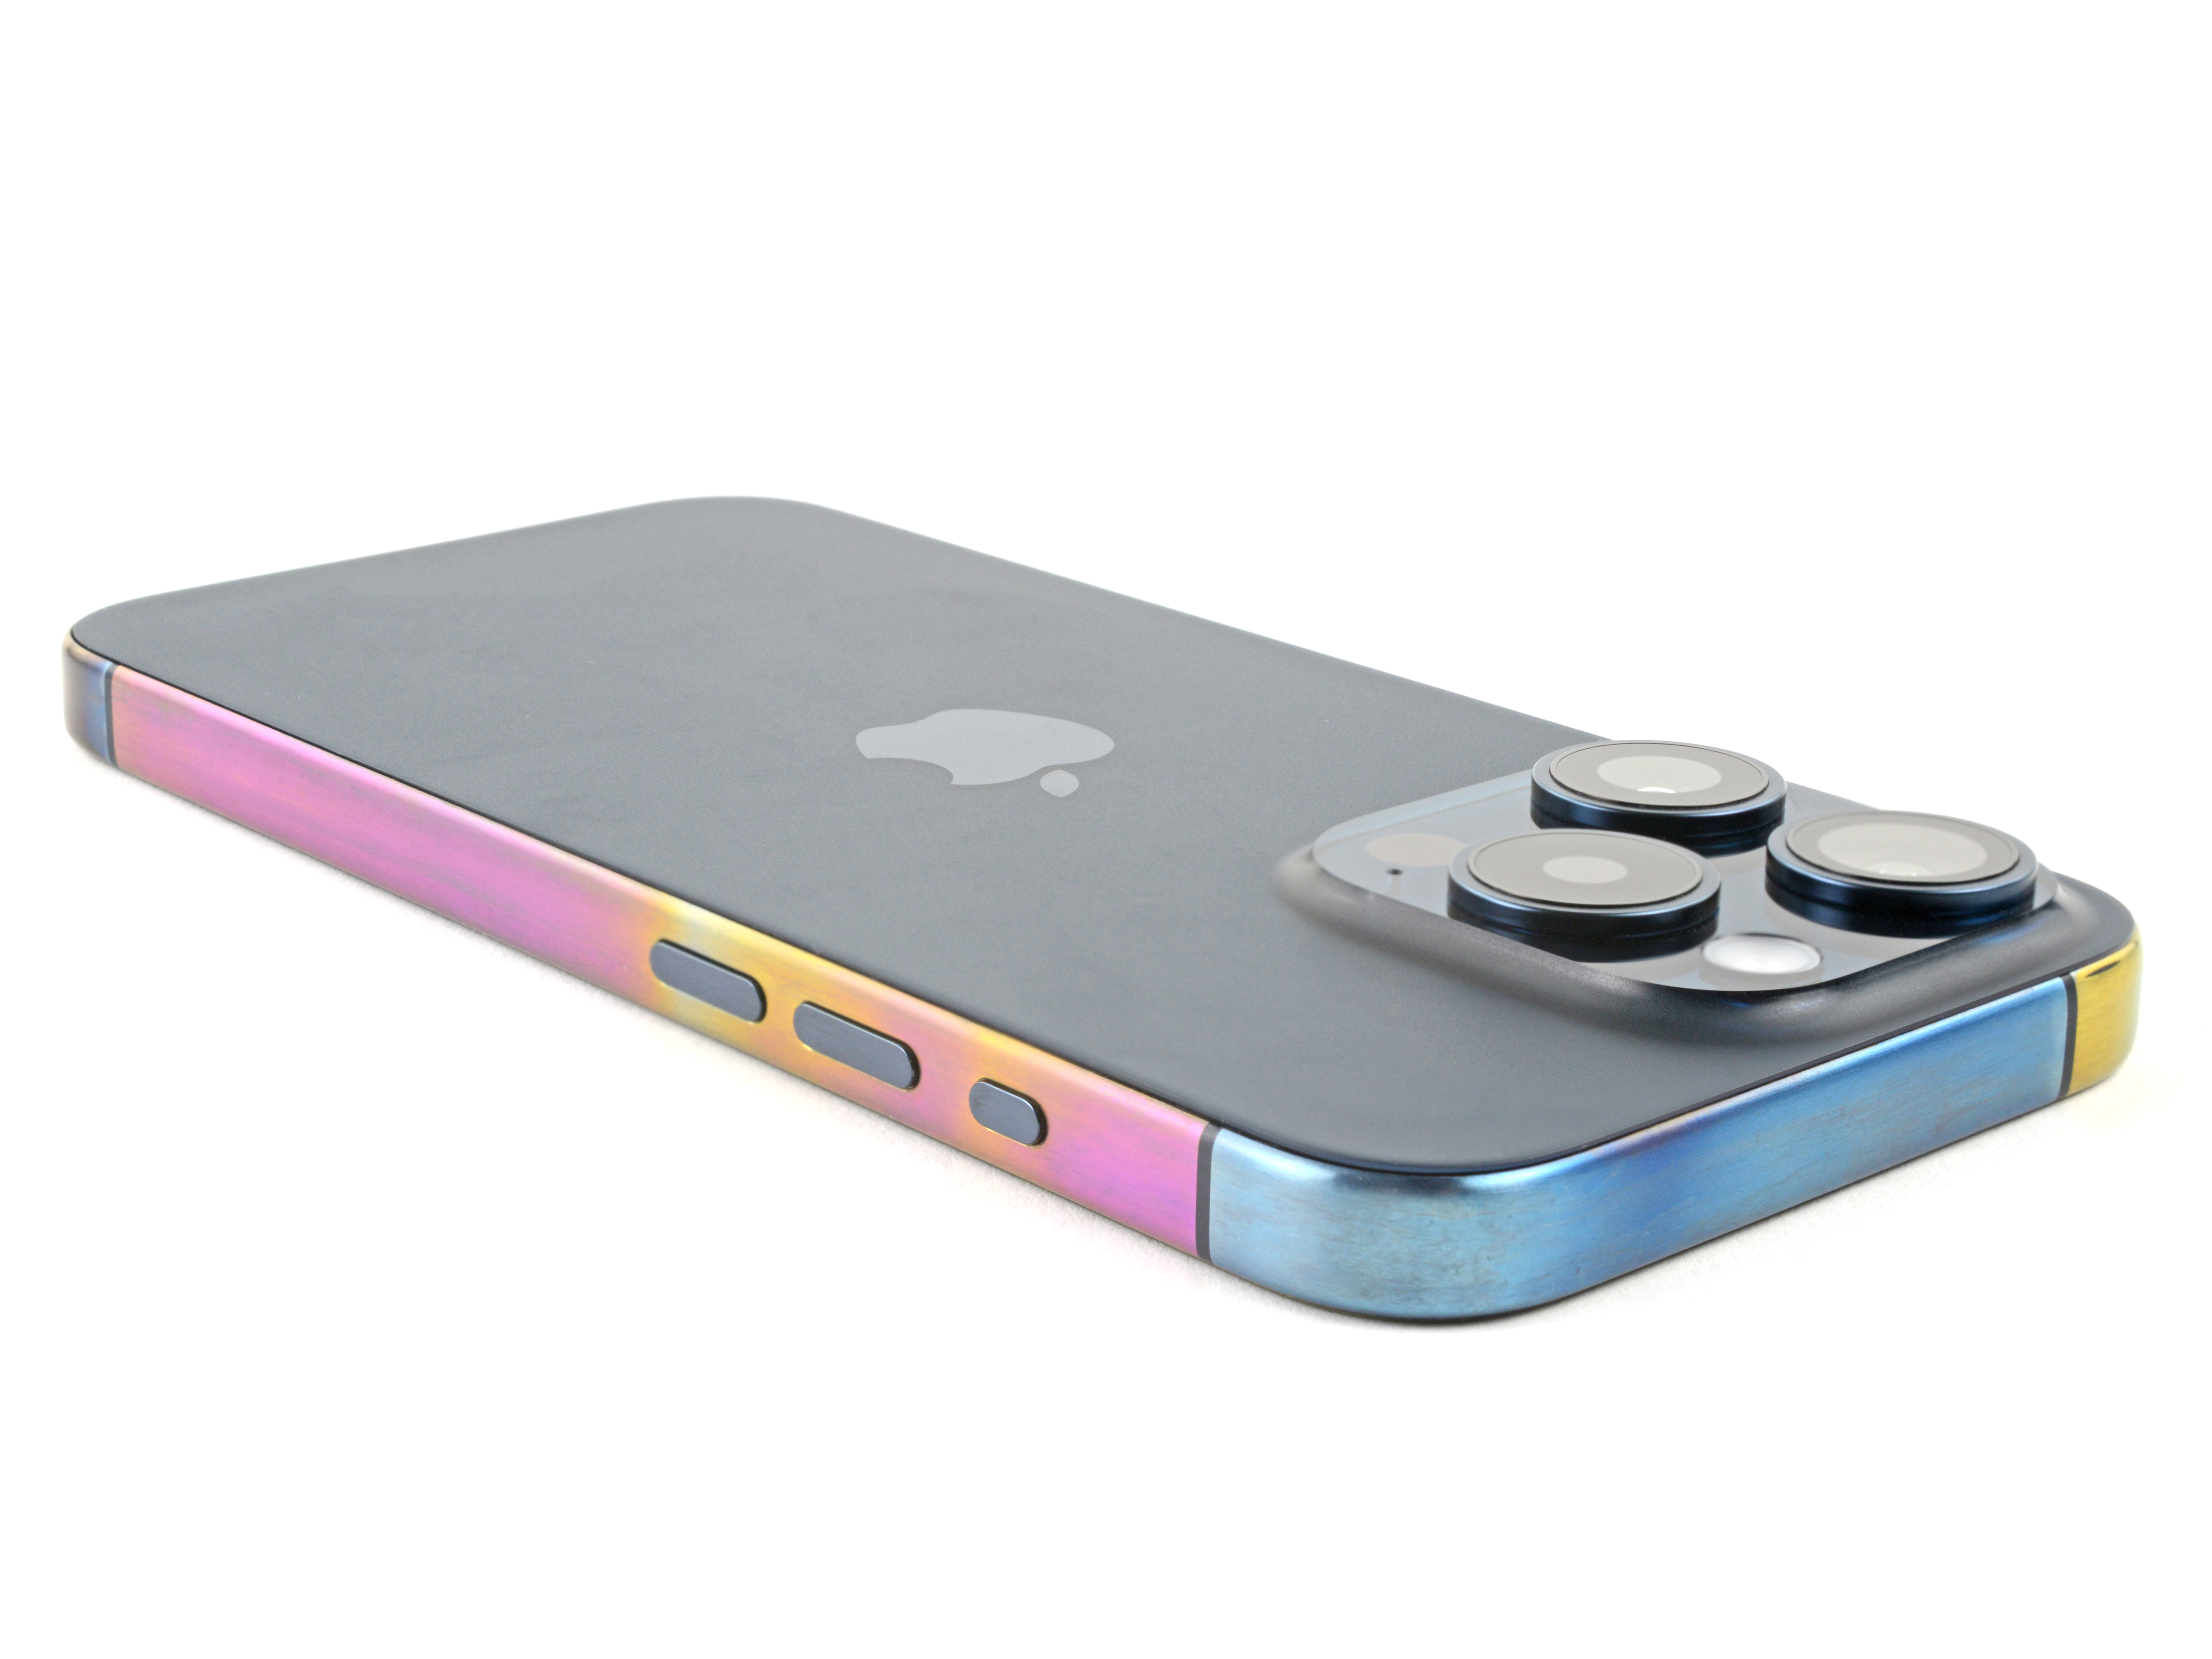
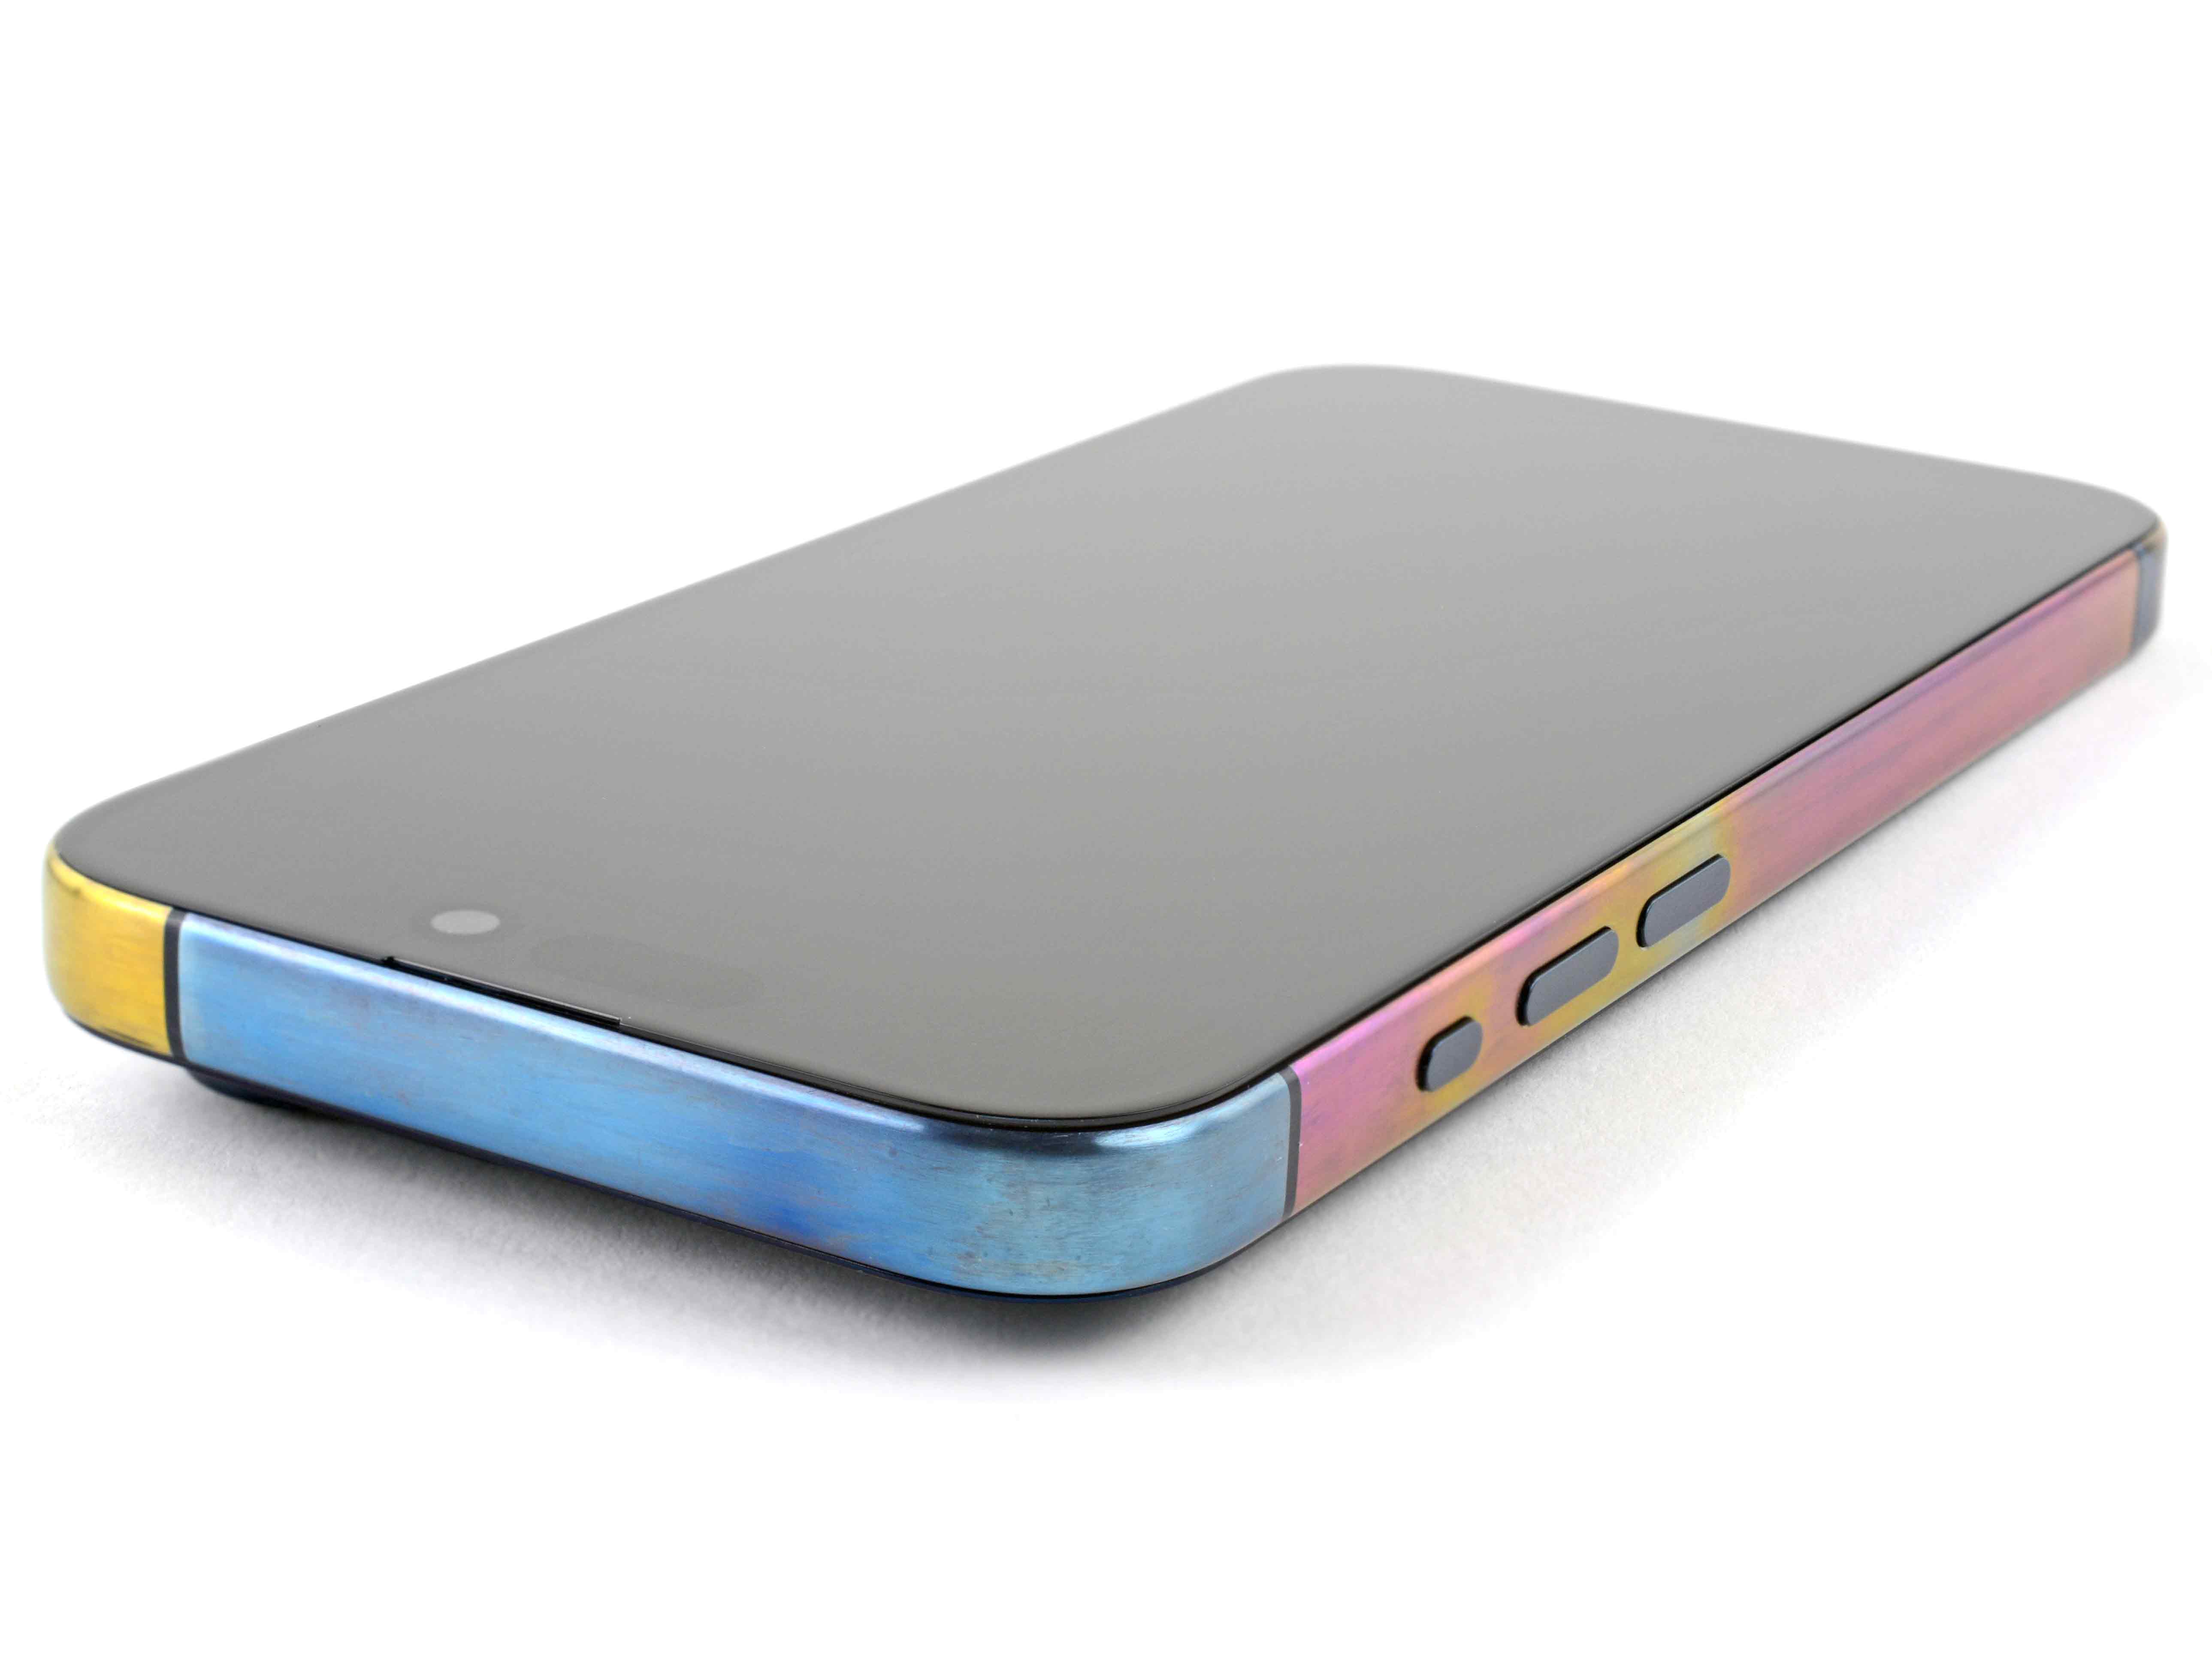
The antenna bands divide the frame into four sections that don’t share continuity. This means each section can be anodized individually to create some fun mismatched colors. Initially, we set the power supply to around 25V aiming for an iFixit blue, and wiped the TSP-soaked sponge across the bottom. While not a true iFixit blue, it was pretty close, with some discoloration near the USB-C port cutout.
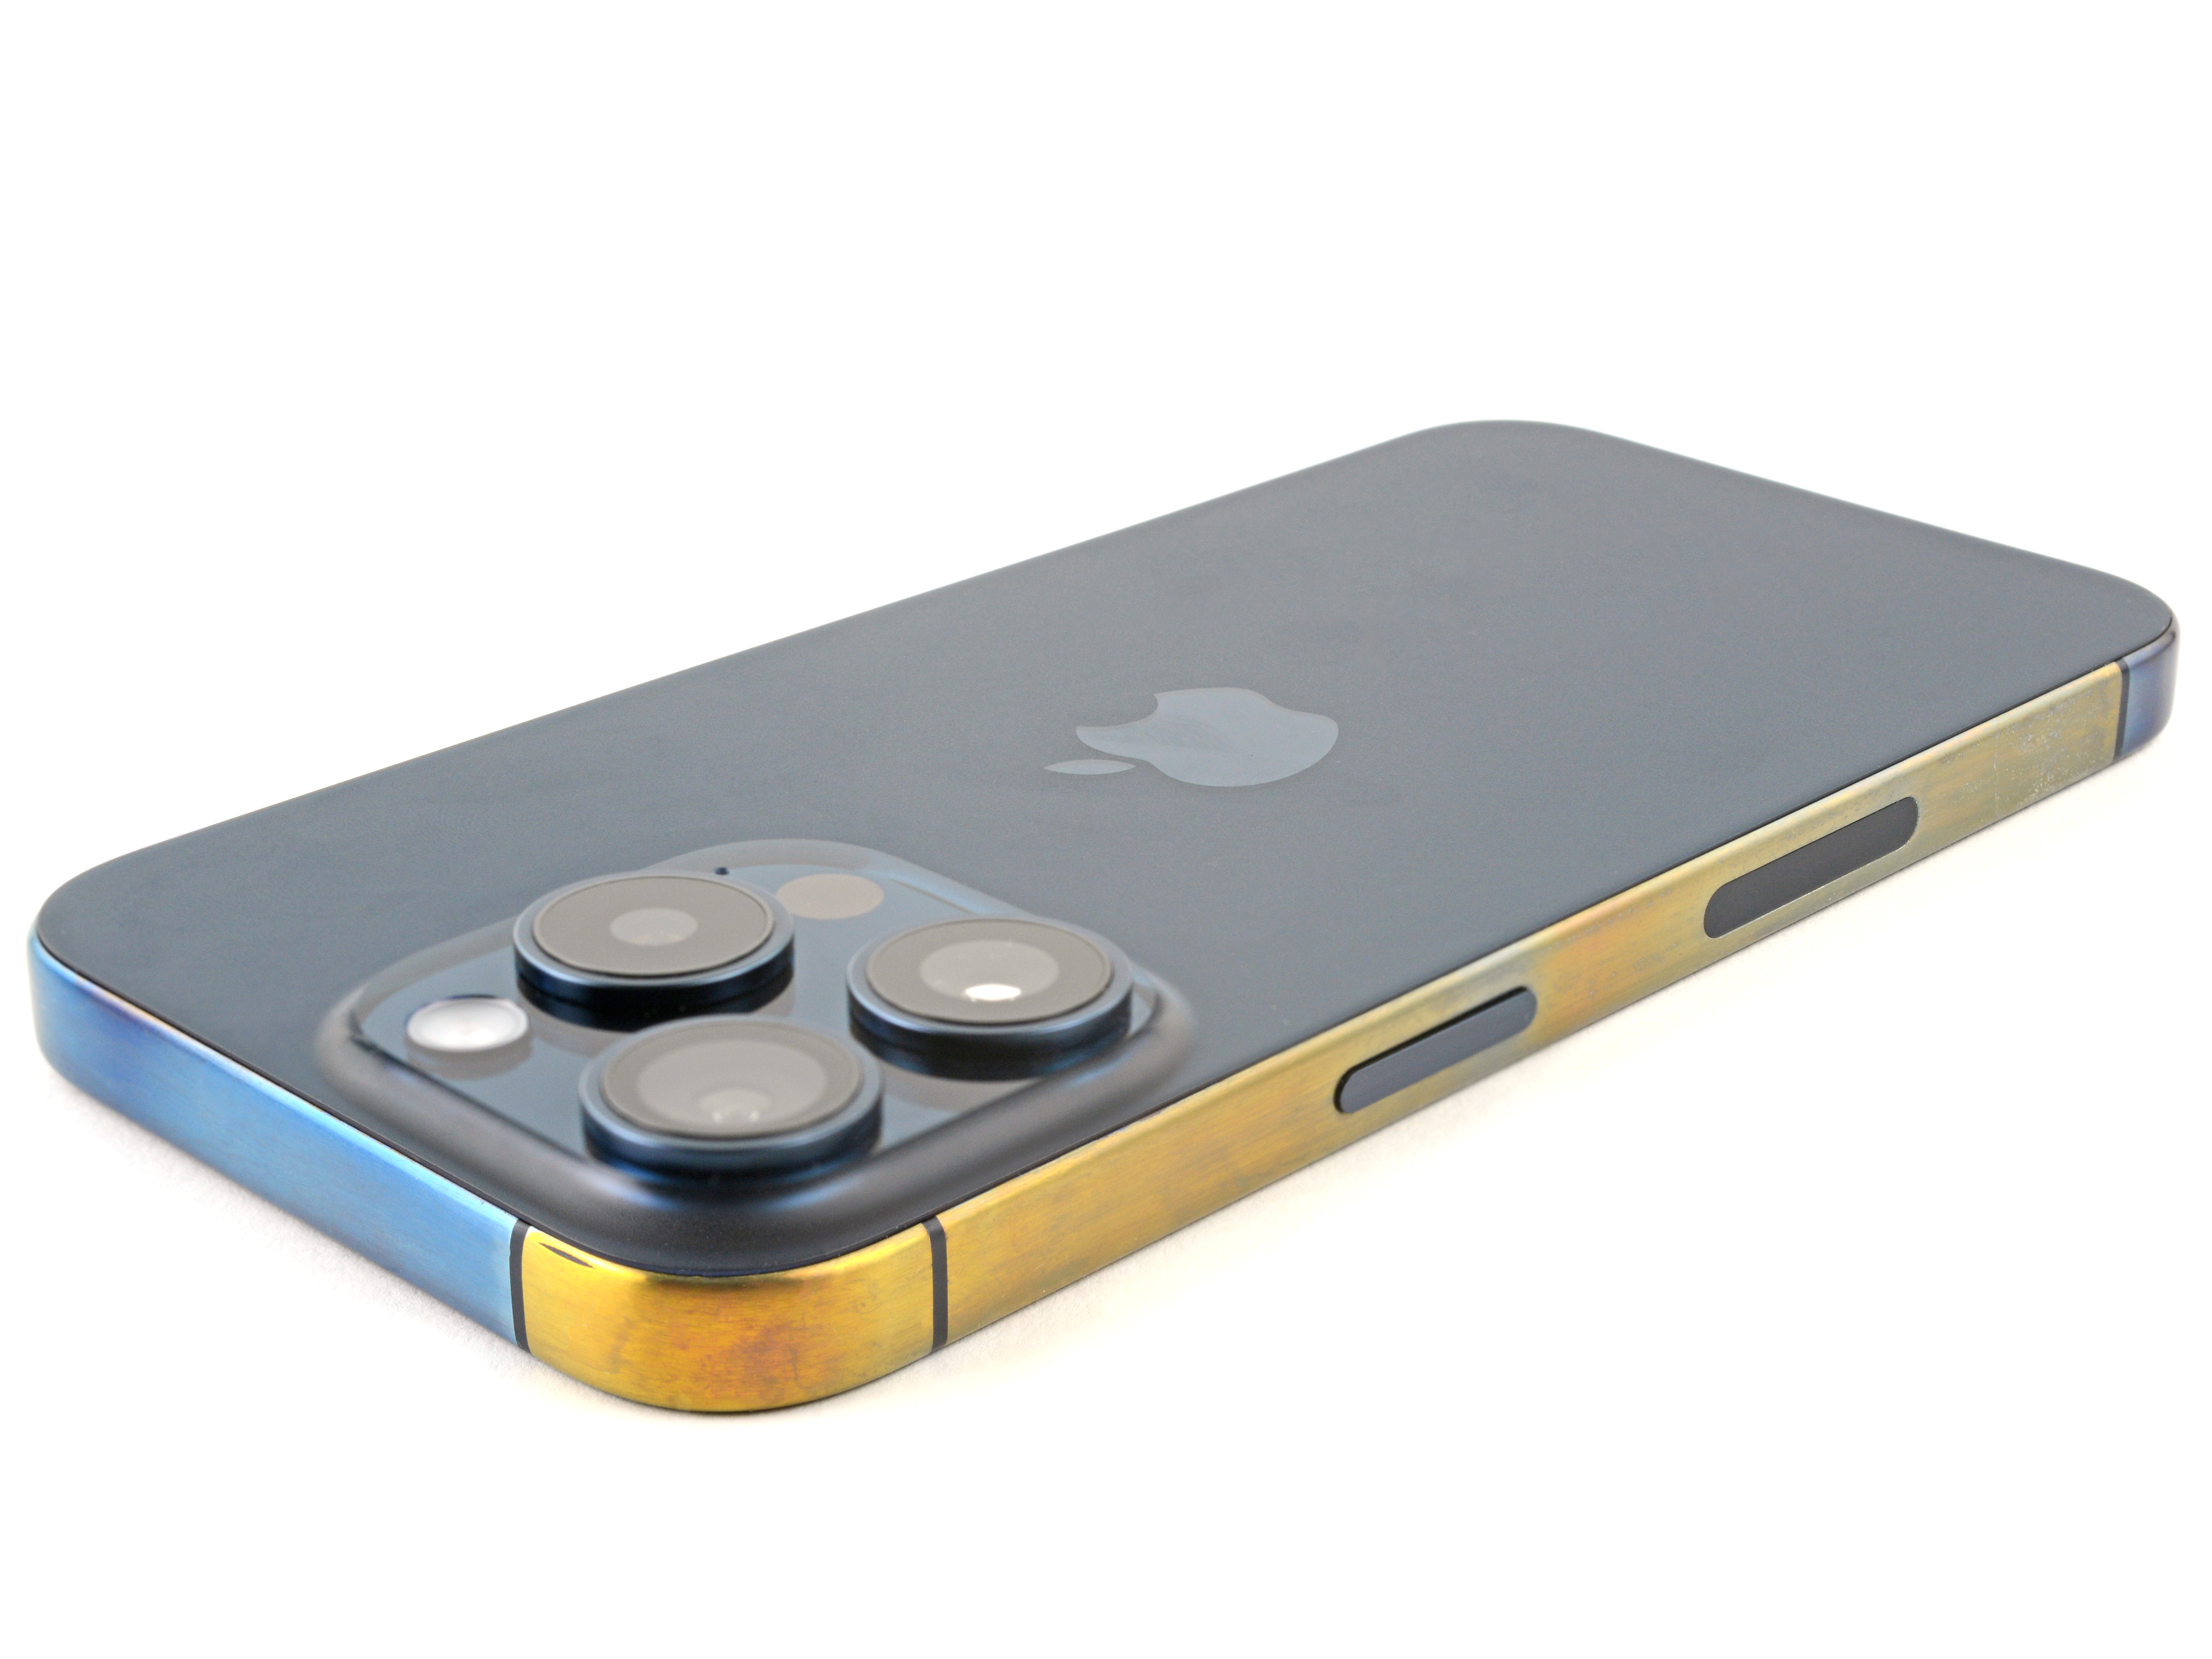
This result excited us so much, we immediately anodized the other edges. Turning up to 50V for yellow and wiping the sponge across the right side, we were greeted with a beautiful straw gold at first. Unfortunately, the lower right side had some scratches and pitting, which didn’t look pretty. This was probably caused by insufficient etching or surface contamination. Nevertheless, we were still stoked to create some awesome colors.


Turning the voltage up even more—to 70V—to get purple yielded some really nice results. Interestingly, the area near the volume and action button cutouts remained yellow after multiple sponge passes. This might be due to a different current density around the cutouts, or not enough electrolyte present in the sponge. Even though we were aiming for purple, the color gradient between yellow and purple was cool-looking and a fan favorite around the office. Mix-matching and swirling colors is something we’ll definitely try if we do this again.
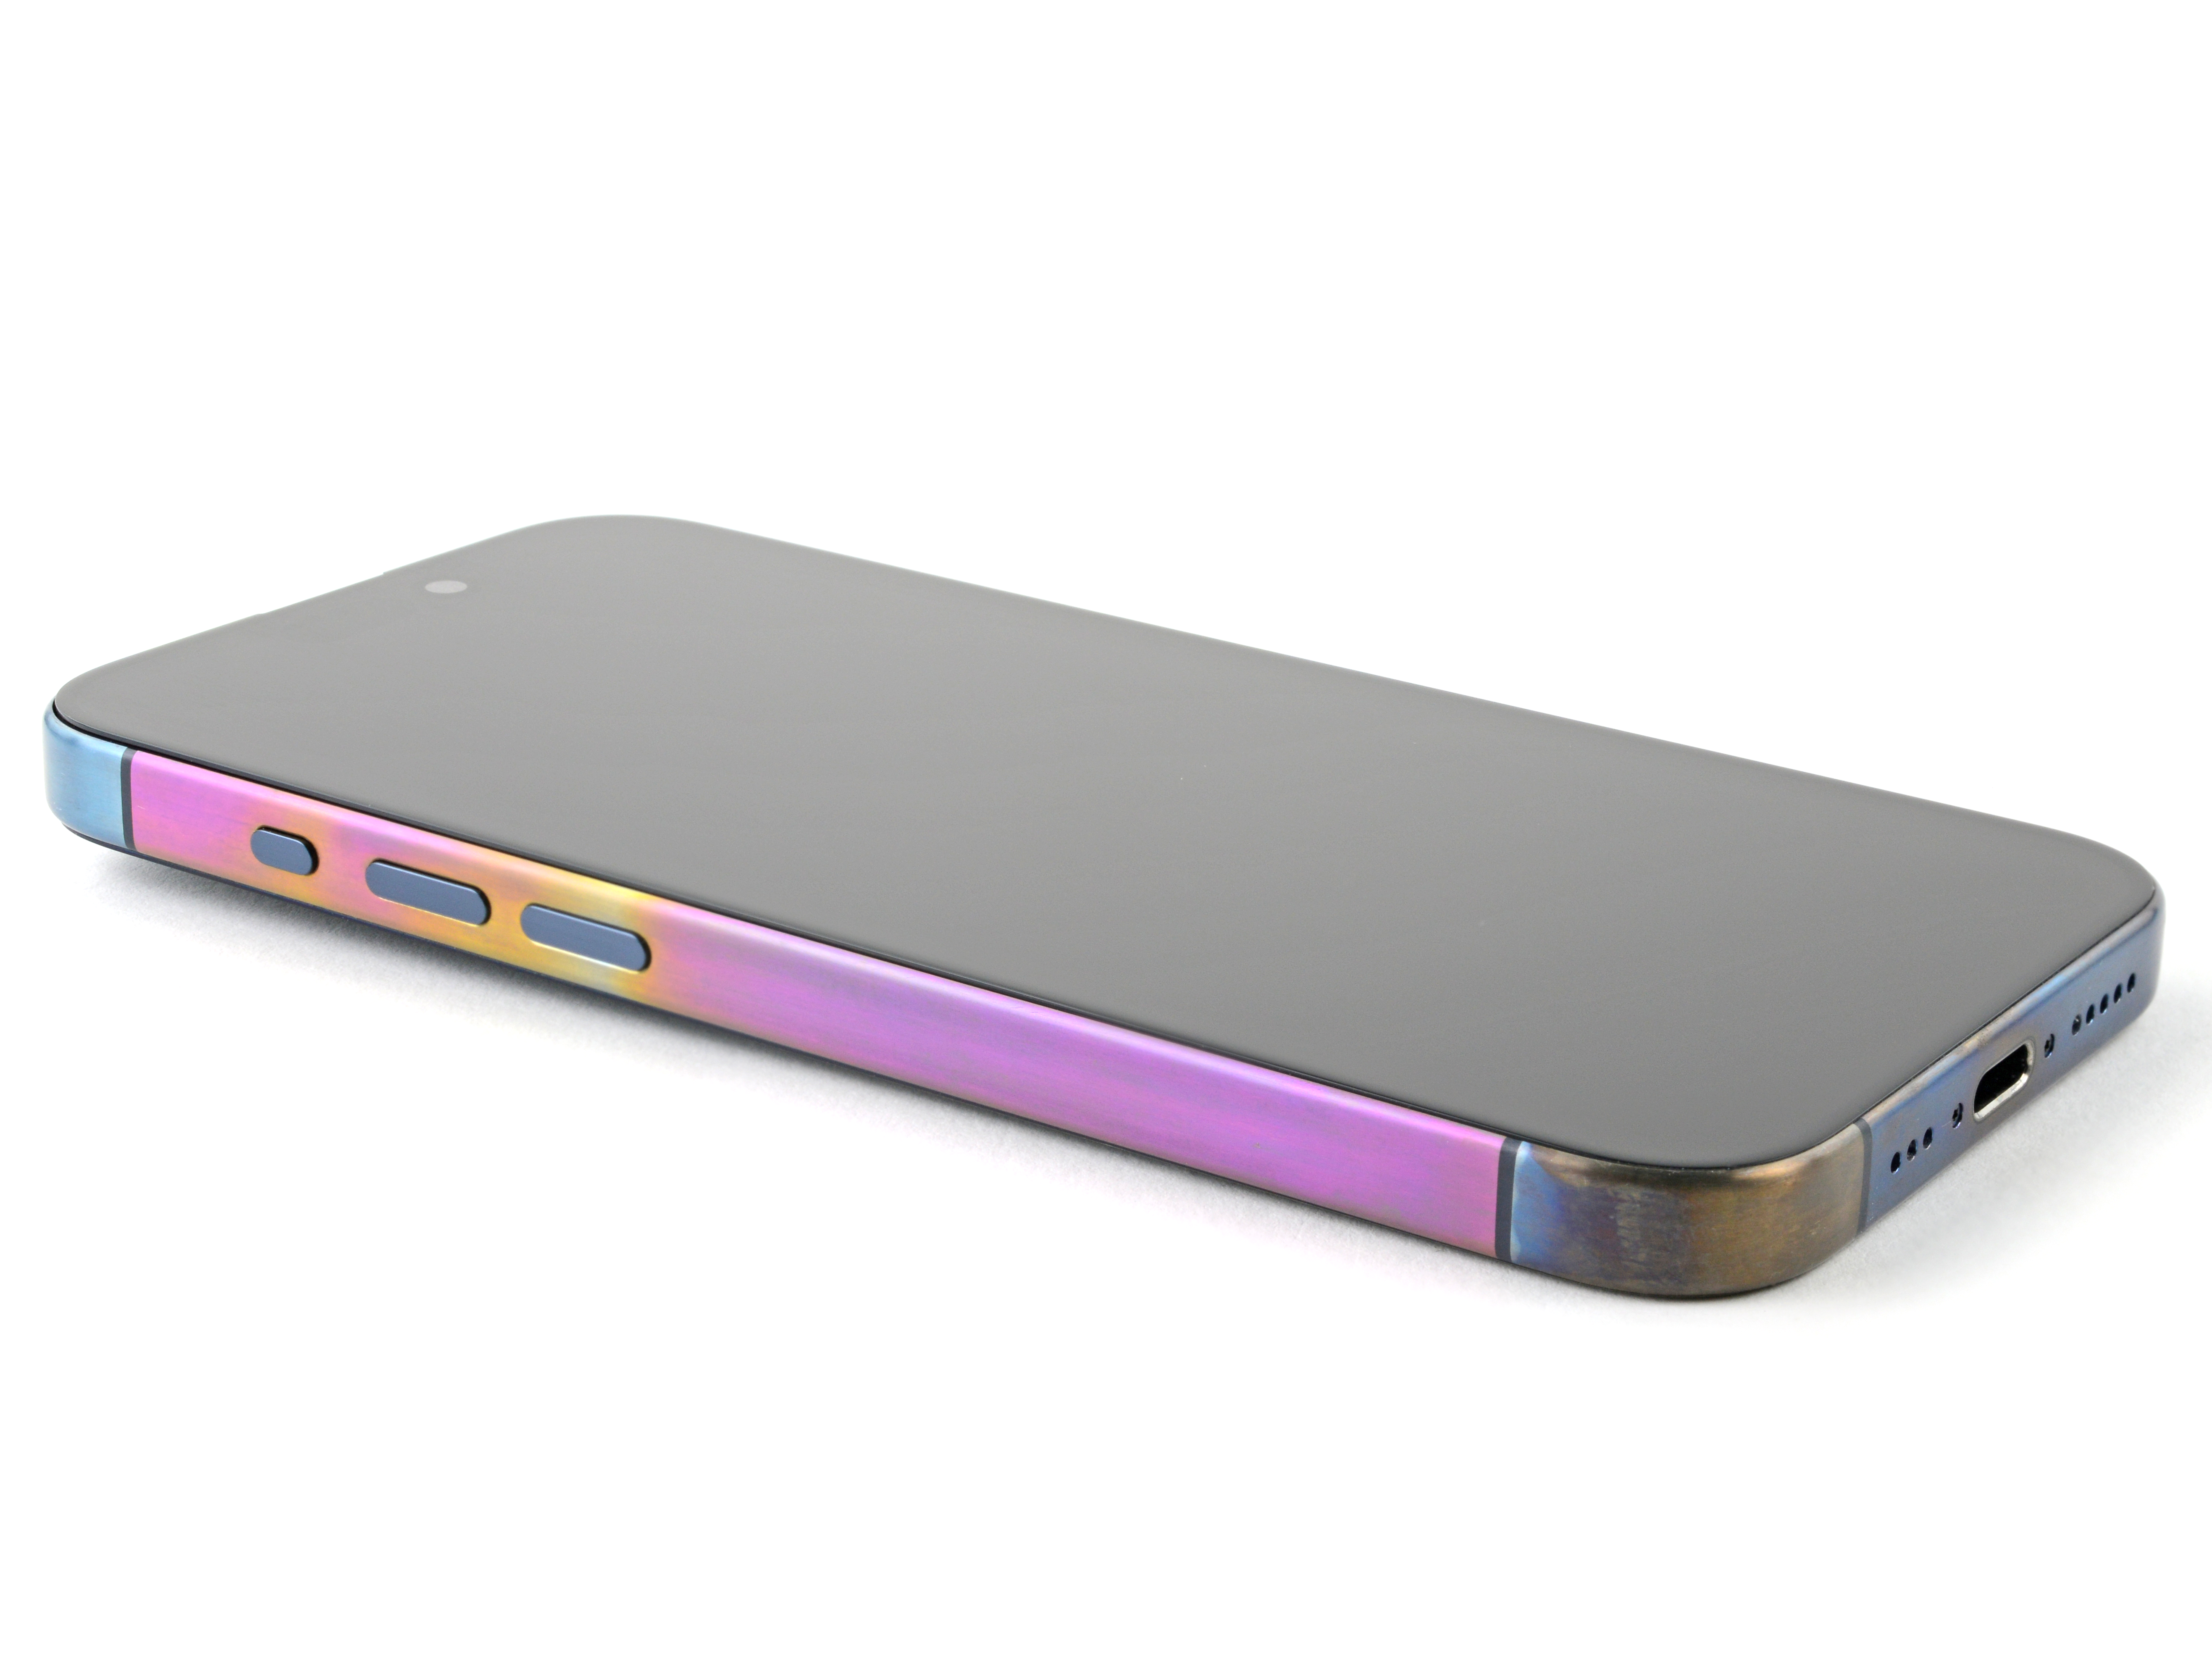
The First Anodized iPhone 15 Pro
Putting the phone back together makes the colors pop even more and has us eagerly waiting to anodize another phone. You might be wondering why the buttons still have the original finish. We tried anodizing them in a previous experiment, but they wouldn’t take a color. They are likely stainless steel and ended up adding a nice contrast to the anodized frame.
What about durability? The original PVD coating is probably more scratch and fingerprint-resistant.
Typical PVD coatings range in thickness from about 1 micrometer to 5 micrometers which is several thousand times the thickness of the anodized oxide layer. Fingerprints and smudges are more visible on the anodized surface because the oil on your skin acts as an additional thin film layer that affects the reflected colors. The durability and scratch resistance could be improved by covering the anodized layer with a clear protective coating. Something like a ceramic coating for cars might work well.
Anodizing Ahead
Apple probably doesn’t approve of anodizing your shiny new iPhone. But you bought it, you own it, and that ownership should come with the freedom to make it uniquely yours. Repair it, hack it, or customize it with some fancy anodized colors (assuming you’re comfortable anodizing and have all the safety equipment, of course).
This experiment was a total success, and we’re itching to do more and refine it. We already have some ideas about what to do next. Some more color blending and mixing would create a unique chromatic phone. Adding masks over the frame to anodize patterns or text would be awesome too. Figuring out how to anodize without a full disassembly would be a game changer, so the factory water resistance won’t be compromised. We’re gonna do some more testing, so stay tuned for more anodizing adventures!


crwdns2944067:04crwdne2944067:0
That's so cool! I wish I had the material to do that (Guess I have to get the iPhone 15 first).
Jadon Lyon - crwdns2934203:0crwdne2934203:0
This is really cool. Just to also say that Snow Peak have free anodising services, you can drop in and make your titanium cup a funky colour! I asked about the chemicals, and they said it was just salt in water. Guessing that HF acid is faster, but could you in theory just do spot process with a safer solution, but accept it takes longer...?
Hey Jude - crwdns2934203:0crwdne2934203:0
That actually works! I tried it on a sanded apple mouse and got a gold one. Looks pretty nice and probably had the same result as proper anodizing with the acidic solution.
Leooooo1061 -
Needlessly dangerous, the HF etch is completely unnecessary if you've sanded down to bare titanium. TSP isn't super dangerous but you can get the same results with a saturated baking soda solution.
Oli Pearson - crwdns2934203:0crwdne2934203:0