crwdns2933423:0crwdne2933423:0

Mitsubishi EX320U Projector Disassembly

crwdns2936315:0crwdne2936315:0
crwdns2936323:0crwdne2936323:0
crwdns2931653:010crwdne2931653:0
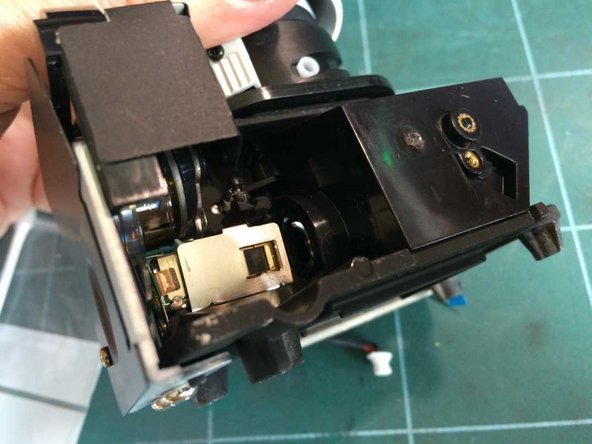
Mitsubishi EX320U Projector Disassembly, Optical path - 1: crwdns2935265:00crwdnd2935265:01crwdnd2935265:03crwdne2935265:0 Mitsubishi EX320U Projector Disassembly, Optical path - 1: crwdns2935265:00crwdnd2935265:02crwdnd2935265:03crwdne2935265:0 Mitsubishi EX320U Projector Disassembly, Optical path - 1: crwdns2935265:00crwdnd2935265:03crwdnd2935265:03crwdne2935265:0
Optical path - 1
  • Follow the light path and inspect carefully for dust or contamination. These pictures show the optical assembly upside down.

  • Light enters from the lamp on the right, facing the screen (on the left in this picture since it's upside down).

  • The light then passes through the colour wheel ...

  • ... and into the collimator.

  • If dust or contamination has been sucked into the projector by the fan, it can deposit on and around the collimator, resulting in shadowy patches on the projected image.

crwdns2935429:0crwdne2935429:0

crwdns2935429:0crwdne2935429:0

crwdns2935429:0crwdne2935429:0

crwdns2935429:0crwdne2935429:0

crwdns2935429:0crwdne2935429:0

crwdns2944171:0crwdnd2944171:0crwdnd2944171:0crwdnd2944171:0crwdne2944171:0