crwdns2933423:0crwdne2933423:0

Elektronik-Übungsbausatz MK112

crwdns2936315:0crwdne2936315:0
crwdns2936319:0crwdne2936319:0
crwdns2931653:06crwdne2931653:0
Electronics Skills Kit 101: crwdns2935265:00crwdnd2935265:01crwdnd2935265:03crwdne2935265:0 Electronics Skills Kit 101: crwdns2935265:00crwdnd2935265:02crwdnd2935265:03crwdne2935265:0 Electronics Skills Kit 101: crwdns2935265:00crwdnd2935265:03crwdnd2935265:03crwdne2935265:0
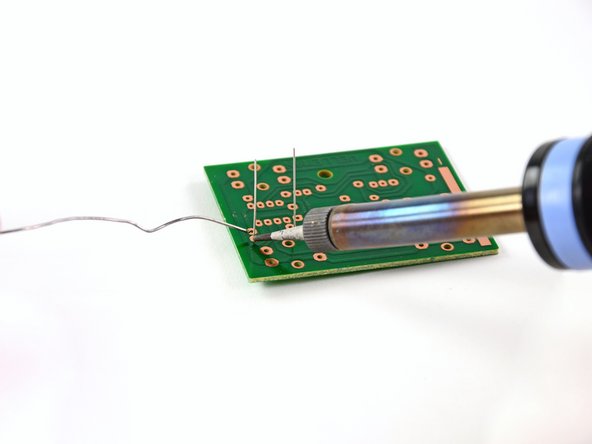
  • Here we are: the moment of truth. It's time to get that solder flowing.

  • Set the tip of the soldering iron on the two parts to be connected. In this case, that's the resistor lead and the copper trace on the circuit board.

  • Touch your solder to the tip of your soldering iron to melt it onto the joint. Don't hold it there for more than a second or two.

  • Quickly, but not frantically, pull both the soldering iron and the solder away from the joint.

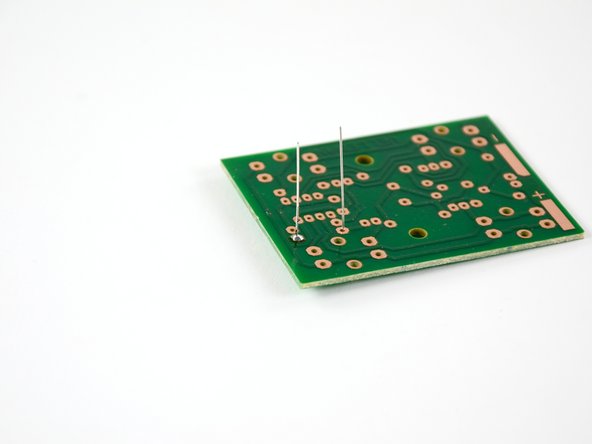
  • Your solder joint should be shiny and conical, and not expand beyond the copper trace.

Jetzt kommt die Stunde der Wahrheit: das Lötzinn muss fließen!

Lege die Lötspitze an die beiden Teile an, die verbunden werden sollen. In diesem Fall ist es der Anschlussdraht des Widerstands und die Leiterbahn aus Kupfer auf der Leiterplatte.

Halte den Lötdraht an die Lötspitze, bis er schmilzt und auf die Verbindung fließt. Halte ihn nicht länger als ein oder zwei Sekunden dran.

Ziehe den Lötkolben und den Lötdraht rasch, aber nicht hastig von der Verbindung weg.

Die Lötverbindung sollte konisch und glänzend sein und nicht über die Leiterbahn verlaufen.

crwdns2944171:0crwdnd2944171:0crwdnd2944171:0crwdnd2944171:0crwdne2944171:0