crwdns2933423:0crwdne2933423:0

Google Pixel 9a Display tauschen

crwdns2936315:0crwdne2936315:0
crwdns2936319:0crwdne2936319:0
crwdns2931653:021crwdne2931653:0
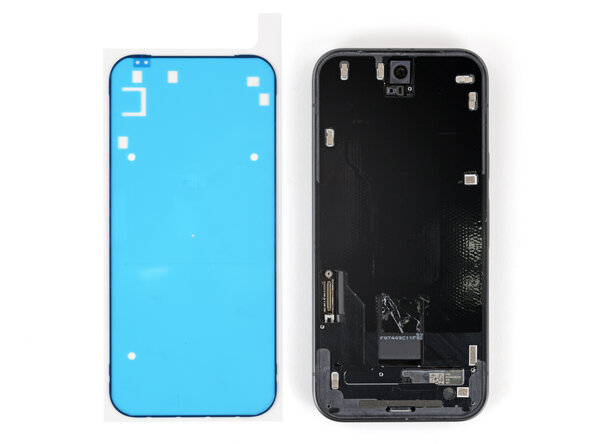
Google Pixel 9a Screen Replacement, Find the adhesive orientation: crwdns2935265:00crwdnd2935265:01crwdnd2935265:02crwdne2935265:0 Google Pixel 9a Screen Replacement, Find the adhesive orientation: crwdns2935265:00crwdnd2935265:02crwdnd2935265:02crwdne2935265:0
Find the adhesive orientation
  • Check if your replacement screen comes with adhesive pre‑installed around its perimeter. If it does, skip down six steps. If it doesn't, follow the next six steps to install new screen adhesive on the frame.

  • Before applying the screen adhesive, make sure you know how it will sit on the frame. If you apply the adhesive incorrectly, you'll need to restart with new adhesive.

  • Hold the adhesive above the frame to find its orientation. Use cutouts in the liner to help visualize how it will lay in the frame.

Schaue nach, ob dein Ersatzdisplay am Displayrand mit Klebestreifen versehen ist. Wenn ja, springe sechs Schritte weiter. Wenn nicht, folge den nächsten sechs Schritten, um neue Klebestreifen am Rahmen zu befestigen.

Bevor du den neuen Kleber befestigst, musst du wissen, an welchen Stellen er am Rahmen sitzt. Wenn der Kleber falsch sitzt, musst du mit einem neuen nochmals neu anfangen.

Halte den Klebestreifen über den Rahmen, um herauszufinden, wie er angebracht wird. Benutze die Ausschnitte in den Schutzfolien um seine genaue Lage auf dem Rahmen zu erkennen.

crwdns2944171:0crwdnd2944171:0crwdnd2944171:0crwdnd2944171:0crwdne2944171:0