crwdns2933423:0crwdne2933423:0

Come riparare terracotta/ceramica rotta con il Kintsugi

crwdns2936315:0crwdne2936315:0
crwdns2936321:0crwdne2936321:0
crwdns2931653:08crwdne2931653:0
How to repair broken pottery/ceramic with Kintsugi: crwdns2935265:00crwdnd2935265:01crwdnd2935265:03crwdne2935265:0 How to repair broken pottery/ceramic with Kintsugi: crwdns2935265:00crwdnd2935265:02crwdnd2935265:03crwdne2935265:0 How to repair broken pottery/ceramic with Kintsugi: crwdns2935265:00crwdnd2935265:03crwdnd2935265:03crwdne2935265:0
  • The amount of kintsugi to be applied depends on your preference. It is also possible to apply more to give a little thickness.

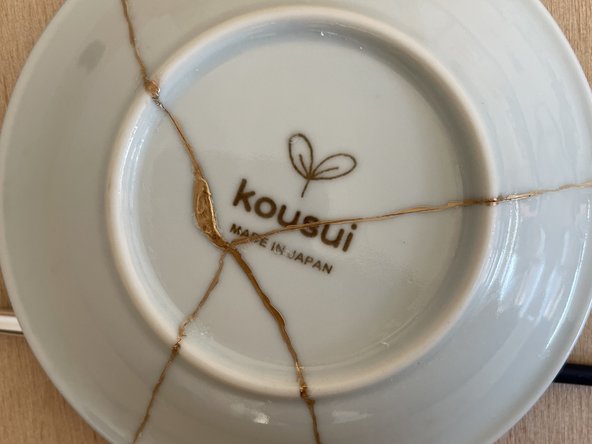
  • Image 1 &2: Front and back of the plate. The front is a thin layer of epoxy resin. Do not apply a thick coat. When applying the kintsugi, the speed is one millimeter per second.

  • Image 3: A plate with chipped rim. In this case, put epoxy resin in the chipped area, file it after it dries, and apply a thin layer of lacquer over it.

La quantità di Kintsugi da applicare dipende dalle tue preferenze. È anche possibile applicarne di più per dare un po' di spessore.

Immagini 1 e 2: fronte e retro del piatto. Il fronte è costituito da un sottile strato di resina epossidica. Non applicare uno strato spesso. Quando applichi il Kintsugi, la velocità è di un millimetro al secondo.

Immagine 3: un piatto con il bordo scheggiato. In questo caso, applica la resina epossidica nell'area scheggiata, limala dopo l'asciugatura e applica sopra un sottile strato di lacca.

crwdns2944171:0crwdnd2944171:0crwdnd2944171:0crwdnd2944171:0crwdne2944171:0