crwdns2933423:0crwdne2933423:0

Whirlpool WED87HED Trockner Heizelement testen und tauschen

crwdns2936315:0crwdne2936315:0
crwdns2936319:0crwdne2936319:0
crwdns2931653:015crwdne2931653:0
Whirlpool WED87HED Dryer Heating Element Testing and Replacement, Remove the heater housing cover: crwdns2935265:00crwdnd2935265:01crwdnd2935265:03crwdne2935265:0 Whirlpool WED87HED Dryer Heating Element Testing and Replacement, Remove the heater housing cover: crwdns2935265:00crwdnd2935265:02crwdnd2935265:03crwdne2935265:0 Whirlpool WED87HED Dryer Heating Element Testing and Replacement, Remove the heater housing cover: crwdns2935265:00crwdnd2935265:03crwdnd2935265:03crwdne2935265:0
Remove the heater housing cover
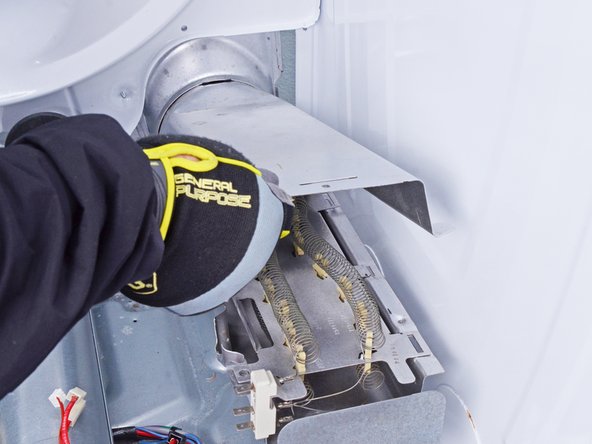
  • Put on gloves before continuing, as the heater housing cover is sharp

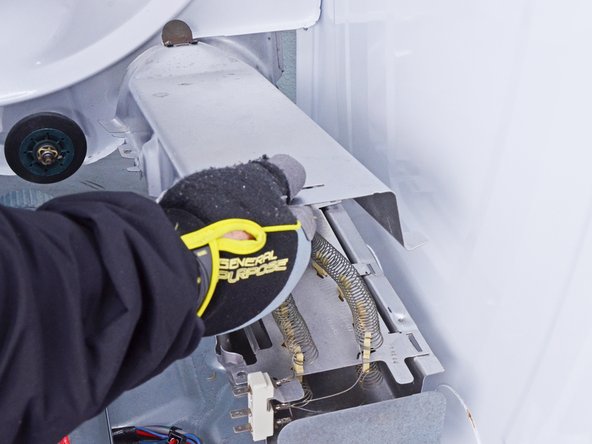
  • Lift the front of the heater housing cover to release the tabs securing it to the inlet housing pipe.

  • Make sure to lift the end of the cover well up so that you can get this tab to come free. Also the tabs on the side of the housing can stick in the slots.

  • Remove the heater housing cover.

  • During reassembly, make sure all the tabs on the cover have gone all the way through the slots on the sides of the housing and on the heating element. It will snap into place when it is correct.

Zieh dir Handschuhe an, bevor du weitermachst, da die Abdeckung des Heizgehäuses scharf ist.

Hebe die Vorderseite der Abdeckung des Heizgehäuses an, um die Laschen zu lösen, mit denen es am Ansaugrohr befestigt ist.

Achte darauf, dass du das Ende des Deckels gut anhebst, damit du die Lasche lösen kannst. Auch die Laschen an der Seite des Gehäuses können in den Schlitzen stecken bleiben.

Baue die Abdeckung des Heizgehäuses aus.

Vergewissere dich beim Wiederzusammenbau, dass alle Laschen des Deckels ganz durch die Schlitze an den Seiten des Gehäuses und des Heizelements gesteckt sind. Wenn sie richtig sitzt, rastet sie ein.

crwdns2944171:0crwdnd2944171:0crwdnd2944171:0crwdnd2944171:0crwdne2944171:0