crwdns2933423:0crwdne2933423:0

Servicio de limpieza de relojes de carruaje de cuerda

crwdns2936315:0crwdne2936315:0
crwdns2936331:0crwdne2936331:0
crwdns2931653:015crwdne2931653:0
Wind-up carriage clock Service clean, Reassembling the gear chain: crwdns2935265:00crwdnd2935265:01crwdnd2935265:03crwdne2935265:0 Wind-up carriage clock Service clean, Reassembling the gear chain: crwdns2935265:00crwdnd2935265:02crwdnd2935265:03crwdne2935265:0 Wind-up carriage clock Service clean, Reassembling the gear chain: crwdns2935265:00crwdnd2935265:03crwdnd2935265:03crwdne2935265:0
Reassembling the gear chain
  • This is the bit you thought would be nearly impossible, but it's not actually very hard.

  • With the front plate flat on the table, first replace the two minute-to-hour wheels,

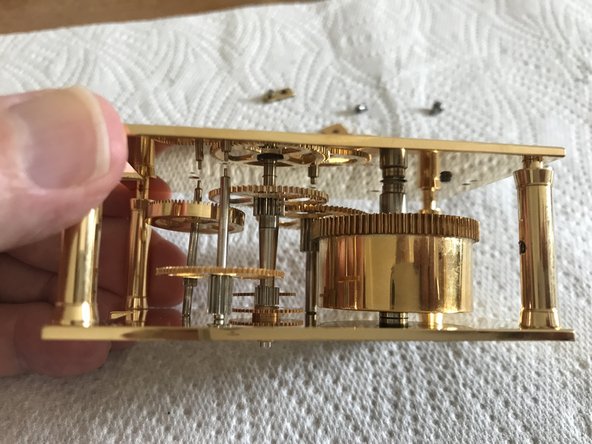
  • Referring to the photos you took earlier, insert all the arbors into their pivot holes in the reverse order to that in which you removed them.

  • To make sure everything is properly in place, check that every wheel except the contrate wheel engages with a pinion. (The astute reader will have noticed that in the photos, I had the contrate wheel and its predecessor the wrong way up. But it gave me more practice in aligning pivots with pivot holes!)

  • The square main spring winder and minute hand adjuster are taller than any of the pivots. Lower the back plate onto these and onto the four posts joining the front and back plates.

  • At this stage, none of the pivots will be lined up with its pivot holes, but with the back plate at a very slight angle, it will be resting on one of the pivots. Gently manoeuvre this into its pivot hole.

  • Repeat for each pivot in turn. Once all the pivots are in their pivot holes (double check that they indeed are) you should be able to press the back plate down onto the four pillars as far as it will go.

  • Holding the back plate firmly in place try gently spinning one of the wheels and check that all the others turn completely freely. You can now reinsert the locking pins.

Esta es la parte que pensaste que sería casi imposible, pero en realidad no es muy difícil.

Con la placa frontal plana sobre la mesa, primero vuelva a colocar las dos ruedas de minutos a horas,

Tomando como referencia las fotos que tomaste anteriormente, inserta todos los ejes en sus orificios de pivote en el orden inverso al que los quitaste.

Para asegurarse de que todo esté correctamente colocado, compruebe que todas las ruedas, excepto la de contacto, engranen con un piñón. (El lector astuto habrá notado que en las fotos, tenía la rueda de contraste y su predecesora al revés. ¡Pero me dio más práctica alinear los pivotes con sus orificios!)

El enrollador cuadrado del muelle principal y el ajustador de la manecilla de minutos son más altos que cualquiera de los pivotes. Coloque la placa trasera sobre estos y sobre los cuatro postes que unen las placas delantera y trasera.

En esta etapa, ninguno de los pivotes estará alineado con sus orificios, pero con la placa trasera ligeramente inclinada, descansará sobre uno de ellos. Introdúzcalo con cuidado en su orificio.

Repita este procedimiento para cada pivote. Una vez que todos los pivotes estén en sus orificios (verifique que estén bien colocados), debería poder presionar la placa trasera contra los cuatro pilares hasta el tope.

Sujetando firmemente la placa trasera, intente girar suavemente una de las ruedas y compruebe que las demás giran con total libertad. Ahora puede volver a insertar los pasadores de bloqueo.

crwdns2944171:0crwdnd2944171:0crwdnd2944171:0crwdnd2944171:0crwdne2944171:0