crwdns2933423:0crwdne2933423:0

Google Pixel Buds A-Series Battery Replacement

crwdns2936315:0crwdne2936315:0
crwdns2936331:0crwdne2936331:0
crwdns2931653:04crwdne2931653:0
Google Pixel Buds A-Series Battery Replacement, Reshaping and Sealing the Housing: crwdns2935265:00crwdnd2935265:01crwdnd2935265:02crwdne2935265:0 Google Pixel Buds A-Series Battery Replacement, Reshaping and Sealing the Housing: crwdns2935265:00crwdnd2935265:02crwdnd2935265:02crwdne2935265:0
Reshaping and Sealing the Housing
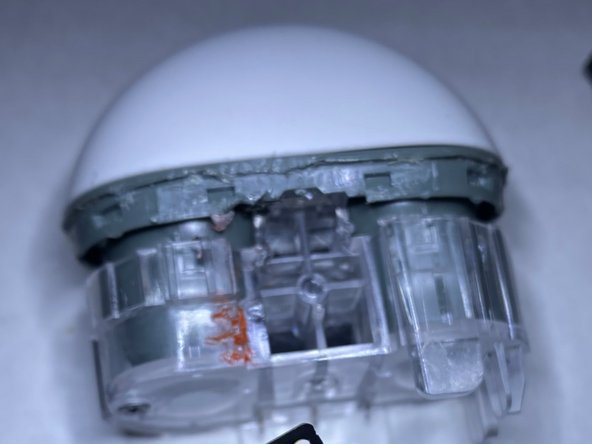
  • If you have any damage to the plastic clips on either the top or bottom half of the housing I suggest just cutting or grinding them down so that they don't catch on anything when you're reassembling the housing. I typically use a surgical scalpel and a dremel for this kind of reshaping. Scalpel is better because it does not heat the plastic.

  • We can't use tape to seal the seam again because it will bunch up and not form an even bond which means that an adhesive like E6000 or anything similar is probably going to be our best bet. Run an even bead around the seam, applying it to the top-half of the housing and making sure that you're not obscuring the LED Indicator.

  • Once your adhesive is applied, press the two halves of the housing back together being mindful of the battery wiring and all flex cables near the seam. A clamp positioned with one side on the top of the housing and the other covering the USB-C Port and/or a rubber band should be applied while the adhesive sets.

Si los clips de plástico de la mitad superior o inferior de la carcasa tienen algún daño, te sugiero que los cortes o los esmeriles para que no se enganchen en nada cuando vuelvas a montar la carcasa. Normalmente, utilizo un bisturí quirúrgico y una dremel para este tipo de remodelación. El bisturí es mejor porque no calienta el plástico.

No podemos usar cinta para sellar la costura de nuevo porque se amontonará y no formará una unión uniforme, lo que significa que un adhesivo como E6000 o algo similar probablemente será nuestra mejor opción. Coloca una capa uniforme alrededor de la costura, aplicándola en la mitad superior de la carcasa y asegurándote de no tapar el indicador LED.

Una vez aplicado el adhesivo, presiona las dos mitades de la carcasa para unirlas, teniendo cuidado con el cableado de la batería y todos los cables flexibles cerca de la costura. Se debe colocar una abrazadera con un lado en la parte superior de la carcasa y el otro cubriendo el puerto USB-C o una banda elástica mientras se fija el adhesivo.

crwdns2944171:0crwdnd2944171:0crwdnd2944171:0crwdnd2944171:0crwdne2944171:0