crwdns2933423:0crwdne2933423:0

Google Pixel Buds A-Series Akku tauschen

crwdns2936315:0crwdne2936315:0
crwdns2936319:0crwdne2936319:0
crwdns2931653:04crwdne2931653:0
Google Pixel Buds A-Series Battery Replacement, Reshaping and Sealing the Housing: crwdns2935265:00crwdnd2935265:01crwdnd2935265:02crwdne2935265:0 Google Pixel Buds A-Series Battery Replacement, Reshaping and Sealing the Housing: crwdns2935265:00crwdnd2935265:02crwdnd2935265:02crwdne2935265:0
Reshaping and Sealing the Housing
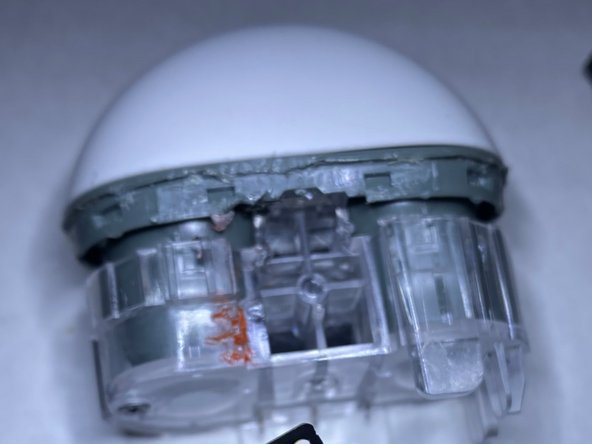
  • If you have any damage to the plastic clips on either the top or bottom half of the housing I suggest just cutting or grinding them down so that they don't catch on anything when you're reassembling the housing. I typically use a surgical scalpel and a dremel for this kind of reshaping. Scalpel is better because it does not heat the plastic.

  • We can't use tape to seal the seam again because it will bunch up and not form an even bond which means that an adhesive like E6000 or anything similar is probably going to be our best bet. Run an even bead around the seam, applying it to the top-half of the housing and making sure that you're not obscuring the LED Indicator.

  • Once your adhesive is applied, press the two halves of the housing back together being mindful of the battery wiring and all flex cables near the seam. A clamp positioned with one side on the top of the housing and the other covering the USB-C Port and/or a rubber band should be applied while the adhesive sets.

Wenn die Klammern an der oberen oder unteren Hälfte des Gehäuses beschädigt sind, empfehle ich, sie einfach abzuschneiden oder abzuschleifen, damit sie beim Zusammenbau des Gehäuses nicht hängen bleiben. Ich verwende für diese Arbeiten ein chirurgisches Skalpell und einen Dremel. Das Skalpell ist besser, weil es den Kunststoff nicht erhitzt.

Wir können kein Klebeband verwenden, um die Naht wieder abzudichten, da es keine gleichmäßige Verbindung herstellen würde. Ein Klebstoff wie E6000 ist wahrscheinlich die beste Lösung. Trage eine gleichmäßige Linie auf die obere Hälfte des Gehäuses auf und achte darauf, dass du die LED-Anzeige nicht verdeckst.

Sobald der Klebstoff aufgetragen ist, drücke die beiden Gehäusehälften wieder zusammen. Achte dabei auf die Akkuverkabelung und alle flexiblen Kabel. Während der Kleber aushärtet, sollte eine Klammer mit einer Seite auf der Oberseite des Gehäuses und der anderen Seite über dem USB-C-Anschluss und/oder ein Gummiband angebracht werden.

crwdns2944171:0crwdnd2944171:0crwdnd2944171:0crwdnd2944171:0crwdne2944171:0