crwdns2933423:0crwdne2933423:0

Instalación de BL Touch CR-10S Pro

crwdns2936315:0crwdne2936315:0
crwdns2936331:0crwdne2936331:0
crwdns2931653:05crwdne2931653:0
CR-10S Pro BL Touch Install, Top Section 2b.: crwdns2935265:00crwdnd2935265:01crwdnd2935265:03crwdne2935265:0 CR-10S Pro BL Touch Install, Top Section 2b.: crwdns2935265:00crwdnd2935265:02crwdnd2935265:03crwdne2935265:0 CR-10S Pro BL Touch Install, Top Section 2b.: crwdns2935265:00crwdnd2935265:03crwdnd2935265:03crwdne2935265:0
Top Section 2b.
  • Tighten button head screws with M2 hex. Start with the top 2 then position the bottom tab, aligning the holes to install the 3rd screw.

  • Add new zip ties to hold the cable loom in place.

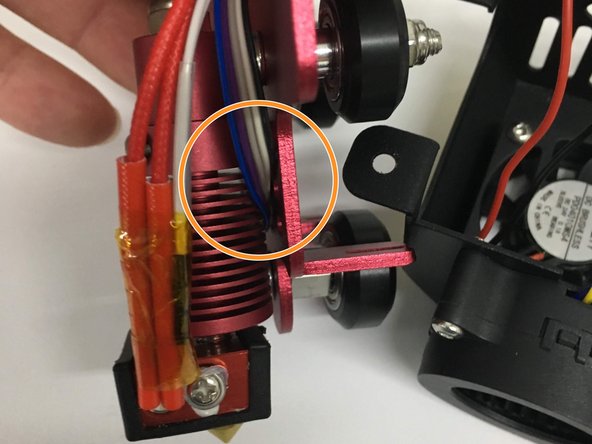
  • On the hot end/probe side, route the wires behind the hot end and plug into the probe.

  • Be sure that the probe wires are not pinched between the X carriage and probe mounting bracket.

  • Install and tighten the button head screws.

Aprieta los tornillos de cabeza semiesférica con hexagonal M2. Comienza con los 2 superiores y luego coloca la lengüeta inferior, alineando los orificios para instalar el tercer tornillo.

Agrega bridas nuevas para sujetar el mazo de cables en su lugar.

En el extremo caliente/lado de la sonda, dirige los cables detrás del extremo caliente y conéctalos a la sonda.

Asegúrate de que los cables de la sonda no queden atrapados entre el carro X y el soporte de montaje de la sonda.

Instala y aprieta los tornillos de cabeza de botón.

crwdns2944171:0crwdnd2944171:0crwdnd2944171:0crwdnd2944171:0crwdne2944171:0