crwdns2915892:0crwdne2915892:0
Learn how to replace your iPhone SE screen. This part comes with the front assembly, earpiece speaker, and EMI shield already installed, making for an easier repair.
All you need to do is remove the old screen and transfer the home button to the new screen, in order for Touch ID to function.
You can also use this guide to replace the front panel assembly cable bracket.
crwdns2942213:0crwdne2942213:0
crwdns2936621:0crwdne2936621:0
-
-
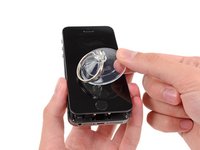
Power off your iPhone before beginning disassembly.
-
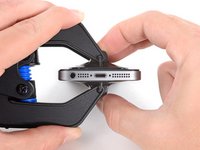
Remove the two 3.9 mm Pentalobe screws from either side of Lightning connector.
-
-
-
If your display glass is cracked, keep further breakage contained and prevent bodily harm during your repair by taping the glass.
-
Lay overlapping strips of clear packing tape over the iPhone's display until the whole face is covered.
This was the most stressful thing I have ever done. I can't get the chips to pop in the top right corner, still coming up with white lines at top of screen even after re-powering the battery. Very poor experience, will let apple or a professional handle this rather than a how to. &&^& this.
-
-
-
Regardless of the tool you use, you need to be sure you pull up the entire display.
-
If the glass begins to separate from the plastic, as shown in the first image, slide a plastic opening tool between the plastic frame and the metal phone body to pry the metal clips out of the case.
In my experience, dust particles have entered the screen, and partially ruins the wiewing experience, but this far the screen still works
-
-
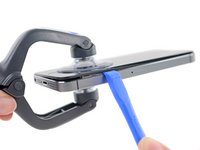
crwdns2935267:0crwdne2935267:0Clampy - Anti-Clamp$24.95
-
Pull the blue handle backwards to unlock the Anti-Clamp's arms.
-
Slide the arms over either the left or right edge of your iPhone.
-
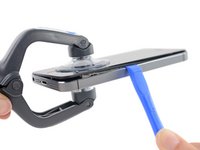
Position the suction cups near the bottom edge of the iPhone just above the home button—one on the front, and one on the back.
-
Squeeze the cups together to apply suction to the desired area.
Argh!! Beware of installing the "plastic depth gauge" properly when first using the iSclack. The depth gauge holds the bottom of the phone (near the button) and has a lip that is intended to hold the underside of the phone while the upper side (the screen assembly) can be pulled upward.. I had it backwards. The lip prevented the top surface from moving up....and my glass separated from the metal screen assembly. This being my first 5s, I didn't realize what was happening. I essentially trashed the screen assembly. !&@$!
-
-
-
Pull the blue handle forwards to lock the arms.
-
Turn the handle clockwise 360 degrees or until the cups start to stretch.
-
Insert an opening pick under the screen when the Anti-Clamp creates a large enough gap.
-
Skip the next two steps.
-
-
-
If you don't have an Anti-Clamp, use a single suction cup to lift the front panel:
-
Press a suction cup onto the screen, just above the home button.
You can also just glue the suction cup to the screen. I used some superglue and it worked perfectly.
Two cents: I’ve fixed two cracked screens with this guide, and no iSclack OR suction cup - I do have a suction cup but found it useless for the task. Personally I found the best way to get the screen up is to patiently work away along the edges with the flat end of a spudger or similar tool. I don’t bother taping the screen either; just be careful and collect all the tiny shards of glass off your work area once you get the front piece up.
-
-
-
While holding the iPhone down with one hand, pull up on the suction cup to slightly separate the home button end of the front panel from the rear case.
-
With a plastic opening tool, gently pry the edges of the rear case down, away from the front panel assembly, while you pull up with the suction cup.
-
-
-
Pull the plastic nub to release the vacuum seal on the suction cup.
-
Remove the suction cup from the screen.
-
-
crwdns2935267:0crwdne2935267:0Tweezers$4.99
-
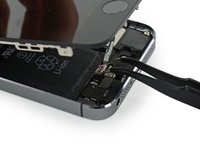
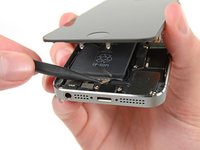
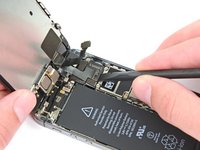
Open the phone just enough to reveal the metal bracket covering the home button cable.
-
Only the phone's original home button assembly will be capable of using the Touch ID functionality. If you rip the cable, installing a new home button will only restore ordinary home button functions, not the Touch ID features.
-
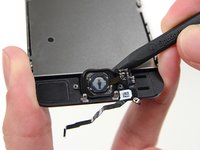
Use the tip of a spudger to push the bracket free and remove it with tweezers.
Hey, folks. For some reason my iPhone 5s looks nothing like this guide (or any other of the guides or videos I've watched). There is no cable near the home button, and there's a large metal plate/cover over the guts of the phone. The home button seems to be connected on the left side by a very short cable. (You can see a picture here: http://gyazo.com/d2b2a5055218e73c7dca6d0... )
So, I'm completely clueless as to how to proceed. Can someone help point me in the right direction, please?
Hi, nice article. I have been pondering concerning this matter, so thanks for sharing. apple phone number apple tech support number apple customer service phone number
-
-
This is the most tricky part :p
I'm not so patient, so I finally gave up and ditched the bracket. No problem so far.
👍That’s so true. It drove me bonkers!
-
-
-
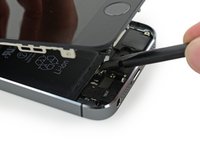
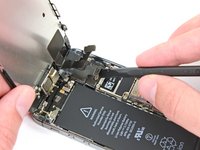
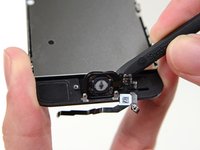
Use the tip of a spudger to pry the home button cable connector up out of its socket.
-
-
-
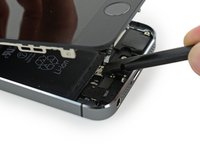
Once the connector has been released, pull the home button end of the assembly away from the rear case, using the top of the phone as a hinge.
-
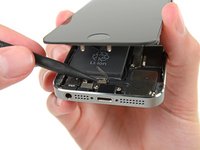
Open the display to about a 90º angle, and lean it against something to keep it propped up while you're working on the phone.
-
Add a rubber band to keep the display securely in place while you work. This prevents undue strain on the display cables.
-
-
-
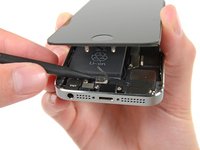
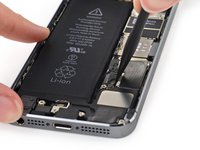
Remove the two 1.6 mm Phillips #000 screws securing the metal battery connector bracket to the logic board.
yes very frustrating - the screw driver provided does not work on these screws.
Yeah the screwdriver doesn’t work on these screws. It might make more sense to buy the proper screwdriver rather than this kit.
yes the screwdriver does not work for the battery screws.
My iPhone 5S model A1688 is not configured the same as the iPhone 5S displayed in this guide and every other guide I have gone to. There is no home button connector and there is no battery connection cover on the right side. The connection from the battery is completely different and my replacement battery I purchased does not fit. Please help.
My phone doesn't look like this at this part! I don't have that bracket, it's an iPhone5 so can't see why it should be different
-
-
-
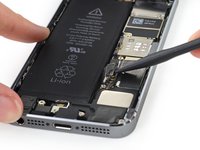
Remove the metal battery connector bracket from the iPhone.
Using the iFixit tweezers to remove the bracket caused a spark. I used the plastic spludger instead.
-
-
-
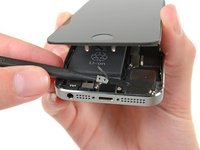
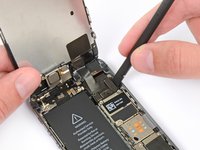
Use the flat end of a spudger to gently pry the battery connector up from its socket on the logic board.
Be really careful with the battery connector. There’s some tiny resistors on the logicboard on the side of the connecter where it is shown to prise the cable up from. I’m certain I didn’t prise on the connector as warned about in the description, yet I still managed to break one of these off. Now my phone restarts after a couple of minutes of use. I’ve bought a donor phone to use the logicboard from, and at this step I intend to prise on one of the shorter edges of the cable (the top/bottom edges when looking at the phone oriented vertically) to avoid this happening again.
Be really careful with the battery connector. There’s some tiny resistors on the logicboard on the side of the connecter where it is shown to prise the cable up from. I’m certain I didn’t prise on the connector as warned about in the description, yet I still managed to break one of these off. Now my phone restarts after a couple of minutes of use. I’ve bought a donor phone to use the logicboard from, and at this step I intend to prise on one of the shorter edges of the cable (the top/bottom edges when looking at the phone oriented vertically) to avoid this happening again.
Be really careful with the battery connector. There’s some tiny resistors on the logicboard on the side of the connecter where it is shown to prise the cable up from. I’m certain I didn’t prise on the connector as warned about in the description, yet I still managed to break one of these off. Now my phone restarts after a couple of minutes of use. I’ve bought a donor phone to use the logicboard from, and at this step I intend to prise on one of the shorter edges of the cable (the top/bottom edges when looking at the phone oriented vertically) to avoid this happening again.
Be really careful with the battery connector. There’s some tiny resistors on the logicboard on the side of the connecter where it is shown to prise the cable up from. I’m certain I didn’t prise on the connector as warned about in the description, yet I still managed to break one of these off. Now my phone restarts after a couple of minutes of use. I’ve bought a donor phone to use the logicboard from, and at this step I intend to prise on one of the shorter edges of the cable (the top/bottom edges when looking at the phone oriented vertically) to avoid this happening again.
*******************Caution**********************************************
There are 4 micro components on logic board right under socket.Pop connector out violently may cause you won’t charge after replace , your battery will stick on 1% and keep restarting again and again.One of micro components that check up battery temperature connect directly to CPU is the whole issue
林瑾毅 -
That’s true.Same problem here, Im now busy finding microscope to check up
林瑾毅 -
These Demo Pics really ought to be Directly Above the device/area of focus…
Considering the perspective of pic(s), it is entirely probable for user to uncouple, seemingly similar, ++Lightning connector cable++ directly next to Battery Connector. Just to be safe, without incurring any additional risk or time to your BATTERY Repair:
DISCONNECT BOTH CONNECTORS, IMMEDIATELY AFTER REMOVING METAL BATTERY CONNECTOR BRACKET (in previous step, #15).
The Red Text Warning in this step is a bit confusing, but it’s definitely not referring to the Lightning connector cable (directly next to Battery Connector). And if you mistakenly uncouple one and not the [batt connector] other, like I did, You’ll Most Certainly Corrupt the (FL2400) Is this what a damaged FL11 looks like on a iPhone SE?, While Attempting to Gently Pry heated (old) Battery From It’s Seat; Rendering your device’s charging capabilities Null.
-
-
-
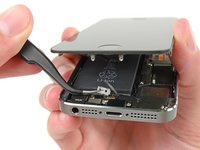
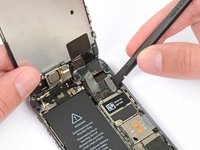
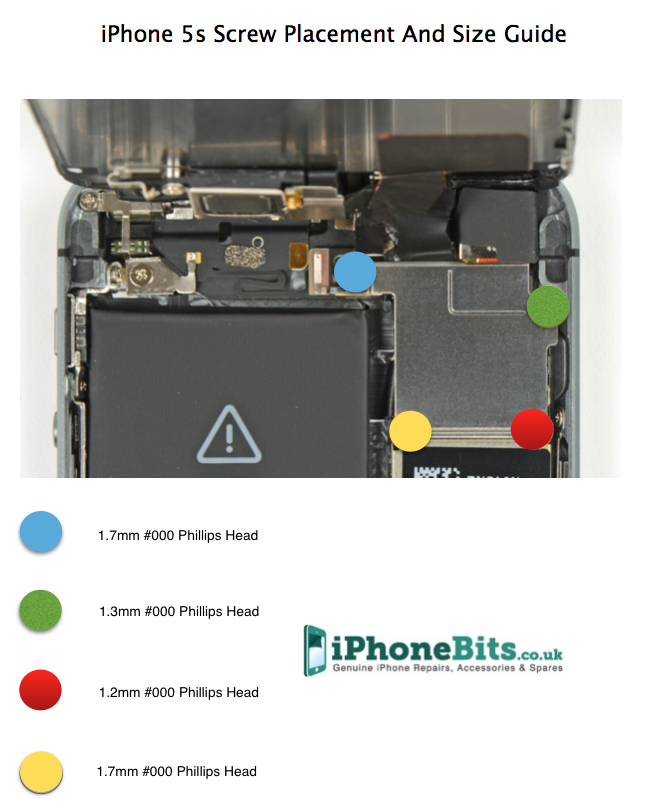
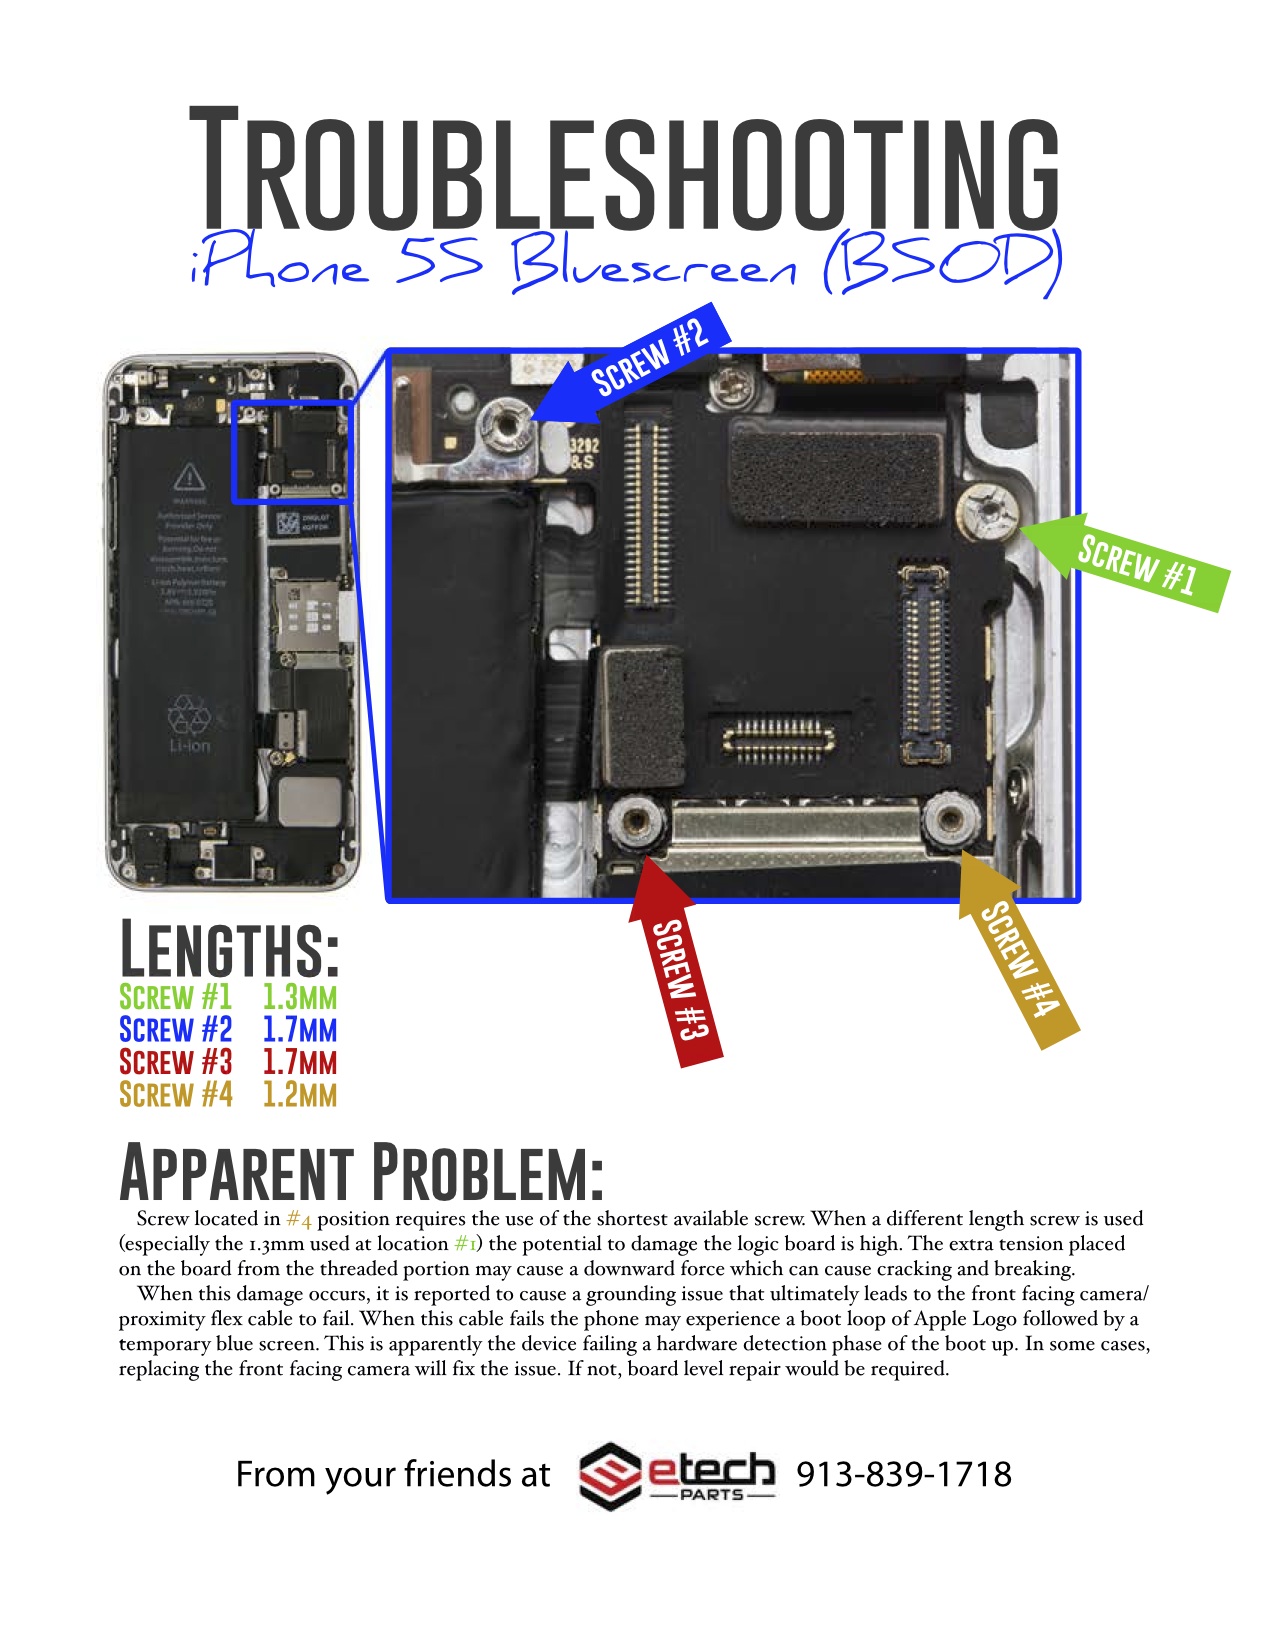
Remove the following screws securing the front panel assembly cable bracket to the logic board:
-
One 1.7 mm Phillips #000 screw
-
One 1.2 mm Phillips #000 screw
-
One 1.3 mm Phillips #000 screw
-
One more 1.7 mm Phillips #000 screw
so these are wrong?:
http://www.iphonebits.co.uk/wp-content/u...
https://blogetechparts.files.wordpress.c...
As they suggest the long screws go on the left...
Steve -
If you keep the top steady this step could be skipped. That's how I did. Everything is ok.
-
-
-
Remove the front panel assembly cable bracket from the logic board.
-
-
-
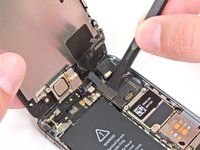
Use a spudger or a fingernail to disconnect the front-facing camera and sensor cable.
I did try the spudger (but I think I should have), because this cable was the most difficult to me. It kept flipping (not aligning with the socket) and with one hand holding the screen and the other trying to connect was very difficult .
As I didn’t have much fingernail to work with, I used a plastic card to pry up the cable
-
-
-
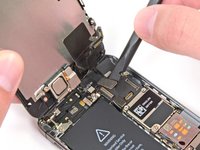
Disconnect the LCD cable connector.
Avevo già sostituito una batteria su iPhone 6 senza problemi. Ma sul SE A1723 ho avuto seri problemi. Innanzitutto si è staccato solo il vetro e non tutto il display. Dopo aver sostituito la batteria il display si accendeva ma con strisce e linne verticali. Dopo un po' di prove la situazione peggiorava fino a non vedere più lo schermo. Sentivo però che il telefono funzionava ad esempio agendo sul pulsante di accensione oppure mettendolo sotto carica udivo il suono di collegamento alla ricarica. Dopo ulteriori tentativi purtroppo non sento più nulla. Sarà successo qualcosa di irreparabile? Nel frattempo ho ordinato un nuovo display. PS durante il rimontaggio ho dimenticato di fare attenzione alle 4 viti che scoprono i cavi delle display etc. E nella concitazione ho scollegato e riattaccato gli stessi senza prima staccare la batteria. Grazie a chi può darmi consigli.
-
-
-
Finally, disconnect the digitizer cable connector.
Well... I'm not sure where I went wrong. I had a broken glass screen, so I had that replaced. Unfortunately, there wasn't any instruction about the metal plate needs to be transferred... and that threw a curveball. I lost one of those tiny screw holding the plate. However, I got it in working order and it worked great for only ... ONE DAY. When I got home, I spotted the missing screw and decided to get it back in the metal plate. Unfortunately, I accidentally ripped the home button cable... nothing beats the "oh no..." sweat perfused on my body. So I had to wait a week until I get the replacement. At last, it has arrived and I managed to get them all connected (yes, properly seated)... it's still not powering on. Even disconnected the battery cable to do the power cycle. It's STILL not powering on. Where the heck am I going wrong? Also, I noticed one of the screw was missing from the plate that covers the connectors behind the camera area (the lower left). I know I put it in before. Is that why?
Unable to disconnect this with iFixit kit tool.
I believe that you “bumped” the ribbon cable to the camera. I would open the phone back up and make sure it is making a good connection . In the picture above, the camera is the black square in the top right corner. Its connection is right below the spundger in this picture.
Annette -
I believe that you “bumped” the connection that is right below the spundger in this picture (it is a smaller connection than the one with the spundger on it and right next to the battery). Try opening the phone back up and making sure that button pad has a good connection. It is also the connection in this picture: iPhone 5s Upper Component Cable Replacement. STEP # 25.
Annette -
Check this connection: iPhone 5s Upper Component Cable Replacement. STEP #25
Annette -
-
-
-
Remove the front panel assembly from the rear case.
-
-
-
Unscrew the single captive Phillips #000 screw securing the home button cable.
Out of curiosity, what happens if the "spring contact backing" is not in the correct orientation?
I re-assembled my phone without paying any attention to this, and it seems to work OK... maybe I coincidentally got it right without trying. What would happen if the contact was facing the wrong way?
There is no *!&*^#% chance in !&&* i can get this stupid little clip back on. Hopefully the phone still works without it because after an hour of trying, I am giving up. This is ridiculous, how are you supposed to precisely position a clip this small? I fix Macs for a living but this is a joke. I’d need an ant to reassemble this crap.
-
-
-
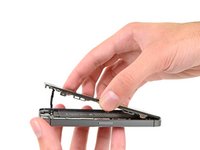
Fold the home button cable down, out of the way of the home button bracket.
-
-
-
Remove the two 1.4 mm Phillips #000 screws from the home button bracket.
-
-
-
Remove the home button bracket from the display assembly.
-
-
-
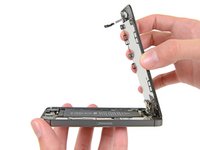
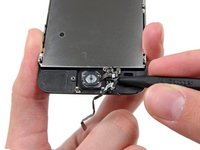
Wedge the the tip of a spudger underneath the home button cable assembly.
-
Gently work the spudger underneath the cable to separate the home button cable from the front panel assembly.
-
-
-
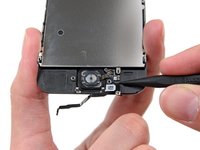
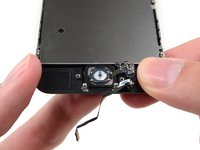
Gently push the top left corner of the home button up away from the front panel.
-
-
-
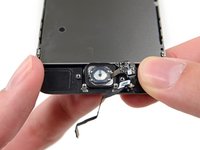
Peel the home button the rest of the way off of the display by prying gently with a spudger.
-
-
-
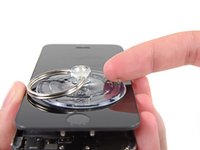
Remove the home button assembly from the front panel.
Very useful hint. I had transferred the button in the new screen when I read your comment and realized it was very dirty.
-
-
-
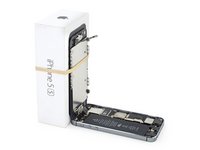
The screen remains.
I had a different issue, but similar. The ear piece speaker didn’t work, but everything else did. So I followed the instructions from the link above in “transfer the Front Facing Camera and Sensor Cable”, steps 23 - 27, to replace the speaker. Reassembled and it was good to go. Just a bad speaker from the kit I guess.
My phone is now stuck in a restart loop. Shows the apple, goes to grey screen, black screen, return. I’ve tried the hard restart (home button and power button held down at once), but that just restarts the restart loop. Now what? :(
Aaaaaaand now the screen is broken again AND I’m stuck in the boot loop. (Broke screen trying to put it back together again. When I pressed glass into place, snapped the end that wasn’t broken on my old screen.) Still boot looping. What a bummer. Help with the bootloop anyone? Not ordering another screen ‘til I know how to get the thing started again. :(
-


To reassemble your device, follow these instructions in reverse order.
To reassemble your device, follow these instructions in reverse order.
crwdns2935221:0crwdne2935221:0
crwdns2935229:0620crwdne2935229:0


crwdns2947412:011crwdne2947412:0
Worked like a charm!
One Addition:
How is the display fixed?
Maybe I overlooked it, it would be helpful to understand how the display holds in place, before the display is removed. There are litte tiny fishplates at the top of the display which fit into notches in the casing. The display then folds down like a lever, pivot point where the fishplates are and is fixed at the bottom with the pentalobe screws. The fishplates from my scattered display werde broken and flew around in the iPhone.
This guide needs better photos with adequate lighting and more closeups after initial photos, and the spudger is the same black color as the materials you’re reaching for so it is difficult to see clearly what you are doing. There is so much else wrong with this that I’m not wasting my time correcting it. Obviously, if Ifixit wanted to improve this they would. I won’t be using your guides or replacement screens any time soon. Also, the cable on the SE display I received has shmutz on it—and I can’t attach a photo or I would. I really wanted to keep the cable I have and now wonder about the quality of the display unit itself as the original cables were A) clean and B) heavier weight be far than the cheap replacements I paid Ifixit for. Never again!
Hi Jennifer!
We appreciate your feedback on our guide, but we certainly do regret the frustration this may have caused you.
If you are still experiencing issues with this display, we ask that you please contact our Customer Support team via help.ifixit.com so that they can assist you and get you all fixed up. Our replacement displays come with a Lifetime Warranty, and they would be happy to consider a replacement for you if necessary.
We hope this helps!
I think they should tell you to put the iphone into a ziplock bag when you lift the display off partially. This is when the tiny spring flew off mine and onto a piece of plastic. I might not have heard it if it hadn’t hit plastic. It’s very tiny, a few millimeters, and a very difficult part to fabricate.
Also, now the new display shows two light areas at the bottom of the screen when the black wallpaper is up.
I wish there were better parts available but I am glad to fix my phone for so cheap. I think the author meant well, but as a former technical writer for endoscope repair, you need to think like the audience more. And the audience is varied and usually not very experienced.
PH000 screw driver bit that came with the SE screen repair kit is too big for this job. PH00 is smaller and is the correct size.
Since replacing the screen on my SE, when I make a call on speakerphone (whatsapp/facetime etc), the recipient gets a loud buzzing/squealing noise and can’t hear my mic, it has also been harder to command Siri. I assume there must be a separate mic for speakerphone calls which has been affected with the screen change. Is there anything I can do?
Thanks
Rick
Followed allong the whole tutorial and everything worked except putting the touch id cover (on the logic board) back on. The home button works nevertheless. It was very hard to get the screen back into the housing, especially at the very bottom. Pushing against the side of the screen worked for me. I turned the iPhone on and everthing was working except touch. I read that some replacement screens have a little protective piece of plastic which has to be removed. One person had a message that the touch screen is not functional (I didn’t get that). I tried to diagnose the problem but I am unable to open the phone again because the new screen fits so tight.
I also forgott to mention that there are some weird bubbles under the glass.
Linus F -
Help! After replacing the screen, the phone starts as normal, but then the display turns off after a few seconds, then the phone restarts, and the display turns of again, and so on.... Has anyone experienced this? Many thanks in advance for any advice!
What are you supposed to do if the screws are stripped or won’t come out. No luck with the tweezers either.
ibrokeit - crwdns2934203:0crwdne2934203:0