crwdns2915892:0crwdne2915892:0
Use this guide to replace the rear-facing camera.
crwdns2942213:0crwdne2942213:0
crwdns2936621:0crwdne2936621:0
-
-
Power off your iPhone before beginning disassembly.
-
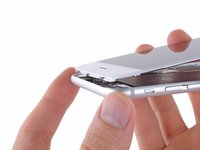
Remove the two 3.6 mm P2 Pentalobe screws next to the Lightning connector.
-
-
crwdns2935267:0crwdne2935267:0Clampy - Anti-Clamp$24.95
-
Pull the blue handle backwards to unlock the Anti-Clamp's arms.
-
Slide the arms over either the left or right edge of your iPhone.
-
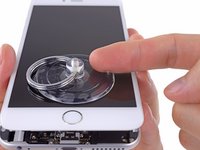
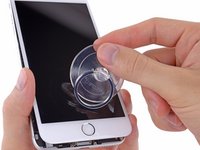
Position the suction cups near the bottom edge of the iPhone just above the home button—one on the front, and one on the back.
-
Squeeze the cups together to apply suction to the desired area.
-
-
-
Pull the blue handle forwards to lock the arms.
-
Turn the handle clockwise 360 degrees or until the cups start to stretch.
-
Insert an opening pick or tool under the screen when the Anti-Clamp creates a large enough gap.
-
Skip the next three steps.
-
-
-
Use a single suction cup to lift the front panel:
-
Press a suction cup onto the screen, just above the home button.
-
-
-
While holding the iPhone down with one hand, pull up on the suction cup to slightly separate the front panel assembly from the rear case.
-
Using a plastic opening tool, begin to gently pry the rear case down, away from the display assembly, while continuing to pull up with the suction cup.
-
-
-
Pull the plastic nub to release the vacuum seal on the suction cup.
-
Remove the suction cup from the display assembly.
-
-
-
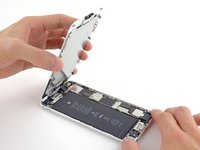
Pull the home button end of the front panel assembly away from the rear case, using the top of the phone as a hinge.
-
Open the display to about a 90º angle, and lean it against something to keep it propped up while you're working on the phone.
-
Add a rubber band to keep the display securely in place while you work. This prevents undue strain on the display cables.
-
-
-
-
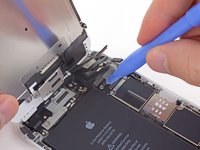
Remove the following Phillips screws from the battery connector bracket:
-
One 2.3 mm screw
-
One 3.1 mm screw
-
-
-
Remove the metal battery connector bracket from the iPhone.
-
-
-
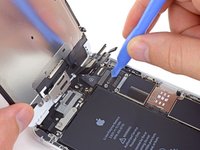
Use a clean fingernail or the edge of an opening tool to gently pry the battery connector up from its socket on the logic board.
-
-
-
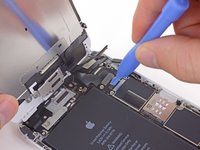
Remove the following Phillips screws securing the front panel assembly cable bracket:
-
Three 1.2 mm screws
-
One 1.5 mm screw
-
One 2.9 mm screw
-
-
-
Remove the front panel assembly cable bracket from the logic board.
-
-
-
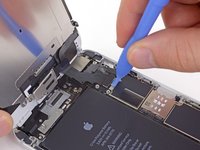
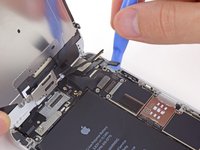
While still supporting the front panel, use a fingernail or the edge of an opening tool to disconnect the front-facing camera and earpiece speaker connector.
-
-
-
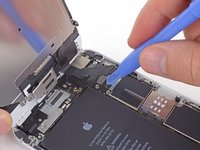
Disconnect the home button cable connector.
-
-
-
Use a plastic opening tool to disconnect the display data cable connector.
-
-
-
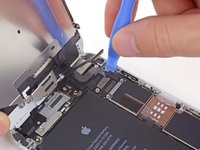
Finally, disconnect the digitizer cable connector.
-
-
-
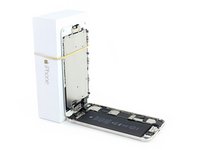
Remove the front panel assembly from the rear case.
-
-
crwdns2935267:0crwdne2935267:0Tweezers$4.99
-
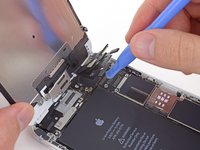
Use a pair of tweezers to peel back the piece of tape covering the hidden screw securing the rear-facing camera bracket to the rear case.
-
-
-
Remove the following screws securing the rear-facing camera bracket to the rear case:
-
One 1.7 mm Phillips #00 screw
-
One 2.3 mm Phillips #00 screw
-
-
-
Lift and remove the rear-facing camera bracket off the rear-facing camera.
-
-
-
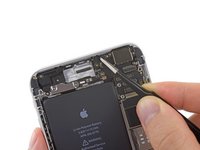
Use the flat end of a spudger to disconnect the rear-facing camera connector from its socket on the logic board.
-
-
-
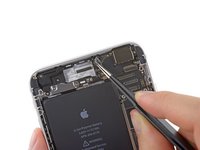
Carefully lift and remove the rear-facing camera out of the iPhone.
-


To reassemble your device, follow these instructions in reverse order.
To reassemble your device, follow these instructions in reverse order.
crwdns2935221:0crwdne2935221:0
crwdns2935229:0153crwdne2935229:0

crwdns2947412:022crwdne2947412:0
Great how-to article. I was able to follow it and fix my son's camera within an hour. Patience is key -- take your time and stay organized and you'll get through this.
Great guide, replacement worked a treat!
I liked How you explained step by step thanks
After the replacement the LCD started to freezing.
after my replacement with the ifixit camera, my camera twitches and will not focus :(