crwdns2931315:0crwdnd2931315:0crwdne2931315:0
crwdns2942213:0crwdne2942213:0
-
crwdns2935201:0crwdne2935201:0 crwdns2935203:0crwdne2935203:0
-
Power off your iPhone before beginning disassembly.
-
Remove the two 3.6 mm-long P2 Pentalobe screws next to the Lightning connector.
-
-
crwdns2935201:0crwdne2935201:0 crwdns2935203:0crwdne2935203:0
-
If your display glass is cracked, keep further breakage contained and prevent bodily harm during your repair by taping over the glass.
-
Lay overlapping strips of clear packing tape over the iPhone's display until the whole face is covered.
-
If the broken glass makes it difficult to get a suction cup to stick in the next few steps, try folding a strong piece of tape (such as duct tape) into a handle and lifting the display with that instead.
-
-
crwdns2935201:0crwdne2935201:0 crwdns2935203:0crwdne2935203:0
-
Pull the blue handle backwards to unlock the Anti-Clamp's arms.
-
Slide the arms over either the left or right edge of your iPhone.
-
Position the suction cups near the bottom edge of the iPhone just above the home button—one on the front, and one on the back.
-
Squeeze the cups together to apply suction to the desired area.
-
-
crwdns2935201:0crwdne2935201:0 crwdns2935203:0crwdne2935203:0
-
Pull the blue handle forwards to lock the arms.
-
Turn the handle clockwise 360 degrees or until the cups start to stretch.
-
Insert an opening pick under the screen when the Anti-Clamp creates a large enough gap.
-
Skip the next three steps.
-
-
crwdns2935201:0crwdne2935201:0 crwdns2935203:0crwdne2935203:0
-
If you don't have an Anti-Clamp, use a single suction cup to lift the front panel:
-
Press a suction cup onto the screen, just above the home button.
-
-
crwdns2935201:0crwdne2935201:0 crwdns2935203:0crwdne2935203:0
-
While holding the iPhone down with one hand, pull up on the suction cup to slightly separate the front panel assembly from the rear case.
-
Using a plastic opening tool, begin to gently pry the rear case down, away from the display assembly, while continuing to pull up with the suction cup.
-
-
crwdns2935201:0crwdne2935201:0 crwdns2935203:0crwdne2935203:0
-
Pull the plastic nub to release the vacuum seal on the suction cup.
-
Remove the suction cup from the display assembly.
-
-
crwdns2935201:0crwdne2935201:0 crwdns2935203:0crwdne2935203:0
-
Open the iPhone by swinging the home button end of the front panel assembly away from the rear case, using the top of the phone as a hinge.
-
-
crwdns2935201:0crwdne2935201:0 crwdns2935203:0crwdne2935203:0
-
Open the display to about a 90º angle, and lean it against something to keep it propped up while you're working on the phone.
-
Add a rubber band to keep the display securely in place while you work. This prevents undue strain on the display cables.
-
-
crwdns2935201:0crwdne2935201:0 crwdns2935203:0crwdne2935203:0
-
Remove the following Phillips screws from the battery connector bracket:
-
One 2.2 mm screw
-
One 3.2 mm screw
-
-
crwdns2935201:0crwdne2935201:0 crwdns2935203:0crwdne2935203:0
-
Remove the metal battery connector bracket from the iPhone.
-
-
crwdns2935201:0crwdne2935201:0 crwdns2935203:0crwdne2935203:0
-
Use a plastic opening tool to gently pry the battery connector up from its socket on the logic board.
-
-
crwdns2935201:0crwdne2935201:0 crwdns2935203:0crwdne2935203:0
-
Remove the following five Phillips screws securing the front panel assembly cable bracket:
-
Three 1.2 mm screws
-
One 1.7 mm screw
-
One 3.1 mm screw
-
-
-
crwdns2935201:0crwdne2935201:0 crwdns2935203:0crwdne2935203:0
-
Remove the front panel assembly cable bracket from the logic board.
-
-
crwdns2935201:0crwdne2935201:0 crwdns2935203:0crwdne2935203:0
-
Use a spudger or a fingernail to disconnect the front-facing camera and sensor cable connector.
-
-
crwdns2935201:0crwdne2935201:0 crwdns2935203:0crwdne2935203:0
-
Use a spudger or a fingernail to disconnect the home button cable connector.
-
-
crwdns2935201:0crwdne2935201:0 crwdns2935203:0crwdne2935203:0
-
Use a spudger or a fingernail to disconnect the display data cable connector.
-
-
crwdns2935201:0crwdne2935201:0 crwdns2935203:0crwdne2935203:0
-
Use the flat end of a spudger to disconnect the digitizer cable connector.
-
-
crwdns2935201:0crwdne2935201:0 crwdns2935203:0crwdne2935203:0
-
Remove the front panel assembly from the rear case.
-
-
crwdns2935201:0crwdne2935201:0 crwdns2935203:0crwdne2935203:0
-
Remove the following Phillips screws from the earpiece speaker/front-facing camera bracket:
-
One 2.3 mm screw
-
One 3.0 mm screw
-
One 2.2 mm screw
-
-
crwdns2935201:0crwdne2935201:0 crwdns2935203:0crwdne2935203:0
-
Remove the earpiece speaker/front-facing camera bracket from the front panel.
-
-
crwdns2935201:0crwdne2935201:0 crwdns2935203:0crwdne2935203:0
-
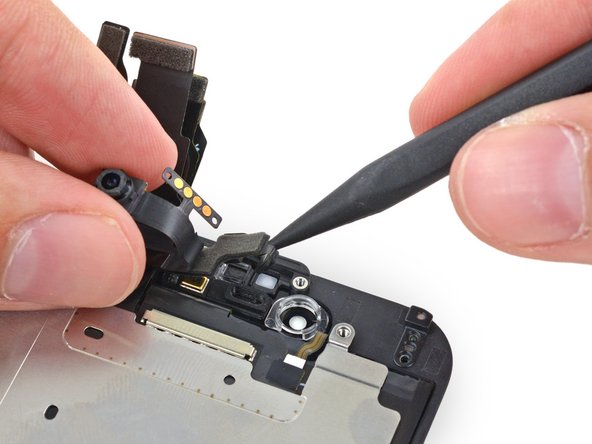
Lift the front-facing camera out of its recess in the front panel.
-
-
crwdns2935201:0crwdne2935201:0 crwdns2935203:0crwdne2935203:0
-
Holding the front-facing camera out of the way, remove the earpiece speaker from the front panel.
-
-
crwdns2935201:0crwdne2935201:0 crwdns2935203:0crwdne2935203:0
-
Keeping the front-facing camera out of the way, use the point of a spudger to push the ambient-light sensor up out of its recess in the front panel.
-
-
crwdns2935201:0crwdne2935201:0 crwdns2935203:0crwdne2935203:0
-
Fold the front-facing camera and sensor cable up to allow access to the microphone.
-
-
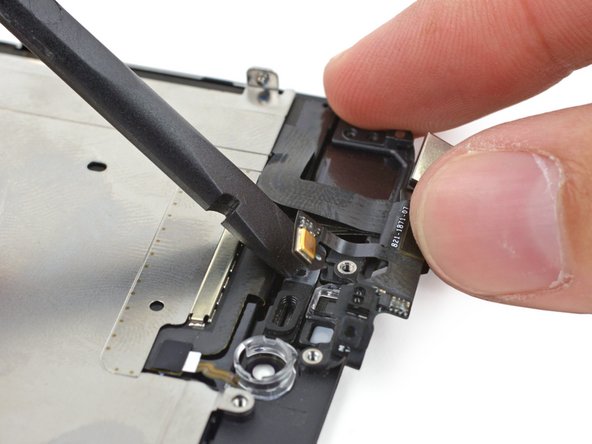
crwdns2935201:0crwdne2935201:0 crwdns2935203:0crwdne2935203:0
-
Carefully pry the microphone end of the sensor cable off of the adhesive holding it to the front panel.
-
-
crwdns2935201:0crwdne2935201:0 crwdns2935203:0crwdne2935203:0
-
Remove the front-facing camera and sensor cable from the front panel.
-
-
crwdns2935201:0crwdne2935201:0 crwdns2935203:0crwdne2935203:0
-
Remove the two 1.9 mm Phillips screws securing the home button bracket.
-
-
crwdns2935201:0crwdne2935201:0 crwdns2935203:0crwdne2935203:0
-
Remove the home button bracket from the front panel.
-
-
crwdns2935201:0crwdne2935201:0 crwdns2935203:0crwdne2935203:0
-
Use the point of a spudger to disconnect the home button cable connector by pushing it up and away from the home button.
-
-
crwdns2935201:0crwdne2935201:0 crwdns2935203:0crwdne2935203:0
-
Apply mild heat (with an iOpener, heat gun, or hair dryer) to soften the adhesive securing the home button membrane.
-
Using your fingertip, apply firm, constant pressure on the home button from the front side of the display assembly, until the membrane starts to separate from the front panel.
-
-
crwdns2935201:0crwdne2935201:0 crwdns2935203:0crwdne2935203:0
-
Peel the home button the rest of the way off of the display by prying gently with a spudger.
-
-
crwdns2935201:0crwdne2935201:0 crwdns2935203:0crwdne2935203:0
-
Use the point of a spudger to carefully separate the home button cable from the adhesive securing it to the front panel.
-
-
crwdns2935201:0crwdne2935201:0 crwdns2935203:0crwdne2935203:0
-
Once all the adhesive has been separated, remove the home button from the front panel.
-
-
crwdns2935201:0crwdne2935201:0 crwdns2935203:0crwdne2935203:0
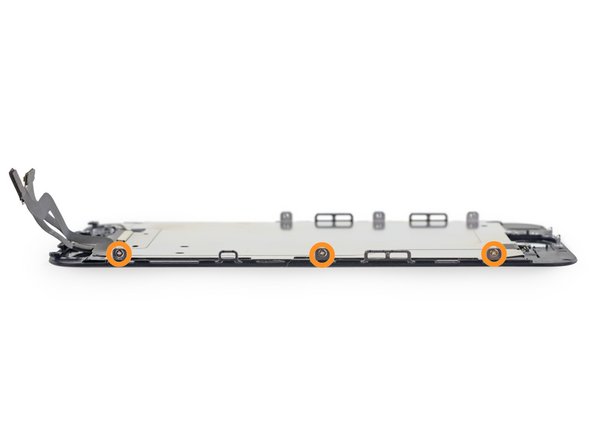
-
Remove the following Phillips #00 screws securing the LCD shield plate to the front panel:
-
One 1.7 mm screw
-
Six 1.6 mm screws (three on each side)
-
-
crwdns2935201:0crwdne2935201:0 crwdns2935203:0crwdne2935203:0
-
Lift the front-facing camera end of the LCD shield plate up slightly.
-
-
crwdns2935201:0crwdne2935201:0 crwdns2935203:0crwdne2935203:0
-
Slide the point of a spudger behind the shield plate to gently peel the home button cable up off of the front panel.
-
Remove the LCD shield plate.
-


crwdns2935221:0crwdne2935221:0
crwdns2935229:01212crwdne2935229:0


crwdns2944067:0123crwdne2944067:0
Did this replacement and the finger scaner stop working. I didnt damge anything im a experienced technician the button still worked but the finger print doest work. I thought the firmware was corrupted and I updated the phone. It now shows an error and can not be restore to normal functionality, its stuck in restore mode . I had to reassemble the phone and set it to pay and paid a fee for a new one.
Wow man, i'm sorry to hear that.. Hate that kinda things.
I have same issue , i tried many time to restore the phone after Touch ID failed , but restore cant be completed because of error #53 ,
Same problem! Same backround! Need help :/
mmummler -
Is there any more reason to disconnect the battery on the 6 than any previous iPhone? I've repaired countless 5,5c and 5S without disconnecting the battery. Never a problem.