
iPhone 5 Logic Board Replacement
crwdns2944107:0crwdnd2944107:0Andrew Optimus Goldheartcrwdnd2944107:0crwdnd2944107:0crwdnd2944107:09crwdnd2944107:0crwdne2944107:0
crwdns2944111:0Dzi 4, 2025crwdne2944111:0
crwdns2915892:0crwdne2915892:0
crwdns2942287:0crwdne2942287:0Resurrect your iPhone 5 with a new logic board.
crwdns2942213:0crwdne2942213:0
crwdns2943213:0crwdne2943213:0
crwdns2943215:0crwdne2943215:0


crwdns2944105:0crwdne2944105:0

-
-
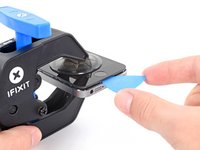
Lay overlapping strips of clear packing tape over the iPhone's display until the whole face is covered.
-
-
-
Power off your iPhone before beginning disassembly.
-
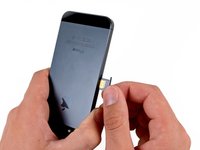
Remove the two 3.6 mm Pentalobe screws next to the Lightning connector.
-
-
-
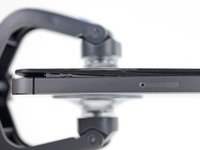
Regardless of the tool you use, you need to be sure you pull up the entire display.
-
If the glass begins to separate from the plastic, as shown in the first image, slide a plastic opening tool between the plastic frame and the metal phone body to pry the metal clips out of the case.
-
-
crwdns2935267:0crwdne2935267:0Clampy - Anti-Clamp$24.95
-
Pull the blue handle backwards to unlock the Anti-Clamp's arms.
-
Slide the arms over either the left or right edge of your iPhone.
-
Position the suction cups near the bottom edge of the iPhone just above the home button—one on the front, and one on the back.
-
Squeeze the cups together to apply suction to the desired area.
-
-
-
Pull the blue handle forwards to lock the arms.
-
Turn the handle clockwise 360 degrees or until the cups start to stretch.
-
Insert an opening pick under the screen when the Anti-Clamp creates a large enough gap.
-
Skip the next two steps.
-
-
-
Press a suction cup onto the screen, just above the home button.
-
-
-
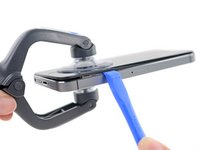
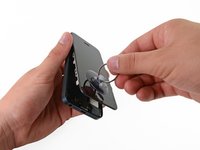
While holding the iPhone down with one hand, pull up on the suction cup to slightly separate the front panel assembly from the rear case.
-
With a plastic opening tool, begin to gently pry the rear case down, away from the screen, while you pull up with the suction cup.
-
-
-
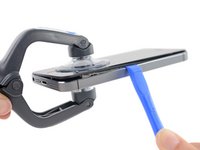
Continue to pry up around the sides of the front panel assembly, detaching the clips along the left and right side.
-
-
-
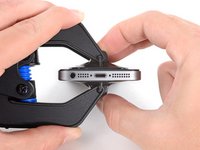
Once the clips have been released on the bottom and sides of the front panel assembly, pull the bottom of the assembly away from the rear case.
-
Open the display to about a 90º angle, and lean it against something to keep it propped up while you're working on the phone.
-
Add a rubber band to keep the display securely in place while you work. This prevents undue strain on the display cables.
-
-
-
Remove the following two screws securing the metal battery connector bracket to the logic board:
-
One 1.8 mm Phillips screw
-
One 1.6 mm Phillips screw
-
-
-
Remove the metal battery connector bracket from the iPhone.
-
-
-
Use a plastic opening tool to gently pry the battery connector up from its socket on the logic board.
-
-
-
Remove the following screws securing the front panel assembly cable bracket to the logic board:
-
Two 1.2 mm Phillips screws
-
One 1.6 mm Phillips screw
Anyone have any idea why the 1.6mm screw is not magnetic? Just wondering why this screw seems to be made of aluminum, its the first screw of its kind as far as iphones go.
The compass is right next to it.
Tom Chai -
I'd recommend if they made that clearer in the guide, luckily I put them back in right, its the one with the little bit of blue on it if i recall that isn't magnetic
Matt -
is it necessary to disconnect the front panel assembly cables fore removing the battery ?
or can you leave it on wile replacing the battery ?
I just finished this process using the battery replacement kit from ifixit and it went easily. I did NOT remove the entire screen but rather just had someone hold it at less than a 90 degree angle until I got the battery out. I found it took a while to slowly pry the battery out. Take your time and alternate between gently using the plastic tool and pulling on the plastic pull tab that says "for authorized use only" or something like that. It was MUCH easier than disconnecting the entire screen for the process. Hope this helps.
david -
Rule #1 on electronics repair methodology: to prevent damage to the electronics, power should be the first thing to be removed and the last to be restored. I'd disconnect the battery before touching anything else, a slip of the screwdriver or a loose screw could cause a fatal short circuit.
It's no need to remove front panel to change battery. I just skip to Step 10 and successfully changed battery, and it works well. And THANKS TO ifixit.com, IT IS AWESOME!
I skipped steps 6-9. leaving the screen attached to the phone makes it that much easier and quicker to repair
Mon téléphone a pris l'humidité et présente un fond d'écran d'aspect granuleux. Du coup l'éclairage n'est plus uniforme, nuisible pour une bonne lecture de l'écran.
J'ai démonté l'écran, une pellicule grasse et collante entre le LCD et la plaque métallique. J'ai nettoyé à l'alcool. Tout remonter avec la crainte que le téléphone ne fonctionne plus.
Le téléphone s'est rallumé, tout fonctionne normalement mais j'ai toujours ses traces sur le fond d'écran. Il faut le changer!
Mes difficultés étaient de remettre les petites vis aimantés, difficiles à remettre!
Merci à IFIXIT pour ce tutoriel très explicite.
Patrick Rosa, june 23 2014
So, of COURSE I dropped the screw that you are not supposed to lose. I was being careful, but as I did not want to lose track of it, I attempted to put it back ing the phone FIRST. Bad idea. This makes the plate kind of springy, and my screwdirver slipped, and the screw popped up, spun in the air, fell between my legs, bounced off my padded chair, and clattered around on the floor. I searched for an hour, and could not locate it. BE IT KNOWN, at least in MY CASE, the screw WAS INDEED attracted to my magnet (I keep a powerful round magnet stuck to the shaft of my drivers to provite the magnetism, far more powerful than a regular magnetic screwdriver. This being the case, I WAS able to provide a substitute fron a bag of iphone 4 screws, and my compass calibrated flawlessly upon power-up. YOUR MILEAGE MAY VARY, but I thought I'd add my experience.
Be warned, the 1.6mm screw is exceptionally easy to strip. I haven't been able to get it out yet (already tried rubber band trick and a few others) and am on the verge of giving up. The #00 screwdriver that comes with the set did not do a very good job of catching.
Were you ever able to get it out? Mine seemed stripped from the get go, rendering my attempt to troubleshoot my blank screen fruitless. Rubber band, glue, flat-head all did not work for me. Buying a soldering iron tomorrow to try that.
I did the repair without disconnecting the screen. I skipped down to step 13 and carefully held the screen while removing the battery. Adds a small element difficulty, but helps prevent all the issues others are having when reconnecting the screen.
The non-magnetized screw was very difficult to install. This is how I ultimately succeeded:
Install the two magnetized screws first. They are easy because the magnetized screws will stick to then end of the screwdriver. They will hold the cable bracket in place.
Place the third, non-magnetized, screw on the center of the cable bracket. Take a toothpick and nudge the screw toward the screw hole. The threaded part of the screw (the shaft) has enough weight that it will fall into the hole, and the head of the screw will be pointed upward. You will then be able to use the screwdriver.
Put a piece of tape on the table sticky side up. Set the screw on the tape head down. lift the tape and guide the screw in place. drive the head of your screw driver through the tape and tighten screw. lift off tape. throw away. :)
rdgentry -
The tape trick works well. Another way is to dip the screwdriver in alcohol (isopropanol, do NOT use water) and put the screw on its tip. It will be held there until the liquid is evaporated, which should be sufficient to put it in place.
Kater_S -
One of the screw is completely stuck and I cannot remove it! What can I do?
When putting it back together, I replugged in all three of the ribbon cables and powered on the phone to test before putting everything back together. All was OK except for the Home button, it had no effect when pressed. I ended up unplugging and replugging the 3 ribbon cables a few times and retrying. I then cleaned the connectors using a can of compressed air, screwed the little silver cover back on and snapped the whole phone back together, hoping everything would be fine. It was. I don't know if the problem was a dirty connector, or if you need to close the phone to make the home button work again.
I recommend wiping the plastic prying tool after lifting the screen off, it gets dirty from the gunk build up and some of that could eventually fall inside the phone.
My battery was really stuck, so much that the plastic tab broke when pulling. I followed someones advice to heat the back of the phone with a hair dryer, still wasn't super easy but I managed to get the battery out, only deforming it slightly.
The contacts for the home button are on the phone base so the screen needs to be in place for the button to work..
Step 9-12 are totally unnecessary unless you need to replace a broken screen. All you need is to keep the front panel in a vertical position once the front is open. The battery can be removed without taken out the 3 connectors which by the way the screws are very very tiny and difficult to put back.
I completely agree. These are unnecessary steps. Might be a little easier to pry the battery out with the display completely off, but not enough to make it worthwhile IMHO.
Is the 1.2mm a #000 or #0000? I have a small set and can't get one of these out. The instructions say a 1.2mm, the tools list shows #000, but my set says #000 = 1.5mm.
1.2 mm refers to the length of the screw (from head to end), the screw head size is compatible with a Phillips #000 driver. So as long as you have a #000 you should be set! Good luck =)
Invest in and use some colored Sharpie Pens... I color the tops of the screws orange and red etc. to match the colors of the circles in this guide. Then when I go to put them back in there's no doubt as to which screw is the correct size.
What an idea, lol.
frustrated...screws to battery holder is stripped, now what?
Maybe a small amount of loctite. I noticed the P2 screws holding the display down had a small amount on my iPhone 5.
Como se ha comentado más arriba, no es necesario desmontar la pantalla, yo he sustituido la batería aplicando calor con el iOpener y siguiendo atentamente la guía. Resultado óptimo.
Yes, right! I, too, do not see the need to remove the LCD display at all; except, when one is replacing a broken display. The battery is ready for replacement once you had removed its bracket.
I found that it wasn't at all necessary to remove the front glass. I did need to use a hair dryer to soften the glue holding the battery, but I simply laid the phone down on the face glass and blew the hot dryer on the back for a couple of minutes at almost point blank range. Then I simply held the phone open with one hand, making sure the front glass never went back more than about 80 degrees (no need to stretch it all the way to 90 degrees), and used my other hand to work the spudger around the battery, making sure not to touch any delicate electronics in the area. The top right corner gave away first and then I worked it down from there and the battery came out pretty easily. The trick is to use the hair dryer for a few minutes beyond the phone being too hot to hold in your hand! (you might need to use a towel to pick it up when you pry the battery out.)
The battery of my 2012 iPhone 5 was working well but started to inflate pushing the front panel assembly out from the case. Replacing is faster and easier than on iPhone 5s. No need to remove the front panel completely, just holdig it at near 90º is enough but needed to warm the case to soften the battery glue. Thanks to iFixit for this guides and you guys for your comments.
As other people already indicated, steps 13 to 16 are not needed and risky. I asked another person to hold the front panel at 70 degrees while changing the battery.
I rushed in and did steps 13 to 16 without reading the warning. There were some unexpected events that happen. The short version of this story is my screen comes up with funny looking grey squares but phone is still usable. I don’t care as my main phone is an iPhone SE and I bought the battery as a learning exercise. Plus iOS 11 doesn’t install on an iPhone 5 so it’s days are numbered as a productivity tool.
Long version. Dissemble was easy. I made sure I had used the phone so the battery was warmed up . First problem with reassembly is in step 13 the bottom most 1.2mm wasn’t biting and screwing in. So it looked like the top of the hole got threaded. Also a screw fell out of what I think is the loud speaker. That was unexpected. This iPhone 5 isn’t my original, it was a replacement phone that came in a white phone that the Apple Store gave me when my original phone from 2012 had 2 recalls on it. So I strongly suspect this is a factory refurbished phone and not 100% mint off the line.
I found I didn’t need to remove the front panel at all so I skipped this step 13 through step 16. These steps seem to add potential problems.
Incredibly helpful tips & comments. Very grateful, thanks!
-
-
-
Lift the display cable bracket toward the battery to unhook it, and remove it from the iPhone.
-
-
-
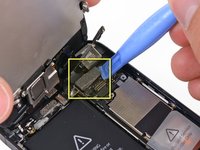
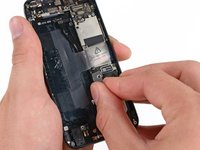
Use a plastic opening tool or a fingernail to disconnect the three front panel assembly cables:
-
Front-facing camera and sensor cable
-
LCD cable
-
Digitizer cable
-
-
-
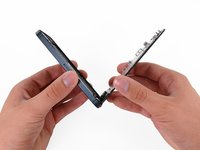
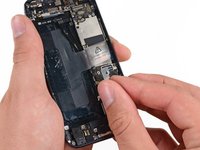
Remove the front panel assembly from the rear case.
-
-
-
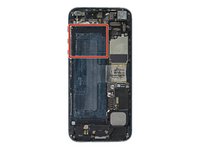
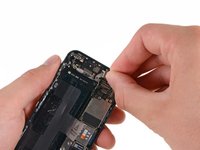
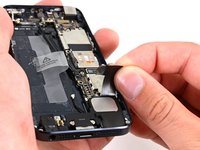
Use the exposed clear plastic pull tab to peel the battery off the adhesive securing it to the iPhone.
-
Wait about one minute for the alcohol solution to weaken the adhesive. Use an opening tool to gently lift the battery by its edge.
-
-
-
Do not pry at the top portion of the battery, you risk severing the volume control cables.
-
-
-
Remove the battery.
-
Adhere the battery, disconnect it, and continue reassembling your device.
-
-
-
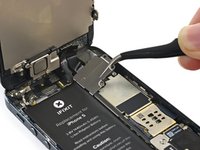
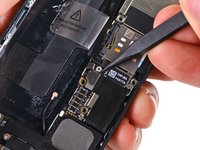
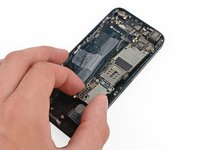
Use the tip of a spudger to pry the cellular data antenna cable connector up from its socket on the logic board, just above the speaker enclosure.
-
-
-
Remove the following two screws securing the top logic board bracket to the rear case:
-
One 1.5 mm Phillips screw
-
One 2.3 mm Phillips screw
-
-
-
Remove the bracket from the top of the logic board.
-
-
-
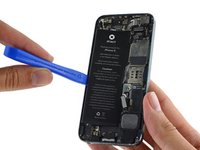
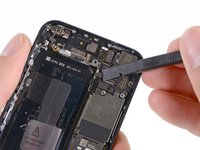
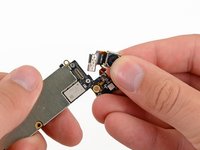
Use the flat end of a spudger to disconnect the following three cables from the logic board:
-
Upper interconnect cable
-
Button assembly cable
-
Lower interconnect cable
-
-
-
Remove the two 1.3 mm Phillips screws from the inner top of the rear case.
-
-
-
Remove the single 1.2 mm Phillips screw remaining in the mid-section logic board bracket.
-
-
-
Remove the mid-section bracket from the logic board.
-
-
-
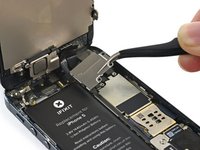
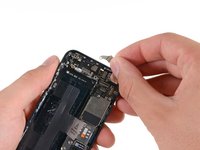
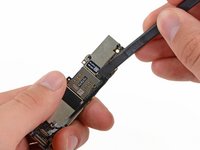
Use a spudger to pry the Lightning connector cable connector up from its socket on the logic board.
-
Gently peel the cable back and out of the way of the logic board.
-
-
-
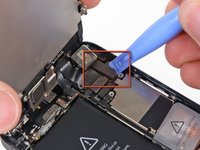
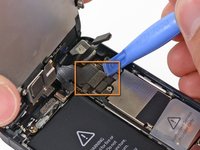
Depress the SIM card release on the right side of the iPhone with a SIM card eject tool or a bent paperclip to eject the SIM card tray.
-
Remove the SIM card tray from the iPhone.
-
-
crwdns2935267:0crwdne2935267:0Standoff Screwdriver for iPhones$5.49
-
Remove the following screws securing the logic board to the rear case:
-
Two 2.3 mm Phillips screws
-
Two 2.7 mm standoff screws
-
One non-magnetic 2.7 mm standoff screw
-
-
crwdns2935267:0crwdne2935267:0Tweezers$4.99
-
Rotate the logic board assembly toward the battery side of the rear case.
-
The flash surround is adhered to the flash unit and the rear case. If it stays on the rear case remove with tweezers and mount it back on the flash unit.
-
Note: when reassembling your device, be sure that the lower interconnect cable is not tucked underneath the logic board.
-
-
-
Use the tip of a spudger to pry the Wi-Fi antenna cable connector up from its socket on the underside of the logic board.
-
-
-
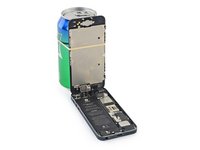
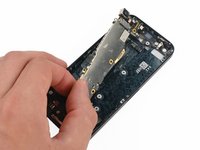
Remove the logic board assembly from the rear case.
-
While your logic board is out of your phone, keep it on a grounded anti-static mat to prevent any damage to the circuitry.
-
-
-
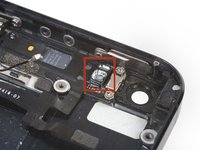
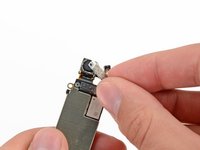
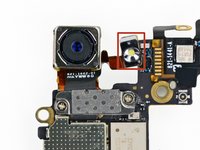
Remove two 1.1 mm Phillips screws securing the rear-facing camera bracket to the logic board.
-
-
-
Remove the rear-facing camera bracket from the logic board.
-
-
-
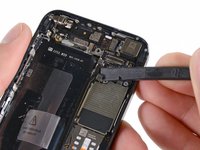
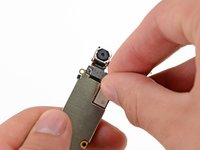
Use the flat end of a spudger to disconnect the rear-facing camera cable from its socket on the logic board.
-
-
-
Remove the rear-facing camera from the logic board.
-
Your replacement part may not come with the flash surround—if not, remove it from the old camera and transfer it to your replacement.
-
-
-
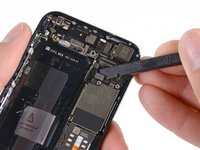
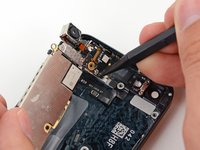
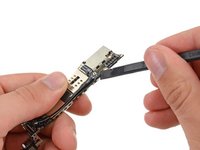
Use the flat end of a spudger to disconnect the bottoms of the interconnect cables from their sockets on the logic board.
-
-
-
Remove the two interconnect cables from the logic board.
-


To reassemble your device, follow these instructions in reverse order.
To reassemble your device, follow these instructions in reverse order.
crwdns2935221:0crwdne2935221:0
crwdns2935229:0207crwdne2935229:0
crwdns2947821:0crwdne2947821:0
crwdns2947823:0crwdne2947823:0


crwdns2947412:024crwdne2947412:0
Is it possible to switch my iphone 5 motherboard to a iphone5s motherboard?
No it isn't, the boards are different sizes.
Is it ok to switch my iphone 5 motherboard to a iphone 5s motherboard?
Is replacing the logic board a sensible way to add memory - i.e. would it make sense to swap a 64GB logic board into my 16GB iPhone 5? (I have been nursing this phone along for a while now but the low memory is getting to be a problem!)
Yes, that’s the best way to do it. It’s possible to unsolder the flash storage from the current motherboard and install a new one, but that’s much more difficult.
My phone is on activation lock by changing the motherboard can i unlock it?
Sorry, but that is not possible without knowing the iCloud mail and password of the person who configured activation lock on that phone.
Andrzej, i think you missed the point of the question. He wants to swap the boards to get rid of the activation lock. And yes, Amit, that is the only way to do it without the icloud info.
My phone is on activation lock can changing the motherboard can unlock this activation screen?
Yes it can. This is the only way to do it.
Does changing the logicboard fix a baseband problem? Phone can't be restored :(
Is it possible to change the hard drive (storage size) of an iphone into another?
I have an iPhone 5 64GB
I have an iPhone 5S 16GB
I would like to take the 64GB storage space off the iPhone 5 and place it into the iPhone 5S, upgrading & rendering the iPhone 5S into an iPhone 5S 64GB.
Is this possible?? If so, please provide me with instructions or how to website/video to do so.
Thank you Apple friends
No it is not the memory is soldered to the logic board
joe dzn -
it is possible to un-solder it, but it is extremely hard.
For everyone asking. Putting a new logic board into an iphone means you will no longer have an activation lock. icloud recognizes a phone based on the logic board, so replacing it does the trick. Unfortunately the old logic board will always be locked even if you put it into a new iphone. So yeah, the cheapest way to be able to use an icloud locked iphone is replacing the logic board (assuming the new logic board did not come from another icloud locked iphone).
Yes, putting a new logic board will let you use an icloud locked phone. You just can’t use the old logic board on a new phone since it will say it’s icloud locked.
Just replaced a “No SIM” logic board with an old iPhone 5 logic board. This worked great, took maybe 1.5 hours. As a note, print out all the pages and use the picture/page to put the screws and parts on so it’s obvious which screws come from/go where.
Hi Guys,
I have two Iphone 5’s at home.
One belongs to my mother and the other belongs to my aunt.
Both are not being used as they have all upgraded since and we want to give one to my younger sister.
My Aunts one is locked to her Itunes account and cant remember her password, the other is in bad shape but still works.
If I dissemble both could i essentially swap out my aunts locked iphone internals and replace with my mothers unlocked internals?
If so which parts are key to the swap?
Any help would be greatly appreciated! :)
Absolutely you can swap parts, the mainboard is the key part you have to change.
r3nzor -
Well Thank you VERY much i have just swapped the logic board on my I phone 5 with that in another ip5 which was locked beyond my redemption.
The other Ip5 is in much better (less) used condition. I had done a hard reset as a precaution (turned them off via the top on/off switch) from the beginning on BOTH . Having put my old logic board in the new ip5 and checked everything out . When i turned it on everything came up as though nothing had changed (what you might expect really) .
All i can say THANKS Again
How can you tell if you need to change the logic board ?
will I have to get a new home button for my iPhone 5 or iPhone 5s, I’m doing both and somebody mention the home button isn’t gonna work after I do
Does anyone know what the two protruding parts on top of the logicboard do? The outer one got broken in my replacement part, and I don't know if it will affect anything.
Hello good afternoon if I replace the motherboard will it delete the Lock Screen home and will remove the iCloud can i connect my phones to different company services thank you