crwdns2933423:0crwdne2933423:0
crwdns2947577:0crwdnd2947577:0crwdne2947577:0
iMac Intel 27" EMC 2639 Fan Replacement

iMac Intel 27" EMC 2639 Fan Replacement

Walter Galan

crwdns2944107:0crwdnd2944107:0Walter Galancrwdnd2944107:0crwdnd2944107:0crwdnd2944107:02crwdnd2944107:0crwdne2944107:0

crwdns2944111:0Nhl 22, 2025crwdne2944111:0

crwdns2931273:0crwdne2931273:0
crwdns2937801:0crwdne2937801:0

crwdns2915892:0crwdne2915892:0

crwdns2942287:0crwdne2942287:0

Replace a broken or noisy fan in your iMac.

Before beginning any work on your iMac: Unplug the computer and press and hold the power button for ten seconds to discharge the power supply's capacitors.

Be very careful not to touch the capacitor leads or any exposed solder joints on the back of the power supply.

crwdns2942213:0crwdne2942213:0

crwdns2943213:0crwdne2943213:0

crwdns2943215:0crwdne2943215:0

crwdns2944105:0crwdne2944105:0

  1. iMac Intel 27" EMC 2639 Fan Replacement, Display: crwdns2935265:01crwdnd2935265:01crwdnd2935265:01crwdne2935265:0
    crwdns2935267:0crwdne2935267:0
    iMac Intel 27" Cardboard Service Wedge
    $4.99
    • With the hinge free to move, the iMac will be unbalanced and hard to work on. Repairs can be completed with the iMac laying down, but are faster and easier with an iMac service wedge.

    • If you are using the iFixit cardboard service wedge, follow these assembly directions to put it together.

  2. iMac Intel 27" EMC 2639 Fan Replacement: crwdns2935265:02crwdnd2935265:01crwdnd2935265:03crwdne2935265:0 iMac Intel 27" EMC 2639 Fan Replacement: crwdns2935265:02crwdnd2935265:02crwdnd2935265:03crwdne2935265:0 iMac Intel 27" EMC 2639 Fan Replacement: crwdns2935265:02crwdnd2935265:03crwdnd2935265:03crwdne2935265:0
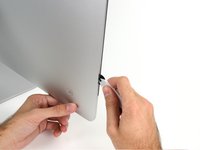
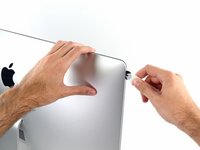
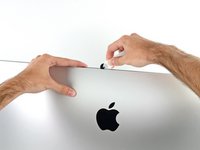
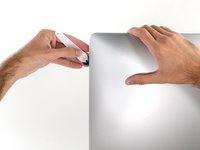
    • Starting on the left of the display, near the power button, insert the iMac Opening Tool into the gap between the glass panel and the rear case.

    • The hub on the iMac Opening Tool will keep you from pushing the wheel in too far. If using a different tool, insert no more than 3/8" (9.5 mm) into the display. You risk severing antenna cables and causing serious damage.

  3. iMac Intel 27" EMC 2639 Fan Replacement: crwdns2935265:03crwdnd2935265:01crwdnd2935265:03crwdne2935265:0 iMac Intel 27" EMC 2639 Fan Replacement: crwdns2935265:03crwdnd2935265:02crwdnd2935265:03crwdne2935265:0 iMac Intel 27" EMC 2639 Fan Replacement: crwdns2935265:03crwdnd2935265:03crwdnd2935265:03crwdne2935265:0
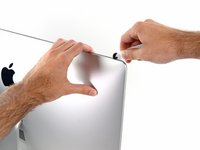
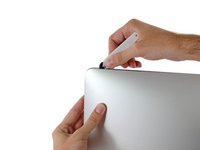
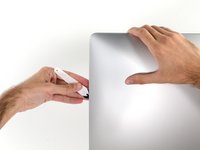
    • Use the tool like a pizza cutter—roll it along through the gap, and it will cut the foam adhesive through the center.

    • Be sure to always push with the handle behind the cutting wheel. If you pull, the wheel might get pulled out of the handle.

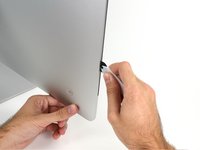
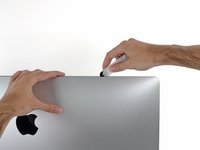
    • Run the tool up along the left side of the display.

  4. iMac Intel 27" EMC 2639 Fan Replacement: crwdns2935265:04crwdnd2935265:01crwdnd2935265:03crwdne2935265:0 iMac Intel 27" EMC 2639 Fan Replacement: crwdns2935265:04crwdnd2935265:02crwdnd2935265:03crwdne2935265:0 iMac Intel 27" EMC 2639 Fan Replacement: crwdns2935265:04crwdnd2935265:03crwdnd2935265:03crwdne2935265:0
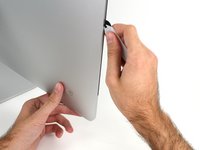
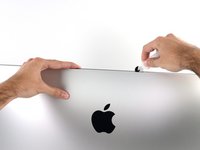
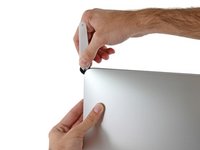
    • Continue wheeling the tool up around the top left corner.

  5. iMac Intel 27" EMC 2639 Fan Replacement: crwdns2935265:05crwdnd2935265:01crwdnd2935265:02crwdne2935265:0 iMac Intel 27" EMC 2639 Fan Replacement: crwdns2935265:05crwdnd2935265:02crwdnd2935265:02crwdne2935265:0
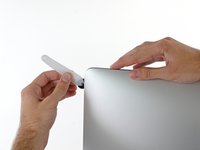
    • Cut the adhesive along the top left of the display.

  6. iMac Intel 27" EMC 2639 Fan Replacement: crwdns2935265:06crwdnd2935265:01crwdnd2935265:02crwdne2935265:0 iMac Intel 27" EMC 2639 Fan Replacement: crwdns2935265:06crwdnd2935265:02crwdnd2935265:02crwdne2935265:0
    • Continue along the top of the display.

    • You may want to run the tool back and forth through what you've already cut a few times, to ensure you get as much of the adhesive separated as possible.

  7. iMac Intel 27" EMC 2639 Fan Replacement: crwdns2935265:07crwdnd2935265:01crwdnd2935265:03crwdne2935265:0 iMac Intel 27" EMC 2639 Fan Replacement: crwdns2935265:07crwdnd2935265:02crwdnd2935265:03crwdne2935265:0 iMac Intel 27" EMC 2639 Fan Replacement: crwdns2935265:07crwdnd2935265:03crwdnd2935265:03crwdne2935265:0
    • Push the tool around the top right corner of the display.

  8. iMac Intel 27" EMC 2639 Fan Replacement: crwdns2935265:08crwdnd2935265:01crwdnd2935265:02crwdne2935265:0 iMac Intel 27" EMC 2639 Fan Replacement: crwdns2935265:08crwdnd2935265:02crwdnd2935265:02crwdne2935265:0
    • Wheel the tool down along the right side of the display.

  9. iMac Intel 27" EMC 2639 Fan Replacement: crwdns2935265:09crwdnd2935265:01crwdnd2935265:02crwdne2935265:0 iMac Intel 27" EMC 2639 Fan Replacement: crwdns2935265:09crwdnd2935265:02crwdnd2935265:02crwdne2935265:0
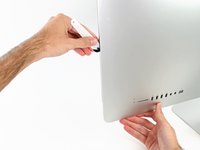
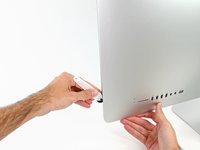
    • Finish pushing the opening tool to the bottom of the right side of the display.
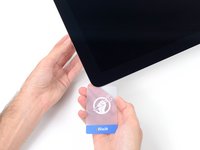
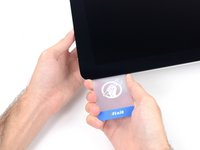
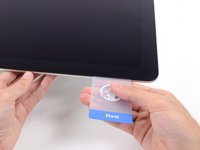
    • At this point, you'll want to run the tool back around the entire display, to ensure you cut as much adhesive as possible.

  10. iMac Intel 27" EMC 2639 Fan Replacement: crwdns2935265:010crwdnd2935265:01crwdnd2935265:03crwdne2935265:0 iMac Intel 27" EMC 2639 Fan Replacement: crwdns2935265:010crwdnd2935265:02crwdnd2935265:03crwdne2935265:0 iMac Intel 27" EMC 2639 Fan Replacement: crwdns2935265:010crwdnd2935265:03crwdnd2935265:03crwdne2935265:0
    crwdns2935267:0crwdne2935267:0
    Plastic Cards
    $2.99
    • While the opening tool did the lion's share of the work, the display will still be slightly adhered to the case. A plastic card will be necessary to free up the last of this adhesive.

    • Set the iMac face-up on a table.

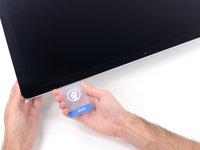
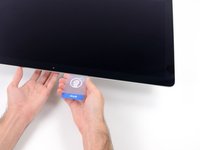
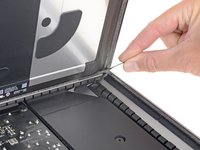
    • Starting from the top right corner of the iMac, insert a plastic card between the display and frame.

    • Be careful not to insert it more than 3/8" (9.5 mm), or you may damage internal components.

  11. iMac Intel 27" EMC 2639 Fan Replacement: crwdns2935265:011crwdnd2935265:01crwdnd2935265:02crwdne2935265:0 iMac Intel 27" EMC 2639 Fan Replacement: crwdns2935265:011crwdnd2935265:02crwdnd2935265:02crwdne2935265:0
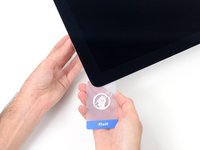
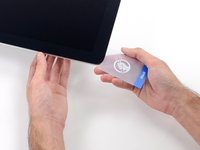
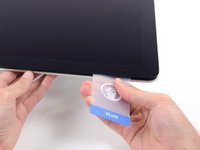
    • Gently twist the plastic card to open the space between the display and frame, and cut any remaining adhesive near the corner.

    • Using too much force will crack the glass. Work carefully, and don't try to create a gap any larger than about 1/4" (6 mm).

  12. iMac Intel 27" EMC 2639 Fan Replacement: crwdns2935265:012crwdnd2935265:01crwdnd2935265:03crwdne2935265:0 iMac Intel 27" EMC 2639 Fan Replacement: crwdns2935265:012crwdnd2935265:02crwdnd2935265:03crwdne2935265:0 iMac Intel 27" EMC 2639 Fan Replacement: crwdns2935265:012crwdnd2935265:03crwdnd2935265:03crwdne2935265:0
    • Be sure to stop cutting before the iSight camera in this step, or you may damage it.

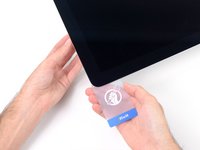
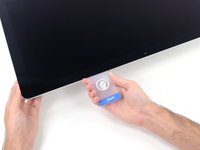
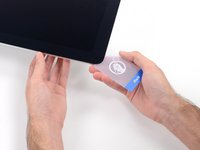
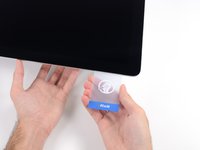
    • Slide the card toward the center of the display, to cut any remaining adhesive.

  13. iMac Intel 27" EMC 2639 Fan Replacement: crwdns2935265:013crwdnd2935265:01crwdnd2935265:02crwdne2935265:0 iMac Intel 27" EMC 2639 Fan Replacement: crwdns2935265:013crwdnd2935265:02crwdnd2935265:02crwdne2935265:0
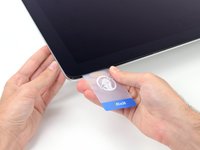
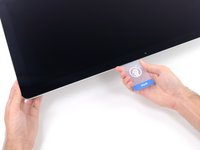
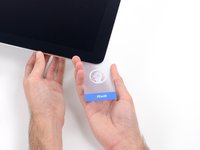
    • Put the card into the corner again and let it stay there to keep the adhesive from resettling.

  14. iMac Intel 27" EMC 2639 Fan Replacement: crwdns2935265:014crwdnd2935265:01crwdnd2935265:03crwdne2935265:0 iMac Intel 27" EMC 2639 Fan Replacement: crwdns2935265:014crwdnd2935265:02crwdnd2935265:03crwdne2935265:0 iMac Intel 27" EMC 2639 Fan Replacement: crwdns2935265:014crwdnd2935265:03crwdnd2935265:03crwdne2935265:0
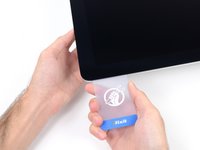
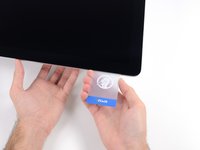
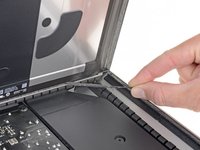
    • Insert a second card into the gap between the display and frame in the top left corner.

  15. iMac Intel 27" EMC 2639 Fan Replacement: crwdns2935265:015crwdnd2935265:01crwdnd2935265:02crwdne2935265:0 iMac Intel 27" EMC 2639 Fan Replacement: crwdns2935265:015crwdnd2935265:02crwdnd2935265:02crwdne2935265:0
    • Gently twist the card, slightly increasing the space between the display and frame.

    • As with the other side, move slowly to allow the adhesive to break, and be careful not to over-stress the display glass.

  16. iMac Intel 27" EMC 2639 Fan Replacement: crwdns2935265:016crwdnd2935265:01crwdnd2935265:03crwdne2935265:0 iMac Intel 27" EMC 2639 Fan Replacement: crwdns2935265:016crwdnd2935265:02crwdnd2935265:03crwdne2935265:0 iMac Intel 27" EMC 2639 Fan Replacement: crwdns2935265:016crwdnd2935265:03crwdnd2935265:03crwdne2935265:0
    • Slide the plastic card toward the center, again stopping just before the iSight camera.

  17. iMac Intel 27" EMC 2639 Fan Replacement: crwdns2935265:017crwdnd2935265:01crwdnd2935265:02crwdne2935265:0 iMac Intel 27" EMC 2639 Fan Replacement: crwdns2935265:017crwdnd2935265:02crwdnd2935265:02crwdne2935265:0
    • Insert the card back into the top left corner.

  18. iMac Intel 27" EMC 2639 Fan Replacement: crwdns2935265:018crwdnd2935265:01crwdnd2935265:03crwdne2935265:0 iMac Intel 27" EMC 2639 Fan Replacement: crwdns2935265:018crwdnd2935265:02crwdnd2935265:03crwdne2935265:0 iMac Intel 27" EMC 2639 Fan Replacement: crwdns2935265:018crwdnd2935265:03crwdnd2935265:03crwdne2935265:0
    • Only lift the display a few inches—it is still attached to the iMac by data and power cables.

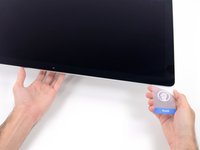
    • With the cards inserted as shown near the corners, gently twist the cards to increase the gap between display and case.

    • If there are any sections that seem to stick and won't separate, stop twisting and use one of the cards to cut the adhesive in the problem area.

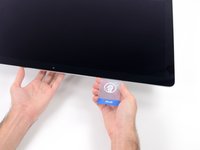
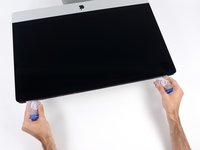
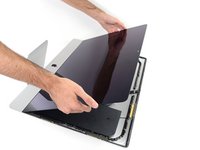
    • Begin to lift the top of the display up from the frame.

  19. iMac Intel 27" EMC 2639 Fan Replacement: crwdns2935265:019crwdnd2935265:01crwdnd2935265:02crwdne2935265:0 iMac Intel 27" EMC 2639 Fan Replacement: crwdns2935265:019crwdnd2935265:02crwdnd2935265:02crwdne2935265:0
    • While holding the display up with one hand, use the other to unplug the display power cable.

    • Lift the display up enough to have easy access to the connections, but not so much that you stretch the cables and stress their connections (about 8").

  20. iMac Intel 27" EMC 2639 Fan Replacement: crwdns2935265:020crwdnd2935265:01crwdnd2935265:03crwdne2935265:0 iMac Intel 27" EMC 2639 Fan Replacement: crwdns2935265:020crwdnd2935265:02crwdnd2935265:03crwdne2935265:0 iMac Intel 27" EMC 2639 Fan Replacement: crwdns2935265:020crwdnd2935265:03crwdnd2935265:03crwdne2935265:0
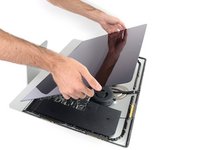
    • Flip up the metal retaining bracket on the display data cable.

    • Disconnect the display data cable.

    • This is a delicate connection that can easily be broken. Be sure to pull the display data cable connector straight out of its socket, toward the top of the iMac.

  21. iMac Intel 27" EMC 2639 Fan Replacement: crwdns2935265:021crwdnd2935265:01crwdnd2935265:02crwdne2935265:0 iMac Intel 27" EMC 2639 Fan Replacement: crwdns2935265:021crwdnd2935265:02crwdnd2935265:02crwdne2935265:0
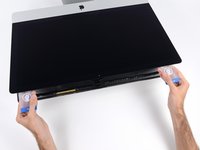
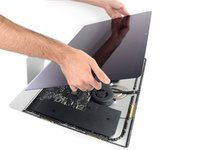
    • Lift the display up to a near-vertical position.

    • At this point there is still a strip of adhesive along the bottom of the display, that will hold the display to the frame like a hinge. You can loosen this adhesive by working the display up and down a few times.

    • Remove as much of the adhesive as possible by grabbing it at the outer edges, and then pulling or rolling it towards the middle.

  22. iMac Intel 27" EMC 2639 Fan Replacement: crwdns2935265:022crwdnd2935265:01crwdnd2935265:03crwdne2935265:0 iMac Intel 27" EMC 2639 Fan Replacement: crwdns2935265:022crwdnd2935265:02crwdnd2935265:03crwdne2935265:0 iMac Intel 27" EMC 2639 Fan Replacement: crwdns2935265:022crwdnd2935265:03crwdnd2935265:03crwdne2935265:0
    • Be very careful not to touch the capacitor leads or any exposed solder joints on the back of the power supply (boxed in red).

    • If necessary, a plastic card can be used to cut any remaining sections of the bottom adhesive strip.

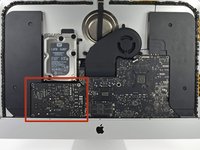
    Would have been helpful to box the same red area when using the plastic card to separate the glue. Since the red blocked picture is inverted, if someone doesn't pay close attention it may not be obvious that the area of concern is at the right top of the graphic pictures in which the plastic card use is being demonstrated..

    Wizbang FL - crwdns2934203:0crwdne2934203:0

    you don't need to cut the bottom part as the bottom tape is stuck on each side and you can easily pull it out

    Thomas Webb - crwdns2934203:0crwdne2934203:0

    What is the twisted wire taped to the back of the display that can bee seen in the upper right of the first two pictures? I have an 27” iMac without a screen an my replacement does not have this wire. I think it is a temperature sensor but do not know where it connects to.

    Eric - crwdns2934203:0crwdne2934203:0

    [|I opened up my iMac and there’s no HDD or SSD in that spot. its just empty.]

    John Warmann - crwdns2934203:0crwdne2934203:0

    You probably had just an SSD installed and no HD, which is on the opposite side of the motherboard (and quite a bit more work to access).

    maccentric -

    Please update the picture to include the RED BOXED IN AREA that you refer to on all three pictures in this step. I have had a few zaps from these supplies and it is not pleasant.

    Charlie Nancarrow - crwdns2934203:0crwdne2934203:0

    J’ai réussi à intervenir dans l’iMac sans décoller l’ensemble de l’écran. Je l’ai ouvert en laissant la dernière partie collée (vers le logo Apple) et qui sert comme une charnière. Bien calé et assuré l’écran n’a pas bougé et j’ai pu changer mon disque dur facilement. Le grand avantage et d’avoir l’écran toute suite juste quand on le recolle par la suite.

    David Mariaux - crwdns2934203:0crwdne2934203:0

    Well, I of course touched a soldering point in the red area as my hand slipped. I heard and felt a tiny “click” and after replacing the HDD with SSD etc I can not power the iMac up anymore. Not a sign of life :-( I suppose I broke the power supply. Can someone confirm? Or could something else have broken too?

    David Rosner - crwdns2934203:0crwdne2934203:0

    I took my time and pulled both tabs slowly gently. Easily removed and glass came right off.

    Keith Thomas - crwdns2934203:0crwdne2934203:0

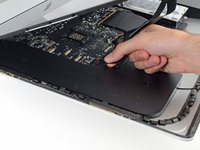
    Before removing any circuit boards or speakers remove the 4mm bar that runs the width of the case, behind the bottom edge of where the screen sits.

    It is amazing how much easier you will find it to remove the speakers and circuit boards with this bar removed.

    However, before you remove the bar insert a sheet of paper between it and the circuit boards to prevent a short circuit.

    The bar is held in by 5 small Phillips head screws (first pictured in step 22).

    Once you remove the bar bend the sheet of paper over the front of the case to keep it in place and then remove your circuit board(s).

    Andrew - crwdns2934203:0crwdne2934203:0

  23. iMac Intel 27" EMC 2639 Fan Replacement: crwdns2935265:023crwdnd2935265:01crwdnd2935265:03crwdne2935265:0 iMac Intel 27" EMC 2639 Fan Replacement: crwdns2935265:023crwdnd2935265:02crwdnd2935265:03crwdne2935265:0 iMac Intel 27" EMC 2639 Fan Replacement: crwdns2935265:023crwdnd2935265:03crwdnd2935265:03crwdne2935265:0
    • Be very careful handling the display—it's big, heavy, and made of glass. The display has fragile edges. Avoid lifting the display by the corners.

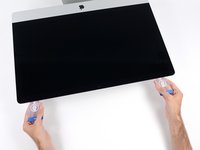
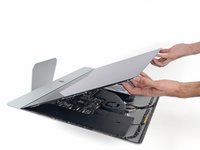
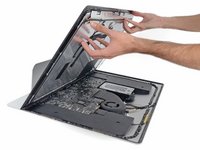
    • Lift the display up from the frame and remove it from the iMac. Lay the display face down on a flat, soft surface.

    • It may be necessary to slowly lift from one side, to peel against the remaining adhesive.

    • After the adhesive is cut, it cannot be used to re-seal the display in place. Follow this guide when your repair is complete to replace the adhesive strips that secure the display to the rear enclosure.

  24. iMac Intel 27" EMC 2639 Fan Replacement: crwdns2935265:024crwdnd2935265:01crwdnd2935265:01crwdne2935265:0
    • If you are replacing the display panel, you may need to transfer additional components from the old panel to the new one. Compare the back of the old display with the replacement display. Note all cables, sensors, and foam cushioning that are missing from the new display.

    • If there is a wire or cable underneath adhesive tape, always pull the tape off first.

    • If the cable is glued to the chassis, use a heated iOpener or a hair dryer to soften the adhesive first. You can then slide an opening pick underneath the cable to loosen it. Never pull directly on the delicate connectors.

    • Slide an opening pick underneath the foam cushion pieces to separate them from the display, and gently pull them off. You may need some double sided tape to re-attach them to the new display.

  25. iMac Intel 27" EMC 2639 Fan Replacement, Fan: crwdns2935265:025crwdnd2935265:01crwdnd2935265:03crwdne2935265:0 iMac Intel 27" EMC 2639 Fan Replacement, Fan: crwdns2935265:025crwdnd2935265:02crwdnd2935265:03crwdne2935265:0 iMac Intel 27" EMC 2639 Fan Replacement, Fan: crwdns2935265:025crwdnd2935265:03crwdnd2935265:03crwdne2935265:0
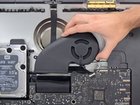
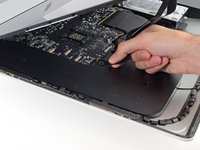
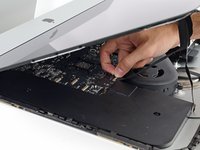
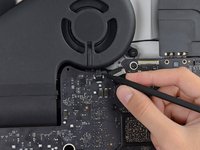
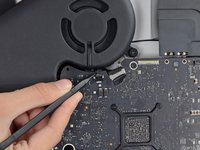
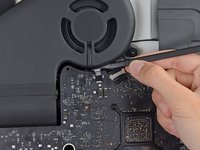
    • Use the tip of a spudger to disconnect the fan cable's connector from its socket on the logic board.

  26. iMac Intel 27" EMC 2639 Fan Replacement: crwdns2935265:026crwdnd2935265:01crwdnd2935265:02crwdne2935265:0 iMac Intel 27" EMC 2639 Fan Replacement: crwdns2935265:026crwdnd2935265:02crwdnd2935265:02crwdne2935265:0
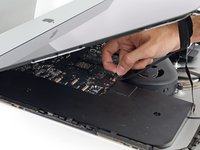
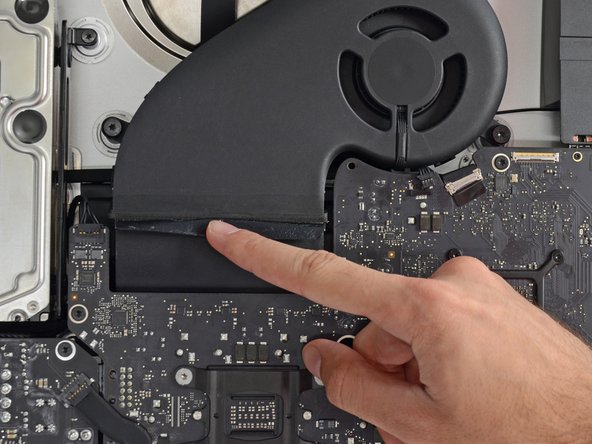
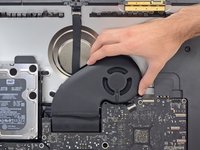
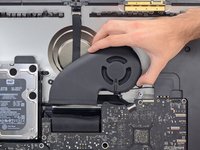
    • Use your fingers to peel the black tape connecting the fan to the exhaust duct back slightly.

    • Leave the tape in place on the exhaust duct, you only need to expose the join to free the fan.

  27. iMac Intel 27" EMC 2639 Fan Replacement: crwdns2935265:027crwdnd2935265:01crwdnd2935265:01crwdne2935265:0
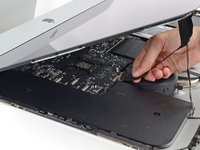
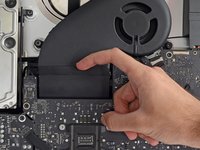
    • Use a T10 Torx screwdriver to remove the three 12.4 mm screws securing the fan.

  28. iMac Intel 27" EMC 2639 Fan Replacement: crwdns2935265:028crwdnd2935265:01crwdnd2935265:02crwdne2935265:0 iMac Intel 27" EMC 2639 Fan Replacement: crwdns2935265:028crwdnd2935265:02crwdnd2935265:02crwdne2935265:0
    • Remove the fan from the iMac.

crwdns2915888:0crwdne2915888:0

To reassemble your device, follow these instructions in reverse and use our Adhesive Strips Guide to reattach the display glass.

Take your e-waste to an R2 or e-Stewards certified recycler.

Repair didn’t go as planned? Try some basic troubleshooting, or ask our Answers community for help.

crwdns2935229:08crwdne2935229:0

crwdns2947821:0crwdne2947821:0

crwdns2947823:0crwdne2947823:0

Walter Galan

705,818 crwdns2915208:0crwdne2915208:0

crwdns2935297:01,203crwdne2935297:0

crwdns2947410:01crwdne2947410:0

If it’s rattling, is it possible that it’s just dust? Would one be able to send compressed air up into the air duct to clear it out?

Eloi - crwdns2934203:0crwdne2934203:0

crwdns2917038:0crwdne2917038:0

crwdns2936625:0crwdne2936625:0:

crwdns2936751:024crwdne2936751:0 7

crwdns2936753:07crwdne2936753:0 92

crwdns2936753:030crwdne2936753:0 388

crwdns2942667:0crwdne2942667:0 8,878