crwdns2915892:0crwdne2915892:0
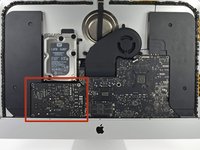
Use this guide to remove the SATA cable.
Before beginning any work on your iMac: Unplug the computer and press and hold the power button for ten seconds to discharge the power supply's capacitors.
Be very careful not to touch the capacitor leads or any exposed solder joints on the back of the power supply. Only handle the board by the edges.
crwdns2942213:0crwdne2942213:0
-
crwdns2935267:0crwdne2935267:0iMac Intel 27" Cardboard Service Wedge$4.99
-
With the hinge free to move, the iMac will be unbalanced and hard to work on. Repairs can be completed with the iMac laying down, but are faster and easier with an iMac service wedge.
-
If you are using the iFixit cardboard service wedge, follow these assembly directions to put it together.
-
-
-
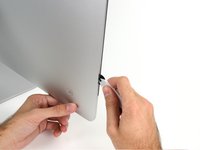
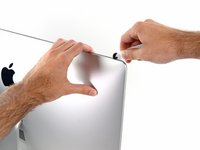
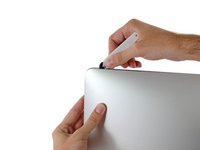
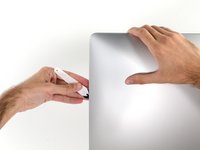
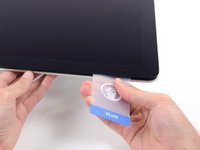
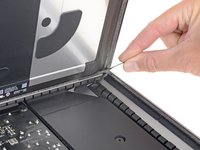
Starting on the left of the display, near the power button, insert the iMac Opening Tool into the gap between the glass panel and the rear case.
I performed this on a Late 2015 iMac and there weren’t any significant differences to these steps.
Hi @snappadoodle! The opening tool is included in the adhesive kit included in the tool list, but you can purchase it separately here.
I just wanted to add a THANK YOU VERY VERY MUCH for this guide. I have 2 imacs (different models). A 2009, with a bad logic board, but a good harddrive. A 2012 that I recently got but the hd already went to crap. So, I opened the 2009 and removed the HD, closed it back up. Really quick. Then on the 2012, I forgot that it’s a refurbished and so they probably used an after market adhesive strips. IT WAS A HELLUVA WORKOUT on my hands not having the pizza cutter tool. That was indeed the longest/hardest part of the whole project. I want to add that…
1: for the 2012 imac, i didnt actually have to worry about 3/8 or 5/8 when removing the adhesive strips and wires. There were zero wires running the perimeter of the screen (except near the isight, but even there the wires are directly below the cam so i think anyone would be safe.
2: if you leave the old adhesive strips (but trim so it doesnt hang outside the machine) you do NOT need to put new strips. place the screen, press lightly on the perimeter. Done.
Unfortunately, I did not pay close attention when disconnecting the headphone jack cable from the logic board. Now I cannot determine how to reconnect the cable. Help.
-
-
-
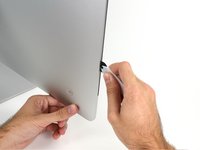
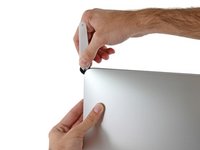
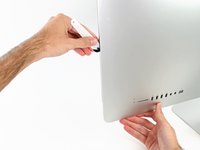
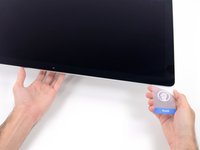
Use the tool like a pizza cutter—roll it along through the gap, and it will cut the foam adhesive through the center.
-
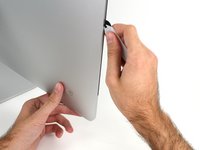
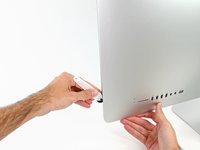
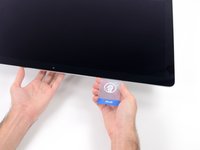
Run the tool up along the left side of the display.
Just make sure you are keeping the tool directly parallel with the screen. Find us at Paket Tour Medan
-
-
-
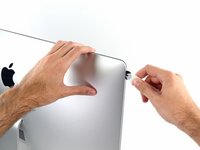
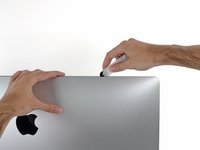
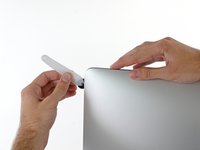
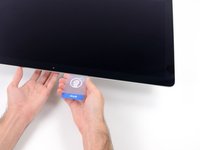
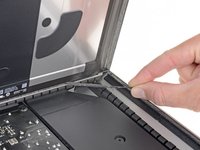
Continue wheeling the tool up around the top left corner.
-
-
-
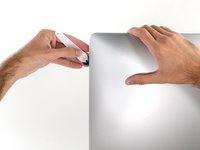
Cut the adhesive along the top left of the display.
I used a can of lighter fluid dribbling as little in as possible as I was going round. I had to use a thin knife and ran the fluid down the blade. It did seem to make it easier whilst doing this process. Some people may have different views but I figured it would evaporate doing no damage and soften the glue.
-
-
-
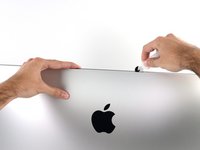
Continue along the top of the display.
-
-
-
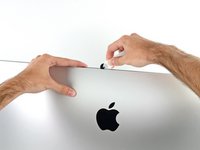
Push the tool around the top right corner of the display.
-
-
-
Wheel the tool down along the right side of the display.
-
-
-
Finish pushing the opening tool to the bottom of the right side of the display.
-
-
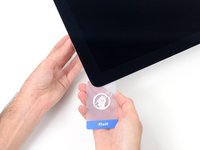
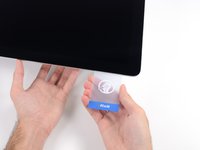
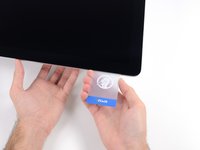
crwdns2935267:0crwdne2935267:0Plastic Cards$2.99
-
Set the iMac face-up on a table.
-
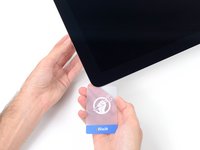
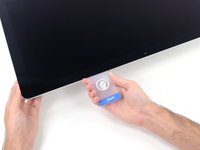
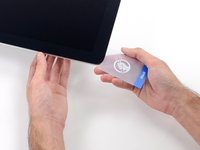
Starting from the top right corner of the iMac, insert a plastic card between the display and frame.
-
-
-
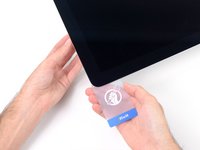
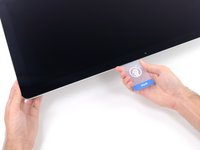
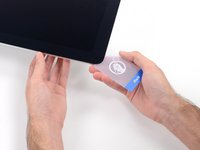
Gently twist the plastic card to open the space between the display and frame, and cut any remaining adhesive near the corner.
-
-
-
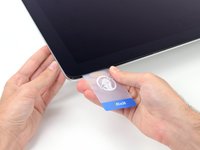
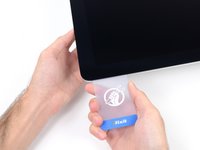
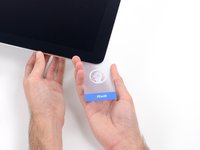
Slide the card toward the center of the display, to cut any remaining adhesive.
-
-
-
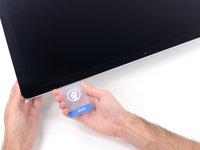
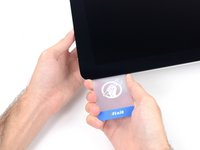
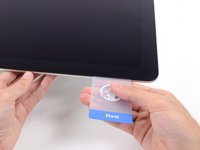
Put the card into the corner again and let it stay there to keep the adhesive from resettling.
-
-
-
Insert a second card into the gap between the display and frame in the top left corner.
-
-
-
Gently twist the card, slightly increasing the space between the display and frame.
-
-
-
Slide the plastic card toward the center, again stopping just before the iSight camera.
-
-
-
Insert the card back into the top left corner.
-
-
-
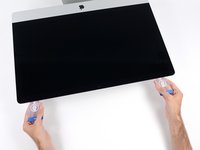
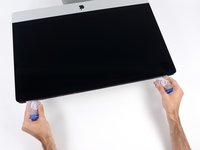
With the cards inserted as shown near the corners, gently twist the cards to increase the gap between display and case.
-
If there are any sections that seem to stick and won't separate, stop twisting and use one of the cards to cut the adhesive in the problem area.
-
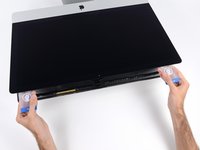
Begin to lift the top of the display up from the frame.
-
-
-
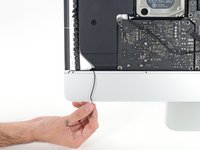
While holding the display up with one hand, use the other to unplug the display power cable.
@lukegibson
Just don't forget to remember why you are able to find this kind of tutorials on this current website : https://www.ifixit.com/ManifestoI followed the instructions, but unfortunately the screen fell out. And after reconnecting it, the screen shows the lowest resolution. What should I do?
-
-
-
-
Flip up the metal retaining bracket on the display data cable.
-
Disconnect the display data cable.
-
-
-
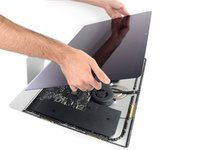
Lift the display up to a near-vertical position.
-
Remove as much of the adhesive as possible by grabbing it at the outer edges, and then pulling or rolling it towards the middle.
There are two strips left and right along the bottom, and where they reach the outer edges the last 20mm has no adhesive, effectively making right-angled lift-tabs, so you can remove these strips completely by carefully pulling them off from the outer ends.
The adhesive strip at the bottom was a pain, but I eventually got the job done by lifting/closing the display a few times and carefully cutting away adhesive at the very bottom corner of the frame using the pizza cutter. My advice is to be very patient and eventually the display will come loose.
-
-
-
If necessary, a plastic card can be used to cut any remaining sections of the bottom adhesive strip.
@john - there’s a slot on the back of the motherboard for a storage stick. fancy
Trying install a SSD and I accidentally dropped it onto something in this area that caused a loud pop and spark. It killed the SSD, but the system still starts up with the startup sound but no video. Do I need replace this and the video card?
-
-
-
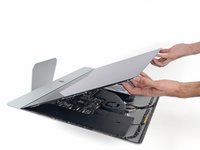
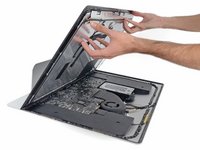
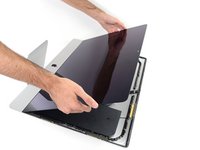
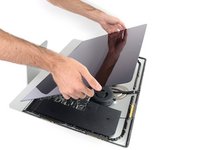
Lift the display up from the frame and remove it from the iMac. Lay the display face down on a flat, soft surface.
-
It may be necessary to slowly lift from one side, to peel against the remaining adhesive.
-
-
-
If there is a wire or cable underneath adhesive tape, always pull the tape off first.
-
If the cable is glued to the chassis, use a heated iOpener or a hair dryer to soften the adhesive first. You can then slide an opening pick underneath the cable to loosen it. Never pull directly on the delicate connectors.
-
Slide an opening pick underneath the foam cushion pieces to separate them from the display, and gently pull them off. You may need some double sided tape to re-attach them to the new display.
Hi all. The 5k screen on the iMac 27" I bought on eBay was totally trashed when it arrived at my home. I was able to find a new 5k replacement screen for it (also on eBay...) which works perfectly. I should note that the new screen did not arrive with a LCD Temp Sensor on it. I was able to Carefully Remove the sensor from the old screen and attach it to the new one successfully. Follow the advice in previous comments and you'll have no problems (and save some money). I've had zero problems with it in the last year, so I think this could be a viable solution to a missing LCD Temp Sensor.
-
-
-
Remove two 10 mm T10 screws.
If you just want access to the HD, there is no need to remove any speaker wires - it slides over enough to access the HD screws.
No need to remove speaker or hard drive to replace power supply. Not clear at all why these steps are included.
Skip directly to Step 31 if you’re just replacing the hard drive. These next steps are totally unnecessary for that! They just add complexity and increase the chances for something going wrong.
Avoid Extra Steps! Again, you DO. NOT. NEED. TO. REMOVE. THE. RIGHT. SPEAKER. Just take out the two speaker mounting screws and scoot the speaker enclosure to the left a bit to access the two Hard Drive bracket screws on the left side. Once you remove the two bracket screws you can easily remove / replace the drive.
Came back just to say what everyone else has said: you really don’t need to take out the whole speaker. You can just loosen the two screws and move it aside to access the drive/put the new one in. Saves a lot of effort.
-
-
-
Unplug the left speaker cable by pulling it straight up out of its socket on the logic board.
-
De-route the cable from the gap between the hard drive and logic board.
-
-
-
Use a spudger to disconnect the power button connector from its socket on the logic board.
-
-
-
Lift the left speaker straight up, until the power button cable is exposed (about 0.5 inches).
-
-
-
Gently de-route the power button cable from its groove in the left speaker.
-
-
-
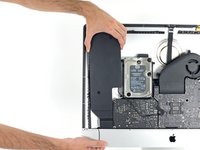
Lift the left speaker straight up and remove it from the iMac.
-
Push from the connector end as you pull from the speaker end to thread the cable under the hard drive's right bracket.
-
-
-
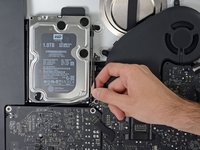
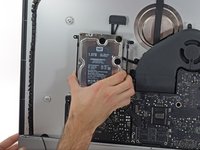
Pull straight up on the SATA data/power cable to disconnect it from the drive.
-
-
-
Remove two 7.3 mm T10 screws securing the left hard drive bracket to the rear case.
Ditto on left hard drive bracket screws being T8. I have late 2013 iMac 27”
-
-
-
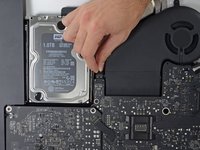
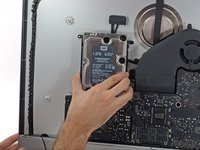
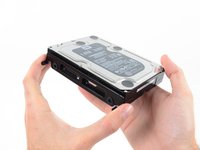
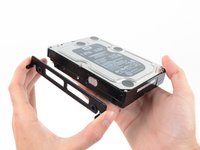
Grab the hard drive and left hard drive bracket together.
-
Tilt the left side up away from the rear case, and slide the assembly to the left.
-
Remove the hard drive and left hard drive bracket from the iMac.
-
-
-
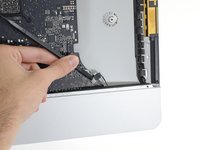
Disconnect the power supply control cable from the power supply.
so in which direction do you have to move these clips to release the cable?
-
-
-
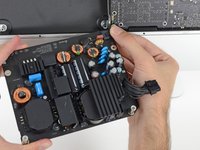
Remove the following four screws securing the power supply to the rear case (size T8 or T10 depending on the exact model):
-
Two 23.7 mm Torx screws
-
Two 7.3 mm Torx screws
In the iMac I just bought (2016), these were not T10. I believe they are T9. Can anyone confirm?
I can confirm these are not T10 screws as shown in the guide (step 35). In my Late 2015 Retina 5k model, the screws on the power supply board are T8. Morgan mentioned T9 and depending on your T9 driver, it may just barely fit but can easily slip and strip the screw. A T8 driver goes deeper in and holds the screw properly.
smudge -
Regarding the screws on the power supply board (step 35), I can confirm these are not T10 screws as shown in the guide. In my Late 2015 Retina 5k model, the screws are T8. Morgan mentioned T9 and depending on your T9 driver, it may just barely fit but can easily slip and strip the screw. A T8 driver goes deeper in and holds the screw properly.
smudge -
My late 2015 model has these as T8 screws.
Late 2015- T8 as well!! Check out this Powerbook Medic teardown video as a cross reference guide!!
Late 2013 - T8 was definitely too small to use for me. T10 worked just fine.
2017 uses T8
-
-
-
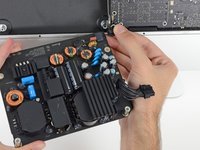
Move the power supply board towards the left edge of the case and up to free it from the notch in the logic board.
-
-
-
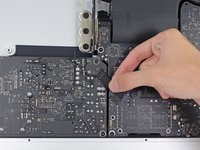
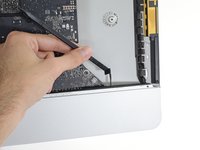
Depress the tab on the DC power cable connector, then pull it straight out of its socket on the back of the logic board.
Pressing on the release on the back with my finger and at the same time using a needle nose pliers to wiggle the connector with my therapist hand worked for me.
-
-
-
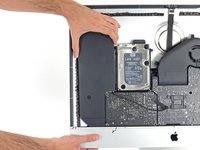
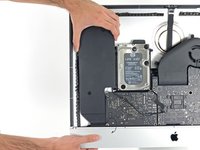
Flip the top of the power supply towards you, like opening a mailbox, to reveal the AC inlet cable connector.
-
Disconnect the AC inlet cable connector.
-
-
-
Remove two 10.0 mm T10 screws.
-
-
-
Gently rock the right speaker slightly to the right, to allow access to its cable's connection on the logic board.
-
-
-
Use a spudger to loosen the right speaker cable's connector from its socket on the logic board.
-
Pull the connector to the right to remove it from its socket.
-
-
-
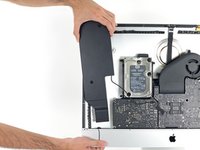
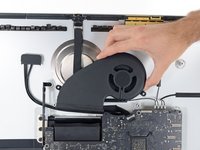
Lift the speaker straight up and remove it from the iMac.
-
-
-
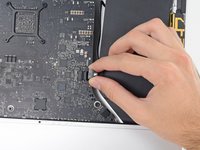
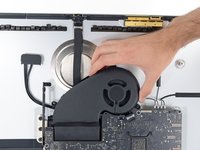
Use the tip of a spudger to disconnect the fan cable's connector from its socket on the logic board.
-
-
-
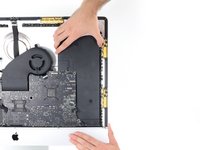
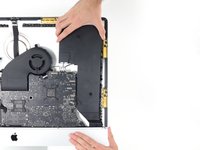
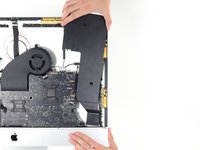
Peel the black tape connecting the fan to the exhaust duct back slightly.
-
Leave the tape in place on the exhaust duct—you only need to expose the joint to free the fan.
-
-
-
Remove three 12.4 mm T10 screws securing the fan to the rear case.
-
-
-
Use the flat end of a spudger to disconnect each of the four antenna connectors from the AirPort/Bluetooth card.
-
Leftmost
-
Top
-
Upper right
-
Lower right
-
-
-
Flip up the metal retaining bracket on the iSight camera cable.
-
Pull the camera cable connector straight out of its socket, toward the top of the iMac.
-
-
-
Use the flat end of a spudger to disconnect the headphone jack cable connector from its socket on the logic board.
-
Gently push the cable out of the way.
-
-
-
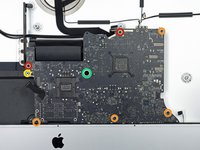
Remove the following screws from the front of the logic board:
-
Two 23.7 mm T10 screws
-
Four 7.4 mm T10 screws
-
One 20.8 mm T25 spacer screw
-
One captive T10 screw
My 2017 has small flat cable and connector on logic board. And all screws are changed to T 9
My 2017 has small flat cable and connector on logic board. And all screws are changed to T 9
-
-
-
Pull the cable and connector through the right hard drive bracket. Move the cable to the right side of the iMac, out of the way of the exhaust port.
-
-
-
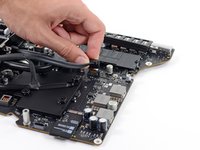
Remove two 5.7 mm T10 screws from the top of the heat sink exhaust duct.
-
-
-
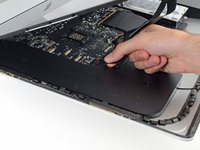
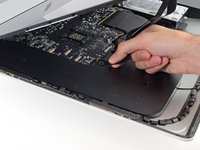
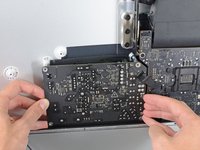
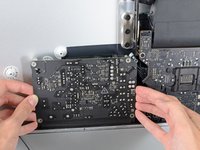
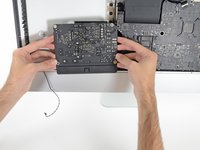
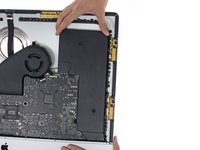
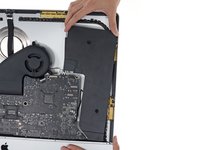
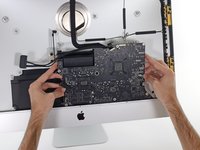
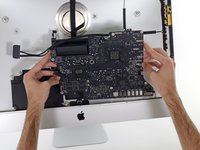
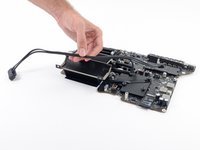
Tilt the logic board slightly forward.
-
Lift the logic board straight up and out of the iMac. Be careful not to snag on any of the screw posts attached to the inside of the rear case.
-
-
-
When reassembling your iMac, be very careful to align the exterior I/O ports correctly. The logic board can sit crooked even when secured with all its screws.
-
You can use a USB flashdrive or ethernet cable to ensure the logic board is seated correctly while you screw it in.
-
-
-
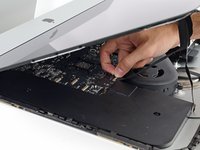
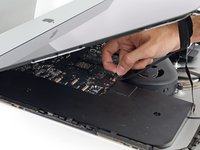
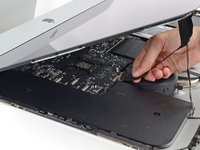
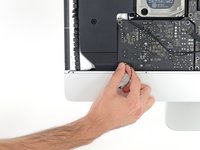
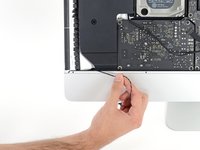
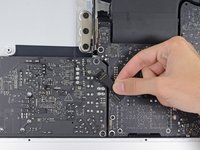
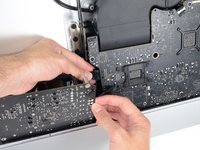
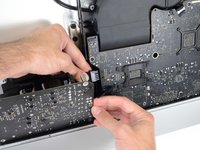
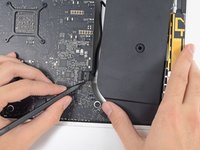
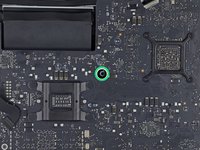
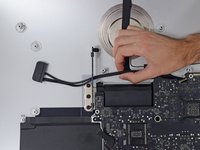
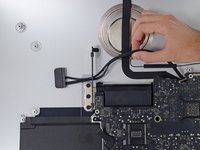
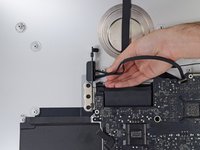
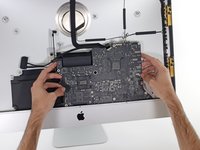
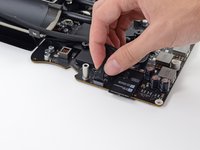
Pull up on the SATA power cable connector to disconnect it.
-
Unplug the SATA data cable connector by depressing its locking tab and pulling straight up on the connector.
-
Remove the SATA cable from the logic board assembly to get it out of the way and prevent it from being damaged.
This guide was written the year before the 5K model first came out. The cable in the photo is definitely for the model listed, although it’s always possible Apple made more than one variation.
Can anyone help me and tell me how to remove the SATA data cable connector? There is no locking tab visible at all, and the connector doesn’t release. I ordered a replacement part, which clearly has a metal locking tab, but the original one on the board does not. Do I just pull hard? I tried to pry it open with a small metal screwdriver, but it does not seem to open up. Thanks so much for any help!
I don’t see a reason to remove this cable. It’s not in the way of the blade.
Yeah, it's tricky on that cable. I watched a Snazzy Labs video on upgrading the i5 to an i7 (which left out lots of stuff, thank goodness for this guide and you folks), and in that video he mentioned that you might or might not find the cable inside your mac, so I went ahead and ordered one, and of course, one was in my computer, despite that it had an SSD in it. Was it because it was an upgraded SSD? I dunno. But I'm certainly sorry you had to deal with that, especially as while the difficulty isn't too high on this one, there's SO. MANY. STEPS.
Sigh. -


To reassemble your device, follow these instructions in reverse and use our Adhesive Strips Guide to reattach the display glass.
Take your e-waste to an R2 or e-Stewards certified recycler.
Repair didn’t go as planned? Try some basic troubleshooting, or ask our Answers community for help.
To reassemble your device, follow these instructions in reverse and use our Adhesive Strips Guide to reattach the display glass.
Take your e-waste to an R2 or e-Stewards certified recycler.
Repair didn’t go as planned? Try some basic troubleshooting, or ask our Answers community for help.
crwdns2935221:0crwdne2935221:0
crwdns2935229:07crwdne2935229:0


ONLY FOR EXPERIENCED MASTERS WITH NON-HUGE (big fat) FINGERS.
On a 27" Retina, I skipped to step 34 and did not remove the speaker nor the Hard Drive. When the instructions instruct removing the left HD Rail, you know it's wasting your time. Go to the power supply and unscrew the 4 T10 screws. *Not in the guide, un-attach the small connector in top left corner, then gently lift and twist the board out. **Next unplug the small plug behind it, in the bottom right corner by pressing the release on it. Lastly dis-connect the large plug which does NOT slip right out until you depress the snap-clamp holding it on the back side.
To reassemble, do the same in reverse but keep power supply board more upright than slanted down when re-inserting it in to the lower right corner. The lower right screw post has an protrusion under/behind it and the Power Supply's small 2 wire plug must fit between the front of your Mac and the obstruction. Then it just slides right in and then screw it down.
Dan H - crwdns2934203:0crwdne2934203:0
Incomplete guidance . Does not say how to transfer cables such as thermal sensor .
Yuan - crwdns2934203:0crwdne2934203:0
La traduction française est tronquée : “…plus faciles avec une cale de maintien pour iMac”
(https://eustore.ifixit.com/fr/Outils/Org...)
Pierre-Aurélien - crwdns2934203:0crwdne2934203:0
My $12.99 iMac Service Wedge looks like a $0 soft pillow from the guest room…
;-)
John Fisk - crwdns2934203:0crwdne2934203:0
It’s a lot simpler to forget about the blade SSD, break the Superdrive and replace just the hard drive with an SSD.
simon - crwdns2934203:0crwdne2934203:0
I like iFixit but the shipping costs are outrageous.
Stewart Seidel - crwdns2934203:0crwdne2934203:0
``***https://wolfwalkers-2020-329.netlify.app...
https://encyclopedia.pub/entry/57766
https://ameblo.jp/warda25/entry-12883618...
http://l-oiseau.skr.jp/blog/index.php/vi...
https://docs.google.com/document/d/1nZbk...
https://docs.google.com/forms/d/1AwKxSbZ...
https://docs.google.com/drawings/d/1VIi3...
https://script.google.com/macros/s/AKfyc...
https://docs.google.com/presentation/d/1...
https://docs.google.com/spreadsheets/d/1...
https://drive.google.com/file/d/1Ht1Fm1R...
Dacih Asih - crwdns2934203:0crwdne2934203:0