crwdns2915892:0crwdne2915892:0
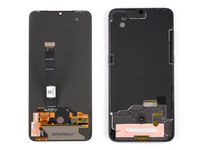
Use this guide to replace a broken or defective AMOLED & Digitizer in your Xiaomi Mi 9.
Due to the phone’s design, you must remove the lithium-ion battery to access the display cables. Reusing a deformed or bent battery after it has forcefully been removed, is a potential safety hazard. Replace it with a new battery in this case.
Before disassembling your phone, discharge the battery below 25%. The battery can catch fire and/or explode if accidentally punctured, but the chances of that happening are much lower if discharged.
Note: This guide instructs you to replace only the screen while leaving the original frame and motherboard in place. However, some replacement screens for this phone come pre-installed in a new frame (a.k.a. chassis), which requires a very different procedure. Make sure you have the correct part before starting this guide.
You’ll need replacement adhesive to reattach components when reassembling the device.
crwdns2942213:0crwdne2942213:0
-
-
Before you begin, switch off your phone.
-
Apply a heated iOpener to the rear glass to loosen the adhesive beneath the edges. Apply the iOpener for at least two minutes.
-
-
-
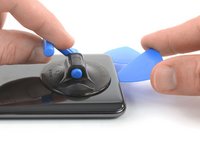
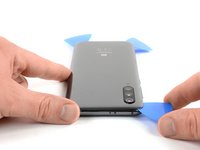
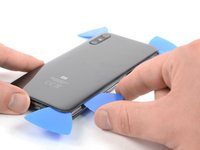
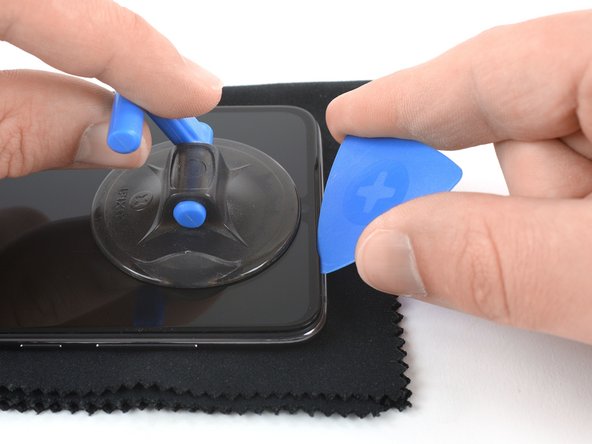
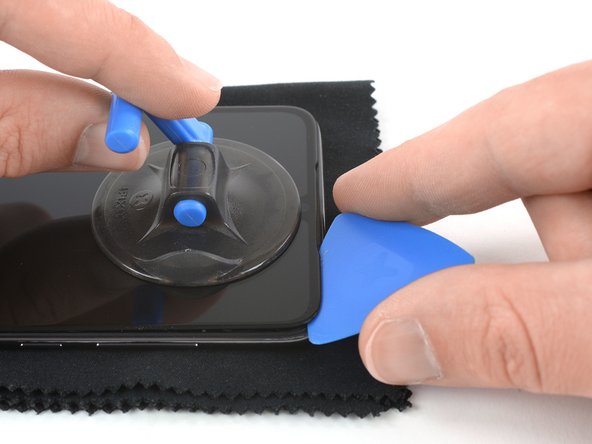
Secure a suction handle to the lower edge of the rear glass, as close to the edge as possible.
-
Lift the rear glass with the suction handle to create a gap between the glass and the frame.
-
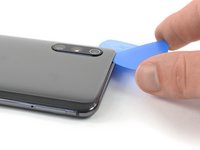
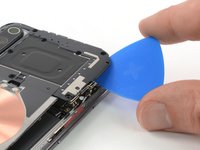
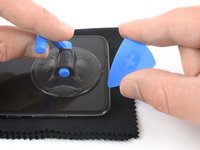
Insert an opening pick into the gap.
-
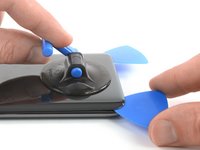
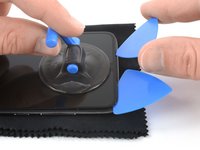
Slide the opening pick to the bottom right corner of the phone.
-
-
-
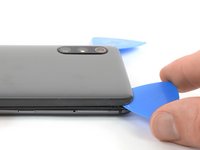
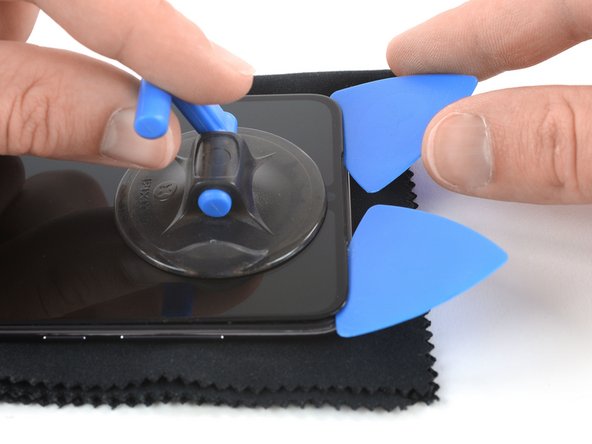
Insert a second opening pick and slide it to the bottom left corner to cut the adhesive.
-
Leave the opening picks in place to prevent the adhesive from resealing.
-
-
-
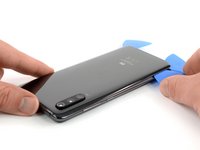
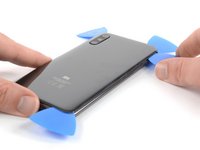
Insert a third opening pick at the bottom left corner.
-
Start to slide the opening pick from the bottom left corner along the side of the Xiaomi Mi 9 to cut the adhesive.
-
Leave the opening pick in the top left corner to prevent the adhesive from resealing.
-
-
-
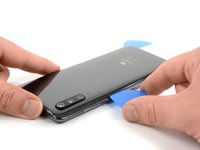
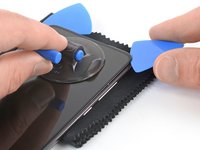
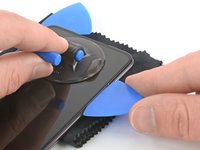
Insert a fourth opening pick under the top left corner of the rear glass.
-
Slide the opening pick along the top to cut the adhesive.
-
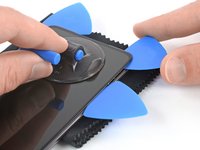
Leave the opening pick in the top right corner to prevent the adhesive from resealing.
Be very careful at this point not to raise the cover too much, at the slightest bending the glass shatters. It just happened to me :(
-
-
-
Insert a fifth opening pick at the top right corner of the phone.
-
Slide the opening pick along the right edge to cut the remaining adhesive.
-
-
-
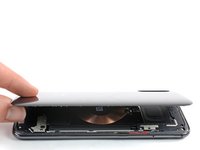
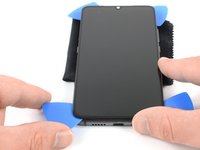
Carefully lift the rear glass and remove it.
Il y a un peu d'adhésif autour de l'appareil photo, c'est pour cela que ça peu forcer un tout petit peu.
-
-
-
Remove the ten Phillips #00 screws (3 mm length) that secure the motherboard cover.
Note, the Explorer/Transparent edition does not use phillips #00 screws.
It uses 0.8mm star screws(P2 Pentalobe in the iFixIt store)
Thanks for mentioning Jason!
-
-
-
Insert an opening pick at the top right corner of the motherboard cover.
-
Twist the opening pick sideways to pry up and slightly lift the motherboard cover.
-
-
-
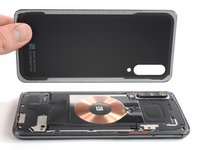
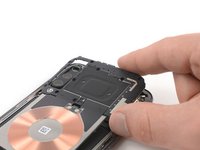
Carefully remove the motherboard cover including the charging coil / NFC antenna.
-
-
-
-
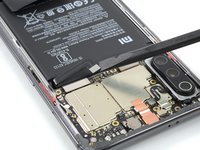
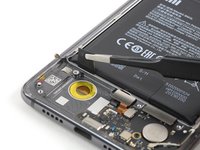
Use a spudger to pry up and disconnect the battery flex cable.
-
-
-
Remove the seven Phillips #00 screws securing the loudspeaker unit:
-
Four silver 3.2 mm long screws
-
Two yellowish 3.8 mm long screws
-
One black 2.8 mm long screw
I found that there was no need to remove the loudspeaker assembly at all. The battery adhesive was easy to pull out (by rolling it up on a screwdriver) without needing to remove the loudspeaker.
I can confirm this. Worked like a charm without taking the loudspeaker assembly out.
Ich stellte fest, dass es überhaupt nicht nötig war, die Lautsprecherbaugruppe zu entfernen. Der Batteriekleber ließ sich leicht herausziehen (durch Aufrollen mit einem Schraubenzieher), ohne dass der Lautsprecher entfernt werden musste.
Gegenteilig sogar! Das Antennenkabel löste sich und hat dann außerordentlich viel Zeit gekostet den Stecker zu reparieren!! -
-
-
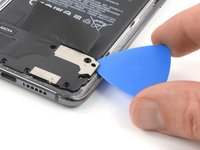
Slide an opening pick under the right side of the loudspeaker unit.
-
Twist the opening pick sideways to pry up the loudspeaker unit until you can get a good grip.
-
-
-
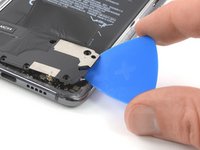
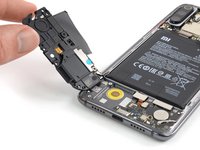
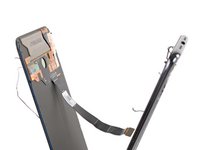
Carefully lift the loudspeaker unit and hinge it open towards the left side.
-
-
crwdns2935267:0crwdne2935267:0Tweezers$4.99
-
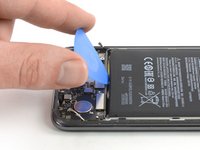
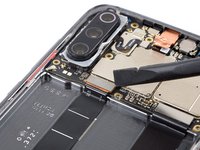
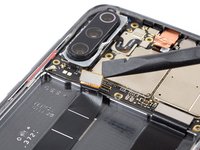
Use a pair of tweezers to pry off and disconnect the antenna cable from the loudspeaker unit.
-
Remove the loudspeaker unit.
-
-
crwdns2935267:0crwdne2935267:0Tweezers$4.99
-
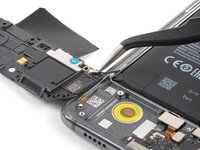
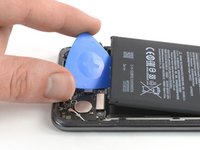
Use a pair of tweezers to peel the black ends of the adhesive tabs off the battery.
-
-
crwdns2935267:0crwdne2935267:0Plastic Cards$2.99
-
Use a pair of tweezers to pull out the left adhesive tab from underneath the battery.
Be careful with this one. My fully charged battery catch fire.
I tried to forcefully remove the battery after ripping the adhesive tab. I was bending it a lot.
It started to burn and smoke a lot. I didnt get any burn wounds but it left some nasty marks on the floor even though I throw it out on the balcony after 1 second.
-
-
-
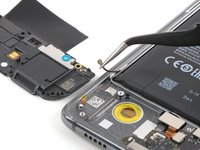
Use a pair of tweezers to pull out the right adhesive tab from underneath the battery.
-
-
-
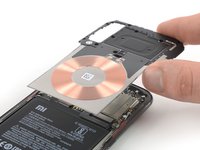
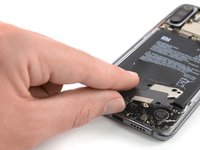
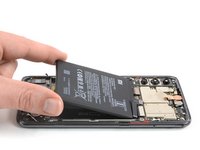
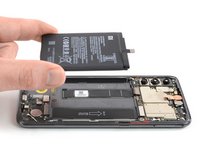
Use an opening pick to pry the battery out of its recess until you can get a good grip.
-
-
crwdns2935267:0crwdne2935267:0Tweezers$4.99
-
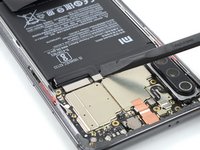
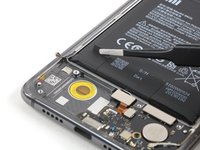
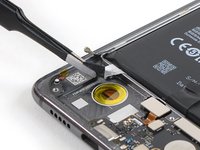
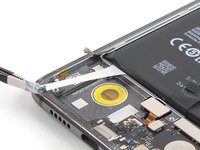
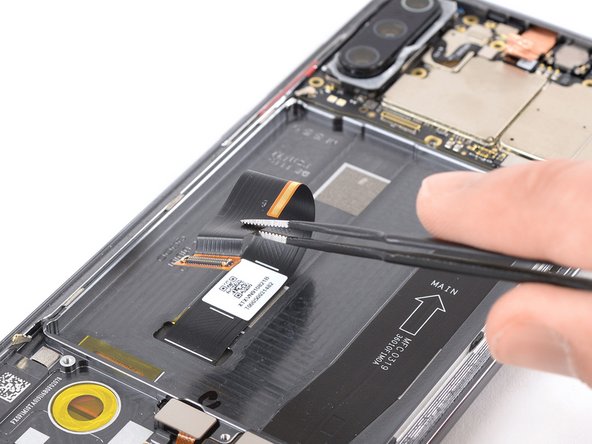
Use a spudger to pry up and disconnect the display flex cable.
-
Use a pair of tweezers to peel the display flex cable off the midframe. It is attached with mild adhesive.
-
-
-
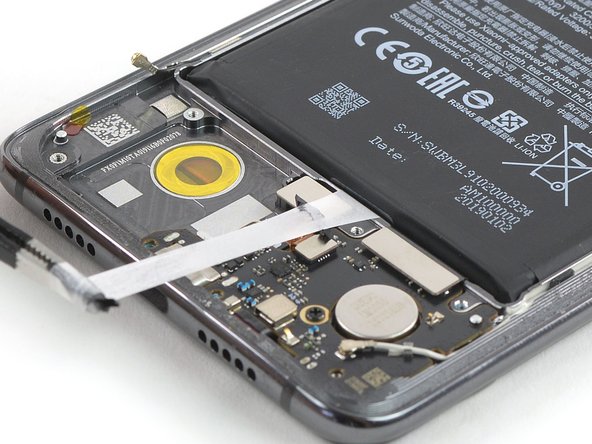
Apply a heated iOpener to the display for two minutes to loosen the adhesive beneath.
-
-
-
Apply a suction handle near the top edge of the phone right under the earpiece speaker.
-
Use the suction handle to pull up the screen and insert just the tip of an opening pick under the right edge of the speaker recess.
-
Rotate the opening pick sideways to bring the long edge of the pick under the display glass and slide it to the top right corner. Leave it there to prevent the adhesive from resealing.
-
-
-
Repeat the previous process on the left corner of the speaker recess and slide the long edge of an opening pick to the top left corner of the phone.
-
Leave the opening pick in its place to prevent the adhesive from resealing.
-
-
-
Slide the long edge of the first opening pick around the top right corner and along the right edge of the phone.
-
Leave the opening pick where the power and volume buttons are located to generate a bigger gap between the midframe and display glass.
-
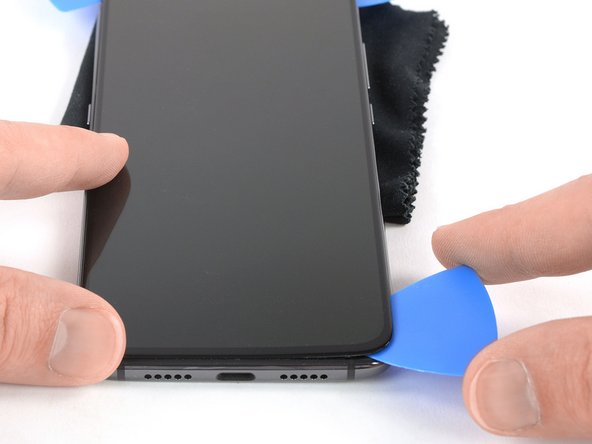
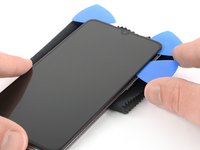
Insert a third opening pick at the top right edge of the screen. Make sure to slide it underneath the AMOLED and not between the the display glass and panel.
-
-
-
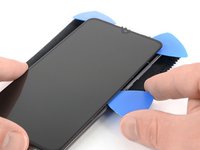
Reposition the opening pick above the power and volume buttons so that the tip of the opening pick is placed underneath the display panel too.
-
Slide the opening pick to the bottom right of the phone to cut the adhesive. Leave it there to prevent the adhesive from resealing.
-
-
-
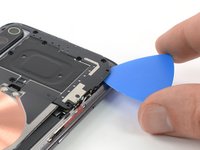
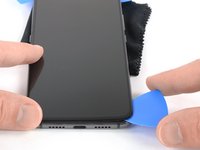
Insert a fourth opening pick underneath the display panel at the top left corner of the phone.
-
Slide the opening pick along the side towards and around the bottom left corner of the phone to cut the adhesive.
-
-
-
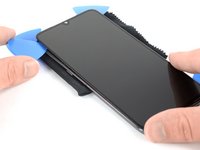
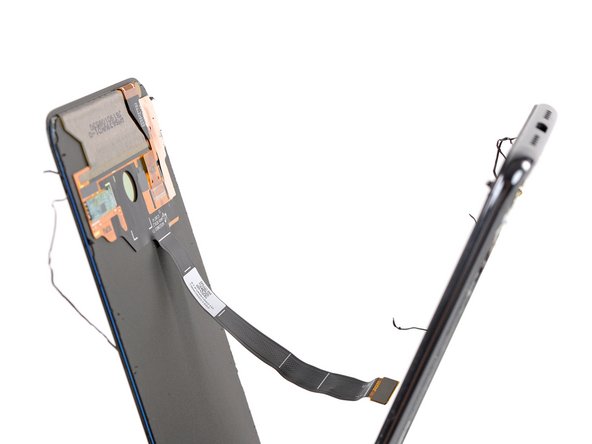
Slowly separate the screen from the frame and cut any remaining adhesive. Make sure the flex cable is no longer stuck to the frame and carefully thread it through its gap.
-
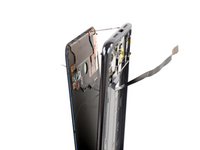
Remove the screen.
-


If possible, turn on your phone and test your repair before installing new adhesive and resealing the phone.
The best way to secure the new screen is with a sheet of custom-cut double-sided tape. Apply the tape to the back of the screen, then carefully feed the display cable through the frame. Align the screen and press it into place.
To reassemble your device, follow these instructions in reverse order.
Take your e-waste to an R2 or e-Stewards certified recycler.
Repair didn’t go as planned? Check out our Answers community for troubleshooting help.
crwdns2935221:0crwdne2935221:0
crwdns2935229:022crwdne2935229:0


crwdns2947412:014crwdne2947412:0
Hat jemand einen Tipp, womit ich das neue Display einklebe?
Doppeltes Klebeband. Gibts auch amazon passgenau oder du bastelt dir selbst wad
¿Sabe de alguna pagina donde pueda conseguir la pantalla original?
il manque la partie ou on enlève la batterie (via les petit scotch. de plus la première étape devait être d’enlever le tiroir pour la carte sim
Bonjour Mathieu, merci de votre attention et de votre remarque. La partie du retrait de la batterie a été ajoutée. Par contre, la carte SIM qui se trouve derrière la carte mère ne dérange pas la procédure. Il n’est donc pas nécessaire de commencer par la retirer. J’espère que vous avez à présent toutes les infos pour effectuer la réparation. Bonne continuation !
Bonjour
est ce que les écrans des MI9 Standard / lite et SE sont les mêmes (ou compatible) ?
Merci
Yohann
Hi Yohann,
the Xiaomi Mi 9 SE has a 5.97 inch screen while the Mi 9 and the Mi 9 lite have 6.39 inches. So there’s no compatibility here. Regarding the Mi 9 and the Mi 9 lite all I can say is, that the Glass Protection is different between them (Corning Gorilla Glass 5 respectively 6). Besides that the screen specs look kind of the same but I can’t guarantee that they are interchangeable.
Hi Dominik
this is a very accurate and helpful answer. I’ll need to be carefull when choosing the vendor because they don’t always indicate clearly the destination of glass.
Thank you very much
Regards
Yohann
Wie kann ich die gesplitterte Frontscheibe ersetzen.
Das Frontglas ist gesplittert
Was muss
Wenn wirklich nur das Frontglas gesplittert ist, das Display aber funktioniert, kannst du es laut diesem Video allein ersetzen: https://youtu.be/i3lJQ7z1cy8?t=527 Du musst das Display trotzdem ausbauen, dann erhitzen und dann das Glas vom Display lösen. Und natürlich brauchst du das Glas als Ersatzteil.
Was hier vielleicht noch wichtig zu erwähnen ist: Nach dem Displaytausch muss man höchstwahrscheinlich den Fingerabdrucksensor neu kalibireren, zumindest wenn einem auffällt, dass dieser nicht mehr richtig funktioniert. Dafür nimmt man am besten ein spezielles Tool (z.B. RELIFE RL 071B). Bevor man sich jetzt aber direkt das (oder ein ähnliches) Ding bestellt, vorher vielleicht einmal das Entsperrmuster entfernen (was auch alle Fingerabdrücke löscht), das Ensperrmuster wieder aktivieren und dann versuchen neue Fingerabdrücke hinzuzufügen. Wenn das klappt, kann man sich die Kalibration natürlich sparen ;)
Über den USSD-Code " *#*#64663#*#* " kommt man in das QC-Menü. Dort über das Kebap-Menü oben rechts auf "Additional tools" und den Punkt "12. fod fingerprint calibration" auswählen. Hier muss man dann die verschiedenen Pads des Kalibrations-Tools auflegen, einfach den Anweisungen auf dem Screen folgen.
Great guide, my phone (Mi9) decided to die 2 days ago, where can i buy the entire front screen from a thrusty place and good price?
Ciao, mancano le indicazioni di sostituzione del frame (touchscreen), e non solo del display.
Sarebbe possibile un'integrazione?
Grazie e ciao