crwdns2933423:0crwdne2933423:0

Xiaomi Mi 10 Battery Replacement

crwdns2942213:0crwdne2942213:0

  1. Xiaomi Mi 10 Battery Replacement, Heat the rear glass: crwdns2935265:01crwdnd2935265:01crwdnd2935265:01crwdne2935265:0
    • Before you begin, switch off your phone.

    • Apply a heated iOpener to the back of the phone to loosen the adhesive beneath the back cover. Apply the iOpener for at least two minutes.

  2. Xiaomi Mi 10 Battery Replacement, Insert the iFlex: crwdns2935265:02crwdnd2935265:01crwdnd2935265:02crwdne2935265:0 Xiaomi Mi 10 Battery Replacement, Insert the iFlex: crwdns2935265:02crwdnd2935265:02crwdnd2935265:02crwdne2935265:0
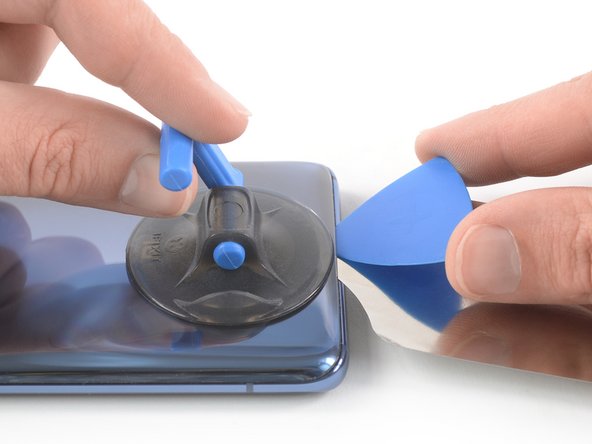
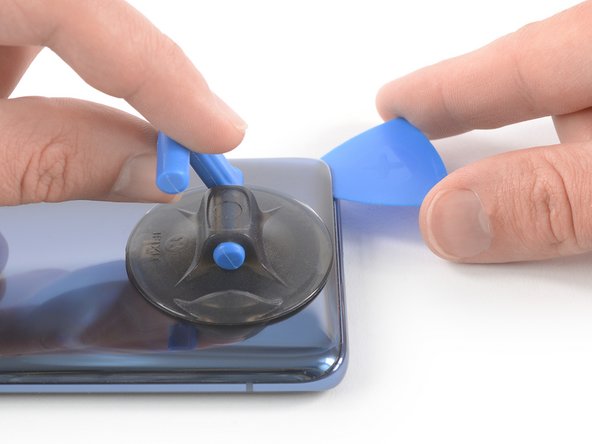
    • Secure a suction handle to the bottom of the rear glass, as close to the edge as possible.

    • If the phone's rear glass is cracked, the suction handle may not stick. Try lifting it with strong tape, or superglue the suction handle in place and allow it to cure so you can proceed.

    • Lift the rear glass with the suction handle to create a small gap between the glass and the frame.

    • The rear glass of the Xiaomi Mi 10 sits tightly in place. In order to create a gap that is big enough to insert an opening pick, you need to insert an iFlex first.

    • Insert the iFlex into the gap and leave it in place to prevent the adhesive from resealing.

  3. Xiaomi Mi 10 Battery Replacement, Begin to slice the adhesive: crwdns2935265:03crwdnd2935265:01crwdnd2935265:03crwdne2935265:0 Xiaomi Mi 10 Battery Replacement, Begin to slice the adhesive: crwdns2935265:03crwdnd2935265:02crwdnd2935265:03crwdne2935265:0 Xiaomi Mi 10 Battery Replacement, Begin to slice the adhesive: crwdns2935265:03crwdnd2935265:03crwdnd2935265:03crwdne2935265:0
    • Insert an opening pick into the gap you created with the iFlex.

    • Slide the opening pick to the bottom right corner.

    • At this point you can remove the iFlex from the phone.

  4. Xiaomi Mi 10 Battery Replacement, Slice the bottom edge adhesive: crwdns2935265:04crwdnd2935265:01crwdnd2935265:02crwdne2935265:0 Xiaomi Mi 10 Battery Replacement, Slice the bottom edge adhesive: crwdns2935265:04crwdnd2935265:02crwdnd2935265:02crwdne2935265:0
    • Insert a second opening pick and slide it to the bottom left corner to cut the adhesive.

    • Leave the opening picks in place to prevent the adhesive from resealing.

  5. Xiaomi Mi 10 Battery Replacement, Slice the lefthand-side adhesive: crwdns2935265:05crwdnd2935265:01crwdnd2935265:03crwdne2935265:0 Xiaomi Mi 10 Battery Replacement, Slice the lefthand-side adhesive: crwdns2935265:05crwdnd2935265:02crwdnd2935265:03crwdne2935265:0 Xiaomi Mi 10 Battery Replacement, Slice the lefthand-side adhesive: crwdns2935265:05crwdnd2935265:03crwdnd2935265:03crwdne2935265:0
    • Insert a third opening pick at the bottom left corner.

    • Slide the tip of the opening pick from the bottom left corner along the side of the phone to cut the adhesive.

    • Leave the opening pick in its place at the top left corner to prevent the adhesive from resealing.

  6. Xiaomi Mi 10 Battery Replacement, Slice the top edge adhesive: crwdns2935265:06crwdnd2935265:01crwdnd2935265:02crwdne2935265:0 Xiaomi Mi 10 Battery Replacement, Slice the top edge adhesive: crwdns2935265:06crwdnd2935265:02crwdnd2935265:02crwdne2935265:0
    • If the adhesive becomes hard to cut, it has most likely cooled down. Use your iOpener to reheat it.

    • Insert a fourth opening pick under the top left corner of the rear glass.

    • Slide the opening pick along the top edge of the phone to cut the adhesive.

    • Leave the opening pick in the top right corner to prevent the adhesive from resealing.

  7. Xiaomi Mi 10 Battery Replacement, Slice the righthand-side adhesive: crwdns2935265:07crwdnd2935265:01crwdnd2935265:02crwdne2935265:0 Xiaomi Mi 10 Battery Replacement, Slice the righthand-side adhesive: crwdns2935265:07crwdnd2935265:02crwdnd2935265:02crwdne2935265:0
    • Insert a fifth opening pick at the top right corner of the phone.

    • Slide the opening pick along the right side to cut the remaining adhesive.

  8. Xiaomi Mi 10 Battery Replacement, Remove the rear glass: crwdns2935265:08crwdnd2935265:01crwdnd2935265:02crwdne2935265:0 Xiaomi Mi 10 Battery Replacement, Remove the rear glass: crwdns2935265:08crwdnd2935265:02crwdnd2935265:02crwdne2935265:0
    • Remove the rear glass.

    • During reassembly, this is a good point to power on your phone and test all functions before sealing it up. Be sure to power your phone back down completely before you continue working.

  9. Xiaomi Mi 10 Battery Replacement, Unfasten the screws: crwdns2935265:09crwdnd2935265:01crwdnd2935265:01crwdne2935265:0
    • Remove the four 4.9 mm Phillips #00 screws.

  10. Xiaomi Mi 10 Battery Replacement, Loosen the charging coil adhesive: crwdns2935265:010crwdnd2935265:01crwdnd2935265:02crwdne2935265:0 Xiaomi Mi 10 Battery Replacement, Loosen the charging coil adhesive: crwdns2935265:010crwdnd2935265:02crwdnd2935265:02crwdne2935265:0
    • Use an opening pick to slice the adhesive underneath the black protective mat covering the upper loudspeaker assembly.

  11. Xiaomi Mi 10 Battery Replacement, Loosen the bottom adhesive: crwdns2935265:011crwdnd2935265:01crwdnd2935265:02crwdne2935265:0 Xiaomi Mi 10 Battery Replacement, Loosen the bottom adhesive: crwdns2935265:011crwdnd2935265:02crwdnd2935265:02crwdne2935265:0
    • Use an opening pick to slice the adhesive underneath the black protective mat covering the bottom loudspeaker assembly.

  12. Xiaomi Mi 10 Battery Replacement, Loosen the NFC & charging coil assembly: crwdns2935265:012crwdnd2935265:01crwdnd2935265:03crwdne2935265:0 Xiaomi Mi 10 Battery Replacement, Loosen the NFC & charging coil assembly: crwdns2935265:012crwdnd2935265:02crwdnd2935265:03crwdne2935265:0 Xiaomi Mi 10 Battery Replacement, Loosen the NFC & charging coil assembly: crwdns2935265:012crwdnd2935265:03crwdnd2935265:03crwdne2935265:0
    crwdns2935267:0crwdne2935267:0
    Plastic Cards
    $2.99
    • There is a small piece of protective copper foil underneath the NFC and charging coil assembly. Avoid damaging it during the following procedure.

    • Slide a plastic card or playing card underneath the NFC and charging coil assembly.

    • Use the card to carefully loosen the adhesive underneath the left edge of the assembly.

    • To make this process easier, you can apply a heated iOpener to the left edge of the NFC and charging coil assembly to soften the adhesive.

    • Do not remove the NFC and charging coil assembly all the way yet. It is still glued to the motherboard cover.

  13. Xiaomi Mi 10 Battery Replacement, Fold over the NFC & charging coil assembly: crwdns2935265:013crwdnd2935265:01crwdnd2935265:02crwdne2935265:0 Xiaomi Mi 10 Battery Replacement, Fold over the NFC & charging coil assembly: crwdns2935265:013crwdnd2935265:02crwdnd2935265:02crwdne2935265:0
    • Carefully fold the NFC & charging coil assembly to the left side of the phone.

    Do I have to replace the detached adhesive in any way before resealing? or should I simply heat it up again and then close to use the same glue?

    Giovanni Marseglia - crwdns2934203:0crwdne2934203:0

  14. Xiaomi Mi 10 Battery Replacement, Unfasten the screws: crwdns2935265:014crwdnd2935265:01crwdnd2935265:01crwdne2935265:0
    • Remove the five 4.9 mm Phillips #00 screws.

  15. Xiaomi Mi 10 Battery Replacement, Pry up the motherboard cover: crwdns2935265:015crwdnd2935265:01crwdnd2935265:02crwdne2935265:0 Xiaomi Mi 10 Battery Replacement, Pry up the motherboard cover: crwdns2935265:015crwdnd2935265:02crwdnd2935265:02crwdne2935265:0
    • Slide an opening pick underneath the bottom right edge of the motherboard cover.

    • Use the opening pick to pry up the motherboard cover.

    This is useless. I'm sitting before my Xiaomi 10 5G and this compononent sticks together and I don't know what to do.

    And I'm certainly NOT RISKING to damage anything by just listening to this sloppy instruction.

    Thank You for absolutely nothing.

    Aleksandar Dejanovic - crwdns2934203:0crwdne2934203:0

    So, I've made it and that what sticks together is the Copperband strip You see on the top.

    It is depressed in the center and that's where You have to separate it (relative) carefully.

    You could, albeit on Your own risk, use a siringe + fine needle filled with 99% Isopropanol and inject a small ammount above a pry tool while it is gently pushed against the glued point.

    The pry tool would also serve to support the direction where the Isopropanol flows.

    Aleksandar Dejanovic -

    the copper piece has broken, is there a way to replace it or does it not affect a problem? The smarphone for now work normally

    Best Regards

    Gianmarco Waller - crwdns2934203:0crwdne2934203:0

  16. Xiaomi Mi 10 Battery Replacement, Remove the motherboard cover: crwdns2935265:016crwdnd2935265:01crwdnd2935265:02crwdne2935265:0 Xiaomi Mi 10 Battery Replacement, Remove the motherboard cover: crwdns2935265:016crwdnd2935265:02crwdnd2935265:02crwdne2935265:0
    • Remove the motherboard cover including the NFC and charging coil assembly.

  17. Xiaomi Mi 10 Battery Replacement, Disconnect the battery: crwdns2935265:017crwdnd2935265:01crwdnd2935265:02crwdne2935265:0 Xiaomi Mi 10 Battery Replacement, Disconnect the battery: crwdns2935265:017crwdnd2935265:02crwdnd2935265:02crwdne2935265:0
    • Use the flat end of a spudger to pry up and disconnect the battery flex cable.

  18. Xiaomi Mi 10 Battery Replacement, Unfasten the screws: crwdns2935265:018crwdnd2935265:01crwdnd2935265:01crwdne2935265:0
    • Remove the three Phillips #00 screws securing the upper loudspeaker assembly.

  19. Xiaomi Mi 10 Battery Replacement, Pry up the loudspeaker assembly: crwdns2935265:019crwdnd2935265:01crwdnd2935265:02crwdne2935265:0 Xiaomi Mi 10 Battery Replacement, Pry up the loudspeaker assembly: crwdns2935265:019crwdnd2935265:02crwdnd2935265:02crwdne2935265:0
    • Insert an opening pick underneath the bottom left edge of the upper loudspeaker assembly.

    • Use the opening pick to pry up the loudspeaker assembly.

  20. Xiaomi Mi 10 Battery Replacement, Remove the loudspeaker: crwdns2935265:020crwdnd2935265:01crwdnd2935265:02crwdne2935265:0 Xiaomi Mi 10 Battery Replacement, Remove the loudspeaker: crwdns2935265:020crwdnd2935265:02crwdnd2935265:02crwdne2935265:0
    • Remove the upper loudspeaker assembly.

  21. Xiaomi Mi 10 Battery Replacement, Disconnect the interconnect cable: crwdns2935265:021crwdnd2935265:01crwdnd2935265:03crwdne2935265:0 Xiaomi Mi 10 Battery Replacement, Disconnect the interconnect cable: crwdns2935265:021crwdnd2935265:02crwdnd2935265:03crwdne2935265:0 Xiaomi Mi 10 Battery Replacement, Disconnect the interconnect cable: crwdns2935265:021crwdnd2935265:03crwdnd2935265:03crwdne2935265:0
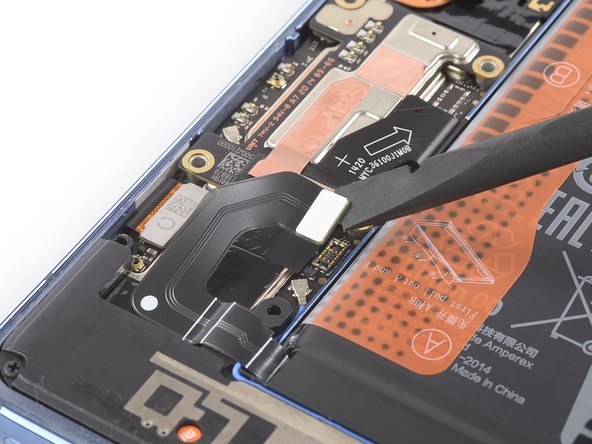
    • Use the flat end of a spudger to pry up and disconnect the interconnect cable covering the top edge of the battery.

    • Fold the interconnect flex cable to the left side of the phone to get free access to the battery.

    Hi Sir, I accidentaly tear this flex interconnect cable when pull up the battery
    But after battery replacement done my Mi 10 seems no problems
    Pls advise what is that flex function, thank's

    Mo Nawi - crwdns2934203:0crwdne2934203:0

  22. Xiaomi Mi 10 Battery Replacement, Peel off the pull tabs: crwdns2935265:022crwdnd2935265:01crwdnd2935265:03crwdne2935265:0 Xiaomi Mi 10 Battery Replacement, Peel off the pull tabs: crwdns2935265:022crwdnd2935265:02crwdnd2935265:03crwdne2935265:0 Xiaomi Mi 10 Battery Replacement, Peel off the pull tabs: crwdns2935265:022crwdnd2935265:03crwdnd2935265:03crwdne2935265:0
    • Use your fingers to peel both ends of the orange pull tab marked A off the battery.

    • Peel the smaller tab marked B off the battery.

  23. Xiaomi Mi 10 Battery Replacement, Pull up the battery: crwdns2935265:023crwdnd2935265:01crwdnd2935265:02crwdne2935265:0 Xiaomi Mi 10 Battery Replacement, Pull up the battery: crwdns2935265:023crwdnd2935265:02crwdnd2935265:02crwdne2935265:0
    • Grasp both ends of the orange pull tab A.

    • Pull upwards to lift the battery out of its recess.

  24. Xiaomi Mi 10 Battery Replacement, Remove the battery: crwdns2935265:024crwdnd2935265:01crwdnd2935265:02crwdne2935265:0 Xiaomi Mi 10 Battery Replacement, Remove the battery: crwdns2935265:024crwdnd2935265:02crwdnd2935265:02crwdne2935265:0
    • Peel the battery off of the adhesive pad.

    • Remove the battery.

    • Do not reinstall a damaged or deformed battery, as doing so is a potential safety hazard.

    • Before you adhere the replacement battery:

    • Temporarily reconnect the battery connector to the motherboard socket. This ensures that the battery is properly aligned in its recess.

    • Adhere the battery, disconnect it, and continue reassembling your device.

crwdns2915888:0crwdne2915888:0

If possible, turn on your device and test your repair before installing new adhesive and resealing.

Secure the new battery with pre-cut adhesive or double-sided adhesive tape. In order to position it correctly, apply the new adhesive into the device at the places where the old adhesive was located, not directly onto the battery. Press the new battery firmly into place.

To reassemble your device, follow these instructions in reverse order. Apply new adhesive where necessary after cleaning the relevant areas with isopropyl alcohol (>90%).

For optimal performance, calibrate your newly installed battery.

Take your e-waste to an R2 or e-Stewards certified recycler.

Repair didn’t go as planned? Try some basic troubleshooting, or ask our Answers community for help.

crwdns2935229:013crwdne2935229:0

Dominik Schnabelrauch

crwdns2935283:011/23/16crwdne2935283:0

232,450 crwdns2915208:0crwdne2915208:0

crwdns2935297:0682crwdne2935297:0

crwdns2915084:0crwdne2915084:0

iFixit crwdns2935289:0iFixitcrwdne2935289:0

Staff

crwdns2931471:0121crwdne2931471:0

crwdns2935297:019,996crwdne2935297:0

crwdns2947412:02crwdne2947412:0

Perfect guide, thank you!

It was very easy to change the battery. Only (beginners fault) problem is that I cracked the glass back side of the phone :)

Jorick - crwdns2934203:0crwdne2934203:0

crwdns2917038:0crwdne2917038:0

crwdns2936625:0crwdne2936625:0:

crwdns2936751:024crwdne2936751:0 21

crwdns2936753:07crwdne2936753:0 180

crwdns2936753:030crwdne2936753:0 1,043

crwdns2942667:0crwdne2942667:0 41,010