crwdns2915892:0crwdne2915892:0
This guide will show you how to replace the joystick on your Xbox Series X Wireless Controller (Model 1914) and fix stick drift.
Note: This guide requires soldering. For more information on soldering take a look at this guide for How to Solder and Desolder Connections.
Caution: The soldering iron gets very hot and can cause injury.
Note: It is also important to solder in a well-ventilated room.
crwdns2942213:0crwdne2942213:0
-
-
Start by flipping the controller over and opening the battery compartment located on the middle back of the controller.
-
Remove the batteries. Place both the cover and the batteries off to the side for now.
-
-
-
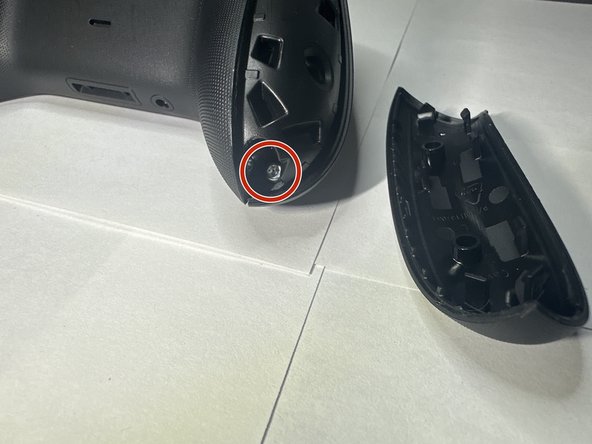
Next, take your opening tool and pry off the grip plates.
-
Using your opening tool, insert it into the grove found on the back of the grips.
-
Slide the tool throughout the groove, apply more pressure when you feel more resistance.
-
Repeat this until the grip cover comes off.
-
Do the same for the other grip.
-
-
-
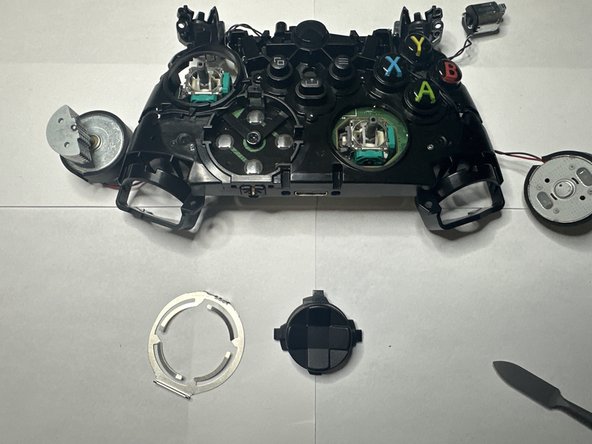
After removing the grip plates, remove the 5 screws holding the front plate.
-
The screws are shown in the picture with two in each grip and one in the battery bay.
-
-
-
After removing the back screws, the face plate should be easy to remove. Remove it and place it to the side for later.
-
Next, locate the joysticks covers and remove them by simply pulling them up from the controller.
-
Place the joysticks off to the side.
-
-
-
Place your spudger as shown and gently peel the sync button plate off using the same method as before.
-
Remove the plate and place it off to the side for later.
-
-
-
After that, locate the RB and LB bumper piece and using your metal spudger, place it between the frame and the hinge.
-
Gently pry the piece away and off, doing the same for the other end of the bumper piece.
-
Having done this successfully, the bumper piece should come off cleanly and with little effort.
-
Set the bumper piece off to the side.
-
-
-
-
By now, the back plastic frame should simply fall off the main components.
-
Take the back piece off and leave it off to the side for now.
-
-
-
Take the main piece and flip it over to show the main components.
-
Next, we will be removing both triggers.
-
Move the triggers forward and expose the back parts of the trigger.
-
Using the T6 sized bit, remove the screw from the trigger and place it safely off to the side.
-
Do the same for the other trigger and set the pieces off to the side.
-
-
-
With the trigger frames out of the way, remove the trigger weights from the triggers and place them out of the way.
-
-
-
Next, we will disconnect the wires for the select and menu buttons.
-
Using either your fingers or a set of tweezers, gently pull the connection up and away to disconnect it.
-
Do this for both connections.
-
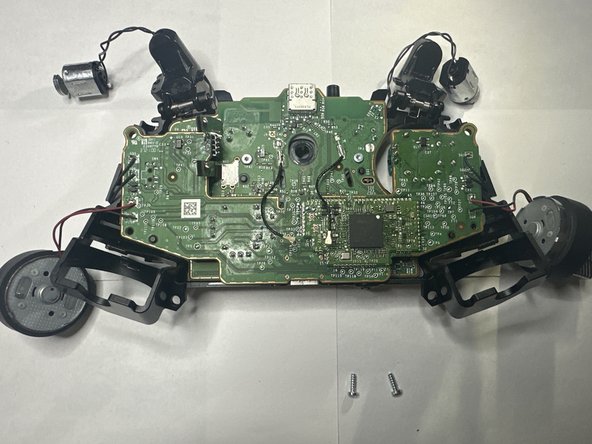
While here, remove the two screws above the connections. These connect the motherboard to the frame.
What screws you never even took them out if they are the ones in the middle and they’re not even connected to the motherboard with the joystick which we are focusing on
-
-
-
Next is the grip rumble weights.
-
Simply using your hands or forceps, remove the weights by sliding them towards you and lifting them out.
-
-
-
With both set of rumble weights out of the way, next is the board screws.
-
Using the T6 bit screwdriver, unscrew the screws located on next to where the grip rumble weights were.
-
Set these screws aside for now.
-
-
-
Flip the controller over.
-
Following the cord attached to the trigger it should be attached to the controller via small tracks.
-
Gently pull the wire out from the tracks and lay the wire and trigger parts out of the way.
-
-
-
Find the D-pad plate surrounding the outer rim of the D-pad.
-
Using your spudger, slide it underneath the piece and pull it up from the controller.
-
Remove the plate and set it to the side.
-
Remove the D-pad from the controller and set aside for now.
-
-
-
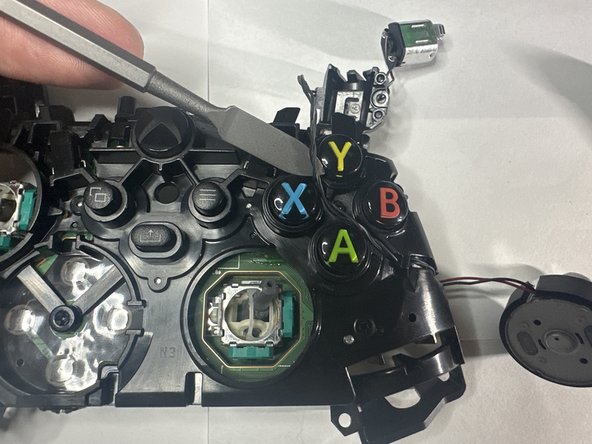
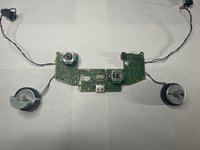
Isolate the motherboard. It will be attached to the joysticks.
-
Lay the board flat and observe for any debris or clear obstructions.
-
-
-
Flip the board over.
-
Locate the joystick solder nubs on the back of the bottom of the board.
-
Using the soldering iron, heat it up to around 350-375 degrees Fahrenheit and lay the tip on the aforementioned nubs.
-
Hold it for around 5-7 seconds or until the solder nub liquefies. Repeat this for the rest of the nubs.
-
Having done this, the joystick should slide out the board. Install the replacement joystick by sliding in the joystick prongs into the slots that the old joystick sat in.
-
With the joystick in, solder the prongs until they are secured into place on the boards.
Voici quelques précisions sur le dessoudage des sticks :
- Si utilisation d'un fer à souder, ne pas oublier d'aspirer la soudure fondue à l'aide d'une pompe. Ce n'est pas très facile... Il y a 14 plots à dessouder.
- Le mieux est d'utiliser (dans la mesure du possible) l'air chaud réglé à 300/350°C en tournant la buse (la petite, jet de 4 mm environ) doucement le plus près possible des plots de soudure pendant une dizaine de secondes. Les plots fondent tous ensemble. Il faut avoir prévu le maintien du stick avec une pince qui servira à extraire le stick HS complet de sa carte-mère. Ensuite, de la soudure reste dans les trous de fixation. Bien nettoyer ces trous en appuyant en biais la pointe fine d'un fer à souder d'un côté et en même temps aspirer de l'autre côté avec une pompe. Passer délicatement un peu d'alcool avec un coton-tige pour éliminer les micro-particules d'étain entre les plots qui pourraient être en court-circuit. Vous aurez alors place nette pour insérer le nouveau stick sans effort.
-


To reassemble your device, follow these instructions in reverse order.
To reassemble your device, follow these instructions in reverse order.
crwdns2935221:0crwdne2935221:0
crwdns2935229:05crwdne2935229:0

crwdns2915084:0crwdne2915084:0

CSU Los Angeles, Team 7-11, Grodsky Spring 2024 crwdns2935289:0CSU Los Angeles, Team 7-11, Grodsky Spring 2024crwdne2935289:0
CSULA-GRODSKY-S24S7G11
crwdns2931471:02crwdne2931471:0
crwdns2935297:06crwdne2935297:0
crwdns2947412:04crwdne2947412:0
Granted I've only ever soldered and desoldered keyboards before, but I'm relatively sure that this is impossible without a hot air reflow station. Keeping all 10 solder joints hot enough to get the joystick out was impossible in my opinion, I couldn't do it. So much for those hall effect joysticks I bought...
Get a solder sucker or one of those copper thingys, they cost under 10 bucks and work just fine for stuff like this
ifixit themself made a video guide on this recently
Use solder wick (the copper thingy Verhulstak mentions) to get the solder sucked out of there. I think the video posted by ifixit has this process explained more thoroughly, I suggest you follow that.
Just watched the video that they put out and I'm considering trying again - I think my problem was that I was using low quality solder wick.
Not gonna lie, from using solder suckers fairly often I do not think that's the move here, solder wick is what you want to do. Cutting it like the video is also important, I didn't do that and I'm assuming that's why it didn't work for me the first time.
David C -