crwdns2933423:0crwdne2933423:0

Xbox Series X SSD Replacement

crwdns2942213:0crwdne2942213:0

  1. Xbox Series X SSD Replacement, Uncover the back panel screws: crwdns2935265:01crwdnd2935265:01crwdnd2935265:02crwdne2935265:0 Xbox Series X SSD Replacement, Uncover the back panel screws: crwdns2935265:01crwdnd2935265:02crwdnd2935265:02crwdne2935265:0
    • Before you begin, completely power down and unplug all cables from your console.

    • Use a pair of tweezers to remove the sticker hiding the first screw on the back panel, near the base.

  2. Xbox Series X SSD Replacement: crwdns2935265:02crwdnd2935265:01crwdnd2935265:03crwdne2935265:0 Xbox Series X SSD Replacement: crwdns2935265:02crwdnd2935265:02crwdnd2935265:03crwdne2935265:0 Xbox Series X SSD Replacement: crwdns2935265:02crwdnd2935265:03crwdnd2935265:03crwdne2935265:0
    • For cleaner removal, use an iOpener or hair dryer to heat the sticker.

    • Use a pair of blunt tweezers to peel back the large sticker on the back panel to reveal the second screw.

    • You only need to peel this sticker to where you can access the hidden screw. You don't need to pull it completely off.

    • Technically, these are tamper-evident stickers, but don't worry—Microsoft can't legally void your warranty, as long as you don't damage anything. Have fun!

    Recommend using a hair dryer to soften the label adhesive.

    Crash - crwdns2934203:0crwdne2934203:0

    Microsoft can void your warranty. They can use whatever excuse if it is sent in because you opened it and you cannot prove you didn’t damage it.

    DirtyD - crwdns2934203:0crwdne2934203:0

  3. Xbox Series X SSD Replacement, Remove the back panel screws: crwdns2935265:03crwdnd2935265:01crwdnd2935265:01crwdne2935265:0
    crwdns2935267:0crwdne2935267:0
    Magnetic Project Mat
    $19.95
    • Use a T8 Torx driver to remove the two 7.4 mm‑long screws securing the back panel.

    • Throughout this repair, keep track of each screw and make sure it goes back exactly where it came from to avoid damaging your console.

  4. Xbox Series X SSD Replacement, Unclip the back panel: crwdns2935265:04crwdnd2935265:01crwdnd2935265:03crwdne2935265:0 Xbox Series X SSD Replacement, Unclip the back panel: crwdns2935265:04crwdnd2935265:02crwdnd2935265:03crwdne2935265:0 Xbox Series X SSD Replacement, Unclip the back panel: crwdns2935265:04crwdnd2935265:03crwdnd2935265:03crwdne2935265:0
    • Insert the flat end of a spudger into the gap between the back panel and the shell, near the left side of the base.

    • Pry up the back panel to release it from the locking clips.

  5. Xbox Series X SSD Replacement: crwdns2935265:05crwdnd2935265:01crwdnd2935265:02crwdne2935265:0 Xbox Series X SSD Replacement: crwdns2935265:05crwdnd2935265:02crwdnd2935265:02crwdne2935265:0
    • Insert the flat end of a spudger into the gap between the back panel and the shell, near the right side of the base.

    • Pry up the back panel to release it from the locking clips.

  6. Xbox Series X SSD Replacement, Remove the back panel: crwdns2935265:06crwdnd2935265:01crwdnd2935265:03crwdne2935265:0 Xbox Series X SSD Replacement, Remove the back panel: crwdns2935265:06crwdnd2935265:02crwdnd2935265:03crwdne2935265:0 Xbox Series X SSD Replacement, Remove the back panel: crwdns2935265:06crwdnd2935265:03crwdnd2935265:03crwdne2935265:0
    • Grip the back panel at the opening you just created and pull it up and away from the shell to unclip the long edges.

    • During reassembly, press along the edges of the back panel to snap it into place.

  7. Xbox Series X SSD Replacement: crwdns2935265:07crwdnd2935265:01crwdnd2935265:03crwdne2935265:0 Xbox Series X SSD Replacement: crwdns2935265:07crwdnd2935265:02crwdnd2935265:03crwdne2935265:0 Xbox Series X SSD Replacement: crwdns2935265:07crwdnd2935265:03crwdnd2935265:03crwdne2935265:0
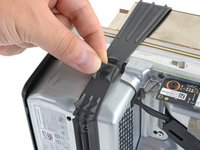
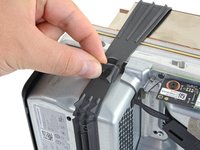
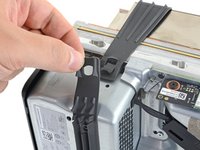
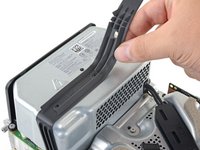
    • The back panel slots into a gap at the top of the shell.

    • Tilt the back panel up and pull it away from the top edge of the shell to release it from the gap.

    • Remove the back panel.

  8. Xbox Series X SSD Replacement, Remove the fan screws: crwdns2935265:08crwdnd2935265:01crwdnd2935265:01crwdne2935265:0
    • Use a T8 Torx driver to remove the three screws securing the fan to the center chassis:

    • One 10.5 mm pancake screw

    • Two 8.8 mm screws

    are there any 10.5mm wide head screw for the xbox fan for sale because i need a replacement because i accidentally broke mine

    GhostMindX9 - crwdns2934203:0crwdne2934203:0

    If the 10.5 mm screw isn’t budging, use some pliers to loosen it

    Joseph Grant - crwdns2934203:0crwdne2934203:0

  9. Xbox Series X SSD Replacement, Disconnect the fan cable: crwdns2935265:09crwdnd2935265:01crwdnd2935265:03crwdne2935265:0 Xbox Series X SSD Replacement, Disconnect the fan cable: crwdns2935265:09crwdnd2935265:02crwdnd2935265:03crwdne2935265:0 Xbox Series X SSD Replacement, Disconnect the fan cable: crwdns2935265:09crwdnd2935265:03crwdnd2935265:03crwdne2935265:0
    crwdns2935267:0crwdne2935267:0
    Tweezers
    $4.99
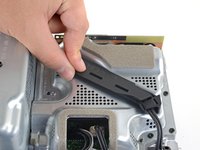
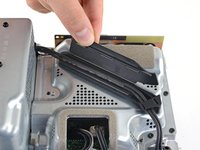
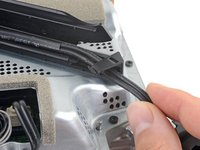
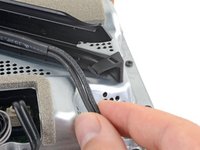
    • Use your fingers or a pair of blunt tweezers to grip the edges of the fan cable connector, and pull up to disconnect it from the center chassis.

    • Always pull cables by their connectors and not the wires themselves.

    • During reassembly, route the fan cable underneath its small cable guide on the fan housing so it doesn't interfere with the back panel.

    But don’t pull the connectors with tweezers because you will inevitably still damage the cable as you have no grip on the connector and the tweezers will slip.

    Leif DeWolf - crwdns2934203:0crwdne2934203:0

  10. Xbox Series X SSD Replacement, Remove the fan: crwdns2935265:010crwdnd2935265:01crwdnd2935265:02crwdne2935265:0 Xbox Series X SSD Replacement, Remove the fan: crwdns2935265:010crwdnd2935265:02crwdnd2935265:02crwdne2935265:0
    • Slide the fan out of its slot to remove it.

    • During reinstallation, note that the fan can only be installed one way—make sure Master Chief is facing you.

    • If you're replacing the fan, a new fan might not include the plastic installation bracket, which is attached to the fan with four T10 Torx screws. This isn't pictured in this guide.

  11. Xbox Series X SSD Replacement, Unlatch the base: crwdns2935265:011crwdnd2935265:01crwdnd2935265:03crwdne2935265:0 Xbox Series X SSD Replacement, Unlatch the base: crwdns2935265:011crwdnd2935265:02crwdnd2935265:03crwdne2935265:0 Xbox Series X SSD Replacement, Unlatch the base: crwdns2935265:011crwdnd2935265:03crwdnd2935265:03crwdne2935265:0
    • Use the flat end of a spudger to lift up on the locking tab holding the base to the shell.

  12. Xbox Series X SSD Replacement, Twist and remove the base: crwdns2935265:012crwdnd2935265:01crwdnd2935265:03crwdne2935265:0 Xbox Series X SSD Replacement, Twist and remove the base: crwdns2935265:012crwdnd2935265:02crwdnd2935265:03crwdne2935265:0 Xbox Series X SSD Replacement, Twist and remove the base: crwdns2935265:012crwdnd2935265:03crwdnd2935265:03crwdne2935265:0
    • Grip the base and rotate it counterclockwise to unlock it from the shell.

    • You may need to hold the locking tab open while you get the base started.

    • Remove the base.

    • During reassembly, drop the base tabs into their holes on the shell and twist clockwise until the base snaps into the interior locking tab.

    • When locked in place, the "Hello from Seattle" line will be parallel with the device's sides.

    had trouble getting the base off, what worked for me is setting the console on the table sitting on the base and turning the whole console while pushing down.

    techy Waterville - crwdns2934203:0crwdne2934203:0

  13. Xbox Series X SSD Replacement, Remove the optical drive screws: crwdns2935265:013crwdnd2935265:01crwdnd2935265:02crwdne2935265:0 Xbox Series X SSD Replacement, Remove the optical drive screws: crwdns2935265:013crwdnd2935265:02crwdnd2935265:02crwdne2935265:0
    • Use a T8 Torx driver to remove the two 8.8 mm screws securing the optical drive's vibration isolator to the shell: one on the base and one on the top of the isolator.

  14. Xbox Series X SSD Replacement, Remove the vibration isolator: crwdns2935265:014crwdnd2935265:01crwdnd2935265:03crwdne2935265:0 Xbox Series X SSD Replacement, Remove the vibration isolator: crwdns2935265:014crwdnd2935265:02crwdnd2935265:03crwdne2935265:0 Xbox Series X SSD Replacement, Remove the vibration isolator: crwdns2935265:014crwdnd2935265:03crwdnd2935265:03crwdne2935265:0
    • Lift up the optical drive's vibration isolator to remove it.

    • The vibration isolator grips the sides of the optical drive with silicone pads, so you may need to "walk" the isolator off of the drive to slip it off each side.

    • During reassembly, ensure the vibration isolator is pushed down and around both edges of the optical drive, so it sits flush with the rest of the center chassis.

  15. Xbox Series X SSD Replacement, Disconnect the power and data cables: crwdns2935265:015crwdnd2935265:01crwdnd2935265:03crwdne2935265:0 Xbox Series X SSD Replacement, Disconnect the power and data cables: crwdns2935265:015crwdnd2935265:02crwdnd2935265:03crwdne2935265:0 Xbox Series X SSD Replacement, Disconnect the power and data cables: crwdns2935265:015crwdnd2935265:03crwdnd2935265:03crwdne2935265:0
    crwdns2935267:0crwdne2935267:0
    Tweezers
    $4.99
    • Use a pair of blunt tweezers to grip the edges of the optical drive power connector and pull up to disconnect it from the optical drive.

    • Always pull cables by their connectors and not the wires themselves.

    • Use your fingers to pull up and disconnect the data cable from the optical drive.

    Once again, DO NOT use tweezers to pull these connectors out. That’s a great way to slip and damage something.

    Leif DeWolf - crwdns2934203:0crwdne2934203:0

    I managed to get the power connector unplugged, but the data cable just refuses to move. I've used quite a bit of force, and using any more feels like I would damage it. I have no clue on how to get it out safely :(

    Izaac Brånn - crwdns2934203:0crwdne2934203:0

    Try to "walk" the connector out: pry up one side, then the other. Best of luck!

    Carsten Frauenheim -

  16. Xbox Series X SSD Replacement, Remove the optical drive: crwdns2935265:016crwdnd2935265:01crwdnd2935265:02crwdne2935265:0 Xbox Series X SSD Replacement, Remove the optical drive: crwdns2935265:016crwdnd2935265:02crwdnd2935265:02crwdne2935265:0
    • Grip the top edge of the optical drive and pull it out of its slot in the shell to remove it.

    • During reassembly, align the pegs on the bottom edge of the optical drive with the guide holes on the bottom of the shell.

    • If the drive is misaligned, the top vibration isolator will not be able to be installed correctly, and the disc reader will be misaligned with the front of the console.

  17. Xbox Series X SSD Replacement, Disconnect the USB port cable: crwdns2935265:017crwdnd2935265:01crwdnd2935265:03crwdne2935265:0 Xbox Series X SSD Replacement, Disconnect the USB port cable: crwdns2935265:017crwdnd2935265:02crwdnd2935265:03crwdne2935265:0 Xbox Series X SSD Replacement, Disconnect the USB port cable: crwdns2935265:017crwdnd2935265:03crwdnd2935265:03crwdne2935265:0
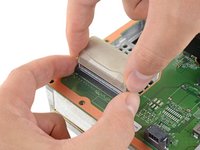
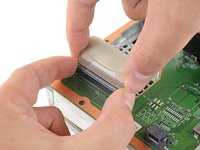
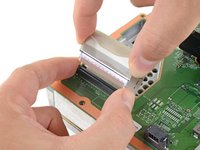
    • The ribbon cables and their connectors are extremely fragile, so always open locking tabs gently and pull cables slowly.

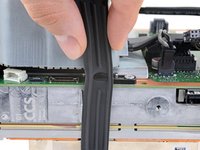
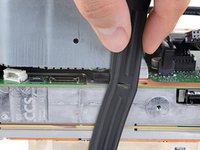
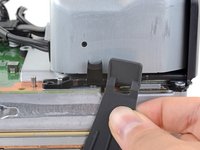
    • Use the flat end of a spudger to flip open the metal locking tab on the USB port ribbon cable.

    • During reassembly, gently snap the metal locking tab back into place once the cable has been inserted.

  18. Xbox Series X SSD Replacement: crwdns2935265:018crwdnd2935265:01crwdnd2935265:02crwdne2935265:0 Xbox Series X SSD Replacement: crwdns2935265:018crwdnd2935265:02crwdnd2935265:02crwdne2935265:0
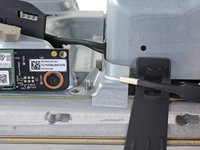
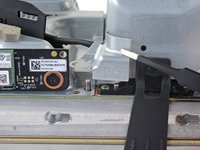
    • Use a pair of tweezers to pull up on the black plastic pull tab to disconnect the USB port cable.

    • Pull only on the pull tab, not the cable itself.

    • If the USB port cable feels adhered to the metal chassis, use an apply an iOpener or hair dryer to heat the cable. Depending on your model of Xbox, you may also need to slide an opening pick under the cable to separate the adhesive.

    The silver ribbon cable is glued down to the center chassis, so only pulling on the black plastic pull tab will result in it pulling free from the cable as that tab is only glued to the cable.

    Better to heat the silver ribbon cable's adhesive with a hair dryer, separate the cable from the center chassis, and then pull the cable from the connector using the black plastic pull tab.

    Crash - crwdns2934203:0crwdne2934203:0

  19. Xbox Series X SSD Replacement, Disconnect the power button cable: crwdns2935265:019crwdnd2935265:01crwdnd2935265:03crwdne2935265:0 Xbox Series X SSD Replacement, Disconnect the power button cable: crwdns2935265:019crwdnd2935265:02crwdnd2935265:03crwdne2935265:0 Xbox Series X SSD Replacement, Disconnect the power button cable: crwdns2935265:019crwdnd2935265:03crwdnd2935265:03crwdne2935265:0
    • Use the pointed end of a spudger to depress the metal tab on the side of the power button cable's board connector.

    • With the metal tab depressed, use a pair of tweezers to pull up on the pull tab to disconnect the power button cable from the center chassis.

    • Pull only on the pull tab, not the cable itself.

    • Don't pull on the cable without depressing the metal tab, otherwise you risk damaging either the cable or the connector.

    • During reassembly, the cable should lightly "snap" into place when inserted.

    I broke this connector during disassembly. Is there a part number I can use to get a replacement on Mouser or Digikey?

    Peter LeCraw - crwdns2934203:0crwdne2934203:0

    I broke this connector during disassembly too. Where can I get this connector?

    Oscar Cedeño - crwdns2934203:0crwdne2934203:0

    the manufacturer of connectors in series x is I-PEX.  exact part number (as far as I'm not mistaken) 20535-010E-02 EVAFLEX 5-VS.  0.5mm pin spacing (10pin connector). a possible rescue may be to desolder the connector from the switch board and solder it permanently there.

    http://www.i-pex.com/sites/default/files...

    drops206 - crwdns2934203:0crwdne2934203:0

    How do I purchase this from their website?

    munirbisharat12 -

    I have these connectors. Baycroc@fedtel.net

    Evenson Electronics - crwdns2934203:0crwdne2934203:0

    Would we be able to order them from you directly

    bailey jackson -

    Yes would we be able to order these connectors directly from you?

    Blake Roan -

    XSX NEXUS FPC Socket

    kasynlife -

    There is no black pull tab on mine😬. How am I supposed to pull it safely?

    Karman Wilmot - crwdns2934203:0crwdne2934203:0

  20. Xbox Series X SSD Replacement, Remove the chassis screws: crwdns2935265:020crwdnd2935265:01crwdnd2935265:01crwdne2935265:0
    • Use a T8 Torx driver to remove the three 7.4 mm screws securing the center chassis assembly to the shell.

  21. Xbox Series X SSD Replacement, Peel up the USB port cable: crwdns2935265:021crwdnd2935265:01crwdnd2935265:02crwdne2935265:0 Xbox Series X SSD Replacement, Peel up the USB port cable: crwdns2935265:021crwdnd2935265:02crwdnd2935265:02crwdne2935265:0
    • Gently peel the taped USB port ribbon cable off of the heatsink.

    • Depending on your model of Xbox, the adhesive may be on the underside of the cable. If so, use an iOpener or hair dryer to heat the cable.

  22. Xbox Series X SSD Replacement, Remove the center chassis assembly: crwdns2935265:022crwdnd2935265:01crwdnd2935265:03crwdne2935265:0 Xbox Series X SSD Replacement, Remove the center chassis assembly: crwdns2935265:022crwdnd2935265:02crwdnd2935265:03crwdne2935265:0 Xbox Series X SSD Replacement, Remove the center chassis assembly: crwdns2935265:022crwdnd2935265:03crwdnd2935265:03crwdne2935265:0
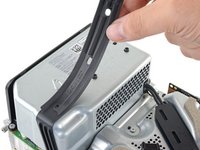
    • The center chassis is aligned to the shell with guide pegs. These pegs will need to slide out of their slots to allow the chassis to be lifted out.

    • Grip the center chassis and pull it towards the green fan grille at the top of the shell, uncoupling the guide pegs from the shell.

    • Lift out the center chassis assembly to remove it from the shell.

    • During reassembly, make sure neither of the ribbon cables get pinched as you lower the center chassis into the shell.

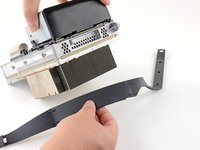
  23. Xbox Series X SSD Replacement, Unlatch the chassis strap: crwdns2935265:023crwdnd2935265:01crwdnd2935265:03crwdne2935265:0 Xbox Series X SSD Replacement, Unlatch the chassis strap: crwdns2935265:023crwdnd2935265:02crwdnd2935265:03crwdne2935265:0 Xbox Series X SSD Replacement, Unlatch the chassis strap: crwdns2935265:023crwdnd2935265:03crwdnd2935265:03crwdne2935265:0
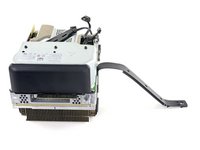
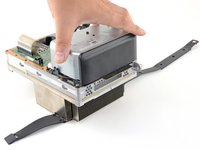
    • Unlatch the chassis strap from the right side of the power supply.

  24. Xbox Series X SSD Replacement: crwdns2935265:024crwdnd2935265:01crwdnd2935265:03crwdne2935265:0 Xbox Series X SSD Replacement: crwdns2935265:024crwdnd2935265:02crwdnd2935265:03crwdne2935265:0 Xbox Series X SSD Replacement: crwdns2935265:024crwdnd2935265:03crwdnd2935265:03crwdne2935265:0
    • Pull the chassis strap over and off of the power supply.

    • Once the strap is off of the power supply, set the loose section to the side.

  25. Xbox Series X SSD Replacement, Remove the power cable port: crwdns2935265:025crwdnd2935265:01crwdnd2935265:01crwdne2935265:0
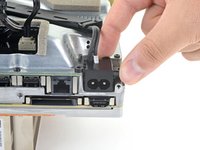
    • Use a T8 Torx driver to remove the three screws securing the power cable port to the chassis:

    • Two 13.1 mm screws

    • One 35 mm screw

  26. Xbox Series X SSD Replacement: crwdns2935265:026crwdnd2935265:01crwdnd2935265:02crwdne2935265:0 Xbox Series X SSD Replacement: crwdns2935265:026crwdnd2935265:02crwdnd2935265:02crwdne2935265:0
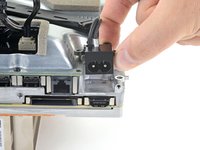
    • Lift the power connector out of its recess in the chassis.

  27. Xbox Series X SSD Replacement, De-route the power cables: crwdns2935265:027crwdnd2935265:01crwdnd2935265:02crwdne2935265:0 Xbox Series X SSD Replacement, De-route the power cables: crwdns2935265:027crwdnd2935265:02crwdnd2935265:02crwdne2935265:0
    • Unlatch and open the lid on the power cable's plastic guide.

  28. Xbox Series X SSD Replacement: crwdns2935265:028crwdnd2935265:01crwdnd2935265:02crwdne2935265:0 Xbox Series X SSD Replacement: crwdns2935265:028crwdnd2935265:02crwdnd2935265:02crwdne2935265:0
    • Lift the power cable out from underneath the extra section of the cable guide.

  29. Xbox Series X SSD Replacement, Remove the corner cover: crwdns2935265:029crwdnd2935265:01crwdnd2935265:01crwdne2935265:0
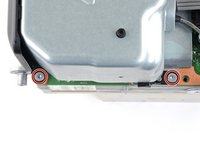
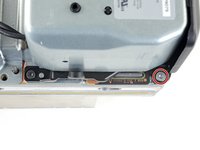
    • Use a T8 Torx driver to remove the 8.8 mm screw securing the power supply corner cover.

  30. Xbox Series X SSD Replacement: crwdns2935265:030crwdnd2935265:01crwdnd2935265:02crwdne2935265:0 Xbox Series X SSD Replacement: crwdns2935265:030crwdnd2935265:02crwdnd2935265:02crwdne2935265:0
    crwdns2935267:0crwdne2935267:0
    Tweezers
    $4.99
    • Your Xbox may not have this cover depending on the model.

    • Use your fingers or a pair of tweezers to lift and remove the power supply corner cover.

  31. Xbox Series X SSD Replacement, Remove the accessory antenna board: crwdns2935265:031crwdnd2935265:01crwdnd2935265:01crwdne2935265:0
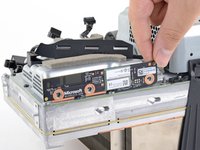
    • Use a T8 Torx driver to remove the three 9.6 mm screws securing the accessory antenna board to the center chassis.

  32. Xbox Series X SSD Replacement: crwdns2935265:032crwdnd2935265:01crwdnd2935265:03crwdne2935265:0 Xbox Series X SSD Replacement: crwdns2935265:032crwdnd2935265:02crwdnd2935265:03crwdne2935265:0 Xbox Series X SSD Replacement: crwdns2935265:032crwdnd2935265:03crwdnd2935265:03crwdne2935265:0
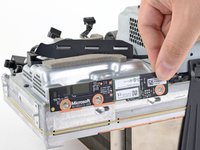
    • Grip the antenna board and pull it directly away from the center chassis to disconnect it.

    • During reassembly, align the board's connector with the port on the center chassis and press to reconnect.

    Is this is WIFI Antenna Board that required to replaced if there is a issue with WIFI non-detection ?

    Raviraj Iddya - crwdns2934203:0crwdne2934203:0

  33. Xbox Series X SSD Replacement, Remove the board shield: crwdns2935265:033crwdnd2935265:01crwdnd2935265:01crwdne2935265:0
    • Use a T8 Torx driver to remove the nine screws securing the board shield:

    • Six 8.8 mm black screws

    • Two 35 mm silver screws

    • One 13.1 mm silver screw

  34. Xbox Series X SSD Replacement: crwdns2935265:034crwdnd2935265:01crwdnd2935265:03crwdne2935265:0 Xbox Series X SSD Replacement: crwdns2935265:034crwdnd2935265:02crwdnd2935265:03crwdne2935265:0 Xbox Series X SSD Replacement: crwdns2935265:034crwdnd2935265:03crwdnd2935265:03crwdne2935265:0
    • Lift up the board shield to remove it from the center chassis.

  35. Xbox Series X SSD Replacement, Remove the chassis strap: crwdns2935265:035crwdnd2935265:01crwdnd2935265:03crwdne2935265:0 Xbox Series X SSD Replacement, Remove the chassis strap: crwdns2935265:035crwdnd2935265:02crwdnd2935265:03crwdne2935265:0 Xbox Series X SSD Replacement, Remove the chassis strap: crwdns2935265:035crwdnd2935265:03crwdnd2935265:03crwdne2935265:0
    • Disconnect the chassis strap from the locking tabs on either side of the power supply.

  36. Xbox Series X SSD Replacement: crwdns2935265:036crwdnd2935265:01crwdnd2935265:02crwdne2935265:0 Xbox Series X SSD Replacement: crwdns2935265:036crwdnd2935265:02crwdnd2935265:02crwdne2935265:0
    • Remove the chassis strap.

  37. Xbox Series X SSD Replacement, Disconnect the motherboard: crwdns2935265:037crwdnd2935265:01crwdnd2935265:03crwdne2935265:0 Xbox Series X SSD Replacement, Disconnect the motherboard: crwdns2935265:037crwdnd2935265:02crwdnd2935265:03crwdne2935265:0 Xbox Series X SSD Replacement, Disconnect the motherboard: crwdns2935265:037crwdnd2935265:03crwdnd2935265:03crwdne2935265:0
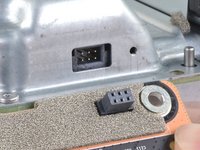
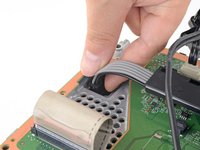
    • Grip and compress the locking tab on the 10-pin power connector.

    • While compressing the locking tab, lift the connector straight up to disconnect it from the board.

    • Always pull cables by their connectors and not the wires themselves.

  38. Xbox Series X SSD Replacement: crwdns2935265:038crwdnd2935265:01crwdnd2935265:03crwdne2935265:0 Xbox Series X SSD Replacement: crwdns2935265:038crwdnd2935265:02crwdnd2935265:03crwdne2935265:0 Xbox Series X SSD Replacement: crwdns2935265:038crwdnd2935265:03crwdnd2935265:03crwdne2935265:0
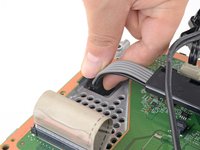
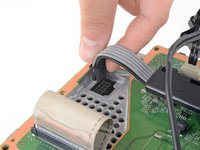
    • Grip the base of the interconnect cable connector with your fingers.

    • Depress each side of the connector to unlock the cable locking tabs.

    • With the locking tabs depressed, grip the edges of the interconnect cable and pull it straight out of the connector to disconnect it.

    • With the locking tabs depressed correctly, the interconnect cable will slide out with very little force.

    • During reassembly, the interconnect cable should "snap" into place when fully inserted.

    Bij deze had ik een andere connector . Ik had in het midden een tab dat ik moest indrukken en toen kwam de kabel met een zwarte connector uit een grijze connector . Ik heb de 20 jaar editie Xbox X .

    Maarten Lauwereys - crwdns2934203:0crwdne2934203:0

    There is a variant of this connection that has the locking tab on the front of the connector.

    Martin Samuelsson - crwdns2934203:0crwdne2934203:0

  39. Xbox Series X SSD Replacement, Remove the silver power supply screws: crwdns2935265:039crwdnd2935265:01crwdnd2935265:02crwdne2935265:0 Xbox Series X SSD Replacement, Remove the silver power supply screws: crwdns2935265:039crwdnd2935265:02crwdnd2935265:02crwdne2935265:0
    • Use a T8 Torx driver to remove the three 35 mm‑long silver screws from the power supply—leave the fourth black screw in place.

  40. Xbox Series X SSD Replacement, Remove the center chassis: crwdns2935265:040crwdnd2935265:01crwdnd2935265:03crwdne2935265:0 Xbox Series X SSD Replacement, Remove the center chassis: crwdns2935265:040crwdnd2935265:02crwdnd2935265:03crwdne2935265:0 Xbox Series X SSD Replacement, Remove the center chassis: crwdns2935265:040crwdnd2935265:03crwdnd2935265:03crwdne2935265:0
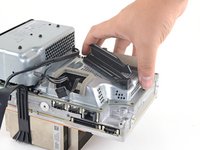
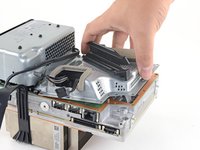
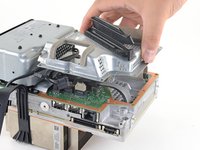
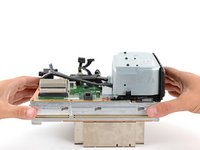
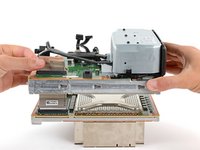
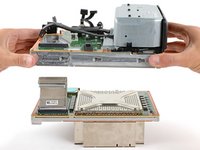
    • Grip the edges of the center chassis (not the power supply) and lift it off of the motherboard and heatsink assembly, routing the interconnect cable through its cutout.

  41. Xbox Series X SSD Replacement, Pry off the SSD shield: crwdns2935265:041crwdnd2935265:01crwdnd2935265:03crwdne2935265:0 Xbox Series X SSD Replacement, Pry off the SSD shield: crwdns2935265:041crwdnd2935265:02crwdnd2935265:03crwdne2935265:0 Xbox Series X SSD Replacement, Pry off the SSD shield: crwdns2935265:041crwdnd2935265:03crwdnd2935265:03crwdne2935265:0
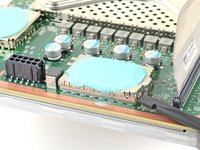
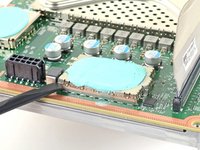
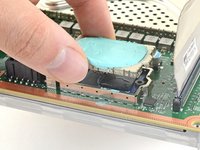
    • The SSD shield has thermal pads on either side, so ensure these are kept as intact as possible during this procedure.

    • Use the flat end of a spudger to pry up the edges of the metal SSD shield.

    • Remove the SSD shield.

  42. Xbox Series X SSD Replacement, Remove the SSD screw: crwdns2935265:042crwdnd2935265:01crwdnd2935265:01crwdne2935265:0
    • Use a T8 Torx driver to remove the 5.2 mm screw securing the SSD.

  43. Xbox Series X SSD Replacement, Remove the SSD: crwdns2935265:043crwdnd2935265:01crwdnd2935265:02crwdne2935265:0 Xbox Series X SSD Replacement, Remove the SSD: crwdns2935265:043crwdnd2935265:02crwdnd2935265:02crwdne2935265:0
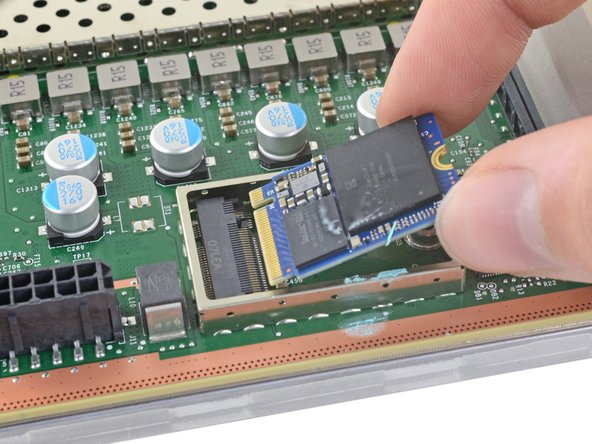
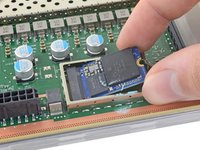
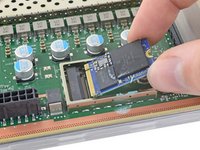
    • With the SSD screw removed, the SSD will pop up at a shallow angle.

    • Grip the end of the SSD and pull it away from its M.2 board connector to remove it.

    • During reassembly, insert the SSD at a shallow angle into its board connector, and secure it back into its horizontal position with the SSD screw.

    If your internally hdd is faulty how can you clone it yo replace

    Murat Bas - crwdns2934203:0crwdne2934203:0

    I use SABRENT Tool-Free USB Type-C Dual Docking Station for PCIe NVMe M.2 SSDs with Offline Cloning Function (EC-SSD2).

    Justin Ott - crwdns2934203:0crwdne2934203:0

    my ssd is unfortunately broken and cloning from another series x nvme didn't work, the power led lights up briefly and goes off again and that's it

    Mario FrodosLabambus - crwdns2934203:0crwdne2934203:0

    It is firmware locked by microsoft, you must go to them to change the ssd

    John Netfixl -

    Imagine going through all this, just to find out the console doesn't even support a full-sized NVMe drive.

    beileijunk - crwdns2934203:0crwdne2934203:0

    48 steps to replace the SSD? Smh

    David Amodt - crwdns2934203:0crwdne2934203:0

    At least the primary storage is replaceable at all, unlike the PS5.

    Tyler -

    Make it daunting enough and people would rather go to the manufacturer to do it.. we need better placement for this. Not only for easier replacement but better cooling

    Mykel Gibson - crwdns2934203:0crwdne2934203:0

    If you want a larger drive with better cooling that should be on the external storage card, not the internal drive.

    Tyler -

    Absolutely terrible from microsoft. Much like their surface pro devices.

    Make a simple task as hard as possible so that people will just buy a new device instead of a simple and cheap fix.

    Boo microsoft

    Joshua Dunsire - crwdns2934203:0crwdne2934203:0

    The storage replacement process is better on the Xbox Series consoles than the PS5 in every way. To replace the Xbox external drive you just slide it out, don't need a screw driver or even turn off the console. The PS5 requires tools. The internal drive on Xbox can be replaced as shown above. The PS5 internal drive is soldered to the motherboard. So boo Sony.

    Tyler -

    There is a partition key that has to be copied over form the original ssd if not damaged. Will have to have a nvme reader and use disk management software. Then after will need to put into safe mode and load the osu1 update for xbox then be set. Though if can't get the partition key it bricks it to where turns on then off. If only there was a master key to initialize the console then run the osu1 for the software.

    Michael Russell - crwdns2934203:0crwdne2934203:0

    What's the ssd model? Maybe hook up to a pc?

    Dark Knight_TJ - crwdns2934203:0crwdne2934203:0

crwdns2915888:0crwdne2915888:0

To reassemble your device, follow these instructions in reverse order.

Take your e-waste to an R2 or e-Stewards certified recycler.

Repair didn’t go as planned? Try some basic troubleshooting, or ask our Xbox Series X Answers community for help.

crwdns2935229:020crwdne2935229:0

Carsten Frauenheim

crwdns2935283:003/10/20crwdne2935283:0

137,921 crwdns2915208:0crwdne2915208:0

crwdns2935297:0379crwdne2935297:0

crwdns2915084:0crwdne2915084:0

iFixit crwdns2935289:0iFixitcrwdne2935289:0

Staff

crwdns2931471:0121crwdne2931471:0

crwdns2935297:019,715crwdne2935297:0

crwdns2947412:014crwdne2947412:0

What name cards are compatible to install in the series x and what is the max storage capacity that can be installed?

Keith Horton - crwdns2934203:0crwdne2934203:0

Theoretically speaking, any M.2 NVMe 2230 SSD PCIe 4.0 that’s been formatted to New Technology File System (NTFS, proprietary MS formatting for Windows 7 onwards) should work. You’ll also need to make a Xbox OS installer USB as well, in the same style as making a Media Creation Tool for Windows 8.1 and 10 installation on new HDDs and SSDs.

https://support.xbox.com/en-AU/help/hard...

The issue I want to find out is which sector allocation value is required -> leads into the theoretical max storage of a single internal SSD (around 16TB assuming a 4KB sector size). https://docs.microsoft.com/en-us/windows...

Noobgamer0111 -

The Xbox SSDs are all PCIe 4.0x2 so you need WD CH (NOT PC) SN530/SN560 or SSSDTC/Lite-On XA1 SSDs.

The CH SN560 is a newer model that has faster read speeds (2400 vs 2000 MB/s) but is much more rare. Most of the CH WD SSDs on the market is CH SN530.

Mike -

I thought these were married to the board? Say if I were to buy one from ebay that's missing its ssd wouldn't installing a new one just make it so that the console won't power on? I'm hoping that I'm wrong because there are several out there.

John - crwdns2934203:0crwdne2934203:0

Correct the SSD has a hidden partition that contains encrypted info marrying the SSD to the main board. However you can do a bit by bit clone of this partition providing your drive hasn't failed already.

Dunno about size or make I suspect you can only install 1GB until MS update the firmware and release models with bigger SSDs in.

NorfolknGood - crwdns2934203:0crwdne2934203:0

Is there a compatible 2tb drive to use internally?

Paul Hardy - crwdns2934203:0crwdne2934203:0

What can I do if the ssd in my series x has been formated and won't switch on? It was stuck in a download loop,then someone formated it without cloning? Please help.

Jack N - crwdns2934203:0crwdne2934203:0

Try your luck at finding someone with an xbox drive that you can clone. Otherwise you may be out of luck if you deleted the original or if it crapped out.

Kayden Wheeler -

Anybody have a reply to jack n's question. How do you format a new ssd if you dont have access to the old one to clone?

Jason Bailey - crwdns2934203:0crwdne2934203:0

I have a question regarding the SSD being married to the board. I assume a similar hidden partition exists on the expansion drives. Is that the case? How would one achieve "tricking" the motherboard? Would I need to buy an expansion and clone it on any new drives? Or could i make a second duplicate of the internal drive?

When the series consoles released, you could build your own expansion using the same m.2 models used with the xbox internal drives and some of the surface tablets.... but now it doesn't work after soem new console updates and the console now recognizes an hand-made device as not being an officially "xbox sanctioned" external drive. Any tips??

Kayden Wheeler - crwdns2934203:0crwdne2934203:0

Bonjour, as-tu un retour d'expérience ?

dorian dodo -

Ooh I hope I'll be able to replace mine with a higher capacity one and then save the original for when I get a Framework laptop!

FullCrimp - crwdns2934203:0crwdne2934203:0

This would be the best tear down instruction set i have ever seen...

Fantastic work... it did however convince me to just live with using an expansion drive....

Yoshy - crwdns2934203:0crwdne2934203:0

me too. this stuff is deliberately made to be difficult.

chris forgan -

crwdns2917038:0crwdne2917038:0

crwdns2936625:0crwdne2936625:0:

crwdns2936751:024crwdne2936751:0 106

crwdns2936753:07crwdne2936753:0 633

crwdns2936753:030crwdne2936753:0 3,093

crwdns2942667:0crwdne2942667:0 117,964