crwdns2933423:0crwdne2933423:0

Teenage Engineering OP-Z Battery Replacement

crwdns2942213:0crwdne2942213:0

  1. Teenage Engineering OP-Z Battery Replacement, Back Cover: crwdns2935265:01crwdnd2935265:01crwdnd2935265:03crwdne2935265:0 Teenage Engineering OP-Z Battery Replacement, Back Cover: crwdns2935265:01crwdnd2935265:02crwdnd2935265:03crwdne2935265:0 Teenage Engineering OP-Z Battery Replacement, Back Cover: crwdns2935265:01crwdnd2935265:03crwdnd2935265:03crwdne2935265:0
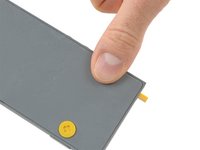
    • Unlock the four rubber feet by turning them 90° counterclockwise using your thumb or finger tip.

    • There is a tiny mark on every foot facing the bottom edge of the OP-Z. After turning them they should face towards the short edge where the on/off switch is.

  2. Teenage Engineering OP-Z Battery Replacement: crwdns2935265:02crwdnd2935265:01crwdnd2935265:02crwdne2935265:0 Teenage Engineering OP-Z Battery Replacement: crwdns2935265:02crwdnd2935265:02crwdnd2935265:02crwdne2935265:0
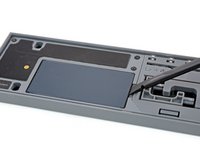
    • When turning the OP-Z over again the bottom plate should come off by itself (thanks gravity).

    • If the bottom plate won’t come off you might want to make sure every foot is rotated correctly and gently tug on one of them.

  3. Teenage Engineering OP-Z Battery Replacement: crwdns2935265:03crwdnd2935265:01crwdnd2935265:01crwdne2935265:0
    • Remove the bottom plate including the rubber feet.

  4. Teenage Engineering OP-Z Battery Replacement, Battery: crwdns2935265:04crwdnd2935265:01crwdnd2935265:02crwdne2935265:0 Teenage Engineering OP-Z Battery Replacement, Battery: crwdns2935265:04crwdnd2935265:02crwdnd2935265:02crwdne2935265:0
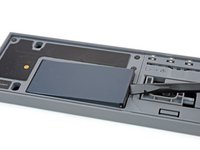
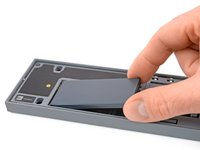
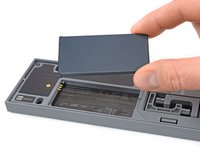
    • Use your fingernail or a spudger to lift the battery on the right side where the notch is.

  5. Teenage Engineering OP-Z Battery Replacement: crwdns2935265:05crwdnd2935265:01crwdnd2935265:02crwdne2935265:0 Teenage Engineering OP-Z Battery Replacement: crwdns2935265:05crwdnd2935265:02crwdnd2935265:02crwdne2935265:0
    • Remove the battery.

    • When installing the new battery make sure you put it in contact side first.

crwdns2915888:0crwdne2915888:0

To reassemble your device, follow these instructions in reverse order.

For optimal performance, calibrate your newly installed battery: Charge it to 100% and keep charging it for at least 2 more hours. Then use your device until it shuts off due to low battery. Finally, charge it uninterrupted to 100%.

Take your e-waste to an R2 or e-Stewards certified recycler.

Repair didn’t go as planned? Ask our Answers community for help.

crwdns2935229:04crwdne2935229:0

Tobias Isakeit

crwdns2935283:003/31/14crwdne2935283:0

117,720 crwdns2915208:0crwdne2915208:0

crwdns2935297:0188crwdne2935297:0

crwdns2915084:0crwdne2915084:0

Master Techs crwdns2935289:0Master Techscrwdne2935289:0

Community

crwdns2931471:0322crwdne2931471:0

crwdns2935297:02,539crwdne2935297:0

crwdns2944067:00crwdne2944067:0

crwdns2917038:0crwdne2917038:0

crwdns2936625:0crwdne2936625:0:

crwdns2936751:024crwdne2936751:0 4

crwdns2936753:07crwdne2936753:0 32

crwdns2936753:030crwdne2936753:0 146

crwdns2942667:0crwdne2942667:0 6,898