crwdns2915892:0crwdne2915892:0
If the headset mute button is not pressing down or not muting the microphone, the physical button may need to be replaced. Follow this guide to safely replace the button.
crwdns2942213:0crwdne2942213:0
-
-
Lift the edge of the cushion and pull out slightly.
-
Work your way around the cushion until it comes off completely.
-
Repeat for the other cushion.
-
-
-
Remove the three 5mm screws with a Phillips #0 driver head on the headphone with the microphone.
-
-
-
Lift the speaker off the headset to expose the circuit board.
-
-
-
-
Remove the three 5mm screws using a Phillips #0 driver head.
-
-
-
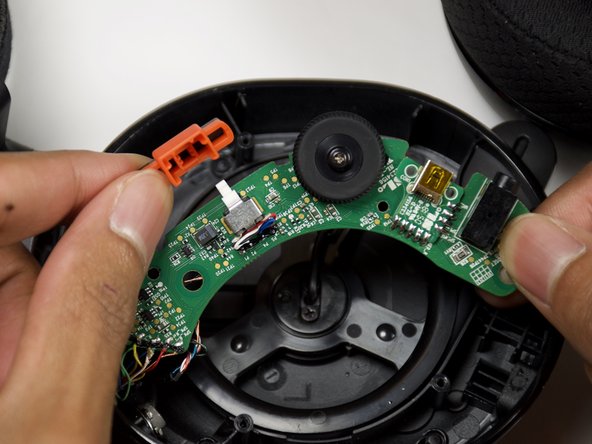
Lift the circuit board out of the plastic housing.
I am worried about damaging the board while lifting the board out, there is quite some resistance, do I apply more pressure?
-
-
-
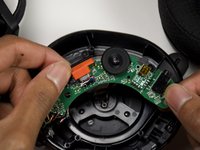
Flip the circuit board over and remove the keycap by pulling on it.
Hi, my headset fell down on the floor while I was charging so the connector is now with bad conection I have to find the right position to charge the headset, do you have any tips of how can I fix it?
Hello, where did you order the mute button cap part for this replacement?
Same question. Where i can buy mute button?
-
-
-
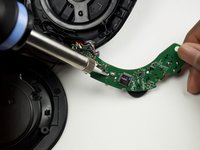
Desolder the wires connecting the button to the circuit board.
-
-
-
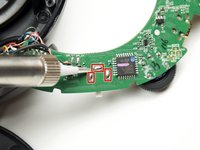
Desolder the three pins to remove the button from the circuit board.
-
For help desoldering connections, follow this useful guide on How To Solder and Desolder Connections.
Do you know where to get the replacement mute button from?
-


To reassemble your device, follow these instructions in reverse order.
To reassemble your device, follow these instructions in reverse order.
crwdns2935221:0crwdne2935221:0
crwdns2935227:0crwdne2935227:0
crwdns2915084:0crwdne2915084:0

Cal Poly, Team S18-G1, White Winter 2019 crwdns2935289:0Cal Poly, Team S18-G1, White Winter 2019crwdne2935289:0
CPSU-WHITE-W19S18G1
crwdns2931471:04crwdne2931471:0
crwdns2935297:021crwdne2935297:0
crwdns2947412:010crwdne2947412:0
Where can you get the replacement switch?
Can you provide any specs for this switch? I’d like to buy the replacement switch before disassembling the headset.
I also need to know where to get the replacement switch from !
If anyone wants to try it (I have not), I think the G type switch will work. BUT you will have to find a way to mount it, as it does not have the Metal case for soldering to the PCB.
Searchebay.co.uk for 11 Types, DPDT Self Latching Locking Momentary Push Button PCB SMD Switch 6 Pin
Select Type G
Try at your own risk and good luck
BTW, the size of the switch is 5.8 x 5.8 mm
How to repair mute button in the ear head.
There's a thread on Reddit about this:
``https://www.reddit.com/r/steelseries/com...
Where they suggest buying 5.8x5.8mm 3 pin latching switches. People in the thread above specifically used the ones in the eBay link below:
``https://www.ebay.com/itm/185336592680``
I'll update my comment if I do this with any success.
have you been succesfull? greetings
The switches I bought were perfect replacements. @maxhbland75222
Soldering was very difficult for me. The pins are clearly on a ground plane so it takes a lot of heat to get the solder to let go. If you take too long to get the heat in it'll transfer heat through and melt the switch itself. I had to compensate for my cheap iron and low skill with a lot of flux, but I managed to push the pins through and get it changed. Considering how the board heat soaked the "difficult" rating really makes sense.
I should also note, I have an Arctis 9X, not an Arctis Pro. They are different products with different boards but, from what I can tell, the switches are the exact same.
If you have the Arctis Pro, you need a 6 pin latching switch: https://www.ebay.de/itm/185336592680
For the Arctis 9 you need a 3pin latching switch.
I do not believe that my Arctis 7 uses Phillips #0 it looks to be some kind of tamper proof start bit, do you know what kind that would be?
Jerrett Smith - crwdns2934203:0crwdne2934203:0