crwdns2933423:0crwdne2933423:0
crwdns2947577:0crwdnd2947577:0crwdne2947577:0

Steam Machine (2026) RAM Replacement

crwdns2869540:0crwdne2869540:0: 2295

crwdns2959988:0crwdne2959988:0

crwdns2959990:0crwdne2959990:0
57
crwdns2959992:0crwdne2959992:0
388
crwdns2959994:0crwdne2959994:0
2.275
crwdns2959996:0crwdne2959996:0
2.295
crwdns2955950:0crwdne2955950:0: 3

crwdns2960004:03crwdne2960004:0.

crwdns2959984:0crwdne2959984:0: 0

crwdns2959956:0crwdne2959956:0

crwdns2959986:0crwdne2959986:0: 0

crwdns2959958:0crwdne2959958:0

crwdns2955944:0crwdne2955944:0: 1 - 3 crwdns2931253:0crwdne2931253:0
crwdns2955970:0crwdne2955970:0: crwdns2937801:0crwdne2937801:0
crwdns2918348:0crwdne2918348:0

crwdns2942335:0crwdne2942335:0

Steam Machine (2026) RAM Replacement

crwdns2915892:0crwdne2915892:0

crwdns2959928:0crwdne2959928:0 ↓

Follow this guide to replace or upgrade the RAM (aka system memory) in your Valve Steam Machine (2026).

The Steam Machine has two slots for DDR5-5600 SODIMM RAM modules.

crwdns2959930:0crwdne2959930:0

crwdns2943215:0crwdne2943215:0

    1. Steam Machine (2026) RAM Replacement, Before you begin: crwdns2935265:01crwdnd2935265:01crwdnd2935265:03crwdne2935265:0 Steam Machine (2026) RAM Replacement, Before you begin: crwdns2935265:01crwdnd2935265:02crwdnd2935265:03crwdne2935265:0 Steam Machine (2026) RAM Replacement, Before you begin: crwdns2935265:01crwdnd2935265:03crwdnd2935265:03crwdne2935265:0
      • Before you begin this repair:

      • Power down your Steam Machine and disconnect the power cable.

      • Unplug any remaining cables or accessories from all ports.

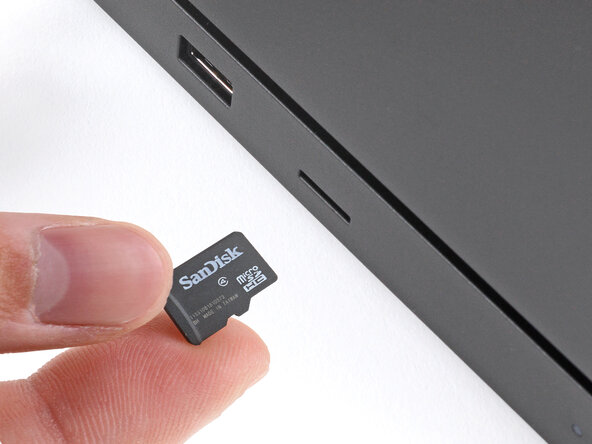
      • If you have a microSD card installed, remove it. Otherwise, it may break during this procedure.

      crwdns2952109:0crwdne2952109:0

      crwdns2917038:0crwdne2917038:0

    1. Steam Machine (2026) RAM Replacement, Reposition the Steam Machine: crwdns2935265:02crwdnd2935265:01crwdnd2935265:01crwdne2935265:0
      • Reposition the Steam Machine so the bottom is facing up.

      crwdns2952109:0crwdne2952109:0

      crwdns2917038:0crwdne2917038:0

    2. Steam Machine (2026) RAM Replacement, Remove the feet: crwdns2935265:03crwdnd2935265:01crwdnd2935265:03crwdne2935265:0 Steam Machine (2026) RAM Replacement, Remove the feet: crwdns2935265:03crwdnd2935265:02crwdnd2935265:03crwdne2935265:0 Steam Machine (2026) RAM Replacement, Remove the feet: crwdns2935265:03crwdnd2935265:03crwdnd2935265:03crwdne2935265:0
      • Use a T8 Torx screwdriver to remove the four rubber feet.

      crwdns2952109:0crwdne2952109:0

      crwdns2917038:0crwdne2917038:0

    1. Steam Machine (2026) RAM Replacement, Reposition the Steam Machine: crwdns2935265:04crwdnd2935265:01crwdnd2935265:01crwdne2935265:0
      • Reposition the Steam Machine so the back panel is facing up.

      crwdns2952109:0crwdne2952109:0

      crwdns2917038:0crwdne2917038:0

    2. Steam Machine (2026) RAM Replacement, Loosen the back panel screws: crwdns2935265:05crwdnd2935265:01crwdnd2935265:02crwdne2935265:0 Steam Machine (2026) RAM Replacement, Loosen the back panel screws: crwdns2935265:05crwdnd2935265:02crwdnd2935265:02crwdne2935265:0
      • Use a T8 Torx screwdriver to fully loosen the two captive screws securing the back panel.

      crwdns2952109:0crwdne2952109:0

      crwdns2917038:0crwdne2917038:0

    3. Steam Machine (2026) RAM Replacement, Remove the back panel: crwdns2935265:06crwdnd2935265:01crwdnd2935265:03crwdne2935265:0 Steam Machine (2026) RAM Replacement, Remove the back panel: crwdns2935265:06crwdnd2935265:02crwdnd2935265:03crwdne2935265:0 Steam Machine (2026) RAM Replacement, Remove the back panel: crwdns2935265:06crwdnd2935265:03crwdnd2935265:03crwdne2935265:0
      • The back panel is secured by two hinge clips near the bottom corners and two locking clips on the sides.

      • Lift the top edge of the panel (near the screws) until the two locking clips release.

      • If you're having trouble getting an initial grip on the panel, use a spudger to lift it enough to grab with your fingers.

      • Slide the panel towards the top edge and lift to remove it.

      crwdns2952109:0crwdne2952109:0

      crwdns2917038:0crwdne2917038:0

    4. Steam Machine (2026) RAM Replacement, Remove the inner assembly screws: crwdns2935265:07crwdnd2935265:01crwdnd2935265:02crwdne2935265:0 Steam Machine (2026) RAM Replacement, Remove the inner assembly screws: crwdns2935265:07crwdnd2935265:02crwdnd2935265:02crwdne2935265:0
      • Use a T8 Torx screwdriver to remove the two 7.3 mm‑long screws securing the inner assembly.

      crwdns2952109:0crwdne2952109:0

      crwdns2917038:0crwdne2917038:0

    5. Steam Machine (2026) RAM Replacement, Remove the inner assembly: crwdns2935265:08crwdnd2935265:01crwdnd2935265:03crwdne2935265:0 Steam Machine (2026) RAM Replacement, Remove the inner assembly: crwdns2935265:08crwdnd2935265:02crwdnd2935265:03crwdne2935265:0 Steam Machine (2026) RAM Replacement, Remove the inner assembly: crwdns2935265:08crwdnd2935265:03crwdnd2935265:03crwdne2935265:0
      • After removal, don't lay the inner assembly down on the microSD and USB ports. These ports are fragile and shouldn't have the weight of the assembly resting on them.

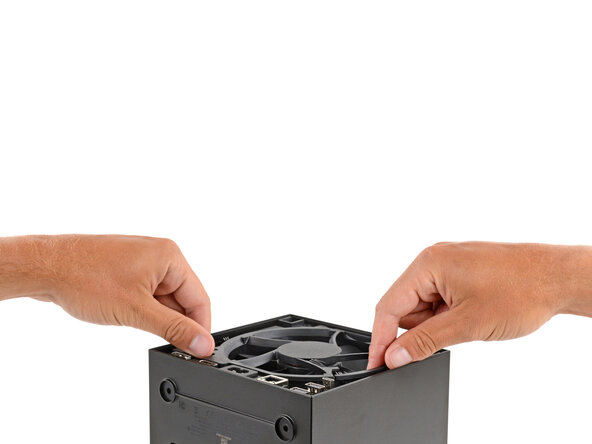
      • Grip the inner assembly under the fan and lift it straight up and out of the shell.

      • Set the inner assembly down so the SSD is on top.

      crwdns2952109:0crwdne2952109:0

      crwdns2917038:0crwdne2917038:0

    1. Steam Machine (2026) RAM Replacement, Reposition the inner assembly: crwdns2935265:09crwdnd2935265:01crwdnd2935265:01crwdne2935265:0
      • Spin the inner assembly so the fan faces you.

      crwdns2952109:0crwdne2952109:0

      crwdns2917038:0crwdne2917038:0

    2. Steam Machine (2026) RAM Replacement, Remove the cable cover screws: crwdns2935265:010crwdnd2935265:01crwdnd2935265:02crwdne2935265:0 Steam Machine (2026) RAM Replacement, Remove the cable cover screws: crwdns2935265:010crwdnd2935265:02crwdnd2935265:02crwdne2935265:0
      • Use a T8 Torx screwdriver to remove the 5.1 mm‑long screw securing the rear USB and Ethernet port cable cover.

      crwdns2952109:0crwdne2952109:0

      crwdns2917038:0crwdne2917038:0

    3. Steam Machine (2026) RAM Replacement, Remove the cable cover: crwdns2935265:011crwdnd2935265:01crwdnd2935265:02crwdne2935265:0 Steam Machine (2026) RAM Replacement, Remove the cable cover: crwdns2935265:011crwdnd2935265:02crwdnd2935265:02crwdne2935265:0
      • Remove the cable cover.

      • During reassembly, make sure the tab on the edge of the cable cover slides into its cutout in the fan.

      crwdns2952109:0crwdne2952109:0

      crwdns2917038:0crwdne2917038:0

    4. Steam Machine (2026) RAM Replacement, Disconnect the board: crwdns2935265:012crwdnd2935265:01crwdnd2935265:02crwdne2935265:0 Steam Machine (2026) RAM Replacement, Disconnect the board: crwdns2935265:012crwdnd2935265:02crwdnd2935265:02crwdne2935265:0
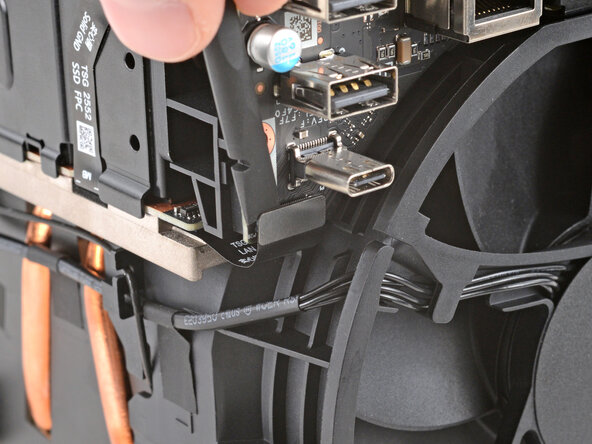
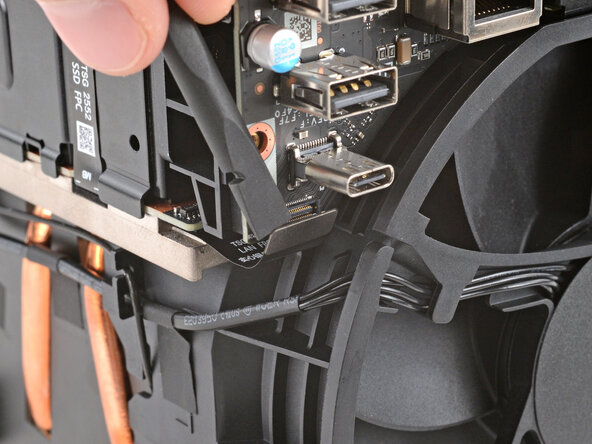
      • Use the flat end of a spudger to pry up and disconnect the board's press connector.

      crwdns2952109:0crwdne2952109:0

      crwdns2917038:0crwdne2917038:0

    5. Steam Machine (2026) RAM Replacement, Remove the board screw: crwdns2935265:013crwdnd2935265:01crwdnd2935265:02crwdne2935265:0 Steam Machine (2026) RAM Replacement, Remove the board screw: crwdns2935265:013crwdnd2935265:02crwdnd2935265:02crwdne2935265:0
      • Use a T8 Torx screwdriver to remove the 5.1 mm‑long screw securing the rear USB and Ethernet port board.

      crwdns2952109:0crwdne2952109:0

      crwdns2917038:0crwdne2917038:0

    6. Steam Machine (2026) RAM Replacement, Remove the board: crwdns2935265:014crwdnd2935265:01crwdnd2935265:02crwdne2935265:0 Steam Machine (2026) RAM Replacement, Remove the board: crwdns2935265:014crwdnd2935265:02crwdnd2935265:02crwdne2935265:0
      • Slide the board straight away fron the inner assembly to remove it.

      crwdns2952109:0crwdne2952109:0

      crwdns2917038:0crwdne2917038:0

    1. Steam Machine (2026) RAM Replacement, Reposition the inner assembly: crwdns2935265:015crwdnd2935265:01crwdnd2935265:02crwdne2935265:0 Steam Machine (2026) RAM Replacement, Reposition the inner assembly: crwdns2935265:015crwdnd2935265:02crwdnd2935265:02crwdne2935265:0
      • Reposition the inner assembly so the antenna marked AUX ANT is facing up.

      crwdns2952109:0crwdne2952109:0

      crwdns2917038:0crwdne2917038:0

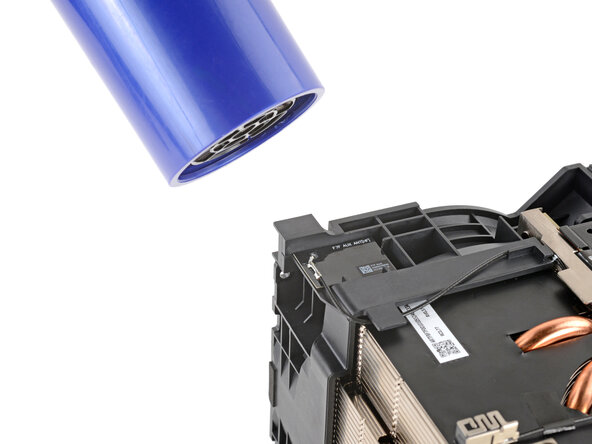
    2. Steam Machine (2026) RAM Replacement, Heat the auxiliary antenna: crwdns2935265:016crwdnd2935265:01crwdnd2935265:03crwdne2935265:0 Steam Machine (2026) RAM Replacement, Heat the auxiliary antenna: crwdns2935265:016crwdnd2935265:02crwdnd2935265:03crwdne2935265:0 Steam Machine (2026) RAM Replacement, Heat the auxiliary antenna: crwdns2935265:016crwdnd2935265:03crwdnd2935265:03crwdne2935265:0
      • Mild adhesive secures the auxiliary antenna to the fan. Heating the antenna softens the adhesive, making it easier to separate. If you don't want to remove the antennas from the fan, you can disconnect and de-route them.

      • Lay a heated iOpener on the auxiliary antenna for two minutes.

      • Check out this guide for instruction on heating an iOpener.

      • Alternatively, you can use a hair dryer to soften the adhesive. For tips on using a hair dryer without accidentally melting plastic, check out this guide.

      crwdns2952109:0crwdne2952109:0

      crwdns2917038:0crwdne2917038:0

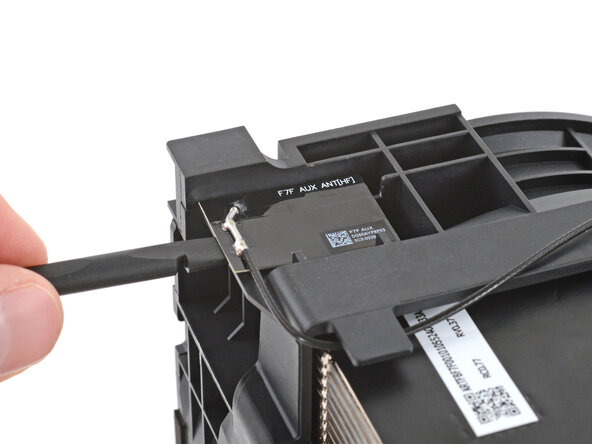
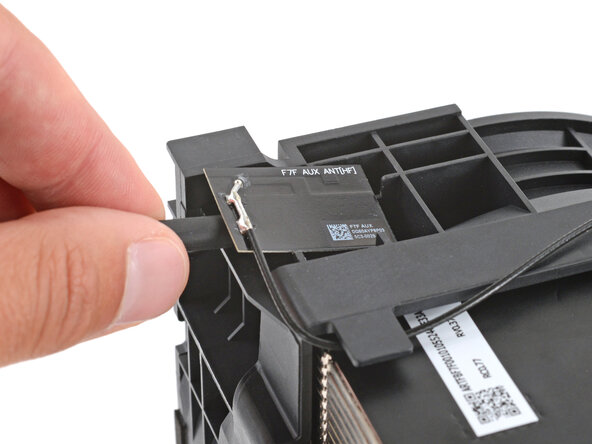
    3. Steam Machine (2026) RAM Replacement, Separate the auxiliary antenna: crwdns2935265:017crwdnd2935265:01crwdnd2935265:03crwdne2935265:0 Steam Machine (2026) RAM Replacement, Separate the auxiliary antenna: crwdns2935265:017crwdnd2935265:02crwdnd2935265:03crwdne2935265:0 Steam Machine (2026) RAM Replacement, Separate the auxiliary antenna: crwdns2935265:017crwdnd2935265:03crwdnd2935265:03crwdne2935265:0
      crwdns2935267:0crwdne2935267:0
      Tesa 61395 Tape
      $2.95
      • Slide the flat end of a spudger under the antenna and lift to separate the adhesive.

      • During reassembly, the adhesive should be sticky enough to reuse. If it isn't, use thin double-sided tape to secure the antenna.

      crwdns2952109:0crwdne2952109:0

      crwdns2917038:0crwdne2917038:0

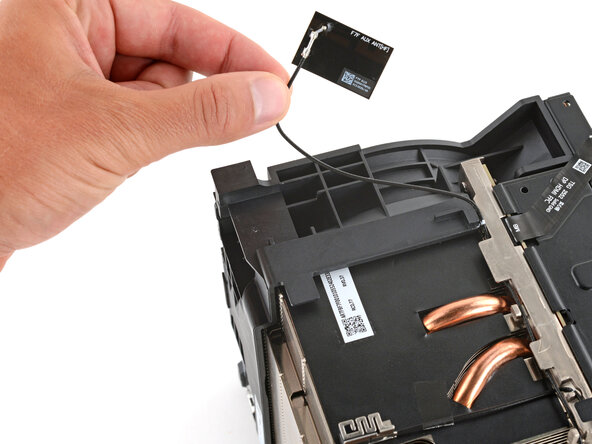
    4. Steam Machine (2026) RAM Replacement, De-route the auxiliary antenna: crwdns2935265:018crwdnd2935265:01crwdnd2935265:03crwdne2935265:0 Steam Machine (2026) RAM Replacement, De-route the auxiliary antenna: crwdns2935265:018crwdnd2935265:02crwdnd2935265:03crwdne2935265:0 Steam Machine (2026) RAM Replacement, De-route the auxiliary antenna: crwdns2935265:018crwdnd2935265:03crwdnd2935265:03crwdne2935265:0
      • Guide the antenna cable out of its clips on the fan.

      crwdns2952109:0crwdne2952109:0

      crwdns2917038:0crwdne2917038:0

    5. Steam Machine (2026) RAM Replacement, Reposition the inner assembly: crwdns2935265:019crwdnd2935265:01crwdnd2935265:02crwdne2935265:0 Steam Machine (2026) RAM Replacement, Reposition the inner assembly: crwdns2935265:019crwdnd2935265:02crwdnd2935265:02crwdne2935265:0
      • Reposition the inner assembly so the antenna marked MAIN ANT is facing up.

      crwdns2952109:0crwdne2952109:0

      crwdns2917038:0crwdne2917038:0

    6. Steam Machine (2026) RAM Replacement, Heat the main antenna: crwdns2935265:020crwdnd2935265:01crwdnd2935265:03crwdne2935265:0 Steam Machine (2026) RAM Replacement, Heat the main antenna: crwdns2935265:020crwdnd2935265:02crwdnd2935265:03crwdne2935265:0 Steam Machine (2026) RAM Replacement, Heat the main antenna: crwdns2935265:020crwdnd2935265:03crwdnd2935265:03crwdne2935265:0
      • Mild adhesive secures the main antenna to the fan. Heating the antenna softens the adhesive, making it easier to separate.

      • Lay a heated iOpener on the main antenna for two minutes.

      • Check out this guide for instruction on heating an iOpener.

      • Alternatively, you can use a hair dryer to soften the adhesive. For tips on using a hair dryer without accidentally melting plastic, check out this guide.

      crwdns2952109:0crwdne2952109:0

      crwdns2917038:0crwdne2917038:0

    7. Steam Machine (2026) RAM Replacement, Separate the main antenna: crwdns2935265:021crwdnd2935265:01crwdnd2935265:03crwdne2935265:0 Steam Machine (2026) RAM Replacement, Separate the main antenna: crwdns2935265:021crwdnd2935265:02crwdnd2935265:03crwdne2935265:0 Steam Machine (2026) RAM Replacement, Separate the main antenna: crwdns2935265:021crwdnd2935265:03crwdnd2935265:03crwdne2935265:0
      crwdns2935267:0crwdne2935267:0
      Tesa 61395 Tape
      $2.95
      • Slide the flat end of a spudger under the antenna and lift to separate the adhesive.

      • During reassembly, the adhesive should be sticky enough to reuse. If it isn't, use thin double-sided tape to secure the antenna.

      crwdns2952109:0crwdne2952109:0

      crwdns2917038:0crwdne2917038:0

    8. Steam Machine (2026) RAM Replacement, De-route the main antenna: crwdns2935265:022crwdnd2935265:01crwdnd2935265:03crwdne2935265:0 Steam Machine (2026) RAM Replacement, De-route the main antenna: crwdns2935265:022crwdnd2935265:02crwdnd2935265:03crwdne2935265:0 Steam Machine (2026) RAM Replacement, De-route the main antenna: crwdns2935265:022crwdnd2935265:03crwdnd2935265:03crwdne2935265:0
      • Guide the antenna cable out of its plastic clips.

      crwdns2952109:0crwdne2952109:0

      crwdns2917038:0crwdne2917038:0

    9. Steam Machine (2026) RAM Replacement, Disconnect the fan: crwdns2935265:023crwdnd2935265:01crwdnd2935265:03crwdne2935265:0 Steam Machine (2026) RAM Replacement, Disconnect the fan: crwdns2935265:023crwdnd2935265:02crwdnd2935265:03crwdne2935265:0 Steam Machine (2026) RAM Replacement, Disconnect the fan: crwdns2935265:023crwdnd2935265:03crwdnd2935265:03crwdne2935265:0
      • The fan connector can be tricky to disconnect. Be careful: excessive force could rip the socket off the board.

      • Use a pair of angled tweezers to firmly grip the head of the fan cable connector.

      • To get the best grip, hold the tweezers close to the pointed ends.

      • Gently rock the connector side-to-side while lifting to disconnect it.

      crwdns2952109:0crwdne2952109:0

      crwdns2917038:0crwdne2917038:0

    10. Steam Machine (2026) RAM Replacement, Peel up the fan cable: crwdns2935265:024crwdnd2935265:01crwdnd2935265:02crwdne2935265:0 Steam Machine (2026) RAM Replacement, Peel up the fan cable: crwdns2935265:024crwdnd2935265:02crwdnd2935265:02crwdne2935265:0
      • Peel up the tape securing the fan cable to the heatsink.

      crwdns2952109:0crwdne2952109:0

      crwdns2917038:0crwdne2917038:0

    11. Steam Machine (2026) RAM Replacement, Reposition the inner assembly: crwdns2935265:025crwdnd2935265:01crwdnd2935265:01crwdne2935265:0
      • Reposition the inner assembly so the fan is facing you and the power cable socket is on the bottom.

      crwdns2952109:0crwdne2952109:0

      crwdns2917038:0crwdne2917038:0

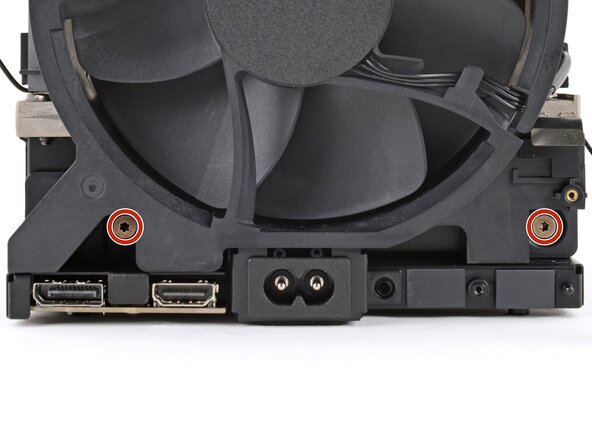
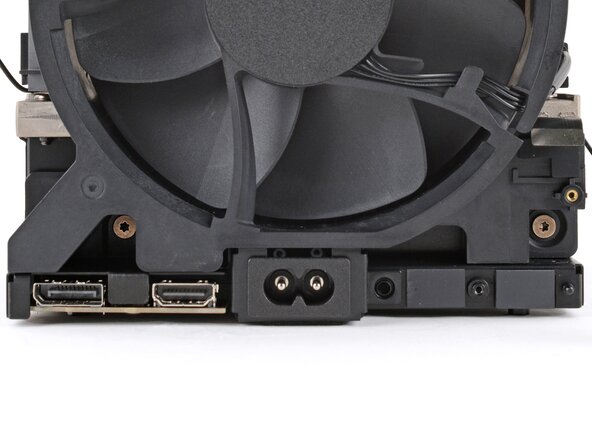
    12. Steam Machine (2026) RAM Replacement, Remove the fan screws: crwdns2935265:026crwdnd2935265:01crwdnd2935265:02crwdne2935265:0 Steam Machine (2026) RAM Replacement, Remove the fan screws: crwdns2935265:026crwdnd2935265:02crwdnd2935265:02crwdne2935265:0
      • Use a T8 Torx screwdriver to remove the two 7.3 mm‑long screws securing the fan.

      crwdns2952109:0crwdne2952109:0

      crwdns2917038:0crwdne2917038:0

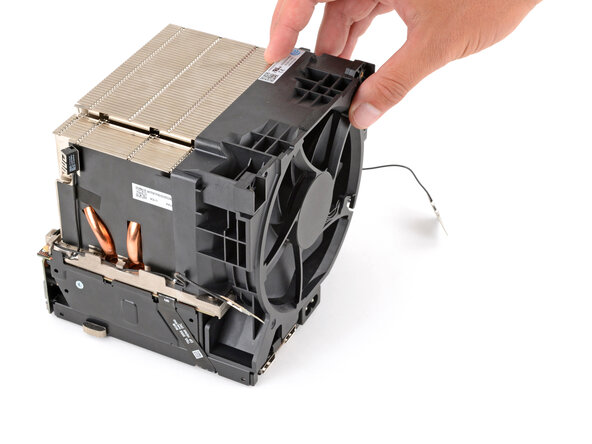
    13. Steam Machine (2026) RAM Replacement, Remove the fan: crwdns2935265:027crwdnd2935265:01crwdnd2935265:02crwdne2935265:0 Steam Machine (2026) RAM Replacement, Remove the fan: crwdns2935265:027crwdnd2935265:02crwdnd2935265:02crwdne2935265:0
      • Slide the fan straight away from the inner assembly to remove it.

      • During reassembly, make sure no cables get stuck behind the fan when sliding it back in place.

      crwdns2952109:0crwdne2952109:0

      crwdns2917038:0crwdne2917038:0

    1. Steam Machine (2026) RAM Replacement, Reposition the inner assembly: crwdns2935265:028crwdnd2935265:01crwdnd2935265:01crwdne2935265:0
      • Reposition the inner assembly so the microSD reader and two USB ports are facing up at the top edge farthest from you.

      crwdns2952109:0crwdne2952109:0

      crwdns2917038:0crwdne2917038:0

    2. Steam Machine (2026) RAM Replacement, Remove the cable cover screws: crwdns2935265:029crwdnd2935265:01crwdnd2935265:02crwdne2935265:0 Steam Machine (2026) RAM Replacement, Remove the cable cover screws: crwdns2935265:029crwdnd2935265:02crwdnd2935265:02crwdne2935265:0
      • Use a T8 Torx screwdriver to remove the two 5.1 mm‑long screws securing the front port cable cover.

      crwdns2952109:0crwdne2952109:0

      crwdns2917038:0crwdne2917038:0

    3. Steam Machine (2026) RAM Replacement, Remove the cable cover: crwdns2935265:030crwdnd2935265:01crwdnd2935265:02crwdne2935265:0 Steam Machine (2026) RAM Replacement, Remove the cable cover: crwdns2935265:030crwdnd2935265:02crwdnd2935265:02crwdne2935265:0
      • Remove the cable cover.

      crwdns2952109:0crwdne2952109:0

      crwdns2917038:0crwdne2917038:0

    4. Steam Machine (2026) RAM Replacement, Disconnect the front port board: crwdns2935265:031crwdnd2935265:01crwdnd2935265:02crwdne2935265:0 Steam Machine (2026) RAM Replacement, Disconnect the front port board: crwdns2935265:031crwdnd2935265:02crwdnd2935265:02crwdne2935265:0
      • Use the flat end of a spudger to pry up and disconnect the board's press connector.

      crwdns2952109:0crwdne2952109:0

      crwdns2917038:0crwdne2917038:0

    5. Steam Machine (2026) RAM Replacement: crwdns2935265:032crwdnd2935265:01crwdnd2935265:03crwdne2935265:0 Steam Machine (2026) RAM Replacement: crwdns2935265:032crwdnd2935265:02crwdnd2935265:03crwdne2935265:0 Steam Machine (2026) RAM Replacement: crwdns2935265:032crwdnd2935265:03crwdnd2935265:03crwdne2935265:0
      • Use the point of a spudger to lift and disconnect the three coaxial connectors, making sure to lift as close to the connector head as possible.

      crwdns2952109:0crwdne2952109:0

      crwdns2917038:0crwdne2917038:0

    6. Steam Machine (2026) RAM Replacement, Reposition the inner assembly: crwdns2935265:033crwdnd2935265:01crwdnd2935265:01crwdne2935265:0
      • Reposition the inner assembly so the microSD and two USB ports are at the top edge closest to you.

      crwdns2952109:0crwdne2952109:0

      crwdns2917038:0crwdne2917038:0

    7. Steam Machine (2026) RAM Replacement, Remove the cable cover screws: crwdns2935265:034crwdnd2935265:01crwdnd2935265:02crwdne2935265:0 Steam Machine (2026) RAM Replacement, Remove the cable cover screws: crwdns2935265:034crwdnd2935265:02crwdnd2935265:02crwdne2935265:0
      • Use a T8 Torx screwdriver to remove the two 5.1 mm‑long screws securing the HDMI and DisplayPort cable cover.

      crwdns2952109:0crwdne2952109:0

      crwdns2917038:0crwdne2917038:0

    8. Steam Machine (2026) RAM Replacement, Remove the cable cover: crwdns2935265:035crwdnd2935265:01crwdnd2935265:02crwdne2935265:0 Steam Machine (2026) RAM Replacement, Remove the cable cover: crwdns2935265:035crwdnd2935265:02crwdnd2935265:02crwdne2935265:0
      • Remove the cable cover.

      crwdns2952109:0crwdne2952109:0

      crwdns2917038:0crwdne2917038:0

    9. Steam Machine (2026) RAM Replacement, Disconnect the board: crwdns2935265:036crwdnd2935265:01crwdnd2935265:02crwdne2935265:0 Steam Machine (2026) RAM Replacement, Disconnect the board: crwdns2935265:036crwdnd2935265:02crwdnd2935265:02crwdne2935265:0
      • Use the flat end of a spudger to pry up and disconnect the press connector on the HDMI and DisplayPort board.

      crwdns2952109:0crwdne2952109:0

      crwdns2917038:0crwdne2917038:0

    10. Steam Machine (2026) RAM Replacement, Separate the cable: crwdns2935265:037crwdnd2935265:01crwdnd2935265:02crwdne2935265:0 Steam Machine (2026) RAM Replacement, Separate the cable: crwdns2935265:037crwdnd2935265:02crwdnd2935265:02crwdne2935265:0
      • Use your fingers to gently peel the HDMI and DisplayPort board's cable off the metal frame.

      • If you're having trouble, use an iOpener or hair dryer to heat the cable.

      crwdns2952109:0crwdne2952109:0

      crwdns2917038:0crwdne2917038:0

    11. Steam Machine (2026) RAM Replacement, Remove the SSD screw: crwdns2935265:038crwdnd2935265:01crwdnd2935265:02crwdne2935265:0 Steam Machine (2026) RAM Replacement, Remove the SSD screw: crwdns2935265:038crwdnd2935265:02crwdnd2935265:02crwdne2935265:0
      • Use a T8 Torx screwdriver to remove the 5.1 mm‑long screw securing the SSD.

      • With the screw removed, the SSD will pop up at a shallow angle.

      crwdns2952109:0crwdne2952109:0

      crwdns2917038:0crwdne2917038:0

    12. Steam Machine (2026) RAM Replacement, Remove the SSD: crwdns2935265:039crwdnd2935265:01crwdnd2935265:02crwdne2935265:0 Steam Machine (2026) RAM Replacement, Remove the SSD: crwdns2935265:039crwdnd2935265:02crwdnd2935265:02crwdne2935265:0
      • Don't pull up on the SSD at a sharp angle, or you may damage the SSD and its socket.

      • Pull the SSD out of its socket at the angle it popped up at to remove it.

      crwdns2952109:0crwdne2952109:0

      crwdns2917038:0crwdne2917038:0

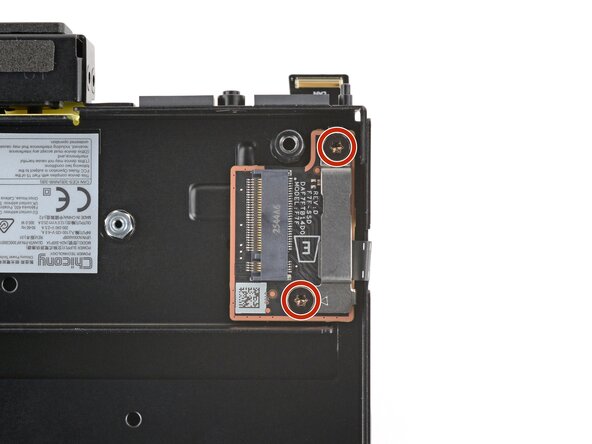
    13. Steam Machine (2026) RAM Replacement, Remove the SSD board screws: crwdns2935265:040crwdnd2935265:01crwdnd2935265:02crwdne2935265:0 Steam Machine (2026) RAM Replacement, Remove the SSD board screws: crwdns2935265:040crwdnd2935265:02crwdnd2935265:02crwdne2935265:0
      • Use a T8 Torx screwdriver to remove the two 5.1 mm‑long screws securing the SSD board and its cover.

      • With the screws removed, the board is only attached by its ribbon cable.

      crwdns2952109:0crwdne2952109:0

      crwdns2917038:0crwdne2917038:0

    14. Steam Machine (2026) RAM Replacement, Remove the SSD board cable cover: crwdns2935265:041crwdnd2935265:01crwdnd2935265:02crwdne2935265:0 Steam Machine (2026) RAM Replacement, Remove the SSD board cable cover: crwdns2935265:041crwdnd2935265:02crwdnd2935265:02crwdne2935265:0
      • Remove the cable cover.

      crwdns2952109:0crwdne2952109:0

      crwdns2917038:0crwdne2917038:0

    15. Steam Machine (2026) RAM Replacement, Disconnect the SSD board: crwdns2935265:042crwdnd2935265:01crwdnd2935265:02crwdne2935265:0 Steam Machine (2026) RAM Replacement, Disconnect the SSD board: crwdns2935265:042crwdnd2935265:02crwdnd2935265:02crwdne2935265:0
      • With one hand, hold the board down by the SSD socket.

      • With your free hand, use the flat end of a spudger to pry up and disconnect the board's press connector.

      crwdns2952109:0crwdne2952109:0

      crwdns2917038:0crwdne2917038:0

    16. Steam Machine (2026) RAM Replacement, Remove the SSD board: crwdns2935265:043crwdnd2935265:01crwdnd2935265:02crwdne2935265:0 Steam Machine (2026) RAM Replacement, Remove the SSD board: crwdns2935265:043crwdnd2935265:02crwdnd2935265:02crwdne2935265:0
      • Lift the SSD board straight up and remove it.

      crwdns2952109:0crwdne2952109:0

      crwdns2917038:0crwdne2917038:0

    17. Steam Machine (2026) RAM Replacement, Separate the cable: crwdns2935265:044crwdnd2935265:01crwdnd2935265:02crwdne2935265:0 Steam Machine (2026) RAM Replacement, Separate the cable: crwdns2935265:044crwdnd2935265:02crwdnd2935265:02crwdne2935265:0
      • Use your fingers to gently peel the SSD board cable off the metal frame.

      • If you're having trouble, you can use an iOpener or hair dryer to heat the cable.

      crwdns2952109:0crwdne2952109:0

      crwdns2917038:0crwdne2917038:0

    18. Steam Machine (2026) RAM Replacement, Reposition the inner assembly: crwdns2935265:045crwdnd2935265:01crwdnd2935265:01crwdne2935265:0
      • Flip the inner assembly over so the heatsink is on top.

      crwdns2952109:0crwdne2952109:0

      crwdns2917038:0crwdne2917038:0

    19. Steam Machine (2026) RAM Replacement, Remove the power supply screws: crwdns2935265:046crwdnd2935265:01crwdnd2935265:02crwdne2935265:0 Steam Machine (2026) RAM Replacement, Remove the power supply screws: crwdns2935265:046crwdnd2935265:02crwdnd2935265:02crwdne2935265:0
      • Use a T8 Torx screwdriver to remove the four 12.8 mm‑long screws securing the power supply.

      crwdns2952109:0crwdne2952109:0

      crwdns2917038:0crwdne2917038:0

    20. Steam Machine (2026) RAM Replacement, Disconnect the power supply: crwdns2935265:047crwdnd2935265:01crwdnd2935265:03crwdne2935265:0 Steam Machine (2026) RAM Replacement, Disconnect the power supply: crwdns2935265:047crwdnd2935265:02crwdnd2935265:03crwdne2935265:0 Steam Machine (2026) RAM Replacement, Disconnect the power supply: crwdns2935265:047crwdnd2935265:03crwdnd2935265:03crwdne2935265:0
      • The corner of the motherboard closest to the DisplayPort port has two metal prongs that connect it to the power supply.

      • With one hand, firmly secure the power supply.

      • With your free hand, grip under the corner of the inner assembly so you're lifting up on the motherboard itself.

      • Firmly pull the corner up until it disconnects from the power supply.

      • This requires some force and may take a few attempts.

      crwdns2952109:0crwdne2952109:0

      crwdns2917038:0crwdne2917038:0

    21. Steam Machine (2026) RAM Replacement, Remove the motherboard and heatsink: crwdns2935265:048crwdnd2935265:01crwdnd2935265:03crwdne2935265:0 Steam Machine (2026) RAM Replacement, Remove the motherboard and heatsink: crwdns2935265:048crwdnd2935265:02crwdnd2935265:03crwdne2935265:0 Steam Machine (2026) RAM Replacement, Remove the motherboard and heatsink: crwdns2935265:048crwdnd2935265:03crwdnd2935265:03crwdne2935265:0
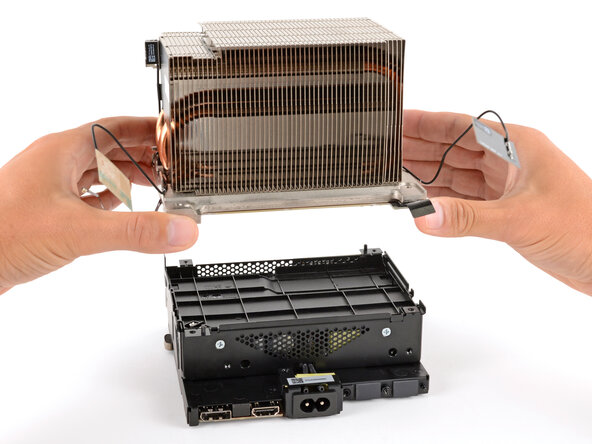
      • Remove the motherboard and heatsink from the power supply and set it down so the motherboard is facing up.

      crwdns2952109:0crwdne2952109:0

      crwdns2917038:0crwdne2917038:0

    1. Steam Machine (2026) RAM Replacement, Remove the RAM: crwdns2935265:049crwdnd2935265:01crwdnd2935265:03crwdne2935265:0 Steam Machine (2026) RAM Replacement, Remove the RAM: crwdns2935265:049crwdnd2935265:02crwdnd2935265:03crwdne2935265:0 Steam Machine (2026) RAM Replacement, Remove the RAM: crwdns2935265:049crwdnd2935265:03crwdnd2935265:03crwdne2935265:0
      • Simultaneously push the RAM module's two metal arms outward to disengage them.

      • Remove the RAM.

      • To install a stick of RAM, slide it into its socket at a slight downward angle and push down firmly until both metal arms lock it in place.

      crwdns2952109:0crwdne2952109:0

      crwdns2917038:0crwdne2917038:0

crwdns2915888:0crwdne2915888:0

To reassemble your device, follow these instructions in reverse order.

Take your e-waste to an R2 or e-Stewards certified recycler.

Repair didn’t go as planned? Try some basic troubleshooting, or ask our Answers community for help.

crwdns2935221:0crwdne2935221:0

Spencer Day

crwdns2935283:009/14/22crwdne2935283:0

207.155 crwdns2915208:0crwdne2915208:0

crwdns2935297:01.266crwdne2935297:0

crwdns2947412:00crwdne2947412:0

crwdns2917038:0crwdne2917038:0

crwdns2936625:0crwdne2936625:0:

crwdns2936751:024crwdne2936751:0 57

crwdns2936753:07crwdne2936753:0 388

crwdns2936753:030crwdne2936753:0 2,275

crwdns2959996:0crwdne2959996:0 2,295