crwdns2915892:0crwdne2915892:0
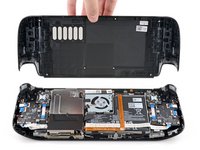
Use this guide to replace the back cover on your Steam Deck LCD, or to remove it for further repairs.
Remember: follow general electrostatic discharge (ESD) safety procedures while repairing your device.
Note: The back button faces (L4, R4, L5, and R5) are part of the back cover and cannot be separately removed.
Valve warns that removing the back cover can weaken the Steam Deck's structural integrity.
crwdns2942213:0crwdne2942213:0
-
-
Power down your Steam Deck and unplug any cables.
-
-
crwdns2935267:0crwdne2935267:0FixMat$36.95
-
Use a Phillips driver to remove the eight screws securing the back cover:
-
Four coarse thread 9.5 mm-long screws
-
Four fine thread 5.8 mm-long screws
there should be a picture of the SD card slot at the start of every Steam Deck teardown. i know the note is there but i generally use the pictures to guide me and forgetting to remove the SD card is a very critical step
I agree, I just broke mine...
What is the the #1 philips used for? Only the #0 is mentioned in the instructions.
I wish they would specify which size to use for which screws.
Mark D -
I found it easiest to use a PH1 for the red screws, and PH0 for the rest (including the internals.)
Be careful you can strip the screws take your time
I use PH00 bit
I used the PH1 bit for this. You can use smaller bits but ideally there should be no play of the bit in the screw head.
are there playstation replacements (circle,square,cross,triangle)
I used the ifixit tools and used the 00 size for the screws on the back.
I've completed the guide and found it very helpful!
I think somewhere in this part it would be helpful to name the size of the correct Phillips driver to use:
Use a Phillips driver to remove the eight screws securing the back cover:
Four 9.5 mm screws
Four 5.8 mm screws
I used the PH1 for the 9.5mm screws and PH00 for the 5.8mm screws. The PH0 wanted to strip one of the small ones.
FYI - 512gb version has blue threadlocker on the Orange screws.
Just a point for knowledge sake, the Four 5.8mm screws on this step are factory installed with a version of locktite. Not sure why but there will be slight resistance when removing the first time.
Stripped two of the 5.8mm screws, feel pretty dumb, now I'm stuck at step 2 of 43 :|
The screw bit that came with my fix kit just stripped the screws of my steam deck. I guess I should've just sent it in...
Model 1030 SteamDeck uses Torque #6 (CR-V T6) 5.0mm for all 8 screws making it far less likely to damage the screw heads.
Model 1030 is the OLED version, which we have separate guides for! See here: Steam Deck OLED
-
-
-
-
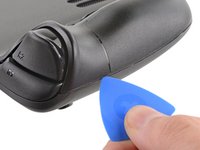
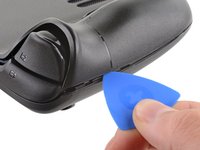
Insert an opening pick into the thin gap between the back cover and the front shell, along the edge of the right grip.
-
Pry up on the back cover to release it from the locking clips.
I found it easiest to start this process at the top of the device near the fan exit.
second that and inserting the pick in the bottom middle and sliding the pick to each side
Sub -
I also found the top near the fan exit to be easier
Thank you for this tip, it definitely was easy starting at the top instead of by the bumper/triggers. After I opened the top I did the bottom and then it was way easier to gently open the sides. be very careful and go slowly to make sure that none of the clips are damaged
Luis B -
this as suggested above:
1. open the top
2. open the bottom
3.gently open the sides
same; i pried from the top of the screen area. I was unable to find an opening on the side
I also started from the middle of the deck and worked my way out since I couldn't get a grip with the pick on the deck's side grips. Since this is a common step for pretty much all guides for opening the deck I think it's also worth noting that you should be careful not to bend the trims/seams where the front and back covers meet with the pick. When I first opened my deck you can definitely see where I nudged the pick in between the covers since I was probably using too much force on the pick itself.
It would be useful to note here that if you want to insert the little blue triangular iFixit opening picks into the right side along the edge, there isn't actually a gap as the directions say, at least not on newer Decks. You'll be making the initial gap using the pick. Brace it on something because you will need to use enough downward force that you're flexing the pick a bit and it'll probably be digging into the skin of a bare hand. With enough force suddenly it will make a click and go in just a bit, and then you're in business.
plastic picks didnt work for me but finger males did the job on prying this open
I found it easiest to open starting with R1 or L1 buttons and proceeding to the center of the top edge
This step was the hardest by far. First I didn't find an opening at the sides, and it did take a really long time until I finally got it open... Then, when I had the one side opening open it didn't just pop out, I needed to slide all the way to the other side with the pick and open everything. I guess they made it even more drop resistant.
-
-
-
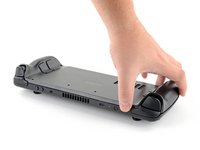
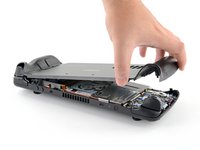
Grip the back cover at the opening you just created and pull it up and away from the device to unclip the long edges.
-
Remove the back cover.
If you have an SD card, you will want to take it out. I followed the guide and didn't think about the SD card I had inside. When I went to snap the case back on it clapped shut on the exposed SD card, shearing it in half and leaving the bottom half stuck in the SD card slot. I am still endeavoring to get it out.
you can use the case that comes with the steam deck to support it once the lid is removed
Luis Barbosa (Armored Saint) - crwdns2934203:0crwdne2934203:0
You can get the pry pick inserted easier if you start in the gap for the shoulder buttons. A lego brick separator works well here
-
To reassemble your device, follow these instructions in reverse order.
Take your e-waste to an R2 or e-Stewards certified recycler.
Repair didn’t go as planned? Try some basic troubleshooting, or ask our Steam Deck answers community for help.
To reassemble your device, follow these instructions in reverse order.
Take your e-waste to an R2 or e-Stewards certified recycler.
Repair didn’t go as planned? Try some basic troubleshooting, or ask our Steam Deck answers community for help.
crwdns2935221:0crwdne2935221:0
crwdns2935229:013crwdne2935229:0
crwdns2947412:07crwdne2947412:0
Alguien sabe donde puedo comprar los 4 tornillos del medio de la tapa trasera, creo que hacen 1,6x5mm ?
La tapa que venden vienen con los tornillos?
Si pueden ser los originales mejor.
Muchas gracias.
one of my screws stripped what should I do?
Can I use it on OLED steamdeck?
Is this backplate also compatible with the OLED model?
For everyone wondering: it is compatible with the OLED model! I just replaced my backplate with this one and it fits perfectly! :)
One of my screws stripped out what do I do. Where can I get new screws
Here's a quick guide on how to remove a stripped screw: How to Remove a Stripped Screw
Here are Steam Deck back cover screws for sale: Steam Deck Back Plate Screw Set
Best of luck!


