crwdns2915892:0crwdne2915892:0
Use this guide to replace the motherboard in a Samsung Galaxy Watch.
crwdns2942213:0crwdne2942213:0
-
-
Remove the four Tri-point #00 screws (4.2 mm length) on the backside of the watch.
-
-
-
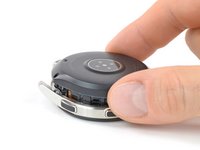
Use an opening tool to get between the back cover and the metal housing of the watch.
-
Carefully pry the plastic back cover open.
You may need to use a small screwdriver or letter opener to pry the case apart. I found with two different spudgers I could not get it to budge.
How do I Secure the sealing, and wish material du you use?
I managed to get the back cover to open with an unused pry tool on one side, however, to fully remove it I needed to use 2 iFixit opening picks from my toolkit as the one side wouldn't open with the pry tool.
I couldn't get the back cover off with any normal tools. However, I discovered I could slip a razor blade a short distance under the back cover. With this in place, something thicker (like a plastic spudger) could easily be pushed between the razor blade and the metal of the watch. Obviously, working with a razor blade like this is quite risky, I had mine in a little holder to protect my fingers!
-
-
-
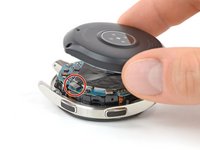
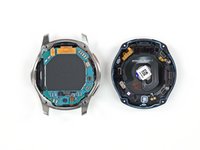
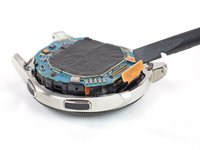
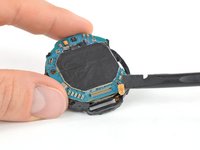
Lay down the watch and lift the back cover to access the sensor connector on the motherboard.
-
-
-
Use a spudger to disconnect the sensor flex cable from the motherboard.
My 2019 Gear Sport has no flex cable it used a post where the flex cable is. This plugs into the mother board.
Much better for disassembly.
-
-
-
-
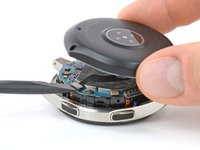
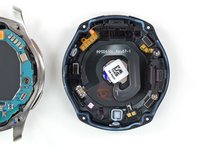
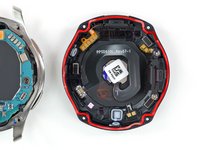
Remove the back cover.
Has anyone seen a listing for the gasket?
anyone where can find the rubber gasket?
is the gasket the Adhesive? If not, what adhesive suggested and how do you apply it?
No, the gasket is not the adhesive. As adhesive you can use this under the battery.
woher bekomme ich eine neue gummidichtung?
Hat jemand eine Quelle für die Dichtung der Rückabdeckung (rote Dichtung, 3. Bild Schritt 5). Hat jemand versucht die erfolgreich selber herzustellen?
Falls jemand die Gummidichtung im Netz findet, gerne hier posten. Wir konnten bisher noch keine finden. Selbst rounded.com hat es nicht, und die haben recht viel für (Samsung) Smartwatches.
Same question : has anybody found a solution for the rubber gasket ? I am not confident at all in the waterproofing of the watch now ...
If the waterproof seal is removed and you only encounter water while washing your hands, would there be any issue?
Anyone know where to get a replacement gasket? I wear my watch showering and swimming, I don't want to loose the waterproofing
When I opened the back cover, the gasket was already muddy.
I purchased a liquid gasket because it is difficult to obtain a dedicated gasket.
It is for general-purpose waterproof packing used for cars and motorcycles, and is contained in a 5g tube.
Since it is necessary to apply it to a fine place, I attached a very thin nozzle for super glue to the tip of the tube and applied it.
I can't guarantee the waterproof performance, but I tried what I could.
-
-
-
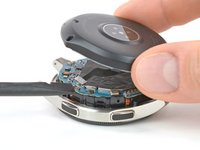
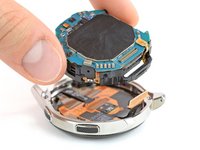
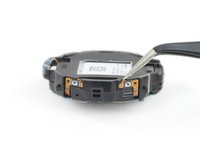
Use a spudger to disconnect the display flex cable from the motherboard.
My display flex cable is cut … is it possible to replace only cable without changing display… if yes please leave a link to buy it
-
-
-
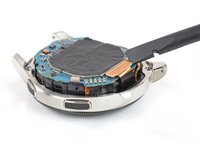
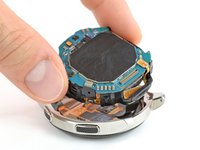
Lift the core unit out of the housing.
Es sind an den Ecken des Kernstücks ein paar "Plastikdreiecke" mit dem man es mit einem Spudger leichter raushebeln kann!
Thanks @Marco Marinkovic. There are a couple holes or points, on which to leverage in order to free and lift the core unit. The core unit won't move otherwise as it is anchored there
-
-
-
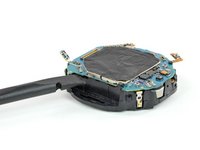
Use a spudger to disconnect the hall sensor flex cable.
-
-
crwdns2935267:0crwdne2935267:0Tweezers$4.99
-
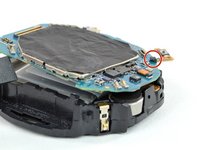
Use a pair of tweezers to gently peel both button cables from the plastic frame.
Plus efficace et moins risquer de les enlever avec la spatule.
-
-
-
Remove the single Phillips #00 screw (3.4 mm length).
-
-
-
Insert a spudger into the small gap underneath the motherboard where the cutout in the plastic frame is.
-
Lift the motherboard by twisting the spudger.
-
Slide the motherboard out from under the plastic tab.
There is a plastic clip holding down the motherboard in the corner opposite to where you’re prying. After lifting slightly, the motherboard should be slid out from underneath that clip to avoid damaging it.
Thanks for the hint. Added an additional image and bullet to point that out.
Also another tab opposite that needs just a LITTLE pressure to unclip to allow you to slide out from other side
-
-
-
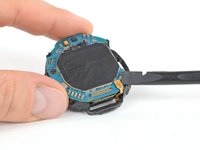
Remove the motherboard.
-


If possible, turn on your device and test your repair before resealing.
To reassemble your device, follow these instructions in reverse order.
Repair didn’t go as planned? Try some basic troubleshooting, or ask our Answers community for help.
Take your e-waste to an R2 or e-Stewards certified recycler.
crwdns2935221:0crwdne2935221:0
crwdns2935229:09crwdne2935229:0

crwdns2915084:0crwdne2915084:0

Tobias Isakeit - Repairability Engineer crwdns2935289:0Tobias Isakeit - Repairability Engineercrwdne2935289:0
Business
crwdns2934841:01crwdne2934841:0
crwdns2935297:01,132crwdne2935297:0
crwdns2947412:07crwdne2947412:0
Anyone know where to purchase a Galaxy Watch mother board?
What is the part number, or where can you get the motherboard?
Where can the motherboard be purchased from for Galaxy Watch ?
I got a motherboard on ebay. Including import duties it was something like 90$. Shipped to Denmark.
Definitely cheaper than repair shop and absolutely more fun! :)
Hello,
Do you know if switching a motherboard from a GW46 Bluetooth only (R800) to a GW46 LTE (R805) is a straight swap or additional parts are needed?
As my R800 sensors are dead and i need to replace the motherboard and the back cover anyway.
Thanks
The one in this guide is a R805F. Unfortunately I can’t say for sure if it will fit. the Plastics on the core assembly might differ. But maybe it’s enough to compare parts visually.
Worked perfectly. Issues that I encountered:
1. Watch back cover was difficult to separate from metal half. I had to get it started with fine, flat, metal tool.
2. Hall sensor cable memory biased to go under motherboard when installing new board (keep it on top)
3. Keep an eye on new button cables when installing the core into the housing (they have a tendency to move out of position.
I can't get them to budge
Irene - crwdns2934203:0crwdne2934203:0
Same here, its impossible to get the screws off. They’re almost stripped now too.
Prabhat - crwdns2934203:0crwdne2934203:0
Sorry to hear that. Here are some tips on how to get those screws off hopefully: How to Remove a Stripped Screw
Tobias Isakeit -
Just started working on watch. Can not get the screws out. I purchased the recommended tools. Screws won't budge. I have not stripped them yet. How do I get them to loosen up?
joyce c - crwdns2934203:0crwdne2934203:0
Same here. I did buy your Electronics repair Bundle. The Y000 is too pointy, we need a flatter tool
Robertob67 - crwdns2934203:0crwdne2934203:0
Hi Ladies & Gentleman, please try as follows:
Use a spray can of "WD 40" with a spray pipe/tube but DO NOT spray into the screw holes. Just spray shortly on a piece of paper, a drop of WD40 will remain at the end of the spray pipe. This drop I put into the screw hole position. Do this for each screw hole and leave the stuff approx. 10 minutes alone. Afterwards use the screw driver as normal to turn the screws out.
*** After the drop is placed into the hole do not wait too long as WD40 is crawling into "even not existing gaps"
*** just use a small drop of WD40.
*** I intend for using 4 new screws as the head (Tri-Pont profile) seems worn out. But if I get new screws for sure I will go for a TORX profile because its the best as you don't need to apply axial force on screw driver.
Very best regards from Harald (a German machine building engineer)
Harald - crwdns2934203:0crwdne2934203:0
Harald again to Robertob67:
It is NOT the Tool Y000 but the Y00
Best regards
Harald
Harald - crwdns2934203:0crwdne2934203:0