crwdns2915892:0crwdne2915892:0
Use this guide to remove the rear glass of the Samsung Galaxy S9.
Opening the Samsung Galaxy S9 will damage the waterproof sealing on the device. If you do not replace the adhesive seals, your phone will function normally, but will loose its water-protection.
You’ll need replacement adhesive to reattach components when reassembling the device.
crwdns2942213:0crwdne2942213:0
-
-
Before you begin, switch off your phone.
-
Apply a heated iOpener to a long edge of the phone to loosen the adhesive beneath the rear glass. Apply the iOpener for at least two minutes.
-
-
-
In the following steps, you'll be cutting through the adhesive securing the back cover.
-
You'll be slicing through the adhesive in the areas shown:
-
Thick portions of adhesive
-
Thin areas of adhesive
-
Avoid prying or slicing in this area, to protect the fingerprint sensor flex cable.
-
-
-
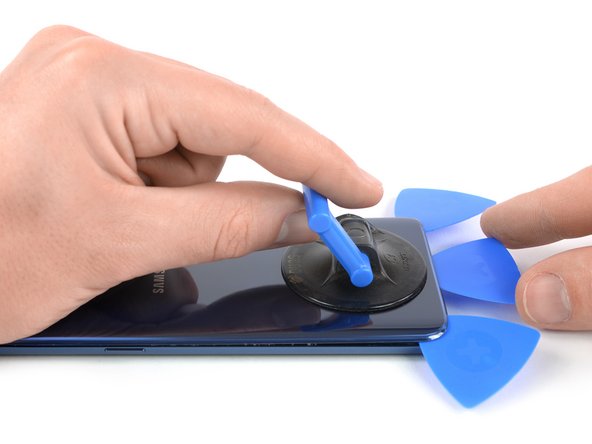
Press a suction cup onto the back cover.
-
Lift the back cover's bottom edge with your suction cup, opening a slight gap between the back cover and the frame.
-
Insert an opening pick in the gap you created and slide it to the bottom right corner.
-
Insert a second opening pick and slide it to the bottom left corner.
-
Insert a third opening pick to prevent the adhesive from resealing during the rest of the removal procedure.
-
-
-
-
While inserting only the tip of the opening pick, slide it from the bottom left corner along the side to the top.
-
Slide the pick around the top corner and leave it there to prevent the adhesive from resealing.
-
-
-
Slide the opening pick from the bottom right corner along the side to the top.
-
Slide the opening pick around the corner and cut the remaining adhesive at the top of the phone.
-
-
-
Carefully lift the side of the rear glass where the volume button is located.
-
Use the edge of a spudger to pry up and disconnect the fingerprint sensor flex cable.
-
Secure the new back cover with pre-cut adhesive or double-sided adhesive tape.
To reassemble your device, follow these instructions in reverse order.
After installing the rear cover, apply strong, steady pressure to your phone for several minutes to help the adhesive form a good bond, such as by placing it under a stack of heavy books.
After you've completed the repair, follow this guide to test your repair.
crwdns2935221:0crwdne2935221:0
crwdns2935229:013crwdne2935229:0
crwdns2947412:02crwdne2947412:0
Sollte nach Abschluss der Reparatur der Fingerabdrucksensor nicht funktionieren bitte folgende Schritte machen:
1. Schalte das Handy aus und hänge es ein Ladegerät
2. Starte das Handy im Restore Modus indem du die Bixby, Lauter und Powertaste gleichzeitig drückst bis das Samsung Logo kommt.
3. Wähle in dem Menü den Punkt: Wipe Cache Partition aus und bestätige mit Power deine Auswahl.
4. Starte das Gerät neu.
Hi,
At least on my unit, the fingerprint sensor was actually retained in the back of the unit and came loose from the camera lens assembly during back cover removal, so I did not need to undo the connector for it until after I had removed the back cover. I was kind of worried when this happened since I thought I tore the cable at first. May want to note that buying a new fingerprint sensor adhesive piece is a good idea, it's like 3 bucks on here.
Also, this might just be me but I would really have preferred more reinstallation details other than "hey reverse these instructions". The aftermarket rear covers on here do not come with the adhesive all preinstalled, only a few pieces of it, so you have to carefully check and make sure you put those on and alignment isn't easy to figure out if you don't know what you're doing. I did alright on that part, but the back cover I bought has adhesive that's too thin and didn't seal everywhere so I will have to redo that and the fingerprint sensor adhesive next weekend.


