crwdns2915892:0crwdne2915892:0
Use this guide to replace the battery in your Samsung Galaxy S9.
Opening the Samsung Galaxy S9 will damage the waterproof seals on the device. If you do not replace the adhesive seals, your phone will function normally, but will lose its water protection.
Before disassembling your phone, discharge the battery below 25%. If your battery is swollen, do not heat your phone. Swollen batteries can be very dangerous, so wear eye protection and exercise due caution, or take it to a professional if you're not sure how to proceed.
You’ll need replacement adhesive to reattach components when reassembling the device.
crwdns2942213:0crwdne2942213:0
-
-
Before you begin, switch off your phone.
-
Apply a heated iOpener to a long edge of the phone to loosen the adhesive beneath the rear glass. Apply the iOpener for at least two minutes.
-
-
-
In the following steps, you'll be cutting through the adhesive securing the back cover.
-
You'll be slicing through the adhesive in the areas shown:
-
Thick portions of adhesive
-
Thin areas of adhesive
-
Avoid prying or slicing in this area, to protect the fingerprint sensor flex cable.
-
-
-
Press a suction cup onto the back cover.
-
Lift the back cover's bottom edge with your suction cup, opening a slight gap between the back cover and the frame.
-
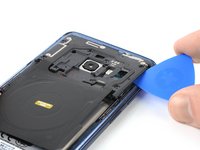
Insert an opening pick in the gap you created and slide it to the bottom right corner.
-
Insert a second opening pick and slide it to the bottom left corner.
-
Insert a third opening pick to prevent the adhesive from resealing during the rest of the removal procedure.
-
-
-
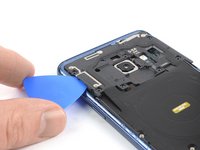
While inserting only the tip of the opening pick, slide it from the bottom left corner along the side to the top.
-
Slide the pick around the top corner and leave it there to prevent the adhesive from resealing.
-
-
-
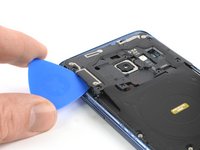
Slide the opening pick from the bottom right corner along the side to the top.
-
Slide the opening pick around the corner and cut the remaining adhesive at the top of the phone.
-
-
-
Carefully lift the side of the rear glass where the volume button is located.
-
Use the edge of a spudger to pry up and disconnect the fingerprint sensor flex cable.
-
-
-
-
Remove the eight 4 mm Phillips #00 screws.
-
-
-
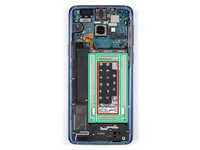
Insert an opening pick under the right side of the plastic cover containing the NFC antenna and charging coil.
-
Twist or pry to release the plastic clips securing the cover.
-
-
-
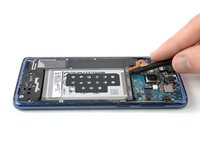
Insert an opening pick under the left side of the plastic cover.
-
Twist or pry to release the plastic clips securing the cover.
-
-
-
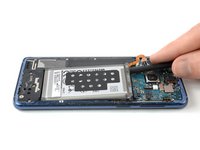
Remove the plastic cover containing the NFC antenna and charging coil.
-
-
-
Use the flat end of a spudger to pry up and disconnect the battery flex cable.
-
-
-
Use an iOpener to loosen the adhesive beneath the battery. Apply the iOpener for at least two minutes.
-
In the following step, only apply the spudger in the areas marked in green, which is where the battery adhesive is located.
-
Avoid this area. There's a gap in the mid-frame right below the battery, and you can accidentally damage the display through it.
-
-
-
Insert the flat end of a spudger at the top left corner of the battery where the flex cable is located and start to pry it up using firm, constant pressure.
-
Work your way down the left side of the battery and loosen the adhesive with the spudger.
-
-
-
Insert the spudger at the top right corner of the battery and pry it up.
-
-
-
Remove the battery.
-
If you used isopropyl alcohol, wait ten minutes before installing the new battery to allow the alcohol to completely evaporate.
-


To reassemble your device, follow these instructions in reverse order.
If possible, turn on your phone and test your repair before installing new adhesive and resealing the phone.
For optimal performance, calibrate your newly installed battery after completing this guide.
Take your e-waste to an R2 or e-Stewards certified recycler.
Repair didn’t go as planned? Check out our Answers community for troubleshooting help.
crwdns2935221:0crwdne2935221:0
crwdns2935229:096crwdne2935229:0


crwdns2947412:027crwdne2947412:0
An exceptionally useful, and dare I add - well-written - fixit.
Merci ifixit.
Mais je n ais pas compris la deconnection du NFC, es une nappe. Je ne comprends pas.
Bonjour @Di Da, vous trouverez la partie qui parle de la démontage du coque / de la cache en plastique qui abrite l'antenne NFC et la bobine de recharge dans les étapes 9 à 11. Au fait, la cache en plastique et la nappe sont UNE pièce ensemble, on ne peut pas les séparer et dès que vous démontez la cache, la nappe va elle aussi sortir automatiquement. Elle n’est lié que par quelques contacts, vous n’avez pas besoin de déconnecter ceux-ci, ils se séparent automatiquement quand vous retirez la coque.
Wenn nach Abschluss der Reparatur der Fingerabdrucksensor nicht funktioniert muss man in den Restore Modus des Handy gehen.
Dazu das Smartphone an den Lader hängen und das Gerät ausschalten.
Dannach die Bixby + Power + Lauter Taste gedrückt halten bis das Samsung Logo erscheint.
In dem Menü den Punkt “Wipe Cache Partition” auswählen mit Lauter / Leiser und mit Power die Auswahl bestätigen.
Die Auswahl nochmal mit Yes bestätigen und warten bis das Gerät die Cache Partition gelöscht hat und das Gerät neu starten.
Dannach sollte der Fingerabdrucksensor wie gewohnt funktionieren.
Why does the guide stop? How am I supposed to use the adhesive??