crwdns2915892:0crwdne2915892:0
Use this guide to replace the rear cover on your Samsung Galaxy Note10+.
crwdns2942213:0crwdne2942213:0
-
-
Prepare an iOpener and apply it to the left edge of the rear cover for one minute.
-
-
-
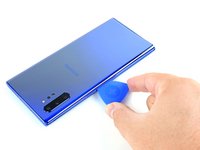
Apply a suction cup to the heated edge of the rear cover, as close to the edge as possible.
-
Pull up on the suction cup with strong, steady force to create a gap between the rear cover and the frame.
-
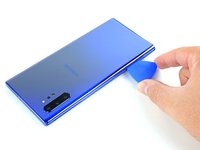
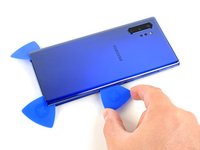
Insert the point of an opening pick into the gap.
-
-
-
-
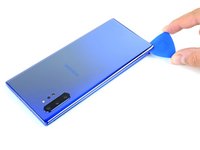
Slide the opening pick along the left edge towards the bottom left corner to slice the adhesive.
-
Leave the pick inserted in the bottom left corner to prevent the adhesive from re-sealing.
-
-
-
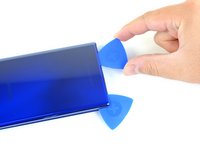
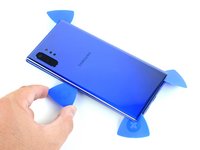
Repeat the previous heating and cutting procedure for the remaining three sides of the phone.
-
Leave an opening pick on each side as you continue to the next to prevent the adhesive from resealing.
-
-
-
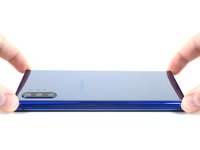
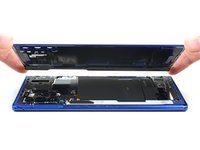
Lift the rear cover straight up to remove it.
Muy buena la guia. nada que añadir. para montar solo limpia el equipo donde estaba el tape anterior, y remoueve los el tape de la tapa nueva solo ponla y listo…
-


Compare your new replacement part to the original part—you may need to transfer remaining components or remove adhesive backings from the new part before installing.
To reassemble your device, follow the above steps in reverse order.
Take your e-waste to an R2 or e-Stewards certified recycler.
Repair didn’t go as planned? Try some basic troubleshooting, or ask our Answers community for help.
crwdns2935221:0crwdne2935221:0
crwdns2935229:012crwdne2935229:0


crwdns2947412:04crwdne2947412:0
Depending on how rough you back glass is. Mine was a shattered mess. It might take almost 2 hours. But mine was a worst case scenario. But be patient and slow and you are sure to be rewarded with a beautiful new back glass! Keep at it my friends! No need to ditch that phone yet!
Great tutorial, I replace real cover with battery. Now my Note list like new.
I can open it easily without any problems
Tuve dificultad para abrirlo, definitivamente como ya estaba rota la tapa trasera, no tuve tanto cuidado, sin embargo, esta guía fue de ayuda para no empezar por otra parte y porsupuesto usar calor de una pistola. Lo ideal sería usar una precalentadora, pero hablamos de hacerlo en casa y no cualquiera tiene herramientas de técnico. Le falta a la guía mencionar cómo quitar el pegamento que queda, lo mejore es limpiarlo y usé un poco de alcohol isoproólico para remover el pegamento pero la verdad aún así tuve dificultades. Limpié lo más posible. Al retirar la tapa me llevé una sorpresa donde había un tornillo suelto y más flojos, así que ajusté todo y volvió a funcionar la carga inalámbrica.
I have an adjustable hot plate. I bought it when I replaced the back and battery on a previous note. I am wondering about some type of shim so that the camera bump is not in contact with the hot plate. I am thinking about fender washers. Is there a better way?
Rusty Lingenfelter - crwdns2934203:0crwdne2934203:0
I actually had my back plate come off by itself after I washed my phone after UV activated glue got on it. I used alcohol and that somehow got on contact with the glue and weakened it. Granted, it was a 6 year old phone with a cover and it did get hot from time to time, so that might have had something to do with the weakened glue. In any case, I'm upset I didn't use this opportunity to change my battery. Instead I just glued it back on :(
Joe - crwdns2934203:0crwdne2934203:0