crwdns2915892:0crwdne2915892:0
Use this guide to replace a worn-out or dead battery in your Samsung Galaxy A40.
If your battery is swollen, take appropriate precautions. For your safety, discharge your battery below 25% before disassembling your phone. This reduces the risk of a dangerous thermal event if the battery is accidentally damaged during the repair.
You’ll need replacement adhesive to reattach components when reassembling the device.
crwdns2942213:0crwdne2942213:0
-
-
Insert a SIM card eject tool, a SIM eject bit or a straightened paper clip into the hole on the SIM tray located on the left side of the phone.
-
Press your SIM card eject tool firmly into the hole in order to eject the SIM card tray.
-
Remove the SIM card tray.
-
-
-
Apply a heated iOpener to the back cover to loosen the adhesive underneath. Apply the iOpener for at least two minutes.
-
-
-
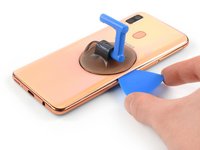
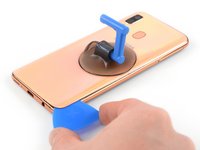
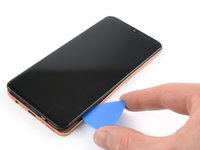
Secure a suction handle to the right edge of the back cover, as close to the edge as possible.
-
Lift the back cover with the suction handle to create a small gap between the back cover and the frame.
-
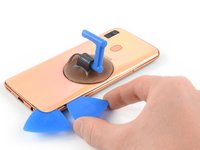
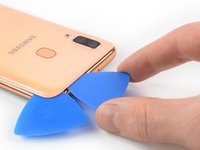
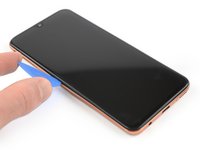
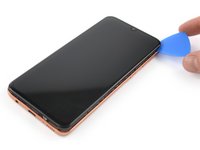
Insert an opening pick into the gap.
-
-
-
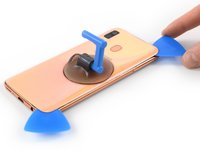
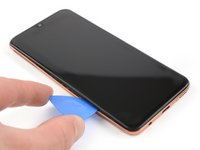
Slide the opening pick to the bottom right corner and leave it in place to prevent the adhesive from resealing.
-
-
-
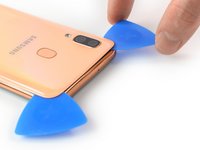
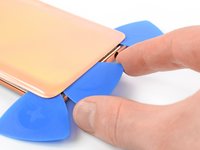
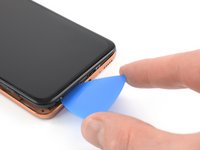
Insert a second opening pick at the bottom right corner.
-
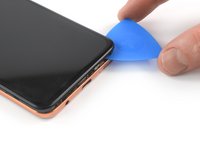
Slide the opening pick along the right edge of your phone to cut the adhesive beneath the back cover.
-
Leave the opening pick in the top right corner.
-
-
-
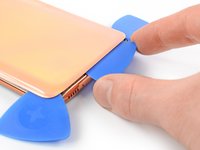
Insert a third opening pick at the top right corner of your phone.
-
Slide the opening pick along the top edge of your phone to cut the adhesive.
-
Leave the opening pick in the top left corner to prevent the adhesive from resealing.
-
-
-
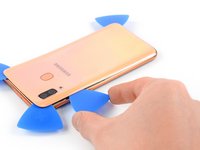
Insert a fourth opening pick at the top left corner of your phone.
-
Slide the opening pick along the left edge of your phone to cut the adhesive.
-
Leave the opening pick in the bottom left corner.
-
-
-
-
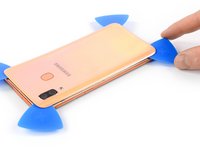
Insert a fifth opening pick to cut the remaining adhesive at the bottom edge of your phone.
-
-
-
Fold the back cover upwards and remove it.
The next step is to remove screws. You cannot remove the plastic mid-frame without first removing the screws. The guide is missing this step.
La cover posteriore è di vetro o in plastica?
The back cover is made in plastic or glass?
Hi Jacopo, the Samsung Galaxy A40 has a plastic back cover.
attenzione al sensore di impronta! a me è rimasto attaccato alla cover e si è rotto il cavo
-
-
-
Remove the thirteen 3.4 mm-long Phillips #00 screws.
Kijk uit voor de vingerafdrukscanner. De flat cable kan aan de behuizing blijven hangen, en kan dan afscheuren.
You can remove the cover for the fingerprint contact AFTER you remove the plastic mid-frame, so when re-assembling it you can get access to the cable connections.
If you DO try to remove the plastic cover first, it probably WILL go flying at great speeds, so cover the area with your hand, or put a finger on it.
I tried from the top, with a tiny flat-head screwdriver & it went flying, I dont think that was the right place to bend, maybe try from one of the sides?
-
-
-
Insert an opening pick between the left edge of the phone assembly and the midframe.
-
Slide the opening pick along the left edge of the phone to release the plastic clips holding the midframe in place.
start from the sim tray empty
Make sure the sim tray is removed and pry from there.
-
-
-
Slide the opening pick around the bottom right corner and release the plastic clips at the bottom edge of the phone assembly.
-
-
-
Slide the opening pick along the right edge of the phone assembly to release the remaining plastic clips holding the midframe in place.
-
-
-
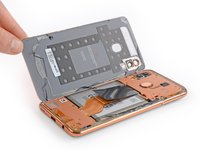
Remove the midframe.
Remove fingerprint sensor by disconnecting the cable in the same way as shown in step15.
-
-
-
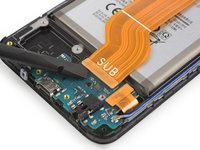
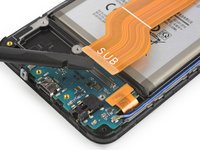
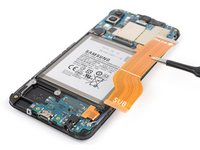
Use the flat end of a spudger to pry up and disconnect the battery cable.
-
-
-
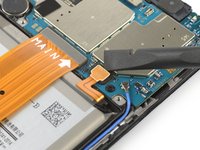
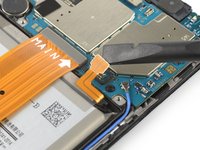
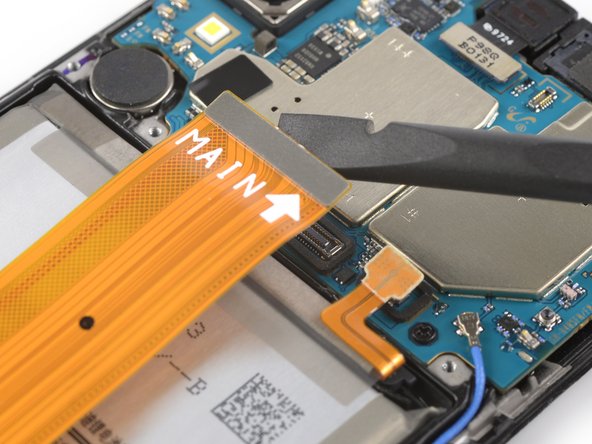
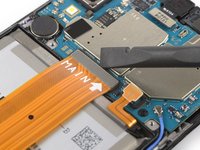
Use a spudger to pry up and disconnect the upper end of the main flex cable.
-
-
-
Use a spudger to pry up and disconnect the bottom end of the main flex cable.
-
Remove the main flex cable.
-
-
crwdns2935267:0crwdne2935267:0iFixit Adhesive Remover$19.99
-
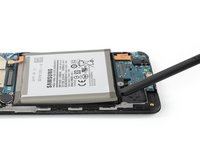
Lift the right edge of the phone assembly and tilt the phone at a 45° angle.
-
Apply a few drops of adhesive remover or high-concentration (90% or higher) isopropyl alcohol into the gap at the bottom edge of the battery. Let the adhesive remover run down to the left edge of the battery but avoid the right edge.
-
Tilt your phone in the direction of the rear facing camera to spread the adhesive remover beneath the battery.
-
-
-
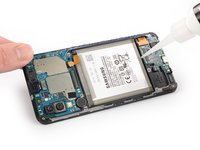
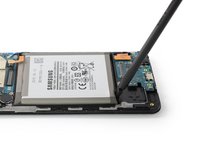
Insert a spudger in the gap at the bottom left edge of the battery.
-
Slide the spudger underneath the battery.
-
Use the spudger to pry up the battery.
-
-
-
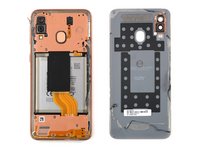
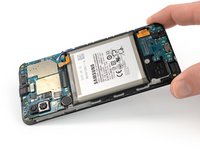
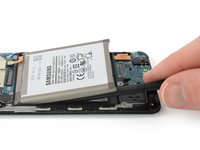
Remove the battery.
Bij stap 20 staat onderaan dat de batterij los gekoppeld moet worden, terwijl deze net is bevestigd. Dat lijkt mij onjuist geformuleerd.
-


If possible, turn on your device and test your repair before installing new adhesive and resealing.
Secure the new battery with pre-cut adhesive or double-sided adhesive tape. In order to position it correctly, apply the new adhesive into the device at the places where the old adhesive was located, not directly onto the battery. Press the new battery firmly into place.
To reassemble your device, follow these instructions in reverse order. Apply new adhesive where necessary after cleaning the relevant areas with isopropyl alcohol (>90%).
For optimal performance, after completing this guide, calibrate your newly installed battery.
Take your e-waste to an R2 or e-Stewards certified recycler.
Repair didn’t go as planned? Try some basic troubleshooting, or ask our Answers community for help.
crwdns2935221:0crwdne2935221:0
crwdns2935229:013crwdne2935229:0


crwdns2947412:02crwdne2947412:0
Hey, thanks a lot! I was able to replace the battery thanks to your tutorial. The only problem was that you didn't mention to remove the fingerprint scanner before removing the back cover. Without that, the cable jumps out of the port while removing the back cover.
Tutorial ziet er geweldig goed uit, stapsgewijs en zoveel informatie! Alleen doet dat mij besluiten om het niet zelf te doen maar hiervoor naar telefoon reparatiewinkel te gaan.