
Retina MacBook 2015 Battery Replacement

crwdns2944107:0crwdnd2944107:0Jeff Suovanencrwdnd2944107:0crwdnd2944107:0crwdnd2944107:06crwdnd2944107:0crwdne2944107:0
crwdns2944111:0Kho 10, 2024crwdne2944111:0
crwdns2915892:0crwdne2915892:0
crwdns2942287:0crwdne2942287:0Use this guide to remove and replace the glued-in battery from your 12-inch MacBook with Retina Display. This is best done with the help of an iFixit battery replacement kit; the liquid adhesive remover in your kit will dissolve the adhesive securing the battery, allowing you to remove it with ease.
iFixit adhesive remover is flammable. Perform this procedure in a well-ventilated area. Do not smoke or work near an open flame during this procedure.
For your safety, drain your MacBook's battery before you begin this procedure. A charged lithium-ion battery can create a dangerous and uncontrollable fire if accidentally punctured.
The MacBook's battery contacts are located under the logic board, and this guide recommends removing the logic board completely for battery replacement. While it's possible to remove the logic board screws and simply tip the board up slightly to remove the battery, it's very difficult to install a new battery correctly with the logic board still in place.
Note: The solvent used to dissolve the battery adhesive can damage and/or discolor certain plastics. Take care where you apply the solvent.
To avoid logic board damage, when your MacBook repair is complete but before powering it on, connect it to low-voltage power using a 5-Watt iPhone charger and a USB-C to USB-A cable. These accessories are not included with your MacBook, so make sure you have them ready before you begin.
crwdns2942213:0crwdne2942213:0
crwdns2942269:0crwdne2942269:0
crwdns2942337:0crwdne2942337:0

crwdns2943213:0crwdne2943213:0


crwdns2943215:0crwdne2943215:0


crwdns2944105:0crwdne2944105:0

-
crwdns2935267:0crwdne2935267:0Magnetic Project Mat$19.95
-
Remove the following eight screws securing the lower case:
-
Two 1.8 mm P5 Pentalobe screws
-
Four 2.9 mm P5 Pentalobe screws
-
Two 6.1 mm P5 Pentalobe screws
-
-
-
Wedge your fingers between the upper case and the lower case, starting from the rear of the MacBook between the hinges.
-
Keeping a firm grip, lift steadily until the lower case separates slightly from the upper case.
-
-
-
While holding the lower case in place, carefully flip the MacBook over so the Apple logo faces up.
-
-
-
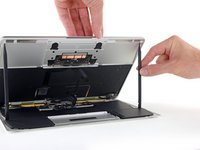
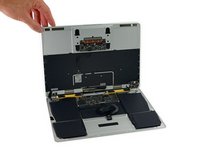
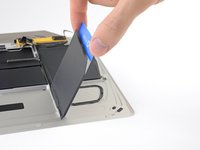
Lift the upper case and display together from the front edge and raise it to about a 45˚ angle.
-
-
-
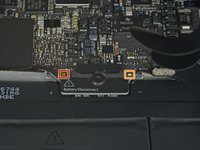
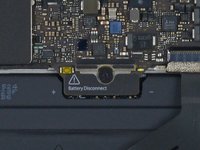
Use the flat end of a spudger to press and hold the small gold 'battery disconnect' button.
-
If the power LED is lit up, continue holding the button until the LED goes dark, and then release. This may take up to 10 seconds.
-
If the LED does not light, release the button after 5-10 seconds. Press and hold it again for 5-10 seconds, and release. Finally, press and hold it a third time for 5-10 seconds, and release.
-
-
-
Close the MacBook and carefully flip it upside-down.
-
-
-
Lifting from the front edge, open the lower case to an angle of about 45°.
-
-
crwdns2935267:0crwdne2935267:0Tweezers$4.99
-
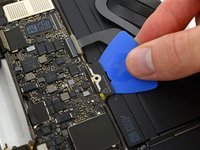
Use tweezers to peel back the tape covering the trackpad cable ZIF connector.
-
-
-
Use a spudger to carefully flip up the retaining flap on the trackpad cable ZIF connector.
-
-
-
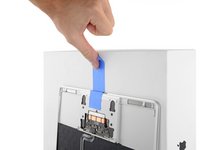
Disconnect the trackpad ribbon cable from the trackpad by pulling it gently through its slot in the frame.
-
-
-
Carefully turn the MacBook over, so that the lower case lays flat.
-
Raise the upper case/display assembly to about a 90° angle, and prop it up against something sturdy so you don't have to hold it.
-
Add a piece of tape near the track pad to secure the upper case and prevent accidental movement.
-
-
-
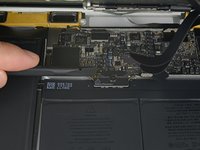
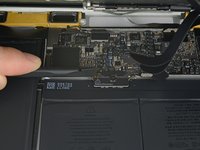
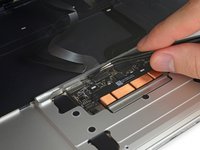
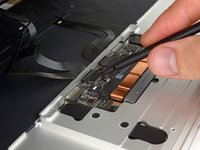
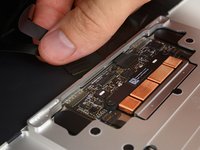
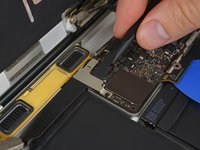
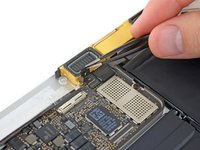
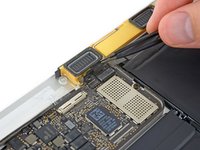
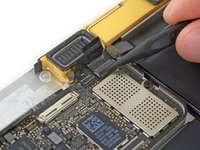
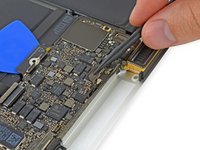
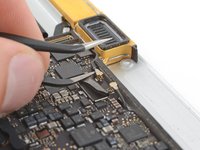
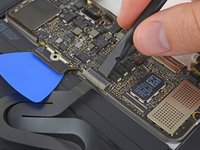
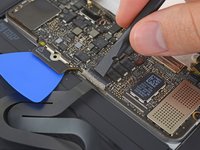
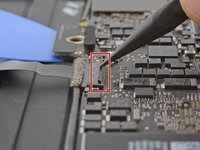
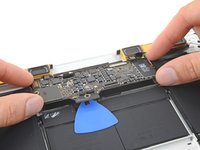
Remove the single 2.9 mm T5 Torx screw securing the battery connector to the logic board.
-
-
crwdns2935267:0crwdne2935267:0Battery Blocker$3.99
-
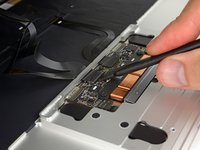
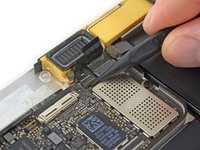
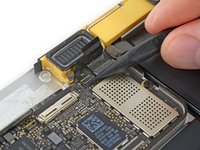
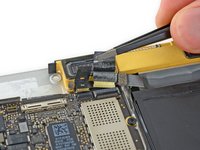
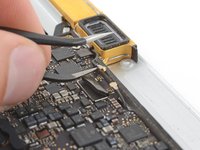
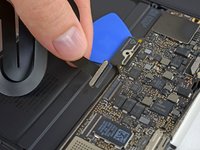
As an added precaution, you may physically disconnect the battery by inserting a battery isolation pick between the logic board and the battery connector.
-
-
-
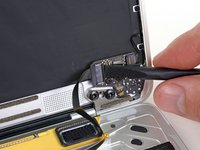
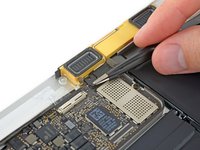
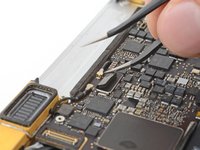
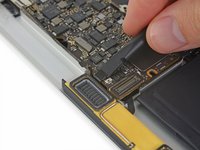
Remove the two screws securing the USB-C port cable bracket:
-
1.1 mm Tri-point Y00 screw
-
3.5 mm T5 Torx screw
-
-
-
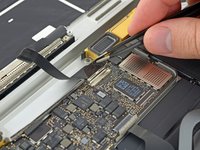
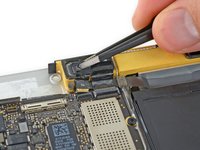
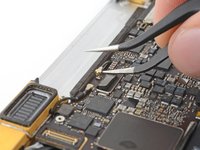
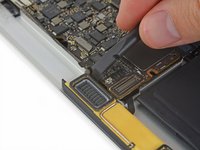
Use the flat end of a spudger to disconnect the USB-C port cable bracket by prying it straight up from the logic board.
-
-
-
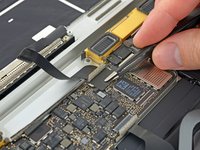
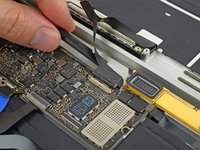
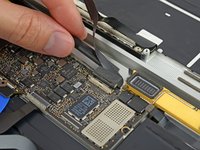
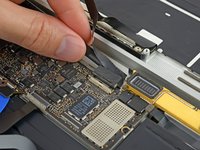
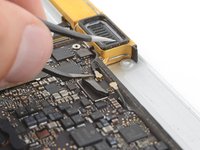
Use a spudger to flip open the retaining flap on the audio jack board cable ZIF connector.
-
-
-
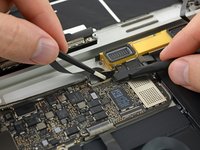
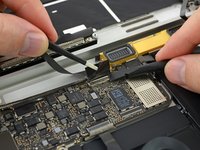
Disconnect the audio jack board ribbon cable by pulling it straight back out of the ZIF connector.
-
-
-
crwdns2935267:0crwdne2935267:0Tweezers$4.99
-
Use tweezers to peel back the tape covering the display cable connector.
-
-
-
If so, use the flat end of a spudger to hold down the retaining flap while peeling the tape away with the tweezers.
-
-
-
Use the flat end of a spudger to flip open the retaining flap on the display cable connector.
-
Try to keep it clear of the tape, or it may re-adhere and make cable removal difficult.
-
-
crwdns2935267:0crwdne2935267:0iOpener$14.99
-
Carefully slide the flat end of a spudger underneath the display cable to separate the adhesive holding it to the lower case.
-
-
-
Disconnect the display cable by gently pulling it straight out of its connector.
-
-
-
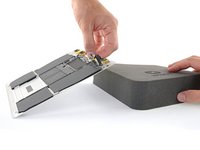
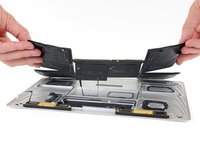
Separate the upper case assembly from the lower case assembly.
-
-
crwdns2935267:0crwdne2935267:0Tweezers$4.99
-
Use tweezers to peel up the tape covering the two ZIF connectors—one for the right speaker cable, and one for the audio jack board cable.
-
-
-
Use the point of a spudger to flip up both ZIF connector retaining flaps.
-
-
-
Carefully pull straight back on the two pieces of tape you just peeled up to disconnect the two ribbon cables.
-
-
-
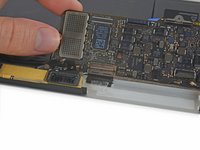
Use the point of a spudger to peel up the foam pad covering the two antenna connectors.
-
-
-
Insert one arm of your angled tweezers under the metal neck of the first antenna connector and pry up to disconnect it.
-
-
-
Pry up the second antenna connector to disconnect it.
-
-
-
Use a spudger to disconnect the left speaker cable connector by prying it straight up from the logic board.
-
-
-
Use a spudger to flip up the retaining flap on the trackpad cable ZIF connector.
-
-
-
Disconnect the trackpad cable from the logic board by gently pulling it straight out of its connector.
-
-
-
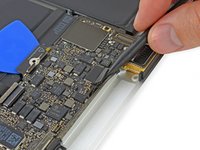
Remove the single 3.5 mm T5 Torx screw securing the logic board to the lower case.
-
-
-
Flip up the front edge of the logic board.
-
Lift and detach the EMI tape securing the logic board to the lower case.
-
-
-
Lift the back edge of the lower case assembly and prop it up at an angle using a book or foam block.
-
-
-
Wear eye protection when handling and applying the adhesive remover. (Eye protection is included in your kit.)
-
Do not wear contact lenses without eye protection.
-
Protective gloves are also included in your kit. If you are concerned about skin irritation, put your gloves on now.
-
-
-
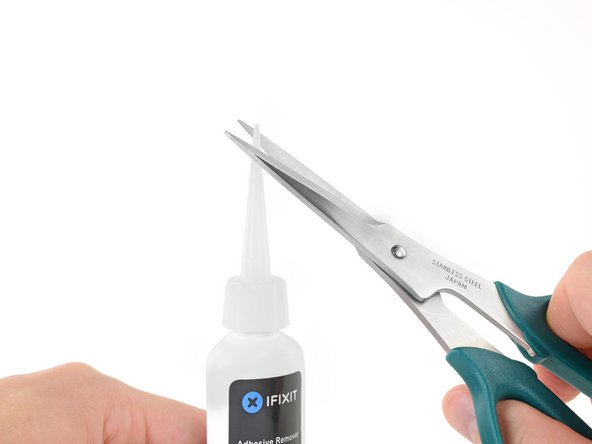
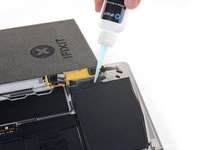
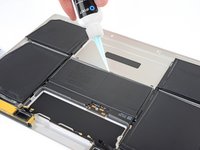
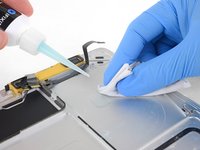
Pull off the black rubber stopper from your bottle of adhesive remover.
-
Use scissors to cut off the sealed tip of the applicator.
-
-
-
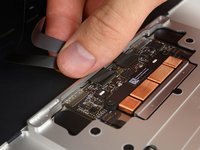
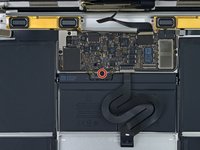
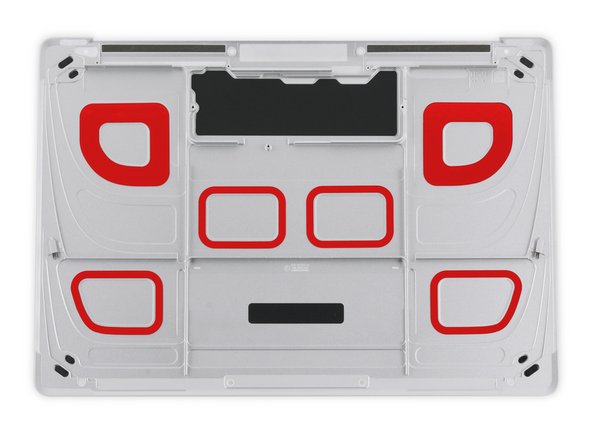
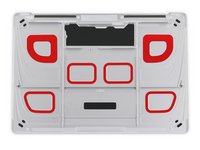
The adhesive securing the battery cells to the lower case is located in the areas marked in red.
-
-
-
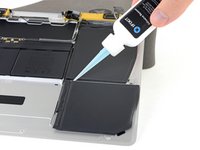
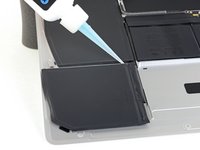
Apply a few drops of adhesive remover along the top edge of the front right battery cell.
-
Wait 2-3 minutes for the liquid adhesive remover to penetrate underneath the battery cell before you proceed to the next step.
-
-
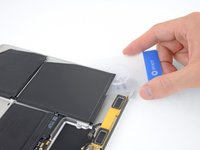
crwdns2935267:0crwdne2935267:0Plastic Cards$2.99
-
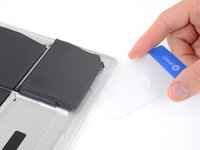
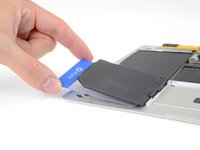
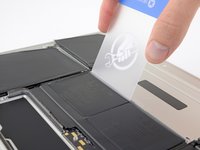
After 2-3 minutes, slide one corner of a plastic card underneath the battery cell.
-
Slide the card farther underneath the battery cell to separate it from the adhesive securing it to the case.
-
-
-
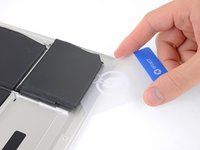
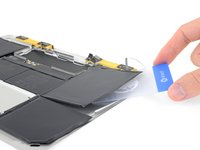
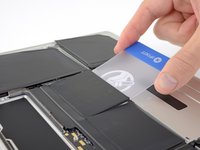
Lift the battery cell from the right edge to fully separate it from the adhesive, but don't try to remove it.
-
Leave the plastic card underneath the battery cell to prevent it from re-adhering as you proceed to the next step.
-
-
-
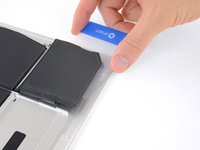
Repeat the previous three steps to separate the front left battery cell.
-
Leave the plastic card underneath the battery cell to prevent it from re-adhering as you proceed to the next step.
-
-
-
Repeat the previous steps to separate the large battery cell on the left side of the MacBook.
-
-
-
Repeat the previous steps to separate the large battery cell on the right side of the MacBook.
-
-
-
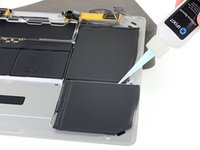
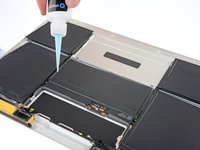
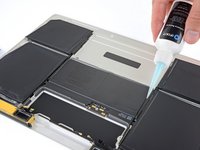
Lay the lower case assembly down flat, and apply adhesive remover to the two middle battery cells—at each side, and along the front edge (opposite the logic board area).
-
-
-
Apply some additional adhesive remover down the middle between the two battery cells.
-
Wait 2-3 minutes for the adhesive remover to penetrate before you proceed.
-
-
-
Insert your plastic card under the front edge one of the battery cells and separate it carefully.
-
-
-
Repeat the previous step to separate the final battery cell.
-
-
crwdns2935267:0crwdne2935267:0Tweezers$4.99
-
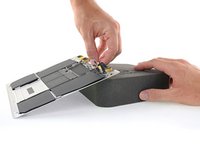
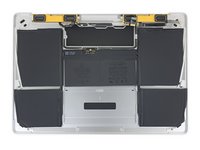
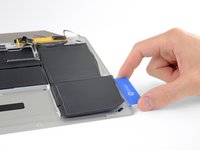
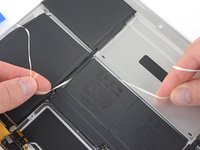
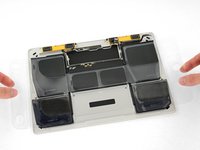
Remove the battery by lifting it away from the speaker and logic board area.
-
Peel off larger pieces of adhesive using tweezers or gloved fingers.
-
Scrape away any remaining adhesive with a plastic tool, and clean the underlying areas with adhesive remover or isopropyl alcohol. Wipe in one direction, not back and forth, until all the adhesive residue is gone.
-
-
crwdns2935267:0crwdne2935267:0Tesa 61395 Tape$12.99
-
Test your new battery's fit and alignment carefully before installing it.
-
Your replacement battery may come affixed to a thick plastic top liner to help keep the individual cells in position as you install it. Don't remove this liner until after the battery is installed.
-
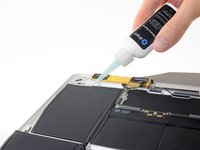
If your battery came with adhesive pre-installed on the bottom, peel away the bottom plastic liners to expose the adhesive. If your battery did not come with adhesive, apply a thin double-sided adhesive tape such as Tesa 61395 to the lower case in the areas marked in red.
-
Carefully position the battery and set it into place. Press and hold each cell firmly for 5-10 seconds to secure it to the lower case. Afterward, peel off the plastic top liner along with any foam padding.
-


For optimal performance, calibrate your newly installed battery after completing this guide.
To reassemble your device, follow these instructions in reverse order.
To avoid logic board damage, before powering on your MacBook, connect it to low-voltage power using a 5-Watt iPhone charger and a USB-C to USB-A cable.
If you notice any unusual behavior or problems after installing your new battery, you may need to reset your MacBook's SMC.
Take your e-waste to an R2 or e-Stewards certified recycler.
Repair didn’t go as planned? Check out our Answers community for troubleshooting help.
crwdns2935221:0crwdne2935221:0
crwdns2935229:0121crwdne2935229:0


crwdns2947412:086crwdne2947412:0
Beautiful. ‘Followed the instructions to a T. No issues at all. Thanks!
Everything worked, except the keyboard. No backlight, no power. Using remote keyboard for now. Any ideas? Trackpad works fine.
@nabrams1 Check both cables that connect to the trackpad—make sure all four connectors are clean and fully seated, and that the cables aren’t damaged in any way. The first cable connects the keyboard to the trackpad, and should not have been disconnected, but check it anyway. The second cable connects both keyboard + trackpad to the logic board. Good luck!
I did try all of those and checked the cables and ZIF connectors under a microscope. I am thinking a bad trackpad now since it works fine, but the keyboard does not respond. The only way I have figured out o use the machine is to disconnect and reconnect the battery, which is not easy. Otherwise, I cannot power it on myself since the power button is part of the keyboard. Apple won’t touch this now since I replaced the battery myself, so it is kind of a brick. I can’t run AHT since the keyboard doesn’t respond (command-D). Any ideas?
Bad trackpad seems possible. If the keyboard was working before the repair, there may be damage to the trackpad or the logic board itself. It’s hard to say without swapping out parts to test, unless you have a microscope + multimeter + board schematic, and we’re rapidly getting out of DIY territory there. I’d probably take another look at the cables and sockets just to make extra sure it’s not something simple. Hope this helps!
Huzzah! I ordered a tracked replacement else suffer bricking my MacBook. All is better and I am typing from the machine right now! I will add a comment to the trackpad replacement, but my machine had T4, not T3 screws. I stripped a couple on the removal. In the end, this was more expensive than Apple replacing the battery, but there is a sense of triumph! I was also bitter since Apple had already replaced the keyboard and screen due to recalls. I wanted to DIY this one. Thank you Jeff!
Awesome!! Thanks for the update :D
Had same dead keyboard, keyboard light, track pad and click problem after battery change. Was able to recover through voodoo magic. Crappy design to with keyboard tracking battery detach/attach sequence.
Howard -
All in all a pretty easy replacement… if it weren’t for the arduous removal of the adhesive!
My device doesn’t have a tri-point screw as mentioned in Step 14, but aside from that, nice writeup!
Same here, follow instructions, READ throughly and you’ll be fine. Watch for those little connectors, WiFi especially (fragile !). No tri-point screw in 14 either, just a phillips type. As for the adhesive removal I used 70% tech alcohol + 30% acetone mixed together + little spatula that came with battery (bought at Aliexpress). After assembly I connected phone 5V charger as suggested. All worked out fine. Just time consuming :)
My 2015 macbook does have the tri-point screw Y00 and i only had the crew driver Y0 and Y1 which are to big :-) so made the quick route.
Step 14 T5 only and then steps 31 and 34 so I could tilt the pcb enough to remove and install the new battery.
I used the usb C to usb A cable with a iPhone charger after connecting the computer starte up, and everything is fine now 4592mAh and cycle 1 :-)
Hope that this battery last longer than the 272 cycles of the original battery. Thanks for the detailed description what makes at easier for me to judge if I will manage.
Gert Jan
I used the guide and it worked very well. I did not have the adhesive remover and simply used heat and a scraper to manually remove the batterie. I was very careful during that manual removal it worked very well. Because of that, I skipped steps 14-33 and I think I was better off. I simply lifted the logic board up and remove the battery while all the cables were in place. I feel this was better because there was less risk of breaking a connector or cable. I cut a lot of work out of the project and it went very well. I had it completed in about 45 minutes.
Great guide - thanks a lot! Like another user I skipped steps 14 to 33. It was no problem to remove the battery without removing the logic board and all the other stuff. You only have to be careful to hold the body of the Macbook tight so that it does not move when you work on the battery.
Heating the glue was not sufficient, I had to go and buy the detergent.
After performing the steps, and the low power startup procedure, on initial startup I had chime, the battery charging image (48%) and then the screen went gray - and the mouse pointer was on the screen and it would respond to the trackpad. Then the screen went squirelly (kinda like it lost sync). I restarted the laptop and then the screen went blank. I’ve gone back in a couple of times to reseat the display cable, to no avail. And I’ve lost the keyboard lights. So I’m going to take a breather and try to perform steps 1 to 22 over again. Any advice?
I went back in and reseated the trackpad ribbon cable and reclosed the ZIF connector, which restored the keyboard. I used an external monitor to confirm that the laptop is booting up. I also reseated the display cable, but that did not work. I have a new cable coming in a few days, and I’ll replace the current cable, hopefully to fix the issue…
Hi, I did everything as said on the guide, but my computer is totally dead. Nothing happens when I charge it, and I can’t turn it on. I thought there was a problem with the battery I bought, but now I got a new one, and it still can’t turn on. I have checked every connection 4 times, so is there anyone who has an idea to what I can do? I don’t have a usb-c to usb-a cable so I just used the normal charger. Could that be it? Thanks in advance!
And the small led light on the logic board is lit.
Hi,
A short way is also possible, take about 15-20min to change the battery for me.
DON’T do steps 8-9-10, disconnect the ZIF connector on the motherboard side only.
SKIP steps 15>>30, only lift the motherboard by placing a pencil eraser under it, and finally SKIP step 35.
For detaching the battery, a credit card also work, no need detergent
Work great for me.
I used your approach after I opened the computer and quickly realized that I didn’t want to disassemble so many components. I also read some comments from people who made mistakes during putting everything together again.
The hardest part was removing the battery while the computer was opened with a 45-60 degree angle while making sure the the ‘prop-up stick’ didn’t fall out resulting in the top half of the computer falling down. Man, that battery is glued in there so well, was hard to remove it. (even using everything that came in the ifixit repair kit.
I was so happy when after plugging in the computer and pressing the button I heard the startup sound.
Job done!
Corjan -
Thanks. I will try to follow your suggestion. May I kindly ask you what do you mean by saying “disconnect the ZIF connector on the motherboard side only”? Can you please help me in understating? That would be greatly appreciated.
RobertoC -
Excellent instructions. My first time opening a macbook. I did see the route to the short way some mentioned as I was going through the steps, but it would not have worked for my repair. I had to get in there, battle the adhesive (still using remover), and pick the bits off which would have been near impossible if it wasn’t fully opened without risking those connectors. Last battery lasted 970 cycles comfortably; I don’t know if heavy use, travel, dirt, heat, etc. really cemented my battery adhesive. Having it fully apart allowed me to be meticulous about getting it clean and perfectly seated as well. If you do purchase the kit and have the 2015 macbook be prepared to have a PH00 on hand if the Y00 screwdriver tip doesn’t fit (step 14) or the ability to run to the store real quick. Thumbs up to the writer of the guide! Thanks! Saved me a good amount of money with excellent DIY instructions.
Thank you very much, excellent instructions. My issue is that, after completion, the Macbook (early 2015) neither starts / wakes up automatically from the lid opening action, nor does the keyboard or trackpad cause any input whatsoever. I have double-checked all 4 connections of the ZIF connectors/cables as mentioned by you in the earlier answer to a comment. Could there be another bigger issue? The display displays everything correctly as it was before the battery replacement…
Hello! The new battery didnt charge, the battery status is still Replace now like on the old battery! Any help please
Thanks for this, I will start replacing the battery but not sure the issue come from it. I managed 2 days ago booting the laptop up but now when it is boot up only the track pad respons ( i can fell the haptic return ) . Any Ideas?
Excellent instructions on the battery replacement for a battery that had failed and reporting service battery after 530 cycles, a big thanks to the author. After completing them the MACBOOK worked OK and then I started to get intermittent problems with the power button and the system bringing the shutdown dialogue without pressing the power button. On closer examination and second removal of the trackpad IPD flex ribbon cable (which also routes keyboard signals to the logic board) the cable came apart at the fold half way along the cable. This cable is very fragile and as mentioned in step 7 you need to be very careful on handling them. In my case I think the cable was fatigued or mechanically damaged where the fold was during manufacture . A replacement cable has been installed and the laptop now works ok.
I have also posted this comment on the trackpad repair fixit.
I was able to replace my battery with the help of this website and my computer is working like a champ! Thank you so much!
Even though I had the screwdrivers necessary for this project, I purchased the entire battery replacement kit which made everything a breeze. Make sure to also have a box of ziplock bags and a sharpie so that you can keep all of the screws organized. And some painters tape to keep the opened laptop held in-place to a 90-degree surface while you’re working on the ribbon removal. For the 90-degree surface, I used another opened MacBook… but a wall would work also. It definitely helped to read the comments, particularly when it came to the “tri-point screw” removal. For me it was simply a Phillips screw. The one frustrating part of this process was removing the Phillips screw that held the USB C connector in place. It was necessary to take a piece of high-grit sandpaper to the screw that was provided in the kit, because the tip was far too pointy for the small screw. After that, everything went smoothly.
Hardest point for me was not having the exact tri-point screwdriver
(it’s one thing I fault Apple on, as it was unnecessary to have two types of screw on one cable).
I used standard Lighter Fluid (easily available in the UK) to remove the batteries, which was far less trouble than I thought it would be. ( I’ve used it before to remove sticky label residue, so, figured it would work).
Really useful guide, thanks for the tip on the 5w (5V - 1A) iPhone charger. Everything appears to be working!
Great instructions, I had two issues step 14 which was the removal of the 3.5 mm screw but eventually managed to remove it. Second, (user error) the Zif connector must have had some dirt or something because once everything was re-assembled the keyboard and trackpad did not work. I cleaned the connector, double-checked all the other cables and the issue was resolved. Other than these two items, make sure to follow step by step.
Connected to 5w charger and I don’t get the chime and the battery icon how long do I need to leave it .cheers
All Sorted lose connection
Excellent instructions, and easy to follow with great pictures that make everything crystal clear. I purchased the replacement kit and had absolutely everything I needed to complete the repair in less than 2 hours. Works as advertised. I had to reset PRAM to get the battery to start charging.
Hello
I have changed my battery with success but I can’t have my camera any more.
Any idea.
Work like a charm after the battery is replaced. The removal of the adhesive takes hours but Isopropyl alcohol comes to the rescue :-)
Would it be easier to just get a new bottom case w/ battery pre-installed?
I tried all the steps and replaced the battery. However, I used the computer charger to plug in the computer. The computer gave the chime sound but nothing came on. No apple logo. I can hear the wire connection but when I press the power button nothing happens.
Do you know why my new battery is not charging and how to fix it?
I have installed a new battery, then first connected with a 5 watt iPhone charger. Subsequently, charged it with my MacBook charger to 100%. The charger was working normally. For calibration I drained the battery by normal usage until the Mac fell asleep. Five hours later I connected the charger, nothing happens. When I push the power button, the low battery symbol is shown with the symbol I should charge.
My second new battery is having exact the same problem. After battery drainage, when the 5 watt iPhone charger is connected, the battery led on the motherboard is on. As soon as I remove the 5 watt iPhone charger, the led turns off. When I connect my regular MacBook charger, the led does not turn on.
Frankmac -
It’s normal for the machine not to boot up right away after a deep drain on the battery. Plug the charger in and leave it for 30-60 minutes, then try turning it on again. The battery charge symbol on the screen is not normally an indication that anything is wrong with the battery; it just means there isn’t enough charge in reserve for the system to safely boot up quite yet. Just give it a little time.
Thank you for your reply Jeff. The 5 W iPhone charger and regular MacBook charger have been plugged in for several hours. When I try to boot it afterwards, nothing happens. In the beginning the battery charge symbol was there, later it was not (probably because the battery was fully drained). Is there another explanation why the battery is not charging? I have ordered a second new battery.
Frankmac -
I followed the instructions and everything works but the audio. I’m pretty excited that it’s working and I’ll go back in and tighten some things later this week. The headphone jack didn’t work either.
Hallo, wie beschrieben ist der Akku eingebaut, wird erkannt, aber leider wird der Mac nicht Strom versorgt. Der Mac schaltet sich ohne externe Stromversorgung ab. Was habe ich falsch gemacht?
Versuchen Sie, die SMC zurückzusetzen
I did every step and I replaced the battery but now my MacBook doesn’t start, she only chimes, the chime cuts when almost finishing and then nothing, I don’t get a charging screen. The led inside tells me there’s power but I don’t know what to do now.
Same thing here, any clue on what's going on?
Thanks
I disconnected the battery two times and nothing changes!
If you are technically oriented, this is a good guide to replace a 2015 MacBook battery. I did this work myself after reading the how-to. Delegating to an Apple repair person seemed fraught with too many places to mess up. Apple doesn’t have a good track record of owning up to mistakes.
Make sure to read the comments. There are a couple of issues in the how-to description that can lead to a bad outcome. Overall, it’s a good how-to guide.
For me, steps 15 and 22 were critical. Read the comments. If after replacement power doesn’t come on, it could be step 15 during re-assembly. Not easy to diagnose because damaging the logic board (despite following instructions and precautions) is always a possibility. If power comes on but the screen remains black, check step 22.
Most of the steps involve seating connectors into sockets for which there is no simple correctness check. Following the instructions carefully will help prevent damaging the laptop. And you can retrace the steps to debug problems.
Great instructions and photos. I would emphasize the delicate ribbon cables don’t like to be twisted. I was almost completely finished reassembling, when I over twisted the trackpad ribbon cable and it broke into three pieces. A quick order and I had the replacement in a couple days. The final battery replacement worked perfectly. Thanks for the great guides!
Make sure you get a PH000 screwdriver and you dont need any extra tape, comes pre applied!
Followed guide step by step and it worked perfectly. For those with the 2015 model and the 5v charger don’t panic if you don’t get a tone or battery icon after fifteen minutes. Mine took nearly 45 to boot up. Be patient before you think of tearing it apart and having another go. Great guide!
Changing my Macbook battery by myself was probably the one of most stressful things I’ve ever attempted, but the instructions were very clear, and the part kit was great. One problem on step 14 (It’s not a tri point but a philips head), however I thankfully had one small enough in my garage. Also struggled a little with the adhesive on the cable in step 21. I think the idea is to separate the cable from the adhesive, or separate the cable and adhesive tape from the case? Also, when calibrating the battery, it’s turn on with the low voltage, then switch to the normal voltage to charge. I was worried it wasn’t charging, then realized I needed to change the voltage back to normal, after powering it on.
Thank you for this great resource and service. Hopefully many more people will be inspired to repair their devices, and not continue to trash the planet.
thanks bro!!!
anyone else having an issue where they need to keep opening the laptop and resetting the battery? i only just installed it the other day it was working fine for a couple days and then it’s started playing up. after reboots it won’t start up properly either i have to give it it’s time (a good hour or two) and then it might decide to switch ON or the best way it so open it up press the little button to “turn off the battery” and then just put it back together and powers up straight away. super strange
es necesario cargarlo con que tipo de cargador de iPhone , podría mandar una foto porque el cuadrado es usb a lightining , otras marcas tienen cable de usb a entrada usb C .
Chime, chime, chime and nothing else… no low battery light nothing and it’s about a half chime. I have tried a few time in the last few days unplugging and plugging it back in. The chime stops after a while then starts up again. I painstakingly followed the removal and replacement directions and now the computer will not fire up with the iPhone charger as directed. With my old, completely dead battery it would at least start up before if I kept the computer plugged in. It is a 2015 model.
Has anyone received any answers beside there may have been a problem with the install? “If the MacBook fails to power on after 15 minutes, there may be an issue with your repair.”
Is there another procedure to follow?
Help me please… thanks
Same for me, any clue?
I followed this guide and it worked perfectly, except for one thing - I had no audio. I took the whole thing back apart, checked all the connections, put it back together…still no luck.
I reset the PRAM and the SMC, with still no luck. I figured I must have damaged one of the cables, so I ordered replacement parts, and prepared to return it to the client. But before I did that, I wanted to make sure I exercised the battery, as the card that I received with the battery from iFixit advised. So I charged it to 100%, turned off all the battery management and played YouTube videos all night to run it all the way down.
The next morning, it was dead as a doorknob. So I charged it for about 5 minutes, pressed the power button and all the sudden it was working!
How long should the iPhone charger be hooked up before switching to the MacBook charger?
This step might be what you’re looking for!
Ottima guida, dettaglio e qualità delle immagini perfetto. Grazie
I just successfully completed this battery replacement on a 2015 MacBook that I picked up on eBay for a song (the original battery had 1,068 charge cycles on it and it wouldn’t hold a charge anymore). The instructions are easy to follow, and the hardest part for me was getting the new battery aligned just right to fit the terraced parts of the case before the adhesive made it impossible to shift. To anyone else who attempts this repair, don’t overlook the instruction to plug in the MacBook to a 5-watt charger before powering up the first time. I was thankful to be told of this quirk in these machines. Many thanks to the author for this writeup!
I did this repair with the ifixit kit and it went almost perfectly. The macbook is as new again with a 5369 mAh battery.
10 min. Preparation and setting up my workplace. This was well worth the time and it helped a lot during the rest of the work to have everything close at hand.
15 min. Taking apart the macbook, then a little break. All the right bits were included. Only the tweezer was not very useful since it is a bit slippery.
30 min. Removing the old battery, with plenty of time for each part of the battery to soak in the solvent. Removal was pretty easy with the provided cards and did not need much force. I stuck some plastic packaging underneath each loose battery to prevent it from re-adhering since the kit only had two plastic cards included.
20 min. Cleaning the lower case of all the old sticky stuff. This was a lot more work then I expected, but worked out fine. The provided solvent and cleaning cloth was very helpful. I cut the cleaning cloth in three pieces beforehand to have a clean piece as spare.
[continuation of previous post]
5 min. Putting in the new battery. Very easy to do with the pre-attached tape and transparent plastic cover sheet.
15 min. Re-assembling the macbook. Some of the tape at connectors would not re-attach, but this did not cause any problems so far.
5 min. Safe-charging with the 5W iPhone charger. I almost directly got the familiar chime sound and the macbook started without any problems.
After charging the battery fully with the normal Macbook charger I'm now using it again to type this review. Now just calibrating the new battery by using the Macbook and then it can hopefully be used for many years to come.
Total repair time (excluding breaks): 100 minutes.
Thank you iFixit for providing this guide and the very useful and complete repairkit!
Just a heads up, after almost 2 months suddenly the battery is not found anymore by the system. See Why does my MacBook 12" A1534 say: Battery not installed? for details on my progress getting it to work again.
I followed each step exactly - no broken clips or cables. Went directly to a 5W iPhone charger, but the laptop is dead - no life or charge at all. I cannot put the old battery back in since the new one is glued in place. Not sure what went wrong or what to try next
To follow up, i plugged the laptop into it’s regular charger. It booted right up and everything is functional. However the battery indicator shows an ‘x’ through it. Battery status shows 1% charge and ‘Needs Service’. I can use the laptop but only with the power cord. Could the new battery be faulty? is there something I can check?
CJB -
The battery was bad and iFixit sent me a replacement. This time everything worked as expected and my MacBook is as good as new! Great customer service.
CJB -
Completed the repair. Everything worked nicely! Great guide with all the necessary detail!
Followed the instructions and my MacBook 12” 2015 works again. I’m very happy with the battery kit and the instructions. Thanks a lot
Superb - thanks for the large amount of adhesive remover - needed it :-). All worked well - skipped 14-33 just proped up the MB
Amazing guide - worked PERFECTLY, but boy did it require exquisite care and patience. I think this probably took me 6 hours, but I went about it very slowly.
Great guide. Followed it carefully and everything worked well.
Thanks for a great guide! A better close-up of the touchpad ZIF connector in its inserted state, tape pulled back as far as it goes for a clear view, would have been helpful. I wasn't sure if I had it fully inserted - the contacts stuck out a little bit, and I was applying more pressure than maybe I should have before realizing this is the correct insertion depth.
Realizing I needed to follow it backwards for reassembly was a little frustrating. I get that everything we need is already in there, but would have preferred straight-forward reassembly instructions to save time and be more confident that I'm putting everything together correctly, since there's a lot that can go wrong.
As for my repair, it went well! There was no sound at first. Not sure why- I opened it back up, and the audio ribbons all seemed properly connected. Disconnecting/reconnecting did the trick.
Breathing new life into the Macbook with a fresh battery & upgrade to Ventura using OCLP, it feels new again after 8 years!
I completed this guide without incident, but plugging in to the 5V/1A charger didn't give me a chime. (I left it plugged in to that overnight just in case.) When I reassembled, screwing in the screw in step 12 turned on the faint white LED, which I understood to mean that the new battery was making good contact. The ribbon cable from the USB-C port also seemed to click back in place with no issues. I plan to disassemble and check both of these again (along with the grounding clip), does anyone else have any more suggestions for things to check when I open it back up? I'm handy with a multimeter if that helps.
Guide was very well written - great work! I skipped most of the disassembly steps and simply removed the 2 motherboard screws to lift out the old and set in the new battery. Working the old battery out was more difficult by leaving the motherboard and related components in the machine but I did not want to mess with detaching and reattaching wires, especially ones that are pushing 8 years old. It took maybe 30 minutes to remove the battery and then another 15-20 minutes to remove all the old adhesive. Not too bad.
The new battery is working well so far.
perfect Instructions. I had no issues - took me 3,5 hours though...
Hi,
I tried and followed this page to change the battery yesterday.
My fault is, I did not turn off the switch on motherboard one, and did not install anything between motherboard to old and new battery during the work.
The other work, I believe perfectly did.
Then I finished assemble, and started to use computer, but it does not work.
After I did SMC reset, and pushed button on the motherboard 10sec x 3 times.
Still doesn't work.
Does anyone have same experience?
If so, how you fixed?
Or if know any expert to suggest any solutions?
I need anyone's advice.
Cheers,
Did his recently on a 2015 Macbook. Didn't need anything special except a spudger to pry up each cell. Sometimes, depending on the glue that was used to glue down the cell, I have used a thin piece of wax paper under each cell as I pry them up to keep them from adhering again to the frame.
There is one major GOTCHA. Be careful to remove the three bridging cables - especially the middle trackpad cable as they are easily damaged. I damaged the middle cable accidentally so had to replace it - $16 or so.
All in all, wasn't as bad as my 2016 Macbook Pro battery replacement.
One thing that also helps is warming up the frame of the Macbook. Doesn't have to be really hot just around 100 deg F so that things separate easier. I'd go this before I would put some solvent on it.
As for the battery connector, I used a piece of cellophane tape on it to keep it from reconnecting accidentally while you're working on the machine. Once finished, remove the tape and screw down the battery connector.
Should be very easy , but: the bottle of adhesive remover Come without any pump , is just an wide open bottle
Very important : this kit doesn’t include all the necessary parts , like the tape that you need for new battery.
Other thing is sort of organizer for the small screws - is very difficult to keep them separate and in order .
Other very important think is the “Take care not to damage the ribbon cables that still attach the lower case to the MacBook.” Should be mark very distinct and this part have to be disconnected first ! Is very very fragile . Mine broke instant
Macbook wouldn't start from the battery after following these instructions to a T. It's a newly ordered battery and it is not showing in System Report. The little led light does light up on the connector board. Tried using a 5w charger first... then a 27w. Then a 60w. It turns on but nothing battery.
I've always wondered about the price of battery replacement at Apple for the Macbook 12". Now I know how fiddly and time-consuming it is to replace the battery. Unfortunately, Apple no longer offers this service and I had to do it myself. Anyone who has ever replaced the home button on an iPhone 4 will also be able to replace the battery on a Macbook 12".
There was a problem with Step 7, although I was careful, the flex cable broke. I was able to order a new flex cable on eBay. If you look at the sales figures, the problem seems to occur very frequently. ;-)
Now everything is working again!
Thank you everyone for the tips. I did not skip any steps and successfully changed the battery without any problems!
Thanks for the tutorial, everything was fine, my computer is working far better now, and it was easier than I thought.
Many thanks for this tutorial, it’s excellent. I did have to trim very carefully the bottom left of the logic board as mentioned above and it fitted perfectly, thanks for the advice and yes all the genuine Apple batteries 2015-2017 work. I bought the base and battery from Cambridge Accessories in Liverpool, a great resource for parts and very customer focused too. Take your time check and double check every step and you should be fine. Many thanks.
Hi, followed this guide and everything seems to be correct. I used a third part battery. After assembling the unit it is completely dead. Any one perhaps have any suggestion where to start searching?