crwdns2943259:0crwdnd2943259:0crwdnd2943259:0crwdnd2943259:0crwdne2943259:0
crwdns2915892:0crwdne2915892:0
Utilisez ce tutoriel pour retirer le bouton marche/arrêt de votre iPhone 5.
crwdns2942213:0crwdne2942213:0
crwdns2936621:0crwdne2936621:0
-
-
Appliquez des bandes de ruban adhésif transparent sur l'écran de votre iPhone jusqu'à ce qu'il soit entièrement recouvert.
-
-
-
Éteignez votre téléphone avant de commencer le démontage.
-
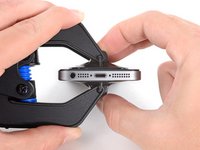
Retirez les deux vis pentalobe de 3,6 mm de chaque côté du connecteur de charge Lightning.
-
-
-
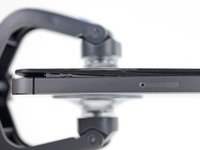
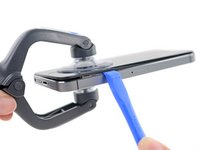
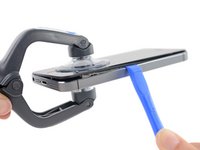
Peu importe l'outil que vous utilisez, assurez-vous de soulever l'écran en entier.
-
Si la vitre commence à se décoller du plastique comme vous pouvez le voir sur la première photo, glissez un outil d'ouverture en plastique entre le cadre en plastique et le châssis du smartphone afin de détacher les clips en métal.
-
-
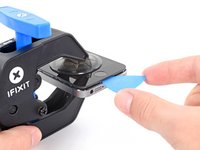
crwdns2935267:0crwdne2935267:0Clampy - Anti-Clamp$24.95
-
Tirez la poignée bleue vers l'arrière pour débloquer les bras de l'Anti-Clamp.
-
Insérez le côté droit ou gauche de votre iPhone entre les bras.
-
Positionnez les ventouses près du bord inférieur de l'iPhone, juste au-dessus du bouton home : une sur le dessus, l'autre en dessous.
-
Appuyez sur les deux ventouses pour qu'elles adhèrent bien à l'endroit voulu.
-
-
-
Tirez la poignée bleue vers l'avant pour bloquer les bras.
-
Tournez la poignée dans le sens horaire, de 360 degrés ou jusqu'à ce que les ventouses commencent à s'étirer.
-
Insérez un médiator sous l'écran dès que l'Anti-Clamp a créé un espace suffisant.
-
Sautez les deux étapes suivantes.
-
-
-
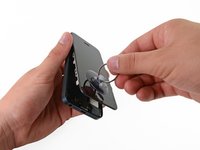
Placez une ventouse sur l'écran, juste au-dessus du bouton home.
-
-
-
Tout en tenant l'iPhone avec une main, tirez sur la ventouse pour séparer légèrement l'écran du boîtier arrière.
-
À l'aide d'un outil en plastique, commencez à pousser le boîtier délicatement vers le bas tout en tirant sur la ventouse vers le haut.
-
-
-
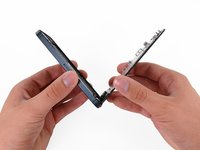
Continuez à faire levier en glissant l'outil sur les côtés du panneau frontal tout en défaisant les clips le long des côtés gauche et droit.
-
-
-
Une fois que vous avez défait les clips en bas et sur les cotés du panneau frontal, éloignez la partie inférieure du boîtier arrière .
-
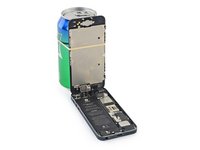
Ouvrez votre écran à un angle de 90° environ et calez-le avec un objet pour le soutenir pendant que vous travaillez sur l'iPhone.
-
Rajoutez un élastique pour bien maintenir l'écran lorsque vous travaillez. Ceci évite de forcer inutilement sur le nappes.
-
-
-
Retirez les deux vis suivantes qui attachent le cache métallique du connecteur de la batterie à la carte mère :
-
Une vis cruciforme #00 de 1,8 mm
-
Une vis cruciforme #00 de 1,6 mm
-
-
-
Retirez le cache métallique du connecteur de batterie de l'iPhone.
-
-
-
Utilisez un outil d'ouverture en plastique pour soulever doucement le connecteur de batterie de sa prise sur la carte mère.
-
-
-
Retirez les vis suivantes fixant le cache de la nappe du panneau frontal à la carte mère :
-
Deux vis cruciformes de 1,2 mm
-
Une vis cruciforme de 1,6 mm
-
-
-
-
Soulevez le support de nappe de l'écran vers la batterie pour le décrocher, et retirez-le de l'iPhone.
-
-
-
Vérifiez que la batterie est déconnectée avant de déconnecter ou reconnecter les nappes de cette étape.
-
Utilisez un outil d'ouverture en plastique pour déconnecter les trois nappes de l'écran :
-
Nappe de caméra frontale et de capteur
-
Nappe de l'écran LCD
-
Nappe du numériseur
-
-
-
Retirez le panneau frontal complet du boîtier arrière.
-
-
-
Utilisez la languette en plastique transparente pour retirer la batterie de l'adhésif qui la maintient à l'iPhone.
-
Attendez environ une minute pour que la solution d'alcool ramollisse l'adhésif. Utilisez un outil d'ouverture pour soulever délicatement la batterie par son bord.
-
-
-
N'essayez pas de soulever la partie supérieure de la batterie, vous risquez de couper les câbles de commande de volume.
-
-
-
Retirez la batterie.
-
Collez la batterie, débranchez-la et poursuivez le remontage de votre appareil.
-
-
-
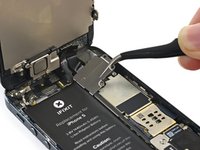
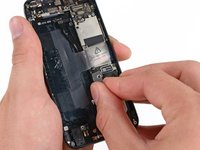
Utilisez la pointe d'un spudger pour retirer le connecteur du câble des données cellulaires de son cache dans la carte mère, juste au-dessus de l'enceinte du haut-parleur.
-
-
-
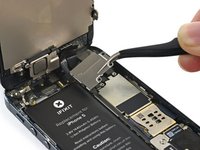
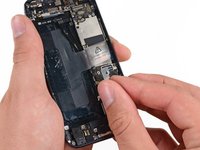
Retirez les deux vis suivantes qui sécurisent le dessus du cache de la carte mère au boîtier arrière :
-
une vis cruciforme 1,5 mm
-
une vis cruciforme 2,3 mm
-
-
-
Retirez la fixation du haut de la carte mère.
-
-
-
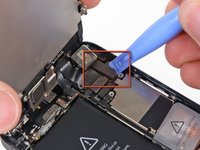
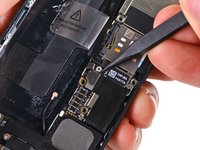
Utilisez le bout plat d'un spudger pour déconnecter de la carte mère les trois câbles suivants :
-
câble d'interconnexion supérieur
-
câble d'ensemble de bouton
-
câble d'interconnexion inférieur
-
-
-
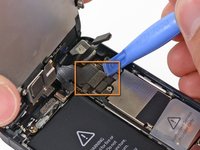
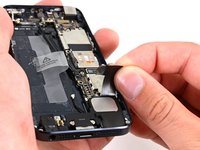
Retirez les deux vis cruciformes 1,3 mm de l'intérieur de la partie supérieure du boîtier.
-
-
-
Retirez l'unique vis cruciforme 1,2 mm restante sur le cache du milieu de la carte mère.
-
-
-
Retirez la fixation centrale de la carte mère.
-
-
-
Utilisez un spudger pour soulever le câble du connecteur Lightning de son cache sur la carte mère.
-
Enlevez délicatement le câble et retirez-le de la carte mère.
-
-
-
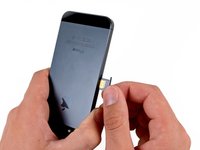
Appuyez dans l'orifice sur le côté droit du téléphone avec un outil d'éjection de carte SIM ou un trombone pour éjecter le plateau de la carte SIM.
-
Retirez le plateau de la carte SIM de l'iPhone.
-
-
-
Retirez les vis suivantes qui fixent la carte mère au boîtier :
-
deux vis cruciformes 2,3 mm
-
deux vis d'entretoise 2,7 mm
-
une vis d'entretoise non magnétisée 2,7 mm
-
-
-
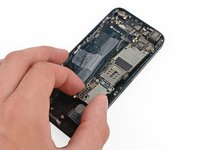
Faites pivoter la carte mère vers le côté de la batterie dans le boîtier.
-
Le cadre du flash est collé au flash et au boîtier. S'il reste sur le boîtier, retirez-le avec une pincette et remontez-le sur le flash.
-
Attention : pendant le remontage de votre appareil, faites attention à ce que le câble d'interconnexion inférieur ne soit pas inséré en-dessous de la carte mère.
-
-
-
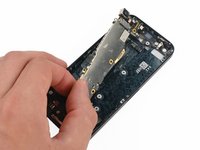
Utilisez la pointe d'un spudger pour soulever le câble de l'antenne Wi-Fi de son cache sur la face inférieure de la carte mère.
-
-
-
Retirez la carte mère du boîtier.
-
Pendant que la carte mère est en dehors de votre téléphone, posez-la sur un tapis antistatique afin de prévenir tout dommage dans le circuit.
-
-
-
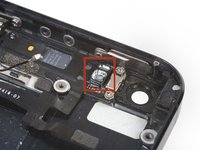
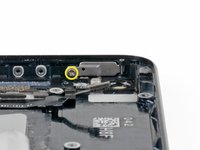
Utilisez la pointe d'un spudger pour retirer le tampon en caoutchouc en dessous du bouton marche/arrêt.
You do not need to remove the rubber bumper. I did the replacement without removing it and that works just fine.
I agree with Johnny on Step 31, removing the rubber bumper is pointless as once its removed you end up with a floating rubber bumper piece OR to replace it. The rubber bumper (pretty sure its just foam anyways) is fine staying attached as it is. Other than that the guide is spot on! Thanks!
blitzn -
Seems to be missing a step to remove the screw from the plate that holds the power button in.
I don't think you really need to remove this rubber bumper.
-
-
crwdns2935267:0crwdne2935267:0iFixit Precision 4 mm Screwdriver Bit$2.99
-
Enlevez les vis suivantes du cache en métal entre les vitres du flash et de la caméra arrière.
-
une vis d'entretoise 2,9 mm
-
une vis cruciforme 1,6 mm
-
une vis cruciforme 1,9 mm
Is this the rear microphone between the rear camera and the flash LED ?
If you only take off the top screw on this bracket and just loosen the bottom one you can spin the bracket out of the way. This helps you when putting everything back together. YOu don't have to align this little bracket while holding a screw and screwdriver.
I lost the One 2.9 mm standoff screw , please let me know where can I buy new screw
I had an interesting discovery when I got to this step. The 1.6mm Phillips screw indicated in this guide was not a Phillips screw head. Mine was more of a circle. It's like it was stripped already. My magnifying glass is not great so I couldn't see if it was stripped or if a different bit was needed. I ended up leaving it in and just swinging the bracket to the right just as the5dunhams suggested. Thankfully it worked and I was able to continue on my 4.5hr repair (problems arose during the start of the installation process). Everything now works. It's weird using my power button since it's been broken for a couple years. Thanks.
-
-
-
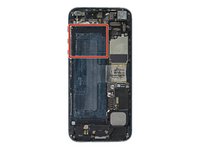
Retirez la fixation en métal entre le flash de la caméra arrière et la fenêtre de la caméra.
-
-
-
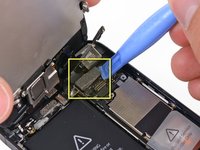
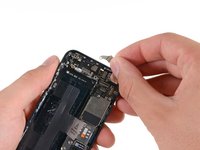
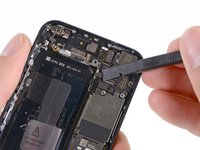
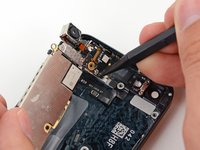
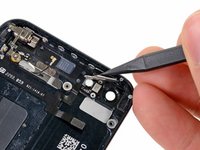
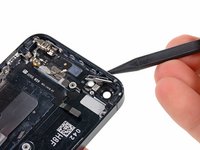
Utilisez la pointe d'un spudger pour écarter la fixation en métal qui maintient le bouton de marche en haut du boîtier.
The screw on the left side had to be removed, but I believe these guides are skipping that step.
Do you mean the screw which is removed on step 32 picture two?
Step 35 picture 2... these guides rarely if ever miss/skip steps.
-
-
-
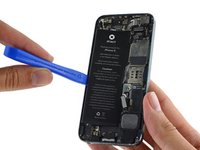
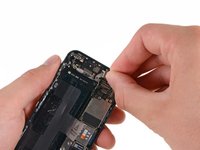
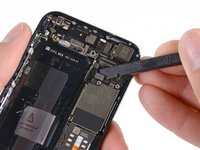
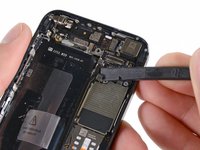
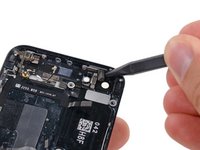
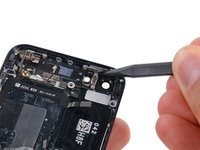
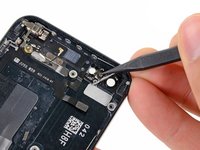
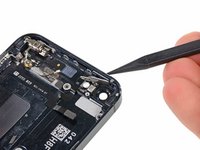
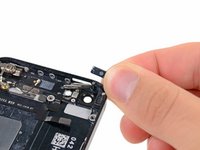
Avec la pointe d'un spudger, poussez le bouton marche/arrêt à l'intérieur du boîtier.
-
Retirez le bouton marche/arrêt.
The power button is glued on the right side to a piece of foam. I found it easier to push the power button in without completely removing it (let it hinge on the foam/rubber), then slide the flat cable out with a pair of tweezers. Re-assembly should be easier and quicker this way.
im swapping over a housing from one phone to another and the new housing dosent have a metal hinge, are these detachable from the old housing?
you can use thin pliers and a screw driver to "bolt out" the old one with force. then use the Pentalobe screwdriver to widen the pin hole in the new housing a little bit, then drive it in with not too much force (in order not to break it). I found these instructions on the internet, and it worked for me - many replacement housing seem to lack that pin.
Andi -
I accidentally got the black power button instead of the white one for my white iPhone 5 and the button doesn't click like it should. I wonder if there is a difference in size of the white button vs. black one. Seems odd.
Did you also replace the cable or just the button?
I only replaced the button, but I may replace the cable to see if that makes a difference. The button now is not working as well as it did first.
I replaced the cable with the power switch AND put everything in a replacement housing. My power button clicks and works fine, but it a bit loose, so as if there is about 0.5mm space between the button and the switch. In the original state from the factory, the button sits tight. Anyone an idea?
I successfully replace my power button, and it worked fine for about two weeks, but the responsiveness of the button has gradually become worse. I'm wondering if this means I need to also replace the cable. Any help or advice would be greatly appreciated.
You need to replace the cable.
I put my lock button into the hole and when I tighten it up the power button is loose and moves around abit. I’m not sure what has happened.
When replacing the cable, attach the power button before adhering down the ribbon.
I ruined 1 cable by trying too many times to put the button together after sticking the ribbon down first.
-


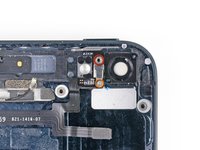


Pour remonter votre appareil, suivez les étapes dans l'ordre inverse.
Pour remonter votre appareil, suivez les étapes dans l'ordre inverse.
crwdns2935221:0crwdne2935221:0
crwdns2935229:0292crwdne2935229:0
crwdns2934873:0crwdne2934873:0
88%


crwdns2934885:0crwdne2934885:0 crwdns2934875:0crwdne2934875:0
crwdns2934877:0crwdne2934877:0 ›
crwdns2935103:0crwdne2935103:0

crwdns2947412:040crwdne2947412:0
Hi! Great step by step guide. I did it twice today and my iphones 5 are working great. Just thing. In my opinion there is no need to remove the battery. It is how I did it without any complication. Keep it up.
This is an extremely helpful guide. I was quite surprised when I opened my iPhone 5 that there were 2 screws lose inside it. I bought it new and have never taken it apart or had it serviced before. Never heard any rattling either so who knows. haha
I noticed that needed the smaller Phillips head screwdriver than the one recommended in the guide.
The only advice I can give is to take your time and go slow slow slow. There were many small heart attacks when prying the screen off and taking out the battery.
I had to go considerably farther in taking apart the phone. My lock button was attached to the volume, mute, and vibrate as one band. found some similar videos on Youtube explaining.
I was skeptical that replacing the tiny power button alone would fix my issue of turning my phone on and off and putting it to sleep, but it did the trick to my great surprise. You'll need a steady hand (ie. no caffeine) to complete this repair because of all of the small screws. Thanks iFixit for a great guide!
My volume and silent toggle switch works great but I'm having issues only with the power button. Does this mean I just have to replace the power button or do I have to replace the flex cable also?
Thanks!
It's highly recommended to replace the cable.
This is the best on the net but the video leaves some steps out. It would be good to tell people to refer to the steps below. I assumed everything below the video was ads so I didn't look there unit I realized something was missing.
After watching this video I ordered my parts and planned to do this. Once I got the phone apart i realized that my button problem (where it works but you have to push hard) wasn't going to get fixed by this video. The button that this video replaces is just a mechanical block. The actual "button" is on a flex circuit\harness and if that is bad you have to replace the harness which you can buy. For me, I just cleaned everything the best I could (don't forget to clean the camera and lens over the camera while you are in there) and put it back together. Everything works great now. No new parts were needed - just a cleaning.
What did you clean it with? Thanks.
Matt Tan -
Die Anleitung ist nicht komplett
Fehlt der Tausch des Powerflexkabels
Gibte es das als PDF ?
Udo
Next to "Formats:" there is a link that allows you to download as PDF
Somebody had some problem with audio jack after this guide? Because mine apparently stop to work after the sostitution!! And I don't understand why.. I didn't touch any other part, infact the charging component and the speaker are working good!
Tips?!
Thx
Help! I followed the guide exactly, including putting the logic board in an anti static bag. Afterwards the iPhone 5 wont turn on, just a blank screen. When connected to power it makes a loud beep, and pauses for several seconds and beeps again etc. I back tracked and did it all over double checking every connector. Checking the display connector. All seemed fine. What could it be?
I had that too. You need to make sure to turn off your power when doing any repairs. After a week I checked back and my phone started working again.
I repaired the power switch problem by just cleaning it. I did not remove the battery or camera, but did remove the small metal bracket just below the power button. I carefully used a contact cleaner spray and small knife to clean out some dust.
The power button now has the 'click feel' again and powers the phone on and off.
I didn't turn my iPhone off before taking the display assembly apart. How will this affect my iphone ?
You should be just fine. Just power off after this. Until you change connectors there is no reason for the power to be off aside from safety.
I tried this today for the second time, Power button won't come back up.
I think the metal bracket, holding the button up, is broken or bent, I forced it a little.
But I can't find this part nowhere online.. Help Meeeee
Hi, did you finally find that part?
I replaced the button just fine, and I also did not need to remove the battery. I noticed though that there is a little pin that holds the button back that was also broken on my phone (or fell out) that I had to get on ebay.
I'm in the process of changing the rear housing for my 5s, and I've come to a problem with the lock button. It seems the pin to hold the metal cover for the sleep/lock button-on the top right inside of the phone-isn't in the new housing. Can i take it out of the previous housing, or can i buy a new one for the new housing? What should i do?
I got a pair of small (4 inch/10cm) micro 'cutting' pliers, I had to very carefully tear the aluminium on the old case to retreive the pin. Try not to bend the pin. Pin was then straightened slightly with flat pliers and re-slotted into the new case, keeping the 'fat' end at the top it will need forcing home slightly. Phew! it doesn't have to be dead-on straight because the wake button clip only has to wrap around it. Took a few goes to get the clip back but wake button clicked fine.
great guide; however, i followed the iPhone 5 rear housing replacement guide and replaced power button cable with a new one. there's been a problem thou with only the volume down button does not seem to be working. any idea?
I also replaced the volume control buttons, specifically because the volume down button didn't work, but the problem persists even with the new volume control buttons and new cable assembly. I suspect that it's not a hardware problem, but I haven't found a software fix. Tried everything I could think of, even a full factory restore, still doesn't work. As a workaround I use the system setting that displays a moveable touch control that allows volume to be changed:
Settings --> General --> Accessibility --> AssistiveTouch --> On. This displays a finger-tip dot that you can move anywhere on screen. Touching the dot displays 6 icons, touch "Device" then there are more icons including "Volume Up" and "Volume Down", which do work. Of course this problem first appeared soon after my AppleCare expired.
irvbrom -
Need to make sure the cable you received is not defective.
Followed this and it worked for the most part but now my phone does not charge. If I insert the power cord while the phone is turned off it will boot the phone up but does not actually charge the phone. What could have gone wrong? The cable isn't an official apple one but was working before the repair.
HI Michael,
Did you resolve the problem you were having with battery not charging ? I am having the same problem, everything worked fine after the replacement and just found out that the battery won't charge (the lightning connector when connected does not get detected).
Thanks,
-Gunardi
Hello,
I have exactly the same problem, did you find any solution?
Thank you very much
Jerome62 -
I had no success. 2 main problems:
1) When I first pulled apart the phone using the suction caps, only the glass came off, leaving a half of the display assembly still stuck inside the phone. There is a plastic cord which runs around the glass, half of which remained with the glass, and the other half remaining on the remaining part of the display assembly. I'm not sure what I did wrong for this to happen. But I can't put the phone back together.
2) I changed the power button but it does not seem to have been the problem. In any case, the power button now does not click. And floating bits of what I assume used to be a button (a small silver bubble, and a black dot on a piece of clear plastic) came out when I removed the the power button. I assume now that the power/volume ribbon is the problem, and theses little floating bits belong to it, rather than the power button.
Overall, disappointing. Won't try this again.
I tried fixing the power button, but it doesn't click. It sits very soft on the top...I can't figure out anything missing. When i reassembled and plugged in, phone just keeps flashing apple symbol but doesn't turn on at all. This could be due to the fact that power button is not clicking...
Attempt 2: I thought of replacing the whole ribbon, ordered and tried installing. I was successful installing it, but the vibrate/silent button part isn't properly installed, nevertheless, power button is still the same. I had thought that circuit button that connects to the power button had worn out, so decided to change so that power button would click. It doesn't click now. I am stuck, now I am thinking of resorting to some fix by the pros..........this totally sucks!! I wouldn't suggest anyone trying this.
chivaspm -
i changed the lock button and ribbon twice.. lock buttons still doesn't work . silent and volume buttons dont work, and the screen has lines on it also! can any one help, any tips would be great.. mainly on the screen.. i can live with a broken lock button but not screen.
Is there a way to tell if the problem is the metal button or the flex cable?
The whole thing needs to be replaced, since the flex cable includes volume and the rocker components. This is a poor guide because it is misleading. The steps are well done, but you need to include the steps for removing the volume flex parts as well.
Thanks! worked like a charm. I had to remove the power cable assembly as well, but by that time, it was pretty obvious which extra screws to remove. The detailed pictures helped me get it right.
Worth noting that sometimes the power button can start failing for a reason that has nothing to do with the button or its cable. Mine started failing because the battery was puffing up, pulling the button connections further and further apart. iPhone batteries do sometimes get puffy or bloated due simply to age, and this can cause all sorts of problems. Once you've got the phone open it's easy to see that the battery is pillowy. Before you open the phone you may see a vertical faint bluish stripe down the screen, or note that the case looks very slightly sprung. The solution to all these problems is to replace the battery. Before you buy parts you don't need, see if your battery is the culprit.
I tried this last night and it worked, brilliant i thought then realised that i have lost my carrier and signal has gone on the phone, i have tried all aspects of the internet, turn off, take sim card out and reboot network, still nothing. Help!!!!! is my phone knackered????
Done successfully for two phones. The standoff screws were a pain. To remove them I used a sharp knife placed flat into the groove on the screw and unscrewed a quarter turn at a time. The iFixit screwdrivers are not fine enough for that. To reassemble, I held the standoff screws in position with tweezers and rotated the phone underneath it. Great guide.
It worked!!! I used several guides simultaneously as there are many details to check and double check. I’ve never opened a phone before but managed to put in a new power button and power flex-cable. Together we can do anything!
Fixade sig sakta men säkert! Pilligt? Ja verkligen! Tänk till två gånger innan du gör något och titta efter noga. Guiden är verkligen bra, men bara några små saker saknas som när du ska byta ut knappen så lägg den med bygeln uppåt mot displaysidan. OBS! knappen ska sitta ovanför en liten kopplinsplast som finns under den svängbara metalluckan och kopplinsplasten ska alltså ligga under knappen in mot telefonen. Den är lätt att missa. Den petas lätt åt sidan. Lägg den rakt under knappen. Titta efter flera gånger att den sitter rätt. OBS! Rengör också !
Mvh: Thord:)
This is Swedish:)