crwdns2915892:0crwdne2915892:0
This guide will shows how to replace the thermal paste inside a PS4. Thermal paste is a silver liquid applied to a processor to transfer heat to a cooling solution. Thermal paste on any electronic should be replaced every couple of years or so since it will dry out.
In the PS4, the thermal paste board is right under the heat sink, and the heat sink is where most of the dust builds up. Cleaning the heat sink and replacing the thermal paste will help a PS4 run as if it was brand new. My PS4 is about six years old, and after completing this whole procedure, it quit overheating and is as quiet as a mouse. The only skills required for this task is to be able to screw and unscrew screws. It is very easy, but it is a tedious process, so pick a day when you are free if you are going to do this.
crwdns2942213:0crwdne2942213:0
crwdns2936621:0crwdne2936621:0
-
-
Grip the PS4 with both hands along the gap in the top cover.
-
Push the glossy side of the top cover with your thumbs until it pops to the side.
-
Lift the glossy top cover up and back to remove it from the PS4.
-
-
-
Use a Phillips screwdriver to remove the 6.5 mm screw securing the hard drive bracket to the enclosure.
-
-
-
Pull the hard drive bracket out of the enclosure.
-
-
-
Flip the PS4 upside-down with the back side facing towards you.
-
-
crwdns2935267:0crwdne2935267:0Tweezers$4.99
-
Use tweezers to remove the two stickers in the center of the back of the PS4 exposing two case screws.
-
-
-
Use tweezers to carefully remove the plastic screw covers in each corner, exposing two more case screws.
What If my PS4 doesn't have the two screws on the side
I should imagine that plastic cover will come off?
How did you go?
Cary B -
-
-
-
Remove the four 7.2 mm Torx security screws on the back of the PS4.
I only have two screws, those in the middle of the console.
Have you removed the plastic covers mentioned in the previous step? That will expose the other two screws.
same, here. there are only the middle screws, no covers or screws on the sides. and it sits pretty tight
turns out 12XX models are different. Look at this for reference: https://www.youtube.com/watch?v=Hpr0z0ve...
This video guide is very useful, thank you. The disc drive itself is different than this ifixit guide too
Yes there is slight variations between the first models, and the second gen and on models. I have an original and only has the two screws in the middle, removal of the cover remains the same.
-
-
-
Use your thumbs to lift the lower case up and off the PS4.
sur la version 2 de l ps4 fat il n'y a que les 2 vis du milieu. Comment défaire le boîtier ?
Joyeux dodjf ps4
Jordan Carlos Monteiro Semedo - crwdns2934203:0crwdne2934203:0
-
-
-
Use a pair of tweezers to pull the power supply cable straight out and disconnect the power supply unit from the motherboard.
This part looks dangerous. There should be a flag/warning not to destroy that cable yes?
I second Shawn's comment. That cable seems to be very fragile, and one of the wires snapped on mine while removing the cable. It wouldn't have bothered me so much, if it wasn't a pain to find a replacement for it.
The tweezers used here, do not cut it. Not enough grip.
I had to use a set of needle nose pliers to remove this.
Power supply connection stuck. I don't want to damage it
What you need to do here is be patient. Do not pull the wires. Get some fine nosed pliers, wiggle the white connector from left to right in small movements and edge it out slowly. You can also use your nails one finger at each edge of the white connector to do this.
Its really hard but i managed it with both of the tweezers/pincers at the same time
1. Keep in mind to pull not too hard on the wires and make step 2 and 3 simultaneously!2. the straigt and wider tweezer to pull the white connector itself
(top and bottom grip)
3. the small and angled tweezer to pull the wires carefully
(as shown on the picture above)Another option, is to remove the screws holding it down, leave the cable in place and lift it out carefully, revealing the other end of the connection. The hidden side of the connection wire is easier to get a handle on.
I concur with David, some patience and a lot of wiggling did it for me despite the stubbornness of the connection. Does seem like this one varies a lot in how difficult it is to remove.
My connector wouldn't budge no matter how much I wiggled it. I solved it by lifting the power supply out and disconnect the connector at the other end (mainboard end)
I couldn't get the cable out at all on either side, but I was able to disassemble the console with both sides still attached. I had to carefully maneuver the PSU around while going through the rest of the steps, but in case you're in the same position as me then just know that all's not lost!
-
-
-
Remove three 9.7 mm-long TR8 Torx security screws.
-
Remove two 41 mm-long Phillips screws and brackets.
-
-
-
Lift the power supply straight up and out of the PS4.
How do you remove the battery wires? I’ve personally been wiggling it to no effect, is there a certain way i have to pull it out, and should i pull it out of the power supply or the console?
Retirar en vertical, derecho hacia arriba. Sino puedes doblar uno de los tornillos largos
Just got done with this part. It was a struggle for me to disconnect the cable from the PSupply side. It was easier for me to carefully remove the power supply first, using the HDD cover to lift the Power Supply in place and removing the l cable from the Motherboard side. Go slow with your fingers to wiggle it out slowly, when you have enough plastic from the cable casing expose, gently use pliers to wiggle it free. Try hard not to deform the plastic wire casing.
-
-
-
-
Use the tip of a spudger to disconnect the antenna cable from the motherboard.
dumb question but I’m very new to this. when reconnecting the wifi antenna, does it just click back on? I'm hesitant to try this procedure if I need to solder anything since I have zero experience.
Yup! Hold it in place and press straight down on top of it with your finger or a spudger. If you have any other cable/connector questions see this guide.
Heads up, you might have a black philips screw above the power connector. It fixes the motherboard and EMI shield on if you're dealing with an 1100 model.
What type of connector is the antenna? MHF?
-
-
crwdns2935267:0crwdne2935267:0Tweezers$4.99
-
Use a pair of tweezers or your fingers to grab the antenna cable and move it out from the cable guides.
-
-
-
Use a pair of tweezers or your fingers to thread the antenna cable out from underneath the optical drive cable.
-
-
-
Remove the 9.7 mm Torx security screw securing the antenna.
This does not work on the newer 12 series
Thank you! I thought I was insane. I've been trying to figure out where the hell this thing goes and the seat for it is like an inch from the corner. It's driving me mental trying to figure out how to put this back on
-
-
-
Remove the Wi-Fi antenna.
When I’m connected to wifi it does good for awhile then it disconnects from the wifi and I can’t use the controller. I have to turn the game off and disconnect power source. Do you think the wifi antenna could be the problem or doin have another situation.
I would check the antenna connection to the motherboard, if it's properly seated I don't think it's the problem.
hazelrat -
-
-
crwdns2935267:0crwdne2935267:0Tweezers$4.99
-
Use your fingernail to press down on the metal release lever of the ribbon cable on top of the optical drive.
-
Use your fingers or a pair of tweezers to disconnect the ribbon cable by pulling on the black tab.
Please note that the younger generations of PS4 have a different setup of connectors to the driver, its sometimes 3 of these as presented but with different sizes and no pad to press down. However, dont be alarmed, just use the pair of tweezers and gently pull them off the connectors of the motherboard. Grab on tight on the blue area of the ribbon cable and pull gently! They tend to sit tight so take some time and patience on this.
Thank you!!!
This is not true for the larger center connector. At the top, there is a brown part. Use fingers on either side (with wings) and move it upward (2-3mm). When this is done, then you can remove the center connector. The other two connectors are just a compression fit and you just pull them up.
-
-
-
Use your fingernail to press down the metal release lever for the ribbon cable connected to the motherboard.
-
Use your fingers or a pair of tweezers to disconnect the ribbon cable by pulling on the black tab.
-
Set the ribbon cable aside for reassembly.
bei mir ist das leider defekt Plastikteil abgebrochen wie kann ich das ersetzen
Is it possible to buy the white port for ps4? My one seems to be damaged so won't hold the ribbon cable.
This may be a difficult fix, as the white port seems to be integrated into the motherboard. You could try simply holding the ribbon cable down with electrical tape, if it's just a fitting issue?
hazelrat -
The issue I found is the connector for the ribbon cable, the one soldered to the motherboard, is cracked.
I wonder if there is a replacement to re solder? And what should search for when looking to buy
-
-
-
Use your fingers or a pair of tweezers to disconnect the optical drive cable from the motherboard.
This portion does not exist on models that have the three ribbon cables (Model CUH-1215A on bottom sticker).
WOW... do NOT pull up by the CABLES! Cant believe I have to clarify this. Who made this guide??
Use a spudger to lift the left and right sides gently out. And/or use fingernails to grip the white sides and gently lift this out
-
-
-
Use your fingers or a pair of tweezers to remove the optical drive cable from the cable guides that hold it in place.
-
-
-
Remove the four screws securing the optical drive.
-
Three 9.7 mm Torx screws
-
One 6.2 mm Phillips screw
-
-
-
Lift the optical drive straight up and out of the PS4.
-
-
-
Remove the two 9.7 mm Torx screws securing the upper case.
-
-
-
Lift the upper case up and back to remove it from the PS4.
“Significant force” is a bit of an understatement. It’s like it’s superglued together..
You absolutely should not need a lot of force for this. In the picture above, press upward using the left thumb from under the outer lip of the cover. You may need to pull it slightly toward you as well. Once that half is lifted, the right-hand side is still firmly attached. Keeping the left-hand side of the top separated, flip the unit over. Along the right-hand side, press the outside lip with your thumb about 2 thumb-widths down from the corner. There is a tab here and once released, the cover comes off easily and off in the back. Otherwise, you’ll be placing stress vertically (and rotationally) on the first tab on the side.
I appreciate this feedback – thank you. This sounds like a safer method. I’ll test it on our guide unit and update the procedure.
THIS SET OF INSTRUCTIONS FROM YOU, IS ABSOLUTELY SENSATIONAL.
I got this cover off quite easily. Still some resistance, but I didn't need this significant force at all.
THANK YOU!!
:)
Cary B -
There is a piece of plastic underneath the casing here. The PS4 I worked on got so hot on the inside that part of the plastic started to melt and warped some inside the metal plate underneath. This made it tricky to open the case, but by using spacers I managed to get it off.
I found an easier method for myself is to have the console upright and pointed away from myself. From this position, wrap your fingers over the top of the cover, hooking it in its front with the last digits of each finger. This allows you to press with your palm into the top of the console and pry in an upward/outward motion. This feels safer as it took much less force to disengage the problematic clip.
-
-
-
Remove the twelve 9.7 mm Torx screws securing the upper EMI shield.
In my PS4, there is a small black Philips screw behind where the power lead connects to the motherboard. That screw connects the EMI shield to the inner metal where the power supply sits.
I had exactly the same thing, and mine is a fairly old model of PS4. Confused me for a moment until I spotted it.
Tom G -
Can confirm this.
This screw was on mine. To anyone reading this, flip the PS4 over and look where the pain in the ass power supply connector is.
Black screw right there.
If you have that screw of course. :)
Cary B -
-
-
-
Remove the two 15.6 mm Phillips screws.
-
Gradually unscrew the pressure plate by turning each screw one half turn at a time.
-
Alternate between the two screws to maintain even pressure on the pressure plate.
why does my PS4 have some metal thing attaching the plate to the metal beneath it?
My PS4 also has 2 metal rings around each screw hole and 4 metal pieces 2 on each side closing in the same shape as the pressure plate as you take the pressure plate off?
How strong do you tighten the screws when re-applying the plate?
To the max, or stop one to two turns before?
I've tightened mine until the screws became taut and I've not had any stability issues.
hazelrat -
Insure you put it back with the bump down (flex down). On the older PS4, the pressure plate is directly on the PCB. Also agree that the screw will bottom out. It is not a standard screw, but has different diameters. The CPU is on the opposite side. On the inner shield (some steps below) is the aluminium body going (thermally) to the heat fins. Clean any residual thermal paste on the inner shield so that new paste applied to the CPU has good contact. The pressure plate is over the (decoupling) capacitors and the CPU is on the opposite (bottom) side. Also, the replacement fan connector does not match the main board. Save the old fan connector and you may have to solder it to the new fan.
Yes, it also has a 2nd plate that hovers over the decoupling caps and applies pressure to the area of the CPU package below. The pressure 'bar' is pushing on the 2nd plate to keep good contact with the heat sink on the inner shield. Clean out all the fins on the heat sink of dust, etc and clean/fluff the gasket parts so they have a good seal.
-
-
-
Remove the upper EMI shield.
This is the 2nd PS4 I have disassembled and on both units I have found there is a black Phillips screw securing the upper EMI shield. This should be mentioned in the teardown as the EMI shield cannot be removed completely without first removing this screw and you risk damaging the EMI shield in the process . To locate the screw turn the unit over and you will see a small black Phillips screw located near the power supply prongs. There will be a set of arrows pointing to the screw. Once you remove this screw then you can fully release the upper EMI shield.
Ditto. This is my first time disassembling a PS4. EMI shield didn’t lift off easily on one corner. Noticed the black Phillips screw holding it in place. I scrolled up in the tutorial to see if I missed it. Easy enough.
All the ps4's I opened had this one Phillips screw. And I've cleaned/repaired ~12 units. So I think it's safe to assume that (almost) every one of them have it.
throw it way, electromagnetic fields dont exist
-
-
-
Insert the flat end of a spudger in between the fan cable and the motherboard.
-
Twist the spudger to lift the connector straight up and disconnect it from the motherboard.
Mir ist der Stecker leider von der Platine gerissen 🫣 kann man den wieder dran löten?
The wires came out all seperate and the bit on the ps4 broke. What do i do?
-
-
-
Grab the edge of the motherboard on the front of the PS4.
-
Lift the motherboard until the USB ports clear the PS4 case.
-
-
-
Lift the motherboard out from the PS4.
That shiny metal cover box on the opposite side of the hdi port shown in picture 30 at the very front is showing over heating signs I guess very brown around the edges I think is causing my PS4 not to show up on tv any ideas how to fix that hdi port looks fairly good to me but the black plastic port shows burnt signs as well that's on the same side of the HDMI port but the shiny metal cover is on the opposite side
-
-
-
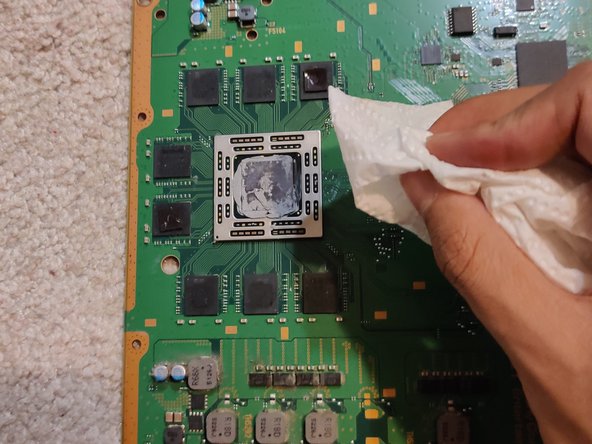
Using tissue paper, wipe off the existing thermal paste. Take the new thermal paste and apply a small amount to the middle of the component.
-


To reassemble your device, follow these instructions in reverse order.
To reassemble your device, follow these instructions in reverse order.
crwdns2935221:0crwdne2935221:0
crwdns2935229:0178crwdne2935229:0
crwdns2915084:0crwdne2915084:0

CSU Los Angeles, Team S12-G1, Harris Fall 2020 crwdns2935289:0CSU Los Angeles, Team S12-G1, Harris Fall 2020crwdne2935289:0
CSULA-HARRIS-F20S12G1
crwdns2934841:01crwdne2934841:0
crwdns2935297:09crwdne2935297:0
crwdns2947412:023crwdne2947412:0
Se me hizo muy buena la guia, sobre todo para no cometer algun error al trabajar en la reparacion, mi PS4 dejo de zumbar el abanico con el cambio de pasta termica y una limpieza general de polvo y pelusa.
I followed this guide step by step, including reversing the order to reassemble my unit.
My PS4 is still loud but not as loud as before, so everything worked well. Thanks for the writeup!
i might be a little late to reply, but i followed this guide aswell BUT after step 31 i took off the extra metal/aluminum plating and saw thats that where the bulk of the dust will be built up, this plate has the vents that go to the cooling fan on the opposite side of it after unscrewing. i bought an original ps4, it sounded like a jet engine taking off. The vents on my ps4 were just about covered in dust almost no airflow was able to get through, after taking the extra step and taking off the 1 extra panel (the one under the motherboard in step 31) and of course after replacing the thermal paste made my ps4 run and sound like new again,
Beau -
I cannot reply to Beau's comment.
I also went the extra step of taking that metal shroud that sits below the motherboard (step 31).
I completely recommend this step. It is then you can get access to the heat sink fins to remove dust. There are 3 screws that hold this metal shroud in place. Easy to get out.
Then you can also now remove the fan - 2 screws for this.
You can then clean out the accumulated dust from the fan and in the plastic shroud, that the fan sits in.
Holy cow, dust factory. :)
Great guide! Just did it and now the console is dead silent during gameplay of super demanding games <3 I just went a step further after Step 31 and removed the plate there so that I could properly take care of the heat sink underneath that had lots of dust on it.
“Great guide! Just did it and now the console is dead“ I just read that and was shocked for a second, you had me in the first half.
What thermal paste did yall use
I just used Arctic Silver 5, it’s for sale on iFixit’s store and works great. However, it is not a lot if you repair or build a lot of devices.
Great guide! Did repair a white model for a friend, which had an extra screw next to the powersupply cable that is holding the EMI shield from the other side. also great tipp from the other commenters to look underneath the heat sink!
The ps4 is working fine but the fan is not working after launching a game for 1m the ps4 die due to overheat
What Size Thermal Pads for the RAM? not sure how necessary it is but the old ones look a bit dated
I had to replace my fan and thermal paste. My fan bearings were not gliding at all. Before fixing I would just hear a click, like the fan was trying to spin but couldn't. There was a huge blockage of dust on the heat sink too. Not sure which did the trick but now I'm playing the latest COD on PS4 and it's absolutely silent. I do have two tiny Phillips head screws leftover though. Oh well?
When I take my PS4 apart I always write down where the screws came from on a piece of paper. It helps if you're a little forgetful.
Some Guy -
What screw driver do i need?
Habe gestern die Sony PlayStation die weiße Version die Wärmeleitpaste und Kühlpad erneuert und jetzt ist sie wieder leise und nicht mehr laut
Super Anleitung!!! Meine PS4 ist vom startenden Düsenjet zu absolut nicht hörbar gerettet. Dank Dir!!!!!!
Habe auch Schritt 31 noch gemacht und der Kühler war komplett voller Staub.
Kostenpunkt der Reinigung: 8,99,- für Druckluftspray und 15,- für Wärmeleitpaste.
Nochmal großes Danke!!!
Simply remarkable. I replaced the fan and thermal paste in my PS4 and it has made the WORLD of difference. Cleaned all the dust from every part with my Dyson along the way, especially the heatsink which was absolutely clogged.
This guide is incredible. My PS4 sounded like a harrier jet taking off, now it is whisper quiet - no exaggeration. Even the wifey cannot believe it.
Really wish i had done this sooner. Whole job took around an hour with my 8 year old son helping, he had a blast.
Hola a todos, realicé un proceso de mantenimiento a un play station 4 modelo 1100 del año 2014 (primer mantenimiento desde ese año), la razón, el ventilador se activa a la máxima velocidad y la consola se siente caliente. Proceso: Eliminación de polvo y limpieza general, cambio de pasta térmica del procesador y cambio de todos los pads térmicos. Al probar los resultados en la consola, en juegos modernos como god of war 4, el ventilador sigue activándose al máximo y la consola se sigue calentando.
¿Existirá alguna otra razón de que persistan los problemas?
Por la antigüedad de la consola. ¿ya no existe solución a los problemas aún haciendo mantenimiento y limpieza ?
¿Existe alguna otra solución ?
Esperando su ayuda, les mando un saludo.
José Antonio García Galicia - crwdns2934203:0crwdne2934203:0
Seguir o passo a passo e fiz a limpeza do meu PS4 hoje usei a pasta térmica prata, aqui estava no meu processador estava até ressecada o barulho que ele fazia parecia uma máquina de lavar aproveitei e tirei o dissipador e jateei ele todo com ar, tinha muita poeira agora ele está tão silencioso como quando eu comprei tenho uma pergunta a Quem souber me responder Me ajuda aí De quanto em quanto tempo é o ideal para fazer essa manutenção nele
Amazing guide! Worked perfect.
One small problem though: I have one torx screw thats left after i put it back together.
Whoops, Im sure it'll be fine though.
Just glad i could revive a dead ps4
I followed this guide step by step, cleaning every removed part as I go. The 9 year old PS4 that I was working on (it was never cleaned before) is now working silently when playing NFS Heat (I had to put my ear to the console side to be sure that the fan is working). I put PTM7950 as thermal compound and it seems to be working great.
Great Guide my ps4 had overheating problems and when I clean the fans it would still overheat like crazy but was too nervous to try it myself and the guide made me realize that I wasn't as difficult as I had thought since I how had a step by step instructions
What a great guide! I did the whole procedure on my PS4 that I have since 2014 (new) that was still with the OEM paste.
The difference is like night and day. The fan is barely spinning now (while playing the same games) when before it was going crazy like a jet engine!
I used the latest Arctic MX-6 paste.
I have a CUH-1102A version of this PS4.
Would this teardown work for it?
Cary B - crwdns2934203:0crwdne2934203:0