crwdns2915892:0crwdne2915892:0
This guide shows how to remove and replace the rear-facing camera for the OnePlus 3.
Due to the phone’s design, you have to loosen/remove the motherboard in order to remove the rear-facing camera. The hardest part of the guide is getting the frame clips of the back cover free.
Some guide images will show the battery already removed from the phone. You do not need to remove the battery for the rear-facing camera procedure.
crwdns2942213:0crwdne2942213:0
-
-
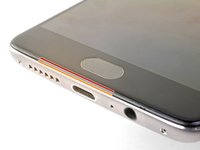
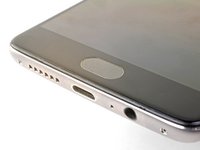
Insert a SIM eject tool, bit, or straightened paperclip into the hole located between the SIM card slot and the power button.
-
Press firmly to eject the SIM card tray.
-
-
-
Remove the two 2.6 mm T2 screws from the bottom edge of the phone.
-
-
-
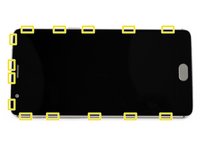
Display panel seam: This seam is part of the display assembly. Do not pry at this seam, or you will separate and damage the display panel.
-
Frame seam: This is where the plastic frame meets the back cover. It is recessed into the back cover. Only pry at this seam.
-
There are fourteen clips that hold the frame against the rear case. Be aware of their location as you pry the back cover off in the following steps.
This picture is a bit misleading, the frame seam is actually sunk into the metal frame, and is not visible at first.
With an older phone, it’s more likely to separate the display panel itself than to separate the displaypanel from the frame. If the top of the screen comes off first, before the part with the touch sensor, then you’re separating the wrong thing (ie displaypanel).
Mind that the displaypanel itself seems as if it has two seams (the panel itself and the board).
Thanks for the helpful tip! I re-worded the step slightly to hopefully clarify where the frame seam is.
-
-
-
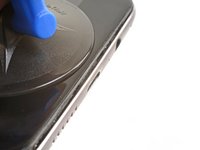
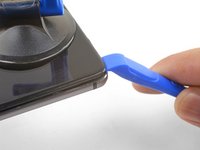
Place a suction cup near the bottom edge of the display.
-
Pull on the suction cup with strong steady force.
-
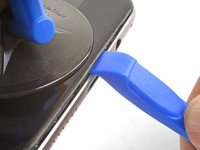
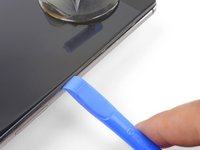
Press the edge of an opening tool straight into the frame seam near the suction cup until the edge wedges between the plastic frame and the back cover's lip.
To get maximum leverage and make this step possible with my weaker suction cup, I held down the phone with a plastic pick/tool pressed down onto the metal back. As the suction cup pulled up the plastic frame, the plastic pick holding down the metal back naturally was pushed further and further into the gap between the frame and back.
-
-
-
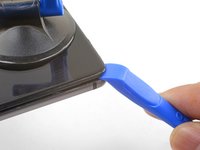
Once the opening tool's edge is wedged in position, carefully slide the tool along the bottom edge of the phone.
-
Carefully guide the opening tool around the left corner of the phone while keeping the tool's edge within the seam.
-
-
-
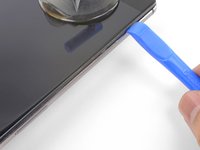
Continue sliding the opening tool along the long edge, releasing the clips along the way.
I found I had to use a couple of those “guitar picks” to get the screen off, left the first one inserted on the bottom and then went around the side of the phone with the second.
I couldn’t get the last clip easily, so I also went around the other side, and then the last two clips left and right went out togther much more easily.
Yep, thanks for your note. It was far more easy to go round the other side.
-
-
-
-
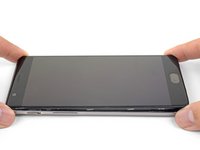
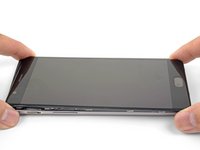
With the bottom and left edge of the phone freed, gently wiggle the frame to release the top and right edge clips.
-
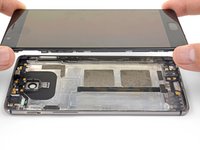
Lift the screen up and remove it.
-
Align the top edge of the frame to the back cover and ensure that the top clips slip into place.
-
Squeeze along the long edges of the phone to snap the remaining clips into place.
I’m having trouble putting on the back cover, anyone else had this issue?
Hello.
From this Step on I directly jumped to Step 13. Removing the 7 Screws. NOT removing the Mainboard. It is easy possible to remove the camera just like this if you loosen the Camera-cable and pull carefull on it. Because the 7 Screws are removed there is enough space to remove the old camera and bring the new camera in. I tried It various times to verify this.
-
-
-
Use the point of a spudger to pry up and disconnect the battery connector from its socket, located above the top right corner of the battery pack.
-
Bend the connector away from the socket to prevent accidental contact.
Why not removing the camera without removing the mainboard?
Warum wird die rückseitige Kamera nicht ausgebaut, ohne das Mainboard auszubauen?
Hello Ingo,
The rear camera is trapped under the motherboard. You must at least loosen the motherboard to remove the camera.
Die Kamera befindet sich unter dem Motherboard. Sie müssen mindestens das Motherboard lösen, um die Kamera zu entfernen.
During reassembly this part was tricky for me: the new battery couldn’t clip into place the way the old one did, resulting in a loose connection and “battery does not match “ message when trying to power the phone up. The new battery probably had a slightly different connector that than the old one. I even ordered another battery but the same thing happened. I finally managed to connect it by applying much more pressure on the press connector than needed for the other ones. it did not make any clip sound though.
-
-
-
Remove the 3 mm Phillips screw securing the cable bracket.
-
Remove the cable bracket.
-
-
-
Use the point of a spudger to pry up and disconnect the interconnect flex cable from the motherboard, which is located above the battery.
-
Repeat the process to disconnect the daughterboard flex cable from the motherboard.
-
-
-
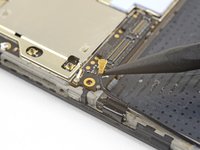
Slide the point of a spudger underneath the antenna interconnect cable located at the bottom left corner of the motherboard.
-
Pry up and disconnect the antenna interconnect cable.
Connector may go oval, push with spudger to make circular again
-
-
-
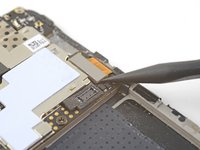
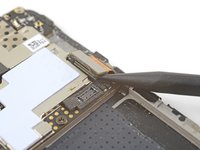
Use the point of a spudger to pry up and disconnect the display connector from its socket on the motherboard.
-
-
-
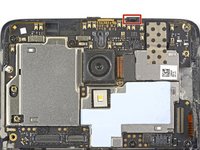
Remove the seven Phillips screws securing the motherboard to the frame:
-
Four 3 mm black screws
-
Three 2.9 mm silver screws
-
-
-
The motherboard is still held in place near the top by clips.
-
Slide the flat end of a spudger underneath the top left corner of the motherboard.
-
Twist the spudger and pry up to release the motherboard from its recess.
I find it easier to pry from the opposite side, where the antenna cable connector are as it required less force to release the motherboard.
-
-
-
Remove the motherboard.
When removing the motherboard, the front camera module's connector on the backside of the board tried to be retained by its recess in the frame. I had to peel the tape off the back of the front camera, then remove the motherboard, and finally prise the connector away from the frame before reinstalling it on the motherboard.
-
-
-
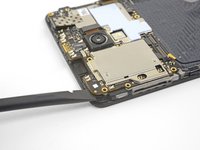
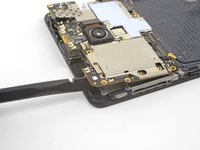
Use the point of a spudger to pry up and disconnect the rear-facing camera connector from its motherboard socket.
-
-
-
Remove the rear-facing camera.
-
If your replacement part did not come with a black cover, carefully peel the cover off from your old camera and transfer it to your replacement part.
My replacement camera didn’t have the black rubber cover as pictured in this step so I simply removed the one in place and put it on my new one. It’s not stuck with glue or anything, just placed on top. I assume it’s useful for something, keeping it in place perhaps, I just think it’s worth mentioning in this step.
Hi Billy,
Thanks for the tip! I’ve updated the step to mention that.
Hey, thanks for the repair instructions!
Worked all smooth until I was putting the screen unit back into the metal-case.. It just wouldn’t fit.
Then I saw a little notch in the center, right on the top side of the mainboard, that has to be engaged to put the display back in the case.
-


To reassemble your device, follow these instructions in reverse order.
Take your e-waste to an R2 or e-Stewards certified recycler.
Repair didn’t go as planned? Check out our OnePlus 3 Answers community for troubleshooting help.
To reassemble your device, follow these instructions in reverse order.
Take your e-waste to an R2 or e-Stewards certified recycler.
Repair didn’t go as planned? Check out our OnePlus 3 Answers community for troubleshooting help.
crwdns2935221:0crwdne2935221:0
crwdns2935229:048crwdne2935229:0

crwdns2947412:018crwdne2947412:0
Why do I have to take out the MoBo? For me it looks like the camera connector is accessible without removing everything, one less step to swap screws etc...
I haven't done this procedure yet, but it looks like there is a metal tab that protrudes from the top of the camera module that is tucked under the PCB.
Fantastic! Many thanks. That fixed the problem: no more blurry rear camera. For less than 9 €… You’re the boss!!!
under 10 bucks finally fixed my broken auto focus, great tutorial!
It worked pretty well for me, but I had to use a metal 0.3mm Guitar Pick for the very first opening step, as neither the plastic opening tools nor plastic picks worked for me.
@jackhutchinson60: The back cover is taken off first (which has no eletrical connections) and then the motherboard is removed, but it’s all screws and plugs, so no problem there. According to youtube lens cover fixes are cheap and doable as well.
Very easy to follow! Great ten buck fix. The hardest part was definitely opening the phone, but with a little elbow grease it is possible. I used the iFixit opening tools, and would recommend getting a few, as you will dull some out at first. Overall, great guide. Took me about 90 minutes (mostly from trying to pry open the phone.
Thank you for this great guide!
I just replaced the rear facing camera on my OP3 (original was no longer able to focus image) and now I can finally use my camera again!
I used the iFixit Pro Tech Toolkit for the repair and that worked great. Only the opening tools did not work as well for removing the backshell as the ones pictures in the guide, but after some struggling, I managed to open the phone just fine.
a few tips from my repair: (*note 3T)
careful when prying the bottom of the rear housing off, there are rubber gaskets around the usb and speaker than can be damaged
the motherboard connectors are easier to remove before you unscrew it
the philips bits you’ll need are PH00 and PH000, and you’ll need tweezers (which are not listed in the equipment needed)
one of the small screws is covered with a water
the front facing camera does not come away with the motherboard, and is attached to security tape
otherwise, great tutorial. all is fixed, thank you.
Great instructions, I’ve changed my faulty rear camera following your video in less than 1 hour, without any troubles.
The key is be patient opening the case, as it is very tight fit, but it’s all pretty straightforward as shown on the video.
Thanks!
Awesome guide, thank you very much for the steps. I have had some difficulty in removing the back cover, but completed the process successfully. I have just replaced my camera and so far so good.. hope the new camera lives longer than the original…
Great Instructions….Thanks Again
Worked really well, thanks for the detailed instructions!
Thanks for this - a great guide! I would add that when prying off the mobo, it’s important to pay attention to a small plastic tab that clips it in place, in the middle of the top part. It seems much more secure to help that clip along while prying the rest of the PCB.
Thanks Michał!
I updated the step to add that info.
I followed the instructions step by step and everything worked as advertised. Opening the phone was easy with the required tools, with the most difficult part was lifting up the display, which took a couple of minutes.
Replaced the camera and had fixed my previously blurry camera image instantly after assembly.
I paid 18 $ for a new camera and tools vs well over 100$ I would’ve paired when having a repair shop do it.
Thank you so much for this article.
Really good instruction. With a little fear, wrong glasses, armed with another smartphone-camera for optical documentation and illumination it works very good. Thanks a lot! The new camera works well and focused optimal.
My Oneplus 3 rear camera has lost focus function and front camera is shattered.
Can I replace them with rear and front camera from Oneplus One/two model?
Hi Santhosh, the cameras are different models in the OnePlus 1, 2, and 3, so they are most likely not interchangeable.