
Nintendo Wii DVD Drive Lens Replacement

crwdns2944107:0crwdnd2944107:0David Hodsoncrwdnd2944107:0crwdnd2944107:0crwdnd2944107:07crwdnd2944107:0crwdne2944107:0
crwdns2944111:0Kho 13, 2024crwdne2944111:0
crwdns2915892:0crwdne2915892:0
crwdns2942287:0crwdne2942287:0Most disc read errors (DREs) can be fixed by replacing the laser lens in your Wii's DVD drive.
crwdns2942213:0crwdne2942213:0
crwdns2943213:0crwdne2943213:0

crwdns2943215:0crwdne2943215:0


crwdns2944105:0crwdne2944105:0

-
-
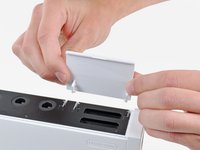
Use a metal spudger to remove the white plastic screw covers stuck to the lower case near the front of the Wii.
-
-
-
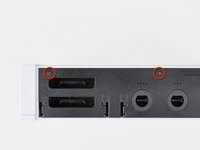
Remove the two 8.3 mm Tri-Point screws hidden under the covers you just removed.
Before you start, get a small plastic tray with at least 15 small bins in it, and put the screws you take out in each step in the bins in order. It makes reassembly a LOT easier.
NOTE: You need a Y1 screwdriver. Be careful when buying the little red screwdrivers on Amazon that claim to fit the Wii - they don’t!! From personal experience.
I have an ifixit kit and the Y1 didn't fit. I ended up using a Y0 and it worked.
Just to add to Robotai’s comment, if you do get the little red/orange screwdrivers on Amazon, file off the tip. It if’s mostly blunt, it fits the tri-wing screws much better.
1/16 x 1 craftsman Phillips mini screwdriver works for this if you don’t have the tri-wing driver
How do you make one ? If you don’t have the screwdriver
I am using a 18ct empty egg carton to hold the screws/parts removed in the steps.
Larry’s idea about the bins was great and helpful.
Robots is right- you NEED a Y1. Just buy the thing with the drive. I didn’t, tried many other options, none worked. Had to order the thing separately with shipping. Mistake….
My two screws hidden are on the backend of the Wii. This picture shows them on the front.
I had to hold the tri point driver in a vice-grip to get the leverage to get these screws out
These screws were really tough for me too. Amazon screw driver was stripping them. I attached a 7 mm socket to the end of the screwdriver and got enough force to get them out.
-
-
-
Remove the single 5.9 mm Phillips screw under the controller port door nearest the faceplate.
-
-
-
Use a metal spudger to remove the rubber foot stuck to the side of the Wii near the DVD drive opening.
-
-
-
Remove the single 5.9 mm Phillips screw hidden under the foot you just removed.
-
-
crwdns2935267:0crwdne2935267:0Tweezers$4.99
-
Carefully pull the faceplate away from the front of the Wii.
-
Use a pair of tweezers to disconnect the LED cable's plastic connector from the motherboard.
-
Remove the faceplate.
-
-
-
Open the controller port cover until it is perpendicular to the black controller port bezel.
-
Pull the controller port cover straight up to release it from the outer case.
-
-
-
Remove the two remaining 4.1 mm Phillips screws along the top edge of the black plastic controller port bezel.
-
Lift the bezel from the long edge furthest away from the controller ports and remove it from the Wii.
-
-
-
Remove the two 5 mm Phillips screws above the controller ports.
-
-
-
Use a metal spudger to remove the three highlighted screw covers stuck to the side of the Wii.
-
-
-
Remove the following screws:
-
Two 5 mm Phillips screws
-
One 8.2 mm Tri-Point screw
-
-
-
Use a metal spudger to remove the two rubber feet stuck to the bottom face of the Wii near the rear ports.
-
-
-
Remove the two 8.2 mm Tri-Point screws hidden under the feet you just removed.
-
-
-
Lift the outer case straight up off the body of the Wii.
-
-
-
Remove the small Phillips screw securing the battery door to the bottom panel.
-
Pull the battery door out of the Wii.
-
-
-
Remove the 8.2 mm Tri-Point screw that was hidden beneath the battery door.
-
-
-
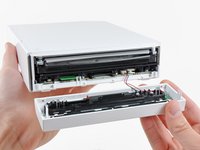
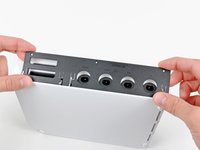
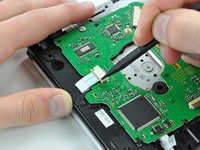
Remove the two 8.2 mm Tri-Point screws securing the DVD drive shield near the controller ports.
-
-
-
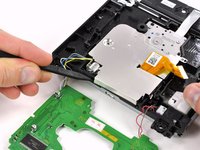
Lift the DVD drive shield upward and remove it from the Wii.
-
-
-
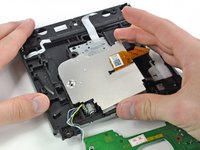
Remove the four 9 mm #1 Phillips screws securing the DVD drive to the bottom panel.
-
-
-
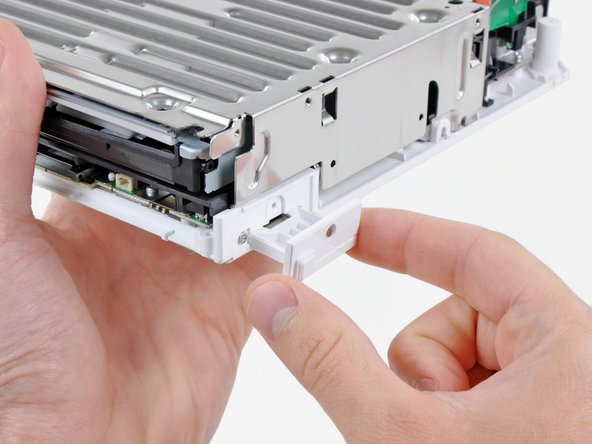
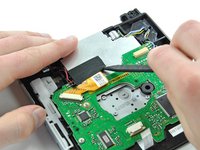
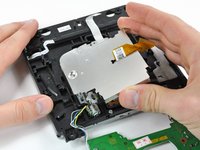
Lift the side of the DVD drive opposite the controller ports enough to access the cables on its bottom face.
-
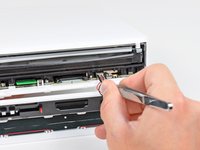
Carefully pull the DVD drive power cable out from under the plastic shroud near the heat sink.
-
-
-
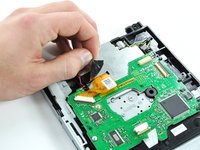
Pull the DVD drive power cable away from its socket on the DVD drive.
-
-
-
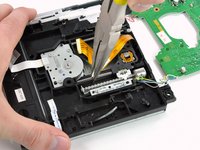
Use your fingernail to flip up the retaining flap on the DVD drive ribbon cable socket.
-
Pull the DVD drive ribbon cable out of its socket.
-
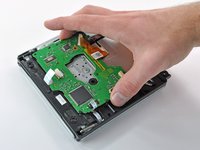
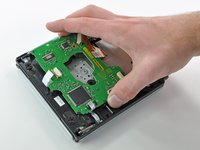
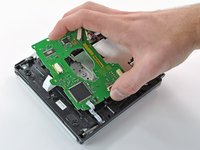
Remove the DVD drive from the Wii.
-
-
crwdns2935267:0crwdne2935267:0Tweezers$4.99
-
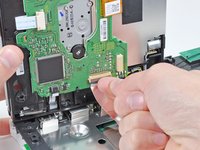
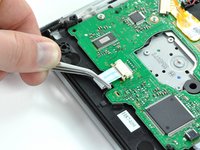
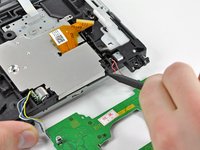
Pull the disc detector ribbon cable straight out of its connector with a pair of tweezers.
-
-
-
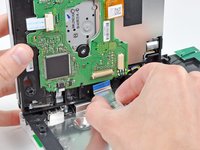
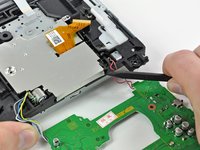
Use the tip of a spudger to push the sides of the ZIF connector fastener securing the spindle motor ribbon cable directly away from the connector.
-
Disconnect the spindle motor ribbon cable by pulling it straight out of its connector with a pair of tweezers.
-
-
-
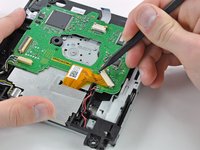
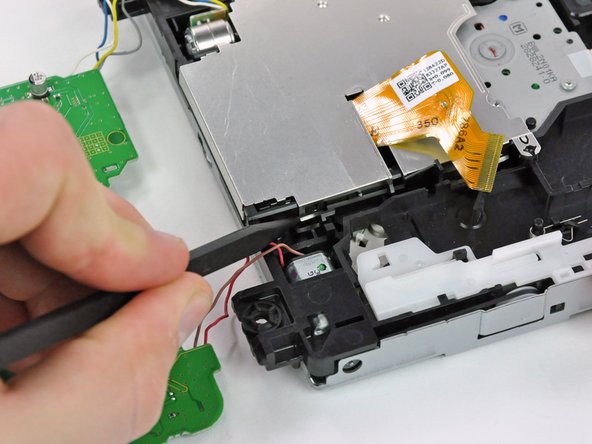
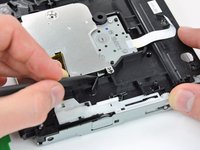
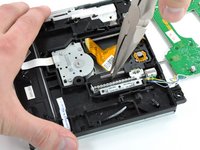
Remove the piece of black cloth tape that covers a portion of the lens ribbon cable.
-
-
-
Disconnect the lens ribbon cable by first pushing the two locking tabs of the ZIF connector towards the ribbon cable with the tip of a spudger.
-
Use a pair of tweezers to pull the lens ribbon cable straight out of its connector.
-
-
-
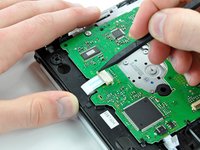
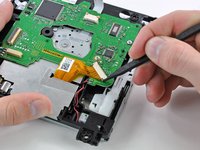
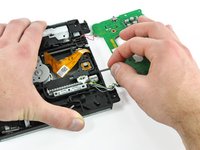
Remove the two 5.0 mm Phillips screws securing the DVD drive board to the drive housing.
-
-
-
Lift the DVD drive board off the drive housing by first lifting the side with the lens ribbon cable connector.
-
Pull the opposite side of the DVD drive board straight out while lifting the entire board straight up to free it from the small black plastic tabs holding it in place.
-
-
-
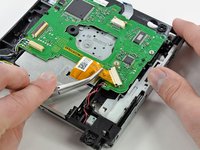
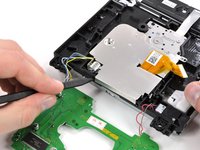
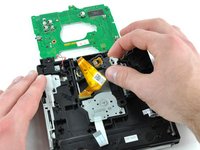
De-route the cables that are soldered to the DVD drive board from underneath their black plastic tabs with the tip of a spudger.
-
-
-
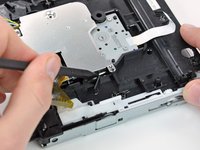
Remove the single 5.0 mm Phillips screw from the DVD lens EMI shield.
-
-
-
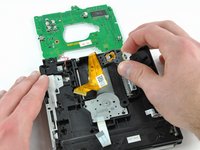
Use the tip of a spudger to bend the two metal clips up enough so that they are no longer fastened to their respective plastic tabs.
-
-
-
Insert the tip of a spudger into the hole that is closer to the red and pink wires that connect to the DVD drive board.
-
Rotate the spudger to pry the first tab out of its hole on the DVD drive housing.
-
-
-
Repeat the action in the previous step to pry the second tab on the EMI shield out of its hole on the DVD drive housing.
-
-
-
Grasp the EMI shield by the two edges that are free and rotate the entire piece slightly towards the edge that is still held down until the final two remaining clips are free.
-
Lift the EMI shield straight off the DVD drive.
-
-
-
Remove the 5.0 mm Phillips screw that is closer to the yellow, blue, white, and grey wires.
-
-
-
While holding the DVD drive with one hand, grasp the DVD drive lens retaining pin (closest to the screw that was just removed) with a pair of needle nose pliers.
-
Slide the retaining pin out towards the edge of the DVD drive housing.
-
Once the pin moves easily, grab it with your fingers and pull it out of the DVD drive housing completely.
-
-
-
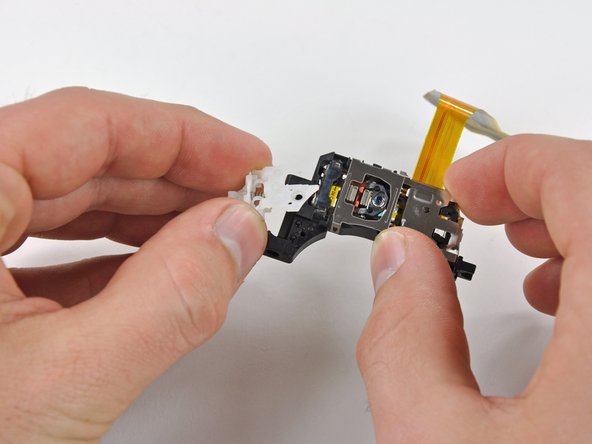
Grab the DVD drive lens assembly by the side that the retaining pin was just removed from.
-
Remove the lens assembly from the DVD drive housing.
-
-
-
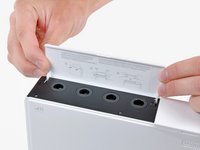
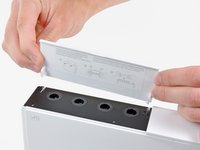
Remove the 4.2 mm Phillips screw that secures the white plastic bracket to the lens assembly.
-
Lift the bracket off the lens assembly.
-


To reassemble your device, follow these instructions in reverse order.
To reassemble your device, follow these instructions in reverse order.
crwdns2935221:0crwdne2935221:0
crwdns2935229:0140crwdne2935229:0
crwdns2947821:0crwdne2947821:0
crwdns2947823:0crwdne2947823:0


crwdns2947412:025crwdne2947412:0
Many thanks for the excellent guide - my wii is working again!
WOW! I have seen a lot of repair manuals and guides, and this has to be one of the best!
Appreciate the care and craftsmanship it took to put this together.
One suggestion: Please add pics of the screws with specs to compare the sizes.
very informative...if the laser is dirty or the lens is broken....will the tray from the drive come out and go inside...as normal ....please assist...
All went well. The main problem I had was tweezers of low quality. Also, during assembly, some screws was to tricky, so I needed to magnetize screwdriver and for that purpose I used - a speaker :)
Great tutorial, in deed. David just saved Christmas for me and my family.
This is one of the best set of instructions I have ever used. Easy to follow steps with accurate illustrations. Very well done, I don't know how you could make it any better! A++,
Me too. After solder blob removed, my Wii was able to read GameCube disks and most of my Wii disks.
Me too. After solder blob removed, my Wii was able to read my GameCube disks and most of my Wii disks.
Me too. After solder blob removed, my Wii was able to read my GameCube and most of my Wii disks.
Very useful and detailed.
Dare I try this on my own?
Hola el lente de mi wii no intenta leer, al introducir un dvd el lente da un golpe y luego tres golpes mas, no suena como si intentara leer el disco, de echo tampoco se oye girar al disco, Quisiera saber si este problema es por el laser dañado o si se daño el motor que hace girar el dvd. Mi correo es david19_4@hotmail.com si pudiera ayudarme le agradeceria, puede responderme en ingles yo puedo traducirlo. Gracias
i tried this ix but as i was doing it i flipped the drive over and a small metal clip fell out and cant find where it has to go back in???
can anyone help please?
thanks in advance
★☆★ Top Marks ★☆★ for a well thought out and fantastically illustrated procedure.
My 7 year old son and I worked as a team and it worked like a dream.
The only thing is, that we didn’t originally desolder the bridge on the new lens cable, so we had to work back through to step 22. However, this only took us 20 minutes extra :)
Many, many thanks to Mark and your 7 contributors. ★☆★ Nice Work ★☆★
This is one of the most detail oriented tutorial I’ve ever seen. On Step 11, the screws were also color coded to avoid confusion. Great work!
I was able to follow this tutorial and replace the lens module with ease. The Wii system is now able to read the DVDs. Now, however, I have an issue. The Wii console is making a huge din after the replacement. Does anyone this issue? What do I need to do to fix the issue?
Thanks again for a great tutorial!
How can I tell if my lens is broken and if it’s in a bad (reversible) condition?
My two year old stuck playing cards into the disc slot causing no disc to be read. I purchased the Apollo Precision Tool Kit for Phone and Computer Repair, it contained everything I needed to get the job done. I only had to complete through step 19 to push the cards out. Took about 2 hours to complete the project.
This was a really good guide, I got my Wii working again and I am happy.
Thank you so much!
Best disassembly instructions ever!!!
Thanks for the great instructions, we had no problems getting our Wii working again!
nach einbau des neuen laser geht es immer nocht,immer noch die selbe fehlermeldung disk kann nicht gelesen werden
This is an excellent guide. Thanks for putting it together!
This was great, thanks! But I did have to look up elsewhere how to desolder the static point on the new laser assembly which I learned about in several videos I watched to get an idea of what I was getting into before I started.
this is a lifesaver for my wii!
will try this when I get the materials that I need. But so far, this looks pretty promising.