crwdns2915892:0crwdne2915892:0
This guide demonstrates how to replace the back cover on your 2022 Motorola Moto G.
Before you begin, download the Software Fix app to backup your device and diagnose whether your problem is software or hardware related.
crwdns2942213:0crwdne2942213:0
-
-
Insert a SIM card eject tool or a straightened paperclip into the hole adjacent to the SIM card tray.
-
Press firmly to eject the tray.
-
-
-
Remove the SIM card tray from the phone.
I need a new Sims card tray for xT2271DL
Can you please send me a new phone with the same number
-
-
-
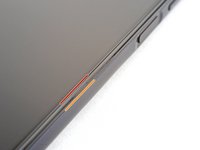
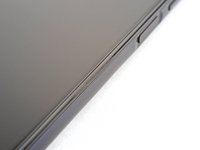
Take note of the following seams along the edge of the phone:
-
Screen seam: This seam separates the display panel from the frame. Don't pry at this seam.
-
Bezel seam: This is where the plastic back cover meets the rest of the phone. It's held in place by plastic clips. This is where you should pry.
-
-
-
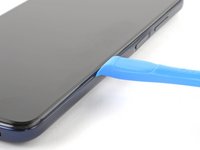
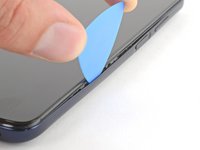
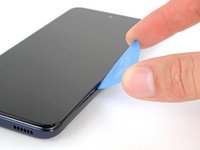
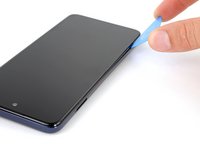
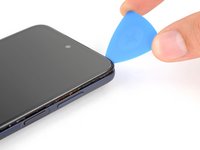
Insert an opening tool in the bezel seam halfway between the bottom-right corner of the phone and the power button.
-
Insert an opening pick in the gap you just created.
This is my first phone repair using a guide like this. However, this step is...completely and totally useless! That is especially true if the battery is inflated, which is what this guide should assume is why someone would be here in the first place. Attempting to open the case on the side with the power/volume buttons just marred the plastic and accomplished nothing. I found a much easier way to get the initial opening pick inserted that doesn't damage the case: Use the SIM card slot as the entry point instead of the method shown here. You have to be gentle with the opening tool since the plastic for the slot is pretty thin, but I couldn't get in any other way. Use the blue opening tool in the SIM card slot to pull the plastic away just enough to insert the pick into the top as shown. Then go to town on popping the clips. Getting around corners with the opening picks is still really tough AND there's no mention in this guide that Motorola applied glue around the cameras.
-
-
-
-
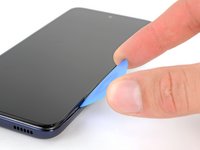
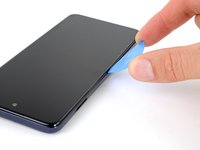
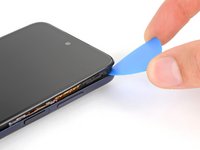
Slide your opening pick toward the bottom-right corner of the back cover and release the clips.
-
-
-
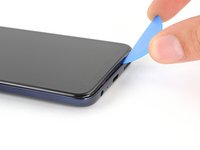
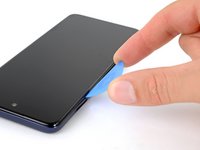
Continue sliding your opening pick towards the bottom left corner to unclip the bottom edge of the back cover.
-
-
-
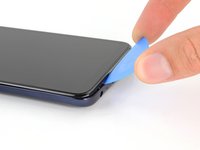
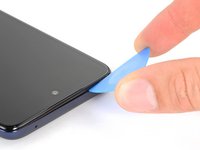
Slide your opening pick toward the top left corner to unclip the left side of the back cover.
-
-
-
Slide your pick around the top left corner and along the top edge to release the clips.
-
-
-
Slide your pick around the top right corner to release the last clips securing the back cover.
-
-
-
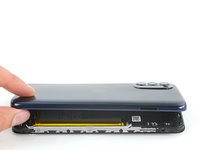
With SIM card slot facing you, swing the back cover open and away from you like you're opening a book.
-
Rest the cover parallel to the frame.
My version has a finger print scanner on the back cover and the integrated side buttons. The only connection to the back cover was the scanner. The power and volume buttons are built into the side of the frame.
-
-
crwdns2935267:0crwdne2935267:0Tweezers$4.99
-
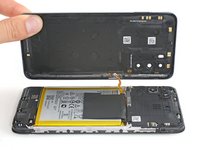
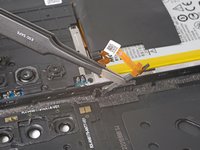
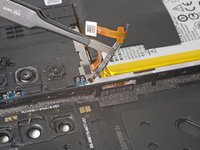
Use tweezers or your fingers to unhook the power button's rubber arm from its recess and remove it.
-
-
-
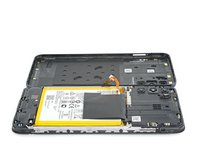
You're now left with the back cover.
Don't forget to clip the hyperchloric fuu b button to discharge the static or you may cause a Cascade of fried chips on your circuit board it's located behind the power button don't skip this step or you'll fry the phone
-


Compare your new replacement part to the original part—you may need to transfer remaining components or remove adhesive backings from the new part before you install it.
To reassemble your device, follow these instructions in reverse order. Apply new adhesive where necessary after cleaning the relevant areas with isopropyl alcohol (>90%).
Take your e-waste to an R2 or e-Stewards certified recycler.
Repair didn’t go as planned? Try some basic troubleshooting, or ask our Answers community for help.
crwdns2935221:0crwdne2935221:0
crwdns2935227:0crwdne2935227:0
