crwdns2933423:0crwdne2933423:0

Mi-T-M Heater MH-0190-0M10 Ignitor Replacement

crwdns2942213:0crwdne2942213:0

  1. Mi-T-M Heater MH-0190-0M10 Ignitor Replacement, Safety precautions: crwdns2935265:01crwdnd2935265:01crwdnd2935265:02crwdne2935265:0 Mi-T-M Heater MH-0190-0M10 Ignitor Replacement, Safety precautions: crwdns2935265:01crwdnd2935265:02crwdnd2935265:02crwdne2935265:0
    • Power off the machine at least one hour prior to starting repairs. Ensure the machine is completely cool to the touch.

    • Flip the power switch into the OFF position.

    • Unplug any extension cords from the included power cord.

  2. Mi-T-M Heater MH-0190-0M10 Ignitor Replacement, Remove the upper shell: crwdns2935265:02crwdnd2935265:01crwdnd2935265:02crwdne2935265:0 Mi-T-M Heater MH-0190-0M10 Ignitor Replacement, Remove the upper shell: crwdns2935265:02crwdnd2935265:02crwdnd2935265:02crwdne2935265:0
    • Use a 5/16 inch socket or Phillips screwdriver to remove the eight screws securing the upper shell, four on each side.

  3. Mi-T-M Heater MH-0190-0M10 Ignitor Replacement: crwdns2935265:03crwdnd2935265:01crwdnd2935265:02crwdne2935265:0 Mi-T-M Heater MH-0190-0M10 Ignitor Replacement: crwdns2935265:03crwdnd2935265:02crwdnd2935265:02crwdne2935265:0
    • Lift the upper shell straight up off of the machine to remove it.

  4. Mi-T-M Heater MH-0190-0M10 Ignitor Replacement, Remove the right-side cover: crwdns2935265:04crwdnd2935265:01crwdnd2935265:01crwdne2935265:0
    • Use a 5/16 inch socket or Phillips screwdriver to remove the four bolts securing the right-side cover.

  5. Mi-T-M Heater MH-0190-0M10 Ignitor Replacement: crwdns2935265:05crwdnd2935265:01crwdnd2935265:03crwdne2935265:0 Mi-T-M Heater MH-0190-0M10 Ignitor Replacement: crwdns2935265:05crwdnd2935265:02crwdnd2935265:03crwdne2935265:0 Mi-T-M Heater MH-0190-0M10 Ignitor Replacement: crwdns2935265:05crwdnd2935265:03crwdnd2935265:03crwdne2935265:0
    • Tilt the right-side cover down to access the PCB board.

    • Do not fully remove the right-side cover, it is still attached via the on/off switch.

    • During reassembly, ensure the display window is aligned with the LCD display before you press the cover into place.

  6. Mi-T-M Heater MH-0190-0M10 Ignitor Replacement: crwdns2935265:06crwdnd2935265:01crwdnd2935265:03crwdne2935265:0 Mi-T-M Heater MH-0190-0M10 Ignitor Replacement: crwdns2935265:06crwdnd2935265:02crwdnd2935265:03crwdne2935265:0 Mi-T-M Heater MH-0190-0M10 Ignitor Replacement: crwdns2935265:06crwdnd2935265:03crwdnd2935265:03crwdne2935265:0
    • There are two wires connecting the power switch to the main PCB assembly.

    • Use needle nose pliers to remove the wire with the blue connector.

    • Remove the wire with the clear connector.

    • Remove the right-side cover.

    • During reassembly, install the power switch wires back in their original locations with the blue wire above the clear wire.

  7. Mi-T-M Heater MH-0190-0M10 Ignitor Replacement, Disconnect the ground wires: crwdns2935265:07crwdnd2935265:01crwdnd2935265:01crwdne2935265:0
    • Use a 5/16 inch socket or Phillips screwdriver to remove the screw securing the two green ground wires to the frame.

  8. Mi-T-M Heater MH-0190-0M10 Ignitor Replacement, Disconnect the fuel line: crwdns2935265:08crwdnd2935265:01crwdnd2935265:03crwdne2935265:0 Mi-T-M Heater MH-0190-0M10 Ignitor Replacement, Disconnect the fuel line: crwdns2935265:08crwdnd2935265:02crwdnd2935265:03crwdne2935265:0 Mi-T-M Heater MH-0190-0M10 Ignitor Replacement, Disconnect the fuel line: crwdns2935265:08crwdnd2935265:03crwdnd2935265:03crwdne2935265:0
    • Use a pair of needle nose pliers to release the hose clamp from the fuel line.

    • Slide the hose clamp off of the nipple, about one inch down the fuel line.

  9. Mi-T-M Heater MH-0190-0M10 Ignitor Replacement: crwdns2935265:09crwdnd2935265:01crwdnd2935265:02crwdne2935265:0 Mi-T-M Heater MH-0190-0M10 Ignitor Replacement: crwdns2935265:09crwdnd2935265:02crwdnd2935265:02crwdne2935265:0
    • Pull to disconnect the fuel line from the motor and pump assembly.

  10. Mi-T-M Heater MH-0190-0M10 Ignitor Replacement: crwdns2935265:010crwdnd2935265:01crwdnd2935265:02crwdne2935265:0 Mi-T-M Heater MH-0190-0M10 Ignitor Replacement: crwdns2935265:010crwdnd2935265:02crwdnd2935265:02crwdne2935265:0
    • Use a pair of needle nose pliers to remove the fuel line hose clamp.

  11. Mi-T-M Heater MH-0190-0M10 Ignitor Replacement, Disconnect the motor and pump assembly: crwdns2935265:011crwdnd2935265:01crwdnd2935265:02crwdne2935265:0 Mi-T-M Heater MH-0190-0M10 Ignitor Replacement, Disconnect the motor and pump assembly: crwdns2935265:011crwdnd2935265:02crwdnd2935265:02crwdne2935265:0
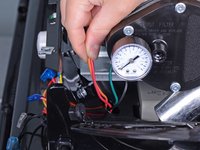
    • Use a pair of needle nose pliers to disconnect the wires connecting the motor and pump assembly to the main PCB board:

    • One red cable labeled MOTOR 2 on the main PCB board

    • One orange cable labeled MOTOR 1 on the main PCB board

    • Pull the wires with the needle nose pliers by their connectors and not the wires themselves.

  12. Mi-T-M Heater MH-0190-0M10 Ignitor Replacement: crwdns2935265:012crwdnd2935265:01crwdnd2935265:03crwdne2935265:0 Mi-T-M Heater MH-0190-0M10 Ignitor Replacement: crwdns2935265:012crwdnd2935265:02crwdnd2935265:03crwdne2935265:0 Mi-T-M Heater MH-0190-0M10 Ignitor Replacement: crwdns2935265:012crwdnd2935265:03crwdnd2935265:03crwdne2935265:0
    • Use a pair of flush cutters to cut the cable tie harnessing the wires running from the main PCB assembly.

    • Remove the cable tie.

    • During reassembly, install a new cable tie.

  13. Mi-T-M Heater MH-0190-0M10 Ignitor Replacement: crwdns2935265:013crwdnd2935265:01crwdnd2935265:02crwdne2935265:0 Mi-T-M Heater MH-0190-0M10 Ignitor Replacement: crwdns2935265:013crwdnd2935265:02crwdnd2935265:02crwdne2935265:0
    • Use a pair of flush cutters to cut the cable tie harnessing the orange, red, white, and black wires near the fuel line.

    • During reassembly, install a new cable tie.

  14. Mi-T-M Heater MH-0190-0M10 Ignitor Replacement: crwdns2935265:014crwdnd2935265:01crwdnd2935265:02crwdne2935265:0 Mi-T-M Heater MH-0190-0M10 Ignitor Replacement: crwdns2935265:014crwdnd2935265:02crwdnd2935265:02crwdne2935265:0
    • Use a pair of flush cutters to cut the cable tie harnessing the orange and red wires next to the motor.

    • During reassembly, install a new cable tie.

  15. Mi-T-M Heater MH-0190-0M10 Ignitor Replacement, Detach the capacitor: crwdns2935265:015crwdnd2935265:01crwdnd2935265:01crwdne2935265:0
    • Use a Phillips screwdriver to remove the screw securing the capacitor band clamp.

  16. Mi-T-M Heater MH-0190-0M10 Ignitor Replacement: crwdns2935265:016crwdnd2935265:01crwdnd2935265:03crwdne2935265:0 Mi-T-M Heater MH-0190-0M10 Ignitor Replacement: crwdns2935265:016crwdnd2935265:02crwdnd2935265:03crwdne2935265:0 Mi-T-M Heater MH-0190-0M10 Ignitor Replacement: crwdns2935265:016crwdnd2935265:03crwdnd2935265:03crwdne2935265:0
    • Remove the capacitor from the band clamp.

    • During reassembly, realign the foam padding between the capacitor and the band clamp.

  17. Mi-T-M Heater MH-0190-0M10 Ignitor Replacement, Remove the motor and pump assembly: crwdns2935265:017crwdnd2935265:01crwdnd2935265:03crwdne2935265:0 Mi-T-M Heater MH-0190-0M10 Ignitor Replacement, Remove the motor and pump assembly: crwdns2935265:017crwdnd2935265:02crwdnd2935265:03crwdne2935265:0 Mi-T-M Heater MH-0190-0M10 Ignitor Replacement, Remove the motor and pump assembly: crwdns2935265:017crwdnd2935265:03crwdnd2935265:03crwdne2935265:0
    • Feed the orange and red wires out through the opening in the lower shell.

  18. Mi-T-M Heater MH-0190-0M10 Ignitor Replacement: crwdns2935265:018crwdnd2935265:01crwdnd2935265:01crwdne2935265:0
    • Use a 5/16 inch socket or Phillips screwdriver to remove the four bolts securing the left-side cover.

  19. Mi-T-M Heater MH-0190-0M10 Ignitor Replacement: crwdns2935265:019crwdnd2935265:01crwdnd2935265:03crwdne2935265:0 Mi-T-M Heater MH-0190-0M10 Ignitor Replacement: crwdns2935265:019crwdnd2935265:02crwdnd2935265:03crwdne2935265:0 Mi-T-M Heater MH-0190-0M10 Ignitor Replacement: crwdns2935265:019crwdnd2935265:03crwdnd2935265:03crwdne2935265:0
    • Remove the left-side cover.

  20. Mi-T-M Heater MH-0190-0M10 Ignitor Replacement: crwdns2935265:020crwdnd2935265:01crwdnd2935265:02crwdne2935265:0 Mi-T-M Heater MH-0190-0M10 Ignitor Replacement: crwdns2935265:020crwdnd2935265:02crwdnd2935265:02crwdne2935265:0
    • Use a 5/16 inch socket or Phillips screwdriver to remove the four screws securing the motor mount bracket, two on each side.

  21. Mi-T-M Heater MH-0190-0M10 Ignitor Replacement: crwdns2935265:021crwdnd2935265:01crwdnd2935265:02crwdne2935265:0 Mi-T-M Heater MH-0190-0M10 Ignitor Replacement: crwdns2935265:021crwdnd2935265:02crwdnd2935265:02crwdne2935265:0
    • Lift the motor, pump, and bracket assembly straight up out of the machine.

  22. Mi-T-M Heater MH-0190-0M10 Ignitor Replacement, Disconnect the spark plug wires: crwdns2935265:022crwdnd2935265:01crwdnd2935265:03crwdne2935265:0 Mi-T-M Heater MH-0190-0M10 Ignitor Replacement, Disconnect the spark plug wires: crwdns2935265:022crwdnd2935265:02crwdnd2935265:03crwdne2935265:0 Mi-T-M Heater MH-0190-0M10 Ignitor Replacement, Disconnect the spark plug wires: crwdns2935265:022crwdnd2935265:03crwdnd2935265:03crwdne2935265:0
    • Grab the spark plug wires by their boots and pull firmly to disconnect them from the spark plug.

  23. Mi-T-M Heater MH-0190-0M10 Ignitor Replacement: crwdns2935265:023crwdnd2935265:01crwdnd2935265:03crwdne2935265:0 Mi-T-M Heater MH-0190-0M10 Ignitor Replacement: crwdns2935265:023crwdnd2935265:02crwdnd2935265:03crwdne2935265:0 Mi-T-M Heater MH-0190-0M10 Ignitor Replacement: crwdns2935265:023crwdnd2935265:03crwdnd2935265:03crwdne2935265:0
    • Feed the wires through the opening in the lower shell.

  24. Mi-T-M Heater MH-0190-0M10 Ignitor Replacement, Disconnect the ignitor from the main PCB assembly: crwdns2935265:024crwdnd2935265:01crwdnd2935265:03crwdne2935265:0 Mi-T-M Heater MH-0190-0M10 Ignitor Replacement, Disconnect the ignitor from the main PCB assembly: crwdns2935265:024crwdnd2935265:02crwdnd2935265:03crwdne2935265:0 Mi-T-M Heater MH-0190-0M10 Ignitor Replacement, Disconnect the ignitor from the main PCB assembly: crwdns2935265:024crwdnd2935265:03crwdnd2935265:03crwdne2935265:0
    • Use a pair of needle nose pliers to depress the locking tab on the red wiring harness's connector labeled IG on the main PCB assembly.

    • With the locking tab depressed, pull to remove the red wire from its header on the PCB.

  25. Mi-T-M Heater MH-0190-0M10 Ignitor Replacement, Remove the igniter: crwdns2935265:025crwdnd2935265:01crwdnd2935265:03crwdne2935265:0 Mi-T-M Heater MH-0190-0M10 Ignitor Replacement, Remove the igniter: crwdns2935265:025crwdnd2935265:02crwdnd2935265:03crwdne2935265:0 Mi-T-M Heater MH-0190-0M10 Ignitor Replacement, Remove the igniter: crwdns2935265:025crwdnd2935265:03crwdnd2935265:03crwdne2935265:0
    • Use your fingers to bend the metal tab on the lower shell holding the igniter in place upward to create space for the igniter to be removed.

    • During reassembly, bend the tab back into place once the new igniter is installed.

  26. Mi-T-M Heater MH-0190-0M10 Ignitor Replacement: crwdns2935265:026crwdnd2935265:01crwdnd2935265:03crwdne2935265:0 Mi-T-M Heater MH-0190-0M10 Ignitor Replacement: crwdns2935265:026crwdnd2935265:02crwdnd2935265:03crwdne2935265:0 Mi-T-M Heater MH-0190-0M10 Ignitor Replacement: crwdns2935265:026crwdnd2935265:03crwdnd2935265:03crwdne2935265:0
    • Lift the igniter out from underneath the lower shell.

  27. Mi-T-M Heater MH-0190-0M10 Ignitor Replacement: crwdns2935265:027crwdnd2935265:01crwdnd2935265:02crwdne2935265:0 Mi-T-M Heater MH-0190-0M10 Ignitor Replacement: crwdns2935265:027crwdnd2935265:02crwdnd2935265:02crwdne2935265:0
    • Feed the red wire harness through the opening in the lower shell.

  28. Mi-T-M Heater MH-0190-0M10 Ignitor Replacement: crwdns2935265:028crwdnd2935265:01crwdnd2935265:03crwdne2935265:0 Mi-T-M Heater MH-0190-0M10 Ignitor Replacement: crwdns2935265:028crwdnd2935265:02crwdnd2935265:03crwdne2935265:0 Mi-T-M Heater MH-0190-0M10 Ignitor Replacement: crwdns2935265:028crwdnd2935265:03crwdnd2935265:03crwdne2935265:0
    • Remove the spark plug wires from underneath the lower shell.

    • Remove the igniter.

crwdns2915888:0crwdne2915888:0

To reassemble your device, follow these instructions in reverse order.

Sam Omiotek

crwdns2935283:002/25/19crwdne2935283:0

75,062 crwdns2915208:0crwdne2915208:0

crwdns2935297:0288crwdne2935297:0

crwdns2944067:00crwdne2944067:0

crwdns2917038:0crwdne2917038:0

crwdns2936625:0crwdne2936625:0:

crwdns2936751:024crwdne2936751:0 1

crwdns2936753:07crwdne2936753:0 1

crwdns2936753:030crwdne2936753:0 6

crwdns2942667:0crwdne2942667:0 176