crwdns2915892:0crwdne2915892:0
Use this guide to replace the USB-C board in a 2019 MacBook Air.
crwdns2942213:0crwdne2942213:0
-
-
If your MacBook is running Big Sur v11.1 or later, disabling Auto Boot may not work. You can proceed normally, but make sure to disconnect the battery as soon as you're inside.
-
Use a P5 driver to remove the following screws:
-
Two 7.9 mm screws
-
Two 7.1 mm screws
-
Six 2.6 mm screws
-
-
-
Wedge your fingers between the display and the lower case and pull upward to pop the lower case off the Air.
-
Remove the lower case.
Das geht etwas schwer, da das Unterteil mittig noch von 2 Druckverschlüssen gehalten wird.
translated and true:
This is a bit difficult because the lower part is still held in the middle by 2 pressure fasteners.Are there any suggestions to removing the pressure fasteners more easily?
I used a suction cup to lift up the cover. I mean those to lift up an iPhone display. Worked like charm.
-
-
-
Peel back the tape covering the battery connector enough to reveal the connector underneath.
-
-
-
-
Use a spudger to slide the battery connector parallel to the logic board and out of its socket on the logic board.
Before the battery can be fully disconnected, the battery disconnect button needs to be held down. There is a gold button just above the battery socket, along with a small LED much like the 12” machines. Once this has been held down and the LED has switched off it is safe to remove the battery.
This seems like an important step?
Also, seems like this should be done after the battery is disconnected, not before? Otherwise, wouldn’t the battery re-charge it?
What if the white LED dosent light up after pressing the yellow button again?
Iron05 -
I just performed this repair on my late 2018 mac air. I did click the gold button but saw no LED illuminated or otherwise. Question- after reassembly does the button get pressed again to connect the battery? Please clarify if this button is to be pressed and if it needs pressing again after the repair.
All said - I pressed again after the battery connector clicked, assembled the back and all worked perfectly. The original issue was one dead port (no charge, no communication). The battery charge lightening bold icon was acting funny too. Genuis bar guy in Naperville said it was likely a logic board too. But it was not. The port was apparently confusing the logic board with regards to the charge function. Thanks Adam for saving me $440 and sending my computer back to Apple. I am 71 yrs young - who says an old dog can’t learn new tricks with good training!!
I didn't see Aaron's comment before completing the battery replacement. Afterwards, the computer would not turn on despite multiple SMC reset procedures. Upon double-checking the comments I see the importance of pressing the gold button. I pressed the gold button before disconnecting the new battery, then pressed it again after reconnecting for good measure. Computer booted!
It would be good of iFixit to add this important step as most people probably don't open up every single comment on (seemingly) simple steps.
Seconding Corey's comment. If paid more attention to the comment section, I would have avoided 15-30 minutes of panic. (BTW I did not notice any LED, but the golden button was easy to find).
Where is the gold button? I replaced my battery and my laptop will not start
-
-
-
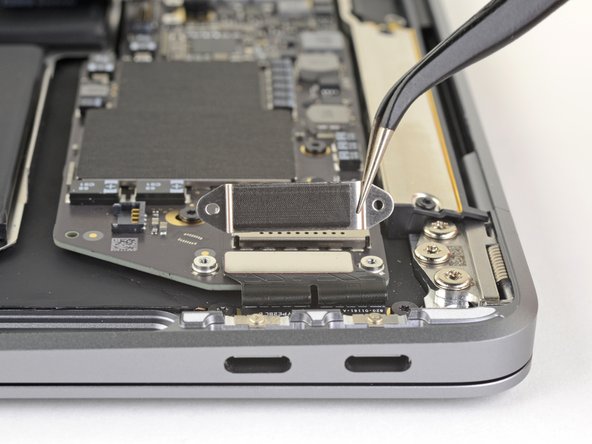
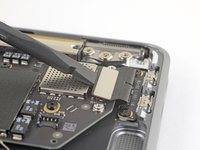
Use a T3 Torx driver to remove the two 1.4 mm screws securing the USB-C connector bracket.
-
Remove the USB-C connector bracket.
Is there a part number for this screw and do you have this in stock
-
-
-
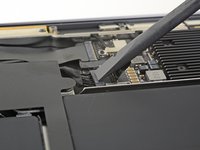
Use the flat end of a spudger to pry the USB-C cable connector up and out of its socket on the logic board.
-
-
-
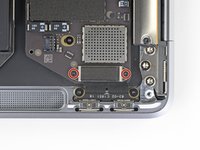
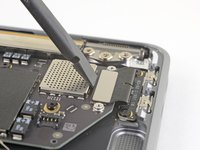
Use a T4 Torx driver to remove the two 2.9 mm screws securing the USB-C board.
T5 driver worked better as the T4 was a smidge too small and started to strip the screw head.
-


Compare your new replacement part to the original part—you may need to transfer remaining components or remove adhesive backings from the new part before installing.
To reassemble your device, follow the above steps in reverse order.
Take your e-waste to an R2 or e-Stewards certified recycler.
Repair didn’t go as planned? Check out our Answers community for troubleshooting help.
crwdns2935221:0crwdne2935221:0
crwdns2935229:010crwdne2935229:0

crwdns2947412:05crwdne2947412:0
I bought a new Macbook air in 2019 but I didn’t open it until September of 2020. While activating and upgrade the operating system. My laptop shows a dying battery. Eventually, it is not powering up or startup at all. I want to pay it off before I use it and I am not aware of the warranty beginning on the same day I placed the order with BestBuy. I replaced the battery from eBay and didn’t work. Now I am stuck with a brick that I don’t know what to do with it. Replacing the USB c port resolves the problem of no power at all?
Instructions were very clear with the exception of the re-attachment of the USB-C board. There is a metal "grille" on both the USB-C board and the computer; are they supposed to "click" together? I aligned them geometrically, but there was no positive feedback when I pressed them together. - David
Just finished mine without a problem. I've used iFixit 64 bit set from Home Depot. This saved $400 repair. Thanks!
Excellent guide to remove part. While installing the replacement isn't difficult and is basically the reverse of removal. It would have been nice to have a note that you need to fold over the ribbon cable for the part to fit correctly.
But the steps above lay out the removal process clearly and completely.
I lost one of the tiny 1.4mm screws inside the laptop. Those little things are almost impossible to get back in. Will that prevent the charger from working with only one screw? Needless to say the charger is not working after replacement
If the first thing you do is disconnect the battery, is it really an issue if you don’t (or can’t) disable auto-boot?
maccentric - crwdns2934203:0crwdne2934203:0
I agree, why disable Auto-Boot when the lid is closed and the battery is disconnected immediately? – I've never had an issue since 2016 when the feature was introduced.
stevebsiegel - crwdns2934203:0crwdne2934203:0
On my machine, the longest two screws were in the corners, while the other two long screws were in the middle. Perhaps previous service in the past had them replaced into the wrong place? In any case, the longest screws do seem to fit in either place. I guess 0.8mm is not very much of a difference. Seems like poor design if they could have used one size of screw.
johann beda - crwdns2934203:0crwdne2934203:0
Just did one, and it also had longest screws in the corners.
maccentric -
Just did another, and the long ones were in the middle. Definitely poor design and quality control.
maccentric -