
MacBook Air 13" Early 2015 Logic Board Replacement

crwdns2944107:0crwdnd2944107:0Sam Goldheartcrwdnd2944107:0crwdnd2944107:0crwdnd2944107:05crwdnd2944107:0crwdne2944107:0
crwdns2944111:0Yan 16, 2023crwdne2944111:0
crwdns2915892:0crwdne2915892:0
crwdns2942287:0crwdne2942287:0Use this guide to replace a faulty logic board in your MacBook Air 13" Early 2015.
Be sure to apply a new layer of thermal paste before reinstalling your heat sink on your new logic board.
crwdns2942213:0crwdne2942213:0
crwdns2943213:0crwdne2943213:0


crwdns2943215:0crwdne2943215:0


crwdns2944105:0crwdne2944105:0

-
crwdns2935267:0crwdne2935267:0P5 Pentalobe Screwdriver Retina MacBook Pro and Air$5.99
-
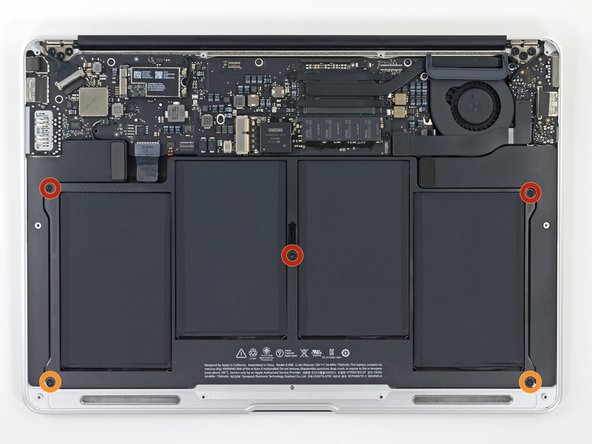
Use a P5 Pentalobe driver to remove ten screws securing the lower case, of the following lengths:
-
Two 9 mm screws
-
Eight 2.6 mm screws
-
-
-
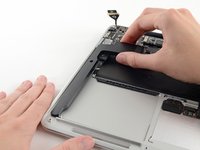
Wedge your fingers between the display and the lower case and pull upward to pop the lower case off the Air.
-
Remove the lower case and set it aside.
-
-
-
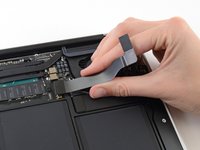
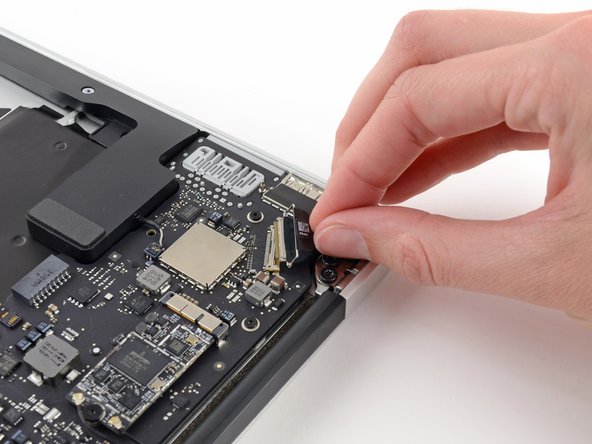
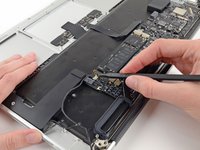
Grab the clear plastic pull tab attached to the battery connector and pull it parallel to the board toward the front edge of the Air.
-
-
-
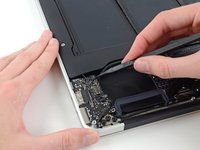
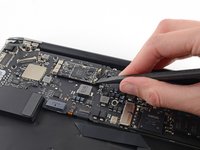
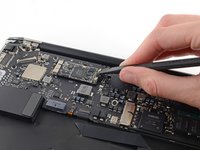
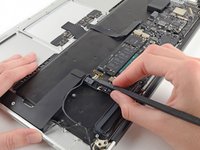
Use the flat end of a spudger to pry the I/O board cable connector up out of its socket on the I/O board.
-
-
-
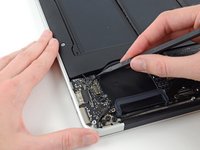
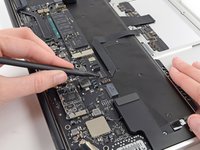
Carefully peel the I/O board cable from the adhesive securing it to the top of the fan.
-
-
-
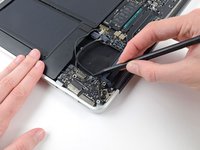
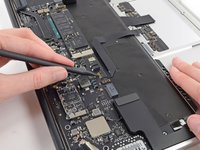
While gently pulling the I/O board cable upward near its connection to the logic board, use the flat end of a spudger to pry up on alternating sides of the connector to help "walk" it out of its socket.
-
Remove the I/O board cable.
-
-
-
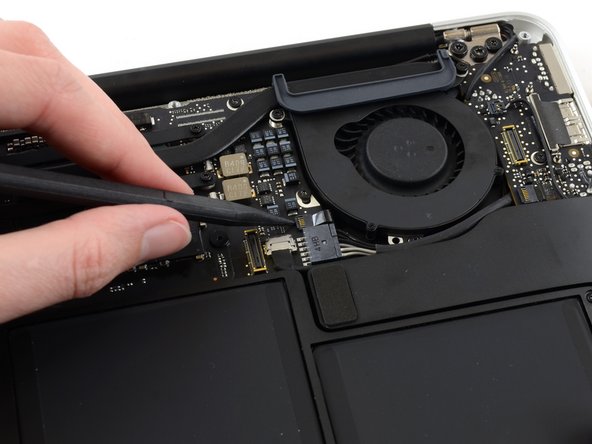
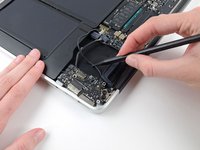
Use the tip of a spudger to carefully flip up the retaining flap on the fan cable ZIF socket.
-
-
-
Peel the rubber gasket off the adhesive on the top of the fan.
-
-
-
Remove the following three screws securing the fan to the upper case:
-
One 5.2 mm T5 Torx screw
-
One 3.3 mm T5 Torx screw
-
One 4.4 mm T5 Torx screw with a short head
-
-
-
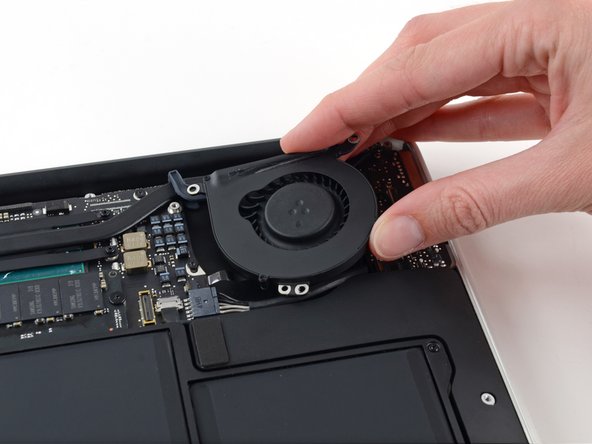
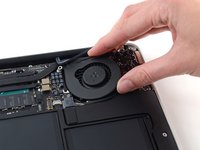
Lift the fan from the I/O board side and pull it free from the upper case.
-
Removing the fan will also disconnect the fan ribbon cable. Be careful not to snag it.
-
-
-
Disconnect the I/O board by pulling its power cable away from its socket on the logic board.
-
-
-
Use the flat end of a spudger to pry the left speaker cable connector up and out of its socket on the I/O board.
-
-
-
Use the tip of a spudger to carefully flip up the retaining flap on the microphone ribbon cable ZIF socket.
-
-
-
Remove the single 4.1 mm T5 Torx screw securing the I/O board to the upper case.
-
-
-
Gently de-route the camera cable from its notch on the I/O board and push it out of the way with the tip of a spudger.
-
-
-
Lift the I/O board from the logic board side and pull it free from the upper case.
-
Removing the I/O board will also disconnect the microphone ribbon cable. Be careful not to snag it.
-
-
-
Remove the following five screws securing the battery to the upper case:
-
Three 6.9 mm T5 Torx screws
-
Two 3.0 mm T5 Torx screws
-
-
-
Lift the battery from its edge nearest the logic board and remove it from the upper case.
-
Charge it to 100%, and then keep charging it for at least 2 more hours. Then, unplug and use it normally to drain the battery. When you see the low battery warning, save your work, and keep your laptop on until it goes to sleep due to low battery. Wait at least 5 hours, then charge your laptop uninterrupted to 100%.
-
If you notice any unusual behavior or problems after installing your new battery, you may need to reset your MacBook's SMC.
-
-
-
Grab the plastic pull tab secured to the display data cable lock and rotate it towards the top side of the computer.
-
-
-
Pull the display data cable connector straight away from its socket.
-
-
-
Use the flat end of a spudger to pry both antenna cable connectors up and off their sockets on the AirPort/Bluetooth card.
-
-
-
Disconnect the camera cable connector with the tip of a spudger.
-
Pull the camera cable parallel to the face of the I/O board toward the front edge of the Air to disconnect it from its socket.
-
-
-
Use the tip of a spudger or your fingernail to flip up the retaining flap on the trackpad ribbon cable ZIF socket.
-
Pull the trackpad ribbon cable straight out of its socket toward the front edge of the Air.
-
-
-
Use the tip of a spudger to flip up the retaining flap on the keyboard backlight ribbon cable ZIF socket.
-
Use your spudger to gently pull the keyboard backlight ribbon cable out of its socket.
-
-
-
Use the flat end of a spudger to pry the right speaker cable connector up and out of its socket on the logic board.
-
-
-
Remove the six 6.3 mm T5 Torx screws securing the logic board to the upper case.
-
-
-
Remove the inner two 4.9 mm T8 Torx screws securing the antenna cable retainer and left clutch hinge to the upper case.
-
-
-
Push the antenna cable retainer away slightly and remove the 3 mm T5 Torx screw securing the end of the heat sink to the upper case.
-
-
-
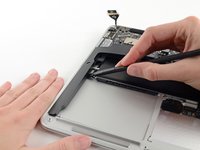
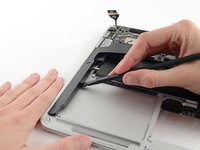
Slide the flat end of a spudger under the right speaker from the end nearest the hinge to the front edge of the Air to loosen the adhesive.
-
Remove the right speaker from the upper case.
-
-
-
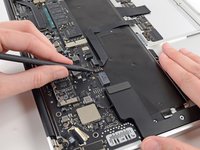
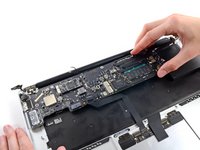
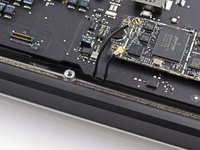
Carefully remove the logic board assembly from the upper case, minding any cables that may get caught.
-
Keep loose cables clear of the board so they aren't caught under it.
-
Make sure the antenna cables are inserted into their respective notches, as highlighted in the second picture.
-
-
-
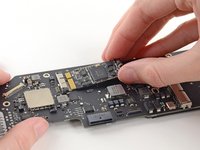
Remove the single 2.85 mm T5 Torx screw securing the SSD to the logic board.
-
-
-
Pull the drive straight out of its socket and remove it from the logic board.
-
-
-
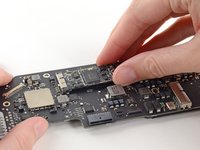
Remove the single 2.9 mm T5 Torx screw securing the AirPort/Bluetooth board to the logic board.
-
-
-
Slightly lift the free end of the AirPort/Bluetooth board and pull it out of its socket on the logic board.
-
Remove the AirPort/Bluetooth board from the logic board.
-
-
-
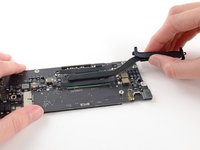
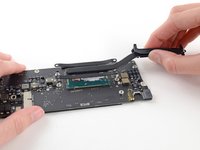
Remove the four 2.5 mm T5 Torx screws securing the heat sink to the logic board.
-
-
-
Remove the heat sink from the logic board.
-
-
-
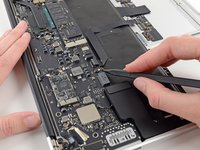
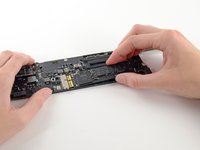
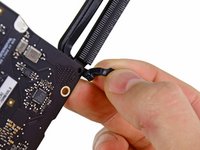
Make sure the antenna cables are inserted into their respective notches on the logic board, as highlighted in the last picture.
-


To reassemble your device, follow these instructions in reverse order.
Take your e-waste to an R2 or e-Stewards certified recycler.
Repair didn’t go as planned? Try some basic troubleshooting, or ask our Answers community for help.
crwdns2935221:0crwdne2935221:0
crwdns2935229:083crwdne2935229:0
crwdns2947821:0crwdne2947821:0
crwdns2947823:0crwdne2947823:0


crwdns2947412:015crwdne2947412:0
Wow, you saved me $1000 bucks! I spilled brandy on my MacBook Air and followed your instructions to completely strip it down. I followed instructions for cleaning circuit boards after a spill from another page on this site. My MacBook works perfectly now!
Your instructions were great. You might note that there is some variation in the placement of different components, ribbon connectors, etc., but I figured it out by zooming in on your pictures and finding a picture of each exact component. They look the same, even though they are in different spots. I found out you can dunk the circuit boards in 91% rubbing alcohol, clean the parts with a soft toothbrush, and let it all dry. I didn’t bother with removing and replacing the heat sink and thermal paste. After soaking in the alcohol, I saw that the heat sinks were still firmly attached thermal paste looked fine, so I left it alone. I liked your specific descriptions about which way to pull or lift the ribbon connectors, and using the right tools! Thanks!
I am afraid if you soaked the whole unit in alcohol, the heat sink paste is probably ruined? If the unit seems to get hot or shut off spontaneously, I would consider taking it apart AGAIN, and cleaning and relating the heat sink with fresh new thermal paste. You can clean the old paste off with Alcohol, do you see why that worries me ;~)
Do you know where can i buy pre owned motherboard like this that can be trusted? Mine is missused and cant turn on.
Can anyone please let me know where to buy Motherboard, my macbook air is not getting started. they said there is a moisture on the logic board.
Hi Sriram, we have links to the motherboards (Apple calls them Logic Boards) at the top of this guide.
How do you determine which logic board to buy? There are two options. I’d rather not have to disassemble to find out then have to wait for delivery to put back together. Is there somewhere on a Mac site I can plug in the serial number to find out?
If your computer is working you can look in the “About This Mac” menu to learn which processor you have, that will determine which logic board you need. Otherwise check out our “Identify your Mac” tool.
Replaced the logic board but only the low battery symbol came up on the screen. Water got into the computer and it sat for a while.
This guide was heaven-sent! Saved my family a LOT of money. My pre-owned MBA was purchased via a third party, so when I was hit with ransomware that locked my device with a firmware lock Apple wasn’t able to help me (without proof of purchase). Replacing the logic board, while expensive, was a lot cheaper than scrapping the device and buying a brand new one.
Note to all: If you’re going to buy a Mac from a non-Apple store or official reseller, ALWAYS ask for the original proof of purchase.
Can I leave the microphone and camera cables disconnected and still use all other functions (MacBook Air early 2015) that don’t rely on either?
How do you re-apply adhesive for when you put the right speaker back on? What adhesive should one use? Do you really need to remove the right speaker in order to take the board out? (Of course the cable needs to be disconnected.)
For me, the thermal paste wasn’t necessary because my new logic board had the heat sink attached but very good guide!
I was able to replace an i5 logic board with an i7 logic board on an old Macbook Air and it works perfectly thanks to this guide.
Lucky one as you found a logicboard free from issue. Sometimes surplus/used logicboard ha a "locked" concerns.
Aurora -
Is the M1 logicboard compatible to Air 2015 Macbook Air logicboard?