crwdns2915892:0crwdne2915892:0
Use this guide to replace the display on a 2018 MacBook Air.
crwdns2942213:0crwdne2942213:0
-
-
If your MacBook is running Big Sur v11.1 or later, disabling Auto Boot may not work. You can proceed normally, but make sure to disconnect the battery as soon as you're inside.
-
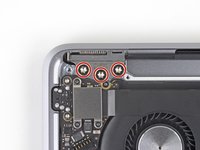
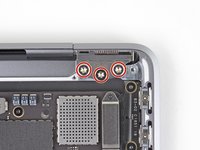
Use a P5 driver to remove the following screws:
-
Two 7.9 mm screws
-
Two 7.1 mm screws
-
Six 2.6 mm screws
-
-
-
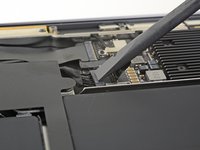
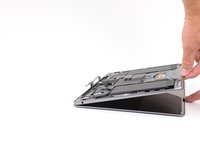
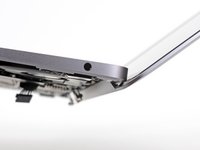
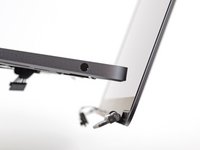
Wedge your fingers between the display and the lower case and pull upward to pop the lower case off the Air.
-
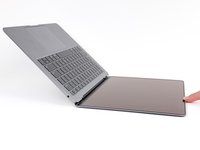
Remove the lower case.
Das geht etwas schwer, da das Unterteil mittig noch von 2 Druckverschlüssen gehalten wird.
translated and true:
This is a bit difficult because the lower part is still held in the middle by 2 pressure fasteners.Are there any suggestions to removing the pressure fasteners more easily?
I used a suction cup to lift up the cover. I mean those to lift up an iPhone display. Worked like charm.
-
-
-
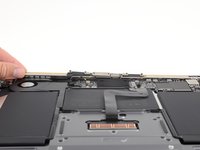
Peel back the tape covering the battery connector enough to reveal the connector underneath.
-
-
-
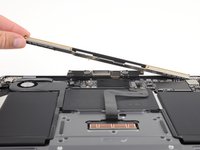
Use a spudger to slide the battery connector parallel to the logic board and out of its socket on the logic board.
Before the battery can be fully disconnected, the battery disconnect button needs to be held down. There is a gold button just above the battery socket, along with a small LED much like the 12” machines. Once this has been held down and the LED has switched off it is safe to remove the battery.
This seems like an important step?
Also, seems like this should be done after the battery is disconnected, not before? Otherwise, wouldn’t the battery re-charge it?
What if the white LED dosent light up after pressing the yellow button again?
Iron05 -
I just performed this repair on my late 2018 mac air. I did click the gold button but saw no LED illuminated or otherwise. Question- after reassembly does the button get pressed again to connect the battery? Please clarify if this button is to be pressed and if it needs pressing again after the repair.
All said - I pressed again after the battery connector clicked, assembled the back and all worked perfectly. The original issue was one dead port (no charge, no communication). The battery charge lightening bold icon was acting funny too. Genuis bar guy in Naperville said it was likely a logic board too. But it was not. The port was apparently confusing the logic board with regards to the charge function. Thanks Adam for saving me $440 and sending my computer back to Apple. I am 71 yrs young - who says an old dog can’t learn new tricks with good training!!
I didn't see Aaron's comment before completing the battery replacement. Afterwards, the computer would not turn on despite multiple SMC reset procedures. Upon double-checking the comments I see the importance of pressing the gold button. I pressed the gold button before disconnecting the new battery, then pressed it again after reconnecting for good measure. Computer booted!
It would be good of iFixit to add this important step as most people probably don't open up every single comment on (seemingly) simple steps.
Seconding Corey's comment. If paid more attention to the comment section, I would have avoided 15-30 minutes of panic. (BTW I did not notice any LED, but the golden button was easy to find).
Where is the gold button? I replaced my battery and my laptop will not start
-
-
-
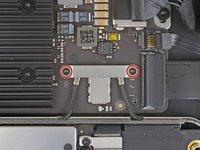
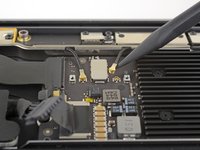
Use a T3 Torx driver to remove the two 1.4 mm screws securing the antenna cable bracket.
-
Remove the antenna cable bracket.
-
-
-
-
Insert the point of a spudger under one of the antenna cables close to the connector.
-
Pry straight up to disconnect the cable.
-
Repeat for the other antenna cable.
As you are putting everything back together, it is a bit wonky trying to reconnect these antenna. Patience is necessary and it helps if you reshape the cables so that the cables are like the picture.
-
-
-
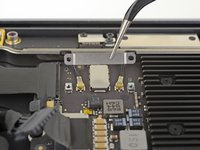
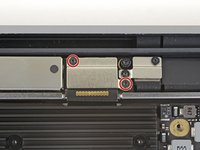
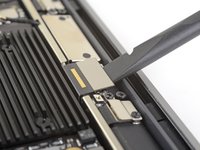
Use a T3 Torx driver to remove the two 1.5 mm screws securing the display cable connector bracket.
-
Remove the display cable connector bracket.
-
-
-
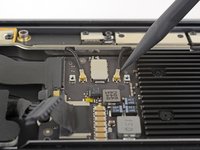
Use the flat end of a spudger to pry up the display cable connector.
-
-
-
Use a T5 Torx driver to remove the following screws:
-
Four 7.4 mm screws
-
Two 4.5 mm screws
-
-
-
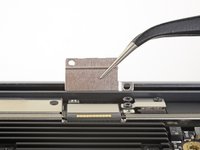
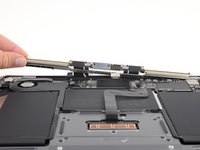
Lift the antenna bar straight up and out of the case. Take care not to snag the antenna bar on any cables or connectors.
-
Remove the antenna bar.
Tip: keep the six big lid anchor screws in place until after you remove the antenna bar. You may have to use your plastics spudger to wedge underneath the vents and get leverage off the underside of the lid along the hinge area. I also had to remove the Logicboard so I could get the plastic spudger underneath the antenna bar and lift it up. It felt like it was going to break. Did not want to have to remove the logic board, but seemed that was the only way I could get underneath and pry the antenna out.
Felt like I was going to break it! It will come out but it requires patience and light touch
Go to 12:02 on this Video:
Subscribe to this dude’s channel! I donated because he has taught me a lot with his videos!
Lamar's suggestion to view the video is excellent. Though I saw it only in arrears, it was quite valuable. I found a spudge, used to GENTLY pry both side first, then begin lifting on your right side (with back of laptop facing you) while gently twisting slightly inward to do the trick.
Probably the worst moment in this repair.
DLC
-
-
-
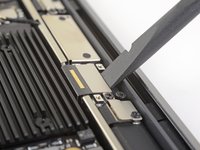
Use a T9 Torx driver to remove the six 4.9 mm screws securing the display hinges to the upper case.
This was a T8 Torx driver for me
It’s easier to leave 1 on each side in place open the MacBook fully and the remove them. This will help not damaging the bottom screen rim
Torx T8 for me too on a MacBook Air 2020
T8 for me as well on a 2019 MacBook Air
-
-
-
With the MacBook still screen-side down, carefully lift the upper case to open the MacBook as far as possible.
-
-
-
Lift the MacBook and carefully rotate the display to a 90 degree angle with the upper case.
-
Keeping the display at a 90 degree angle with the case, move the display straight down while holding the case still, so that the hinges slide out the bottom of the case.
Can i skip antenna screw and battery to reallign the screen lid ? My screen lid is misalligned with the body about half milimeters
Yes. You can loosen the screen lid screws to re-align the top lid.
(quote)
"Keeping the display at a 90 degree angle with the case, move the display straight down while holding the case still, so that the hinges slide out the bottom of the case."
(end quote)
If you're moving the display straight down, how does it "slide out"? I do ge the point, but this instruction could stand a tad amount of re-wording.
Also, on installing the new screen, the hinges on the new screen are very tight. It is easier to the install if you use some needle-nose or some tweezers to open the hinges to 90 degrees before trying to slot the new screen.
It is good idea to lay computer keyboard down over side of a table with non-slip surface to hold it down while navigating screen hinges out from their slots, one hinge at a time. Also when you are ready to insert new screen, be sure the cable is untaped and available to bottom of the laptop where it must be connected before you start securing hinges and screws in place.
-


Compare your new replacement part to the original part—you may need to transfer remaining components or remove adhesive backings from the new part before installing.
To reassemble your device, follow the above steps in reverse order.
Take your e-waste to an R2 or e-Stewards certified recycler.
Repair didn’t go as planned? Check out our Answers community for troubleshooting help.
crwdns2935221:0crwdne2935221:0
crwdns2935229:027crwdne2935229:0

crwdns2947412:011crwdne2947412:0
So…….. Which one of those flexes is the camera flex? It seems you skipped over a lot of the connectors in your guide.
I would like to know this as well same issue with Camera not detected as other comments.
I’m also interested in this. After a LCD swap, de iSight camera / webcam isn’t working.
Jochem -
Y’all need to give bonus points for putting it all back together again. Those T3 screws in steps 5 and 7 are awful hard to get back into place while holding the brackets in place. Not to mention the replacement display I purchased (from a third party) didn’t have the other two brackets in place, so I had to move those over from the original display as well.
The high res images in this guide are very helpful, and the guide is very well written and straightforward. Thanks.
I have replaced the complete screen on my macbook air and followed these repair instructions to the letter, but for some reason the camera is not detected, I have double checked the connectors but still no camera detected when opening any app s like facetime, photo booth etc.
Thank you. Very clear guide. The antenna bar removal IS a tense moment and and I’d suggest everyone carefully look at all three photos in this stage just to facilitate the display logic board falling through the gap. With this guide, this is at the low end of ‘moderate difficulty’.
Antenna bar removal_Felt like I was going to break it! It will come out but it requires patience and light touch
Go to 12:02 on this Video:
Subscribe to this dude’s channel! I donated because he has taught me a lot with his videos!
Anybody can solve the problem of the “no camera detected” after replacing the screen? I also don’t have the auto bright function.
Step 5 mentions using a T3 Torx screwdriver - not so on my unit - magnification reveals 2 Pentalobe screws, what size I know not, though they are not P5. Any advice?
Is it possible to replace just the display cable? There is a replacement display cable sold by ifixit that’s supposedly compatible with MacBook Air 2018, but I haven’t seen any instructions for it specifically.
Just tried this unsuccessfully. My two 4.5 mm screws that hold the antenna bar on were stripped, so I couldn’t complete the repair. I reassembled everything, but when I tried to turn my computer on again, it wouldn’t turn on. Any advice would be much appreciated
If the first thing you do is disconnect the battery, is it really an issue if you don’t (or can’t) disable auto-boot?
maccentric - crwdns2934203:0crwdne2934203:0
I agree, why disable Auto-Boot when the lid is closed and the battery is disconnected immediately? – I've never had an issue since 2016 when the feature was introduced.
stevebsiegel - crwdns2934203:0crwdne2934203:0
On my machine, the longest two screws were in the corners, while the other two long screws were in the middle. Perhaps previous service in the past had them replaced into the wrong place? In any case, the longest screws do seem to fit in either place. I guess 0.8mm is not very much of a difference. Seems like poor design if they could have used one size of screw.
johann beda - crwdns2934203:0crwdne2934203:0
Just did one, and it also had longest screws in the corners.
maccentric -
Just did another, and the long ones were in the middle. Definitely poor design and quality control.
maccentric -