
Mac mini Late 2012 Outer Case Replacement
crwdns2944107:0crwdnd2944107:0Andrew Optimus Goldheartcrwdnd2944107:0crwdnd2944107:0crwdnd2944107:03crwdnd2944107:0crwdne2944107:0
crwdns2944111:0Maw 5, 2025crwdne2944111:0
crwdns2915892:0crwdne2915892:0
crwdns2942287:0crwdne2942287:0Use this guide to completely replace your mini's outer case. Replacing the outer case requires removal of every component in your mini.
crwdns2942213:0crwdne2942213:0
crwdns2943213:0crwdne2943213:0


crwdns2943215:0crwdne2943215:0


crwdns2944105:0crwdne2944105:0

-
-
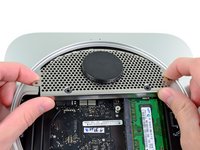
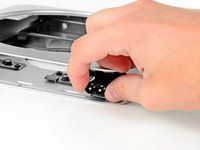
Place your thumbs in the depressions cut into the bottom cover.
-
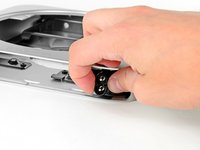
Rotate the bottom cover counter-clockwise until the white dot painted on the bottom cover is aligned with the ring inscribed on the outer case.
-
-
-
Tilt the mini enough to allow the bottom cover to fall away from the outer case.
-
Remove the bottom cover and set it aside.
-
-
-
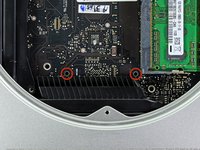
Remove the two 11.3 mm T6 Torx screws securing the fan to the logic board near the antenna plate.
-
-
-
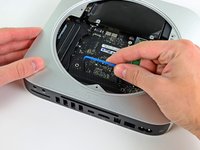
Lift the ear of the fan nearest the RAM up off the standoff secured to the outer case.
-
-
-
Lift the fan out of the mini for enough clearance to access its connector.
-
Grab all the wires at once and gently pull straight up to disconnect the fan from the logic board.
-
Remove the fan.
-
-
-
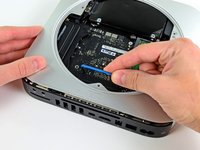
Remove the single 3.5 mm T6 Torx screw securing the cowling to the heat sink.
-
-
-
Lift the cowling from the end nearest the antenna plate.
-
Rotate the cowling away from the outer case and remove it from the mini.
-
-
-
Remove the following screws securing the antenna plate to the mini:
-
Two 6.6 mm T8 Torx screws
-
Two 5.0 mm T8 Torx or 2.0 mm Hex screws (either screwdriver will work)
-
When putting back together:
-
-
-
Slightly lift the antenna plate from the end closest to the RAM.
-
Carefully pull the antenna plate away from the circular rim of the outer case.
-
-
-
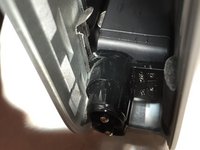
Use the tip of a spudger to carefully pry the antenna connector up from its socket on the AirPort/Bluetooth board.
steps 10 11 13 14 15 16 not necessary …
1 2 3 4 5 6 7 8 9 12 17 only needed to change hard drive …
You were right.
yep worked for me too
Worked for me too.
ablack3 -
Absolutely correct. Thanks. The wide-head screws holding in the antenna plate may be used on the upper side of the HD (SSD in my case) to help hold the side of the HD that slips under the case -up- so the two side mounting screws in the drive may be seated properly in the case. This is easier to do than to describe. (Others have noted this, as well and I followed the advice.)
This, agreed. Do as Radioman says. Far less complicated and I had everything apart and back together within 10 minutes.
Step 10 is different for late mini Mac 2012
The antennaplug is different (round)
That s why it is easier to leave it on the logic board at all times
There is no need to remove it.
Carefully let it follow the logic board assembly when you take that it out completely in the nex steps.
Agreed. I just rotated the antenna plate out of the way.
unless, of course, you are here to replace the logic board
I skipped steps 10 and 11 but had to do the rest to get the drive out. My system had a second drive so that may be why the logic board had to be removed to have enough room to get the drive out past the DIMM sockets.
On the Late 2012 model the antenna connector is hidden under the case, so unlike as indicated in step 10 you can not see the connector and definitely not remove it until the Logic Board has been eased out an inch. Note how the cable makes a loop under the case as it is removed. Remember to reconnect the same way with the loop and connected before the logic board is pushed in all the way.
The antenna connector is underneath a black flap. I just lifted the flap slightly with a spudger and used my fingers to disconnect.
...in the latest delivery of the mac mini they had changed something. The antenna plug is hidden under a plastic cover and some tape on it.
You have to push up the cover and remove the tape...not really difficult, it was formed so you can put up easilly.
If your machine came with a 7mm drive and you are replacing with a 7mm drive you do not need to move the logic board. I installed an Intel 335 240GB drive which is a 9.5mm drive and to get that drive in I did need to bump the logic board out to clear the memory slot brackets. I did not need to remote any other wires or connections as the logic board only needs to move maybe an 1/8" to get the drive to clear the memory bracket.
When removing the wifi antenna make sure you use a plastic spudger and lever up underneath the wire. I used a metal screwdriver and levered up from the side opposite the wire and ripped the pico-ITX connector right off the board! Fortunately I only use my mini via Ethernet, but now I have no choice!
Did you actually break it? It pops out easily and can actually be plugged back in easily too with tweezers or small needle nose pliers. I did the same thing with no permanent damage.
Steen Rancher
January 12, 2015
Steener -
I skipped this step with no problems.
I have a late 2012 Mac mini, but it must be an earlier version than this late 2012 Mac mini in this description, because removing the hard drive is much more complicated than described here. Please see this YouTube video if you have trouble removing your hard drive with these directions. https://www.youtube.com/watch?v=cvmuQIZP... There is a longer process you've got to go through. It can be done, it just takes much longer. (3-4 hours for me)
I think sandyfacebook is speaking about the mini server with the second drive this guide is about replacing the primary drive.
BTW, I agree with radioman: it MUCH safer if you do not need to remove the logic board to replace the HD. Just stop after step 12 and pull the drive out. The trouble starts when you try to put it back in because gravity is working against you: the drive has to hang in its slots about 1 cm above the top casing, which is on your table. The trick is to flip the mini up onto its front edge and after a couple of tries the buttons on the HD will engage their sockets.
Am unable to reattach the cable to its socket on the wireless board of my late 2012 (after installing SSD as second drive). Looks roughly the same as pictures here, but won’t attach. Anyone had problems attaching and figured it out?
On my late 2012 Mac mini, I could not slide out the lower drive without removing the logic board; the memory cards were in the way. Radioman’s suggestion may work for some disks, but not for mine.
Thanks sandyfacebook, I also had a 2012 Mac Mini (not the Server version) where the Primary drive was installed in the top (that is to say, lower when the Mini is upside down to be worked on) drive slot. This meant a complete disassembly was required, removing the logic board completely, along with the PSU and lastly the lower drive caddy. Unlike the drive shown in the pictures, the one underneath is secured into the caddy with screws and cannot be just lifted out.
You are absolutely right. It would have much too easy to make the drives accessible and user-replaceable. Anyone who has worked on the iMac knows what I am talking about...
skjell -
In the version I am looking at 17 is shifting the main board and not needed for drive only replacement, 18 is pulling the drive out
-
-
-
Remove the antenna plate from the mini.
-
-
-
Use the flat end of a spudger to pry the hard drive connector up from its socket on the logic board.
-
-
-
Use the tip of a spudger to lift the IR sensor connector up and out of its socket on the logic board.
-
-
-
Remove the following three screws:
-
One 5.0 mm T8 Torx or 2.0 mm Hex screw (either screwdriver will work)
-
One 16.2 mm T6 Torx screw
-
One 26 mm T6 Torx standoff
-
-
crwdns2935267:0crwdne2935267:0Mac mini Logic Board Removal Tool$4.99
-
Insert the Mac mini Logic Board Removal Tool into the two holes highlighted in red. Be sure it makes contact with the top side of outer case below the logic board before proceeding.
-
Carefully pull the tool toward the I/O board. The logic board and I/O board assembly should slightly slide out of the outer case.
-
Remove the Mac mini Logic Board Removal tool.
-
-
-
Pull the I/O board/logic board assembly out of the outer case enough to access the power connector.
-
Use your fingers to disconnect the DC-In cable from the logic board.
-
Pull the power cable connector toward the front side of the mini.
-
-
-
Carefully slide the logic board assembly out of the mini, minding any cables that may get caught.
-
-
-
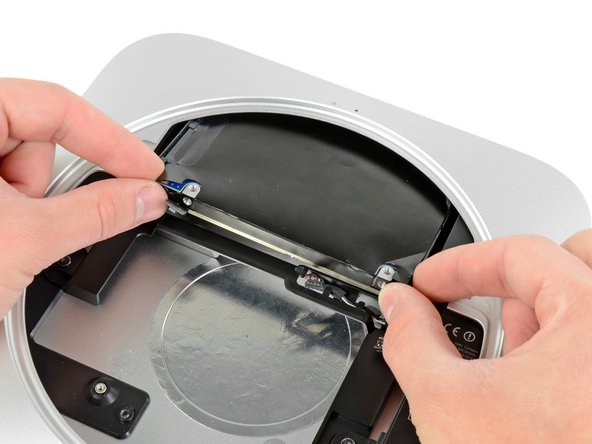
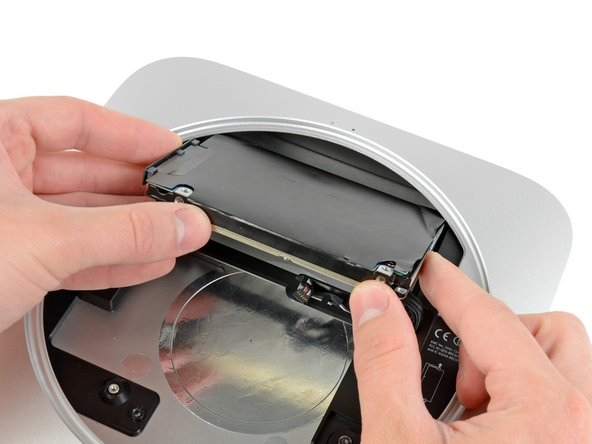
Pull the hard drive away from the front edge of the mini and remove it from the outer case.
-
-
-
Remove the 7.9 mm T6 Torx screw securing the power supply and hard drive tray to the outer case.
-
-
-
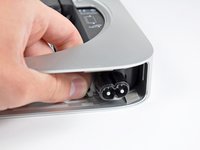
Pull the silver metal AC-In socket retainer away from the side of the outer case and remove it from the mini.
-
-
-
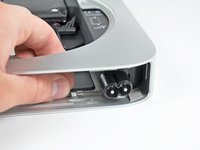
Rotate the AC-In connector 90 degrees counter-clockwise.
-
-
-
Slide the power supply out of the mini, minding any cables that may get caught.
-
-
-
Remove the 7.9 mm T6 Torx screw securing the hard drive tray to the outer case.
-
-
-
Remove the hard drive tray from the outer case.
-


To reassemble your device, follow these instructions in reverse order.
crwdns2935221:0crwdne2935221:0
crwdns2935229:010crwdne2935229:0
crwdns2947821:0crwdne2947821:0
crwdns2947823:0crwdne2947823:0


crwdns2947410:01crwdne2947410:0
Hello, I would like to know where to get a new housing for the Mini? If there is a guide to change, it's got to be even housing. Thank you.