
Mac mini Late 2012 I/O Bezel Replacement
crwdns2944107:0crwdnd2944107:0Andrew Optimus Goldheartcrwdnd2944107:0crwdnd2944107:0crwdnd2944107:03crwdnd2944107:0crwdne2944107:0
crwdns2944111:0Huk 29, 2020crwdne2944111:0
crwdns2915892:0crwdne2915892:0
crwdns2942287:0crwdne2942287:0Use this guide to replace the I/O bezel and its integrated antennas. Replacing the I/O bezel will also give you a new power button.
crwdns2942213:0crwdne2942213:0
crwdns2943213:0crwdne2943213:0


crwdns2943215:0crwdne2943215:0


crwdns2944105:0crwdne2944105:0

-
-
Place your thumbs in the depressions cut into the bottom cover.
-
Rotate the bottom cover counter-clockwise until the white dot painted on the bottom cover is aligned with the ring inscribed on the outer case.
-
-
-
Tilt the mini enough to allow the bottom cover to fall away from the outer case.
-
Remove the bottom cover and set it aside.
-
-
-
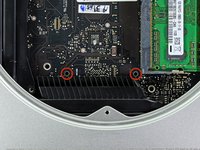
Remove the two 11.3 mm T6 Torx screws securing the fan to the logic board near the antenna plate.
-
-
-
Lift the ear of the fan nearest the RAM up off the standoff secured to the outer case.
-
-
-
Lift the fan out of the mini for enough clearance to access its connector.
-
Grab all the wires at once and gently pull straight up to disconnect the fan from the logic board.
-
Remove the fan.
-
-
-
Remove the single 3.5 mm T6 Torx screw securing the cowling to the heat sink.
-
-
-
Lift the cowling from the end nearest the antenna plate.
-
Rotate the cowling away from the outer case and remove it from the mini.
-
-
-
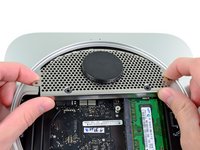
Remove the following screws securing the antenna plate to the mini:
-
Two 6.6 mm T8 Torx screws
-
Two 5.0 mm T8 Torx or 2.0 mm Hex screws (either screwdriver will work)
-
When putting back together:
When reassembling this aerial plate, it may take a very strong force to align the side lips with the screw bays. The circular edge on the body is meant to slot into the plate by less than 1mm. I followed the rule of thumb, which is, if it takes an unusual force, stop and think it out to avoid a disaster! Then, I hit on using a paper clip to get around this problem. Make a paper clip L-shaped to loop through a hole close to the edge of the plate, where the slotting is not deep enough. Gently lifting the paper clip, slide and push the aerial plate in place. This worked like a charm without using a strong force.
Worked like a charm, saved my day!!!
David -
@Al Dente’s approach worked for me, but at first I didn’t understand what he meant. Basically the antenna mesh has a tongue and grove relationship with the mac mini shell; it is hard to see, but along the curved edge has a concave grove which needs to be widened. You can widen this concave grove with a paper clip and then it will fit perfectly.
Wow! I struggled with this for at least 1 1/2 hours. Then I tried this suggestion and it worked with ease and immediately. Genius suggestion. Thanks!!!
Kbwood -
My only real problem in the whole process was putting back the antenna plate. Couldn't get both side screws to align. Ended up leaving one out but might try the paper clip trick now
I had a similar experience, but when I realized the two 5.0mm T8 Torx screws were 2 of a set of 3 that also served to hold the cover on, I wasn't comfortable with only securing the cover with 2.
DO NOT BRUTE FORCE the reinstallation of the plate. In my case, the top lip of the antenna plate has a notch which aligns with the edge of the opening was preventing the perfect fit. All I did in my case was use the spudger to pry open the notch a little more to give me a little bit extra space so that edge of the aluminum enclosure fits into that notch on the top of the antenna plate. Hope that helps. :)
I did this too. Worked like a charm.
ablack3 -
Thanks for the tip: I did the same thing and it worked like a charm
Zitoune7 -
Thank you for this tip! Helped me get through this step, albeit after a good 30 min of sweating bullets... Ultimately, the metal spudger from the Pro Tech tool kit helped bend the notch enough, found the plastic ones didn't bend it at all.
William -
I was installing an SSD in my mini and when I got to this step, an issue came up. The two 6.6mm screws on the antenna plate screw into one side of, and secure, the hard drive. The problem was the SSD was thinner than the original hard drive, so when I tried to reassemble, the hard drive sat too low for the screws to reach it.
Here's how I got around the problem. I loosely attached the antenna plate to the hard drive, leaving plenty of wiggle room between the plate and the drive. I also left the two stand off screws on the logic board off to give me more wiggle room there.
With the SSD attached to the antenna plate, I carefully connected and stowed the Bluetooth cable. Using the antenna plate as a handle, I was able to guide the SSD into the hard drive mount. Once in place, I tightened the 6.6mm screws more, which raised the SSD to the proper level.
After insuring that the screws all lined up, I installed and tightened the logic board, then the other antenna plate screws.
I was able to achieve the same result with an slim SSD disk by simply turning the computer around with the access hole down so that gravity would pull the SSD towards the antenna plate.
Mikael -
I attached the SSD to the antenna plate FIRST. Then I connected the RF and the HD connectors during the antenna plate installation.
After trying these suggestions with a thinner SSD and couldn't get anywhere I used a bent paper clip, L-shaped, to act as a hook. One end I was able to simply hook under the drive and pull it up to install that ends screw loosely. The opposite end I inserted the paper clip through the antenna grate, again pulled up on the drive, installed the screw and carefully pulled the paper clip out.
I used a spudger to lift the SSD so that it reached the screws. Not the best solution as the spudger applied some force on the board but it worked.
vlada -
The SSD was obviously thinner than the old HDD it was replacing so the screws didn’t contact the threads.
As “Mikael”^^ said… flipped it upside down and it worked a treat!!! Cheers dude :-)
Also the paperclip trick came to the rescue to get the antenna plate back on, couldn’t quite get it to sit correctly otherwise!
Thanks all :-)
I found this easy by temporarily using a longer hard drive screw in the right hand hole in the antenna plate to hold the drive in position . Screw in a couple of turns and slide in the HD while the screw is loose. Then tighten to secure the thinner SSD to the plate and insert and tighten the other screw. Finally remove the temporary screw and replace with the correct one.
I've found that Mikael's solution has worked consistently for me as well. I've done this with at least half a dozen SSD upgrades in Mac minis.
The "engineering tolerances" are definitely tight for the AirPort antenna plate. I would recommend trying to replace it as soon as it's removed for the first time, in order to work out the (precise) alignment of it.
Nothing I tried (including the suggestions here) seemed to help me during reassembly. No matter what I tried, I couldn't get the holes for the two 5.0mm T8 screws to line up. Eventually, I had to resort to CAREFULLY and SLIGHTLY re-bending the curved edge of the antenna plate.
REATTACHING grate - al dente's trick helped me.
The tiny perforations on the grate rest ON TOP of the lip of the case, while the remainder of the grate slides UNDER the lip. It is very hard to see - I used a magnifying glass.
To get it into place, create a tiny hook on the end of a paperclip. Moving along the edge of the grate, lift a perforation with the hook to help it slip into place. Keep moving along the edge until entire grate is shifted into place.
I had several 2-terminal connectors that went to what appeared to be temperature sensors on several components including the hard disk and optical drive. I accidentally pulled the wires out of one of these connectors. Lucky for me, they came out clean and I was able to just re-insert them into the connector
On a Mini bought Jan 2014, Red screws were T-9 and orange were 2mm Hex, T-8 didn't work in either one. T-9 didn't work in orange.
As everyone else has noted during re-assembly, seating the antenna plate is tricky. For me, what ended up working was to attach the hard drive screws first. After this, with just a little wiggling of the plate, the 2 5mm screw holes lined up perfectly.
Aligning the drive holes with the ones on the antenna grate was easy – just take the pointy end of the spudger. Also, for getting the circular part of the grate set correctly, I had to bend down the outermost part a tiny little bit and then used curved tweezers to lift the grate once it was near its final position to get it slide in the last millimeter. Frustrating at first, but it worked after a few tries.
Has anyone had any trouble getting the two 5.0mm screws back in place? I can't seem to get them in, as they just keep on turning. I thought the thread may have been damaged but I then removed the plate and could screw them in position okay. It seems the depth of the plate is causing the screws to not go down far enough. I've had to leave these off at the moment (obviously not great as this means the bottom cover is loose. Any ideas?
I had the same problem but only on one of the two screws. Then I realized there's a little tiny "o-ring" underneath which is acting like a nut. I lost one of them in the process of upgrading. If I could find out where to buy a new one I would!
@lyleberman Where are these O-rings? Under what? :)
I figured I’d wasted the thread on the screws here, and was about to buy new ones at an absurd cost, but this is exactly what’s happening to me! I’ve currently ‘secured’ the antenna plate at the sides with duct tape. But this leaves the machine’s lid loose.
I’d love to hear more about this, so I can get rid of my ghetto solution!
The antenna plate seems to give most people problems. Somewhere along the line I found reference to "a wiggle here and a wiggle there" and that seemed to work. Shy away from the brute force - it's the surest way to damage something.
Steen Rancher January 12, 2015
If 5.0 mm T8 holes don't line up with those on the body, you should hook the antenna up a bit.
Despite all the efforts, I couldn't manage to insert both side screws for the antenna plate. I ended up only using a single one (the one nearest to the HD connector), hoping it will hold the weight of the SSD.
Same issue with that antenna plate - take a look at it from the side and you will see the incredibly tight gap which the lip of the case needs to slot into. I assumed it simply butted up against the case, but no.
I used a big paper clip as suggested here, putting in one screw and then lifting through the perforations while applying a little pressure to the plate. Turned out there was one point misaligned and after a few tries it popped back in.
The thickness of your hard drive or SSD plays a part here, I think. With a thicker SSD (Crucial M4) in the upper slot I found the antenna plate very hard to re-install. After replacing this with a Samsung Evo 850 it was much easier, I think because the lower drive has more room to breathe. With the thinner SSD I didn't have to remove the power supply, either – a major plus.
For those having trouble reinstalling the Aerial Plate, it is probably a matter of alignment. The recessed edge of the plate slides all the way up under the lip edge of the case. I used my iFixit bent tweezers spread and inserted through a couple holes to lightly pull up on the grate while pushing on the flat edge. No hard force was required. It just snapped right in. You'll know when it is home because it will be a snug fit to the edge of the case inside the arc of the opening.
I would also add that during the reassembly process, make sure the drive stays firmly seated in the grommets. There's a tendency for it to come out or partially out. I kept nudging on it to make sure it was fully seated. Then the antenna screws line up nicely. Some of the problems I read about getting the screws in I suspect arise form the hard drive not being fully seated.
Al Dente and Chris1000 provided the key for me. I used the logic board tool to help lift the cutout sections into place on the top part. Once I did that I slid in to place so easily I almost pulled it out of place trying to adjust it.
Hilariously, I was trying all the tricks, with the paper clip, and putting the drive screws in first, nothing working for me to get the case screw holes aligned. I ended up saying “one screw might just have to do it”, so I put the first case screw in, then I tried putting the second one in from an angle into the misaligned hole, and screwing it in, and that caused the plate to pop into place!
What finally helped me was to check things one at a time. To check the tongue-and-groove fit, I installed the antenna plate by itself, with the hard drive removed. I used a spudger to pry open the groove on the antenna plate, since I had closed it a bit by forcing things. After the antenna plate was going in by itself, I focussed on the hard drive. At first, I was pre-attaching the hard drive to the antenna plate, but this makes it hard to see if the hard drive is going in as far as it should. Getting the two protruding screws on the hard drive into their holes is tricky (I found turning the Mini upside down to use gravity helped), but for me it was some wires at the side of the hard drive space that were getting under the drive and making it sit up high that was the problem. Once I got the hard drive in, and then the antenna plate, I could get the last two screws which hold the drive to the plate to catch by turning the Mini upside down and tapping it on top to bring the hard drive close to the plate.
So, what they mean by the “paper clip” trick is that you need to lift away the round edge where the wire runs, to be a little further away from the plate. Then it will fit without forcing it.
In order to put back correctly the 2 Torx T8 6,6 mm in the hard drive through the airport grid, I used a pick (to play guitar) to lift up the hard drive in order for the 2 screws to reach the hard drive holes.
I inserted the pick in the little space left between the mother board and the hard drive. Then, by leaning the pick against the motherboard, it lifted up the hard drive against the grid. Then it was super-easy.
Hope it might help…
The flush screws holding the hard drive to the mesh plate are actually T9 torx. The other little screws on the left and right edges of the mesh plate are T8.
No I disagree with all of this … this is plain and simple extremely difficult bordering on impossible and I now have to take the mini to professionals and pay them to see if its salvageable .. so moral of the story I wasted money and time trying to go DYI and I learned the hard way.
In my case the two center screws on the antenna cage do not physically connect to the drive. They're just held in place with rubber grommets and do not screw out. All you need to do is remove the outer two screws and the antenna can be removed
The two outer screws which also holds the bottom plate won’t fit anymore. It seems that the wholes for these screws lost their tight fit, the screws just drops in and falls out again… bummer, now the bottom plate doesn’t stays in place
The screws marked in red are T9 Torx, not T8. For the screws marked in orange, use the proper tool, 2 mm Hex, and nothing else.
-
-
-
Slightly lift the antenna plate from the end closest to the RAM.
-
Carefully pull the antenna plate away from the circular rim of the outer case.
-
-
-
Use the tip of a spudger to carefully pry the antenna connector up from its socket on the AirPort/Bluetooth board.
-
-
-
Remove the antenna plate from the mini.
-
-
-
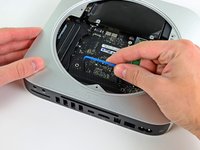
Use the flat end of a spudger to pry the hard drive connector up from its socket on the logic board.
-
-
-
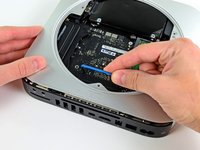
Use the tip of a spudger to lift the IR sensor connector up and out of its socket on the logic board.
-
-
-
Remove the following three screws:
-
One 5.0 mm T8 Torx or 2.0 mm Hex screw (either screwdriver will work)
-
One 16.2 mm T6 Torx screw
-
One 26 mm T6 Torx standoff
-
-
crwdns2935267:0crwdne2935267:0Mac mini Logic Board Removal Tool$4.99
-
Insert the Mac mini Logic Board Removal Tool into the two holes highlighted in red. Be sure it makes contact with the top side of outer case below the logic board before proceeding.
-
Carefully pull the tool toward the I/O board. The logic board and I/O board assembly should slightly slide out of the outer case.
-
Remove the Mac mini Logic Board Removal tool.
-
-
-
Pull the I/O board/logic board assembly out of the outer case enough to access the power connector.
-
Use your fingers to disconnect the DC-In cable from the logic board.
-
Pull the power cable connector toward the front side of the mini.
-
-
-
Carefully slide the logic board assembly out of the mini, minding any cables that may get caught.
-
-
-
Remove the following two screws securing the speaker to the logic board assembly:
-
One 3.5 mm T6 Torx screw
-
One 3.7 mm T6 Torx screw
-
-
-
Carefully lift the speaker wires upward to lift the speaker connector up and out of its socket on the logic board.
-
Lift and remove the speaker away from the logic board.
-
-
-
Use the flat end of a spudger to pry both antenna connectors up from their sockets on the AirPort/Bluetooth board.
-
-
-
Carefully un-clip the antenna from the logic board near the heat sink.
-
-
-
Carefully un-clip the antenna from the logic board near the PRAM battery.
-
Gently de-route the antenna cable through the hole in the logic board.
-
-
-
Carefully un-clip the antenna from the logic board opposite the I/O bezel.
-
De-route the antenna cable from the clips on the logic board near the I/O bezel.
-
-
-
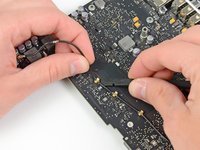
Lift the power button cables upward to gently pull the power button cable up and out of its connector on the logic board.
-
-
-
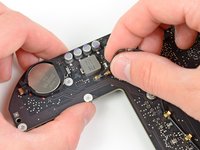
Remove the following screws securing the I/O bezel to the front side of the logic board:
-
Three 2.6 mm T6 Torx screws
-
One 2.9 mm T6 Torx screw
-
-
-
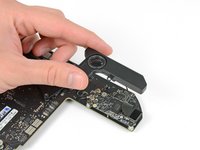
Remove the single 2.6 mm T6 Torx screw securing the I/O bezel to the logic board near the RAM.
-
-
-
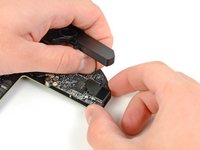
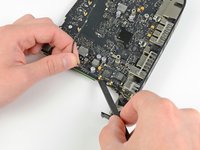
Pull the I/O bezel away from the logic board, minding any cables that may get caught.
-


To reassemble your device, follow these instructions in reverse order.
To reassemble your device, follow these instructions in reverse order.
crwdns2935221:0crwdne2935221:0
crwdns2935229:04crwdne2935229:0
crwdns2947821:0crwdne2947821:0
crwdns2947823:0crwdne2947823:0


crwdns2947412:02crwdne2947412:0
Picture step 27, what are the 2 bare 60pin shining on the right of the data connection?
and the connector in the center of the motherboard? what is it for?
Couldn’t have done it without the iFixit guide. How do I know that? Because I tried! I’m pretty good at this stuff and have taken apart and rebuilt many a Mac. But for the life of me I could not figure out how to remove the bezel/I/O back panel. Thanks again to the folks at iFixit!