crwdns2915892:0crwdne2915892:0
This guide can be used if the device’s back cover is damaged or replacement inside the device is needed. If you are unsure about what you need to replace underneath the back cover, visit this troubleshooting page.
Everything required to begin getting inside your device is here. For this guide, you will need a plastic opening tool and a T5 Torx screwdriver.
Make sure to turn off the device before taking it apart.
crwdns2942213:0crwdne2942213:0
-
-
Flip the device over so that the underside is facing up.
-
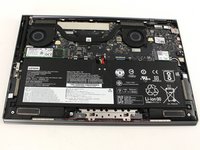
Remove the six 3.5 mm T5 Torx screws.
-
-
-
-
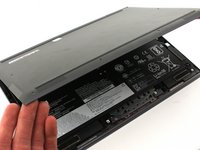
Pry off the back cover using the plastic opening tool.
-
Loosen the back cover in multiple spots using the opening tool, then remove the whole back.
The gap is so small that I wasn’t able to insert anything to pry the cover up. The suction cup tool lifted the cover off easily.
There is a very convenient spot to begin the prying process. Up by the hinge, where the metal back turns in perpendicular to the edge to get around the hinge mechanism, there is a gap between the cover and the rest of the laptop where it can be pried up easily. From there it is easy to run a tool and widen the gap all the way around.
I tried Thomas's suggestion first, and it worked like a charm: the suction cup took it right off.
Instead of pushing the cup against the laptop I "pulled it flat" and placed it against the back, so it'd just suck onto it. (Didn't want to deform the laptop cover)Opening this up again to re-seat the SSD ...and find that Alex's suggestion is also very good. I would start with his suggestion and then move to Thomas's if the back doesn't just jump off.
-
-
-
Carefully lift the cover off with your hands.
-


To reassemble your device, follow these instructions in reverse order.
To reassemble your device, follow these instructions in reverse order.
crwdns2935221:0crwdne2935221:0
crwdns2935229:02crwdne2935229:0

crwdns2915084:0crwdne2915084:0

Cal Poly, Team S19-G5, White Winter 2020 crwdns2935289:0Cal Poly, Team S19-G5, White Winter 2020crwdne2935289:0
CPSU-WHITE-W20S19G5
crwdns2931471:04crwdne2931471:0
crwdns2935297:016crwdne2935297:0
crwdns2947410:01crwdne2947410:0
On mine, not T5 but T4. Also screw holding the chip in is philips 000.