crwdns2915892:0crwdne2915892:0
This step-by-step repair guide demonstrates a battery replacement for the Lenovo Yoga 900-13ISK. The battery supplies power to the computer while it is unplugged, allowing it to function as a mobile device. However, lithium ion batteries have a limited lifespan, and will start to lose the ability to hold a charge over time. If you notice that your Lenovo Yoga 900 is losing its ability to hold a charge, replacing the battery can restore the functionality of your device.
Batteries, even old ones, are toxic and cannot be thrown away in your normal waste bin. Please find a suitable e-waste recycler near you to properly dispose of your old battery.
For your safety, discharge your battery below 25% before disassembling your device. This reduces the risk of a dangerous thermal event if the battery is accidentally damaged during the repair. If the battery within your device is swollen, take appropriate precautions.
Be sure to unplug and completely turn off your device before you start working.
crwdns2942213:0crwdne2942213:0
-
-
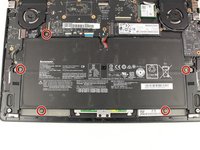
Using a T5 Torx screwdriver, remove the ten 5.5 mm screws from the back case of the laptop.
-
-
-
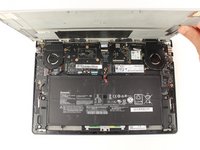
Use a spudger to pry open the back case at the hinges of the laptop.
-
Use your fingers to completely pop off the back cover.
-
-
-
-
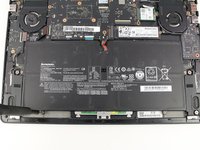
Remove the five 3.6 mm screws from the battery with a Phillips #00 screwdriver.
-
-
-
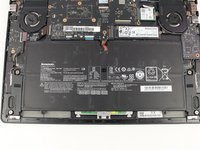
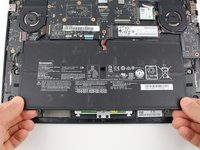
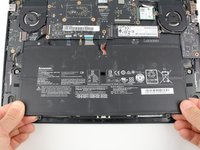
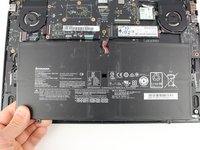
Grab the bottom corners of the battery and gently pull the battery until the cable disconnects from the connector on the motherboard.
The battery replacement procedure is complete. It worked as expected. My new battery is charging. Total time to do this, including finding my tools, is 35 minutes.
-


To reassemble your device, follow these instructions in reverse order.
Take your e-waste to an R2 or e-Stewards certified recycler.
For optimal performance, after completing this guide, calibrate your newly installed battery.
To reassemble your device, follow these instructions in reverse order.
Take your e-waste to an R2 or e-Stewards certified recycler.
For optimal performance, after completing this guide, calibrate your newly installed battery.
crwdns2935221:0crwdne2935221:0
crwdns2935229:02crwdne2935229:0


crwdns2947410:01crwdne2947410:0
Phillips 00 will not fit the 5 screws in my computer!