crwdns2915892:0crwdne2915892:0
Follow these instructions to remove and replace the fan and heatsink assembly in your Lenovo ThinkPad T480s laptop.
The heatsink (or heat sink) is a passive heat exchanger that transfers heat in a device. The heat sink transfers heat from the laptop’s CPU to the fan, which redirects the heat away from the laptop’s internal components. The fan and heat sink work together to prevent the laptop from overheating, which can cause damage to the device.
If you find that your laptop is experiencing the following symptoms, it may be time to replace the fan and heatsink assembly:
- Easily overheats
- Running at higher temperatures than normal
- Loud whirring noises
- Laptop is getting louder
Don’t forget to follow our thermal paste application guide after you have removed your heat sink and are ready to reassemble your device.
Make sure to disable the internal battery, power down your device, and disconnect from any external power sources before you begin. You should also let it cool for 20 minutes before proceeding with the guide if you’ve been using the laptop extensively.
crwdns2942213:0crwdne2942213:0
-
-
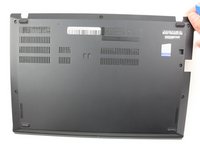
Loosen the six captive screws with a Phillips #1 screwdriver.
-
-
-
Remove the bottom cover with an opening tool.
-
Start from the top edge near the hinge and work your way along the edge until all of the clips are unsnapped.
-
-
-
-
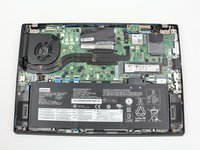
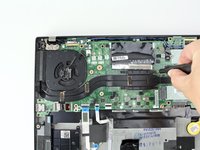
Use the spudger to disconnect the fan cable from the motherboard.
-
-
-
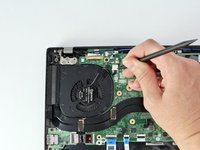
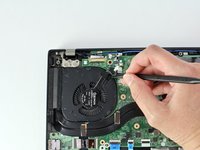
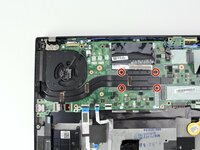
Loosen the four captive screws attaching the fan assembly to the motherboard.
I just checked on my model of the T480s, and I don't believe the vertical pair of screw holes on the left are actually part of the fan/heatsink assembly. I know I bought my unit used, but these screw holes also came empty. Despite having visible threading that can accept a M2x2.7 screw (I don't know if this is the actual size of the screw), only the 4 screws around the CPU are the screws physically securing the combined fan/heatsink assembly.
I found the screw on position 3, around the CPU heatsink, to be stubborn enough that I stripped the screw with a Phillips #1 drive bit. If you find yourself in this predicament, don't worry - in my case, I discovered that using a flathead #2 drive bit helped me get out of this bad situation (for long enough to loosen and tighten this CPU heatshink screw, at least until I obtain a replacement M2x2.5 size screw).
-
-
-
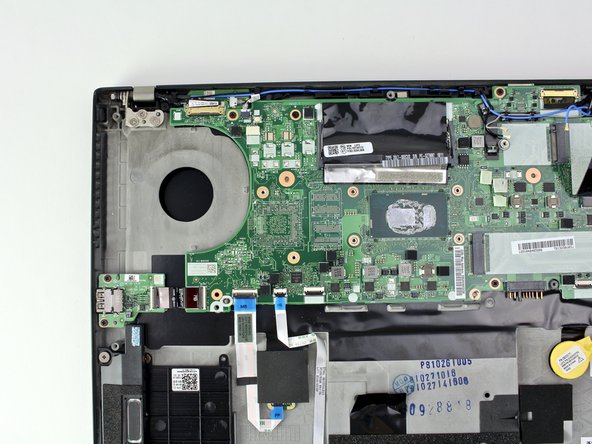
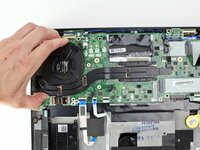
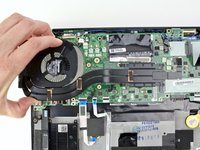
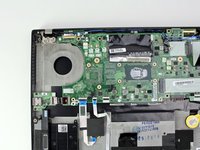
Lift the fan assembly from the system and remove it.
Is it necessary to replace the thermal paste on the CPU?
Hi gordonzaft, it's a good idea to reapply thermal paste after removing a heatsink or CPU for a repair. You may already know how to apply thermal paste, but if you'd like a refresher or some general instruction, check out the How to Apply Thermal Paste guide. Thanks!
-


To reassemble your device, follow these instructions in reverse order.
Take your e-waste to an R2 or e-Stewards certified recycler.
Repair didn’t go as planned? Try some basic troubleshooting, or ask our Answers community for help.
To reassemble your device, follow these instructions in reverse order.
Take your e-waste to an R2 or e-Stewards certified recycler.
Repair didn’t go as planned? Try some basic troubleshooting, or ask our Answers community for help.
crwdns2935221:0crwdne2935221:0
crwdns2935229:04crwdne2935229:0


crwdns2947412:02crwdne2947412:0
Danke. Perfekte Anweisung.
Thank you, @hansrteterra! I'm glad you found it helpful.
Somehow I find the screws for the T480s bottom cover to be slightly more prone to stripping, compared to the ThinkPad T480 and X1 Carbon Gen 6. However, the #1 Phillips screws on the T480s have drives that are cut in a way that also let you use a #3 flathead.
Tai Lam - crwdns2934203:0crwdne2934203:0