crwdns2915892:0crwdne2915892:0
This guide will show you how to replace the internal battery in your Lenovo ThinkPad T470.
A healthy laptop battery will keep your laptop powered on, even when your device is unplugged from an external power source.
If your laptop no longer holds a charge, or loses its charge very quickly, you most likely have a dead or failing battery which may require replacement. Depending on the cause of your faulty battery, you may be able to resolve the issue using this list of troubleshooting symptoms and solutions from Lenovo’s support forum.
Make sure to disable the internal battery, power down your device, and disconnect from any external power sources before you begin.
crwdns2942213:0crwdne2942213:0
-
-
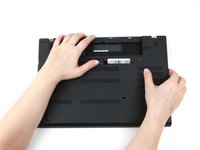
Place the laptop so that the bottom is facing upwards.
-
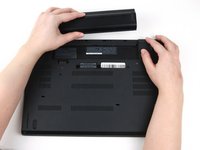
Slide the latch on the left side of the battery to the left until it clicks in place.
-
-
-
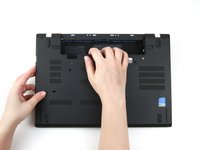
Slide the latch on the right side of the battery to the right and hold it in place with your thumb.
-
Use your other hand to slide the battery towards the back of the laptop.
-
Lift the battery up and away from the laptop.
-
-
-
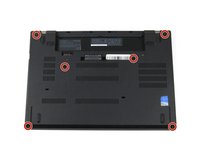
Use a Phillips #1 screwdriver to loosen the six captive screws on the bottom cover of the laptop.
-
-
-
-
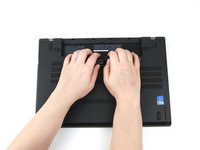
Use your hands to pull up on the back cover and release the plastic clips starting on the bottom side of the battery compartment.
-
Use your hands to pull up on the right side of the bottom cover to release the plastic clips.
-
Use your hands to pull up on the left side of the bottom cover to release the plastic clips.
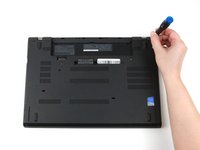
There may be a SIM card holder inserted. If there is, it will prevent the bottom cover from coming off. In the photo, the SIM card holder would be center left edge of laptop. Use a straight pin or paperclip to eject the holder to release the laptop bottom cover.
Also most SIM eject tools that come with smartphones will also work.
If you need a dedicated "place" where you won't loose those small SIM ejectors, then you can also use the SIM eject bits that are included in the various iFixit toolkits, usually the extended versions.
Tai Lam -
-
-
-
Remove the bottom cover from the laptop.
Don't forget to unplug the battery from the motherboard before removing it.
Yeah, what's in the photo seems to be the "space filler" unit.
Not sure what's the reasoning for having this as a produced product, but this does seem to match my memory for items being sold via the Lenovo parts storefront at "pcsupport.lenovo[.]com" (which is not to be confused with the public consumer storefront at "lenovo[.]com/*").
Internally, the T470 and the T480 use the same internal battery, so keep that in mind if you're shopping for an internal battery.
Tai Lam -
Welcher Stecker?!?
-
-
-
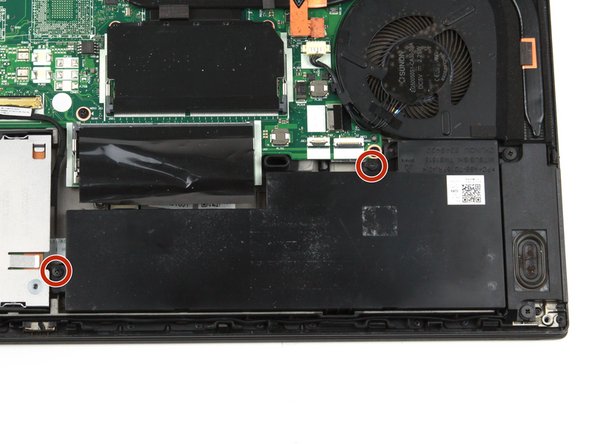
Remove two 5 mm screws from the internal battery using a Phillips #1 screwdriver.
-
-
-
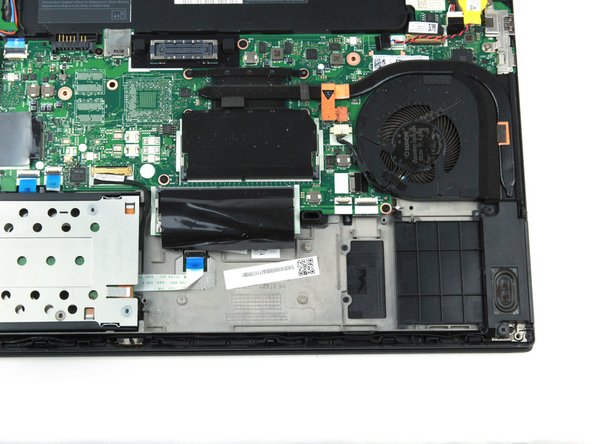
Use your hands to lift the battery up and away from the laptop.
how was the internal battery connected?
Mine has a cable running to a header on the mainboard (header is visible in the photos, but unused. 20 mm from the edge of the battery, near the cooling fan). Battery also has all sorts of lenovo regulatory information on it (CE, etc) FRU numbers. I suspect you have a “dummy” that is not a real battery, but a placeholder. I say this have another refurbished T470 with a black plastic frame + metal plate held to the plastic with plastic rivets, where the battery should be. Definitely not a real battery. And I opened this up because windows was reporting that Battery 1 needed to be replaced… So if I figure out how to post a photo, I’ll do that (once I figure out how to remove the connector without damaging it. Need a magnifying glass, or the Lenovo FRU manual.
Here is a video that shows how to disconnect the internal battery connection (timestamped):
Tai Lam -
-


To reassemble your device, follow these instructions in reverse order.
Take your e-waste to an R2 or e-Stewards certified recycler.
Repair didn’t go as planned? Try some basic troubleshooting, or ask our Answers community for help.
To reassemble your device, follow these instructions in reverse order.
Take your e-waste to an R2 or e-Stewards certified recycler.
Repair didn’t go as planned? Try some basic troubleshooting, or ask our Answers community for help.
crwdns2935221:0crwdne2935221:0
crwdns2935229:07crwdne2935229:0


crwdns2947412:02crwdne2947412:0
Clear, concise and thoroughly enjoyed … thank you 🙏🏻
Nice. If you haven't broken your plastic pin on the upper side of external battery, it would be even better.
To remove the trackpad/touchpad, you can skip a lot of steps here:
4, 5, 6, 7, 8 are for removing the keyboard, which isn't required to swap the touchpad.
14, 15, 16 are for removing the top RAM stick.
22 to 41 are not required (so continue with step 42)
44, 45, 46, 47 are not required either.
So to replace the touchpad, do these steps:
1, 2, 3, 9, 10, 11, 12, 13, 17, 18, 19, 20, 21, 42, 43, 48, 49, 50, 51
tobi - crwdns2934203:0crwdne2934203:0