crwdns2933423:0crwdne2933423:0

Joy-Con Buckle Lock Replacement

crwdns2942213:0crwdne2942213:0

  1. Joy-Con Buckle Lock Replacement, Remove the case screws: crwdns2935265:01crwdnd2935265:01crwdnd2935265:01crwdne2935265:0
    • Use a Tri-point Y00 driver to remove the four 6.3 mm-long screws from the back panel of the Joy-Con.

  2. Joy-Con Buckle Lock Replacement, Separate the halves of the Joy-Con: crwdns2935265:02crwdnd2935265:01crwdnd2935265:03crwdne2935265:0 Joy-Con Buckle Lock Replacement, Separate the halves of the Joy-Con: crwdns2935265:02crwdnd2935265:02crwdnd2935265:03crwdne2935265:0 Joy-Con Buckle Lock Replacement, Separate the halves of the Joy-Con: crwdns2935265:02crwdnd2935265:03crwdnd2935265:03crwdne2935265:0
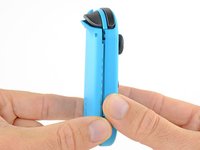
    • Insert an opening pick into the seam at the bottom edge of the controller (opposite the L and ZL buttons).

    • Slowly slide the flat edge of your opening pick up the side of the Joy-Con.

    • Be careful not to slide the opening pick too far inside the Joy-Con. This may damage the inner components. The back panel loosens easily, so not much pressure is needed.

  3. Joy-Con Buckle Lock Replacement, Open the Joy-Con: crwdns2935265:03crwdnd2935265:01crwdnd2935265:02crwdne2935265:0 Joy-Con Buckle Lock Replacement, Open the Joy-Con: crwdns2935265:03crwdnd2935265:02crwdnd2935265:02crwdne2935265:0
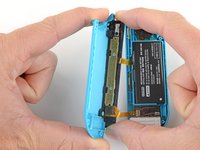
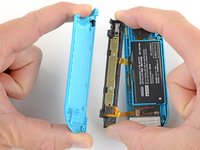
    • With the charging rail facing away from you, open the the Joy-Con like a book.

    • Don’t try to fully remove the back panel. There are still two cables connecting the charging rail to the motherboard.

  4. Joy-Con Buckle Lock Replacement, Unscrew the charging rail: crwdns2935265:04crwdnd2935265:01crwdnd2935265:01crwdne2935265:0
    • Use a Phillips #00 driver to remove the 2.5 mm screw securing the charging rail.

  5. Joy-Con Buckle Lock Replacement, Remove the back panel: crwdns2935265:05crwdnd2935265:01crwdnd2935265:02crwdne2935265:0 Joy-Con Buckle Lock Replacement, Remove the back panel: crwdns2935265:05crwdnd2935265:02crwdnd2935265:02crwdne2935265:0
    • Pull the back panel straight off of the charging rail to remove it.

    • There's a chance the rail unlock button will fall out of the back panel. During reassembly, make sure it is installed correctly, with the tab on the button slotted into the notch in the back panel.

  6. Joy-Con Buckle Lock Replacement, Remove the buckle lock bracket: crwdns2935265:06crwdnd2935265:01crwdnd2935265:01crwdne2935265:0
    • Use a Phillips #00 driver to remove the screw securing the buckle lock retaining bracket.

  7. Joy-Con Buckle Lock Replacement: crwdns2935265:07crwdnd2935265:01crwdnd2935265:03crwdne2935265:0 Joy-Con Buckle Lock Replacement: crwdns2935265:07crwdnd2935265:02crwdnd2935265:03crwdne2935265:0 Joy-Con Buckle Lock Replacement: crwdns2935265:07crwdnd2935265:03crwdnd2935265:03crwdne2935265:0
    crwdns2935267:0crwdne2935267:0
    Tweezers
    $4.99
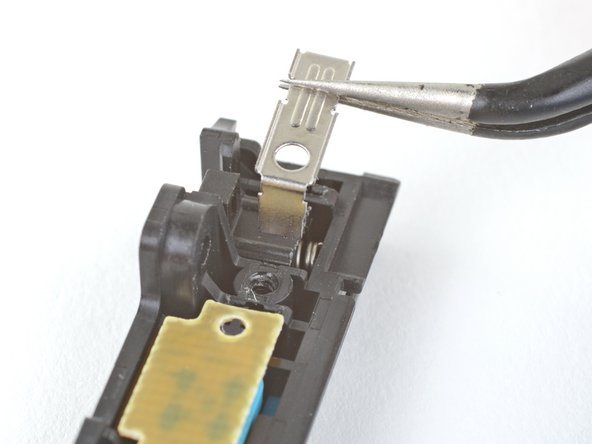
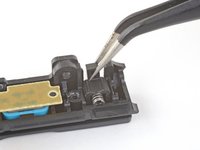
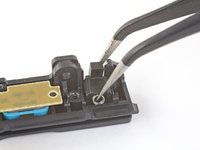
    • Slide one side of a pair of pointed tweezers under the flat part in the middle of the buckle lock bracket.

    • Grasp the bracket with the tweezers and pull the bracket straight away from the charging rail to remove it.

    • Be careful when you remove the bracket, as the spring and old buckle lock may shoot out and be easily lost.

  8. Joy-Con Buckle Lock Replacement, Remove the buckle lock: crwdns2935265:08crwdnd2935265:01crwdnd2935265:03crwdne2935265:0 Joy-Con Buckle Lock Replacement, Remove the buckle lock: crwdns2935265:08crwdnd2935265:02crwdnd2935265:03crwdne2935265:0 Joy-Con Buckle Lock Replacement, Remove the buckle lock: crwdns2935265:08crwdnd2935265:03crwdnd2935265:03crwdne2935265:0
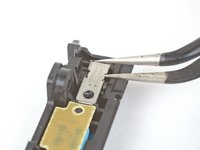
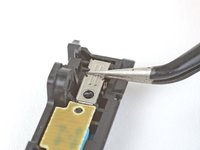
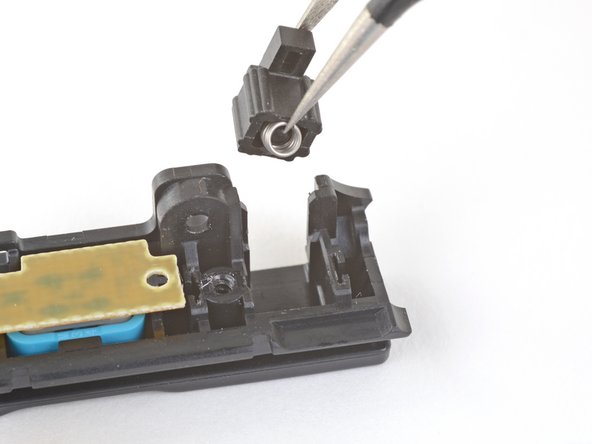
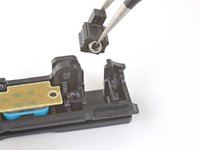
    • Lift the buckle lock slightly out of its slot in the charging rail, just until the spring is exposed enough that you can grab it with tweezers.

    • Grab the buckle lock such that the tweezers are around both sides of the lock and holding the spring inside the lock.

    • When you pull the lock out, the spring can shoot out. Make sure you have a firm grip with the tweezers.

    • Pull the buckle lock out of its slot in the charging rail.

    • During reassembly, make sure to move the spring from the old lock to the new one.

    ALSO be very very careful when unscrewing and screwing because I accidentally stripped the screw meaning

    Alexander Munoz Solis - crwdns2934203:0crwdne2934203:0

    IFix it are jerks for not including springs in the kit! Absolute A$$holes!

    Justin Aughenbaugh - crwdns2934203:0crwdne2934203:0

crwdns2915888:0crwdne2915888:0

To reassemble your device, follow the above steps in reverse order.

Take your e-waste to an R2 or e-Stewards certified recycler.

Repair didn’t go as planned? Check out our Answers community for troubleshooting help.

crwdns2935229:0141crwdne2935229:0

Adam O'Camb

crwdns2935283:004/11/15crwdne2935283:0

212,463 crwdns2915208:0crwdne2915208:0

crwdns2935297:0416crwdne2935297:0

crwdns2947412:02crwdne2947412:0

Hi, what exactly do you need help with?

Martin Refseth -

where can i but the metal buckle lock from

waynepiri - crwdns2934203:0crwdne2934203:0

crwdns2917038:0crwdne2917038:0

crwdns2936625:0crwdne2936625:0:

crwdns2936751:024crwdne2936751:0 74

crwdns2936753:07crwdne2936753:0 497

crwdns2936753:030crwdne2936753:0 2,690

crwdns2942667:0crwdne2942667:0 158,974