crwdns2915892:0crwdne2915892:0
Use this guide to remove and replace the display in your Huawei P10 Lite smartphone.
To protect your eyes from glass shreds and get a better grip to open the phone you might want to apply some tape onto the screen.
When reassembling apply new adhesive where it is necessary.
crwdns2942213:0crwdne2942213:0
-
-
Insert the tip of an opening pick between the back cover and the mid frame and slide it around the phone, to cut the adhesive.
-
Using a suction handle to lift the back cover may help to get an initial gap for the opening pick to put in.
-
-
-
After you cut the adhesive on every edge, twist your opening pick, to separate the rear cover from the phone.
-
Flip the rear cover over to the right side of the phone.
-
-
crwdns2935267:0crwdne2935267:0Tweezers$4.99
-
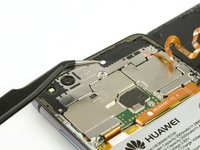
Use a pair of tweezers to remove the sticker.
-
Remove the two Phillips #00 screws.
-
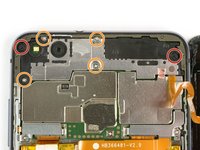
Remove the four 2.5 mm Phillips #00 screws.
Schritt 3 und 4 kann man sich komplett sparen. Wozu auch. Kann gleich mit Schritt 5 weitergemacht werden, zuvor einfach das Flachbandkabel vom Fingerabdrucksensor an der Rückabdeckung abklemmen und fertig.
There are four silver screws and two black to be removed.
Translate what Bobby mcgee said:
Step 3 and 4 can be completely ignored. What for? You can continue with step 5, just disconnect the ribbon cable from the fingerprint sensor on the back cover and you're done.
However, the reason step 3 and 4 should not be skipped is Step 6 — Use an iOpener to loosen the adhesive beneath the battery. I.e., the adhesive cannot be easily removed without heat, however, that heat might damage the electric chips. Thus they’d better be removed first.
-
-
-
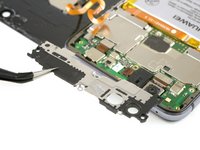
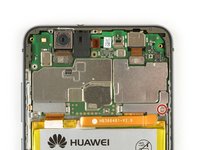
Use tweezers to remove the mainboard shield.
-
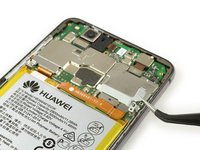
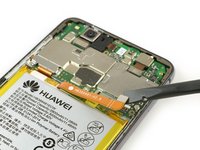
Use the flat end of a spudger to disconnect the finger print sensor flex cable.
Welchen Klebstoff soll man verwenden?
Hallo Josef,
sollte bei deinem Ersatzteil kein Klebstoff oder Klebeband dabei gewesen sein, kannst du dünne Streifen Doppelseitiges Klebeband verwenden. Es gibt für das Huawei P10 Lite auch schon zugeschnittene Klebestreifen zu erwerben, hierbei gilt aber je nach Händler Rezessionen zu lesen, ob die Klebestreifen auch wirklich halten.
Note that there is a copper-colored sticker to lift up near the flat cable connected from the phone the finger pad. Lift the main board plate (shield) up SLOWLY from the camera side to the other end as the plate is wedged in place.
what adhesive is recommended? thanks
Hi darren,
pre-cut adhesive would be the best solution if you can source it. Otherwise a two-sided adhesive tape or carefully used E6000 adhesive glue will be your friend. -
-
-
-
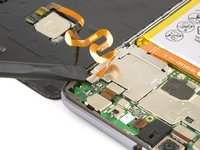
Remove the Phillips screw holding the battery connector plate in place.
-
Remove the battery connector plate.
-
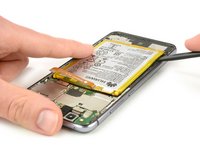
Use the flat end of a spudger to disconnect the battery flex cable.
Very gently lift the silver connecter that was under the battery connecter plate and is at the end of the orange battery cable with the flat end of the spudger as indicated.
-
-
-
Use an iOpener to loosen the adhesive beneath the battery.
-
Insert a spudger between the battery and the mid frame to create a gap.
-
Insert an opening pick or use the spuder in the gap to cut the adhesive beneath the battery.
Ohne eine Erwärmung des Klebers ist die Entfernung des Akkus wirklich sehr hakelig und zeitintensiv!
You must heat the battery two or more times with the iOpener in order to remove it because if you don’t (and even if you do) the battery will certainly bend. So the battery removal has to be done delicately. Lift each corner a very tad bit and the sides to finally lift out as shown.
This step takes at least 15-20 minutes.
Battery easily torn. The kit should include a battery as it’s VERY delicate and would be saved if you have the replacement battery.
Ich habe es mit Zahnseide recht gut hinbekommen! Habe die Seide oben angelegt um gut unter den Akku zu kommen und habe mit Wärme und hin- und herbewegen der Seide den Akku ohne verbiegen gelöst bekommen. Hat auch ein paar Minuten gedauert, aber hat sich gelohnt!
Is it possible to soften the adhesive using isopropyl alcohol?
Hi Michele,
yes, the use of isopropyl alcohol is a common technique when removing a battery in a smartphone. Especially when the adhesive is very strong. Try to apply the alcohol to every corner of the battery and let it penetrate the adhesive for several minutes. Start the prying procedure with the spudger afterwards. In case the adhesive isn’t loose enough you can reapply isopropyl alcohol any time during the removal. Keep in mind, that there’s a gap in the midframe for the display flex cable. It can happen that the isopropyl alcohol runs trough that gap and loosens the adhesive of the display as well. When the display adhesive gets loose you’ll need replacement adhesive for the display. To avoid that, apply as less alcohol as possible at a time and take especially care during prying to avoid damage to the flex cables underneath the battery. The adhesive of the cables will get loose as well.
The battery was very hard to remove. Please note: it is glued everywhere around the ribbon cables at the bottom. The battery is not glued with little strips like the back cover. The spudger and the blue cutting triangles were not very strong and the plastic tip bent upon removal of the battery. I eventually got the battery out with a metallic spatula. Be careful not to rip the shining lining of the battery while cutting the adhesive. I don’t know how people get the battery out without bending it, also every YT video I watched had - slightly - bent batteries. The glue is so strong snd sticky I did not need to apply new adhesive strips.
If you are operating on aged ones:
The Old double sided tape doesn’t really much care about the heat from the iOpener.
Use a metal spudger (round edges) instead but use it with care. Slowly and evenly lift the battery and go around it in a circle. Stay close to the edges to not damage cables under the battery (seen in step 7). Start pushing closer towards the middle only when you can see the cables yet and are sure not to damage them.
If this still doesn’t bring you closer to lifting the battery safely:
Two Options:
1. Try to use some small drops of adhesive remover . Best to use not to much is use Q-Tips or Cotton Swabs to evenly apply the remover through a little crack under the battery.
2. Use unwaxed dental floss push it under the battery. Then gently move it upwards with a pulling-side-to-side motion. To accelerate the process you can also use ***adhesive remover***. The dental floss will soak it up (only works with unwaxed dental floss) and assure that it will only be where it’s needed.
-
-
crwdns2935267:0crwdne2935267:0Tesa 61395 Tape$5.99
-
Use a spudger to cut the rest of the adhesive and lever the battery out of the phone.
-
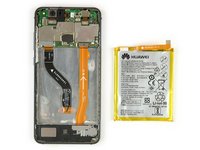
Remove the battery.
-
-
-
Remove the Philipps screw holding the display connection bracket in place.
-
Remove the display connection bracket.
-
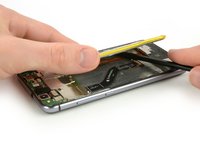
Use the flat end of a spudger, to disconnect the display flex cable.
-
-
-
Use an iOpener to loosen the adhesive under the display.
-
Insert the tip of an opening pick between the display and the midframe.
-
Insert a second opening pick next to the other one.
-
-
-
Slide one of the opening picks round the phone, to cut the adhesive.
-
-
crwdns2935267:0crwdne2935267:0Tesa 61395 Tape$5.99
-
After you slid the opening pick completly around the phone, twist it at the top of the phone, to seperate the display from the midframe.
-
Grab the phone at the upper part and seperate the display from the frame while working the flex cable through the gap.
-


To reassemble your device, follow these instructions in reverse order.
To reassemble your device, follow these instructions in reverse order.
crwdns2935221:0crwdne2935221:0
crwdns2935229:039crwdne2935229:0


crwdns2947412:02crwdne2947412:0
hey bam ich habe ein glück wegend euch ifixit danke dafür die anleitung hat mich zu glück gebracht dank ifixit ist mein
huawei p10 lite heile danke für alles lg der besitzer des huawei p10 lite
Hallo,
soweit ich sehe, ist die Klebefolie nicht im Ersatzteil enthalten, und die vorgestanzte Klebefolie ist nicht (mehr) erhältlich. Statt dessen verweist ihr auf das doppelseitige Klebeband von tesa, das als Rolle erhältlich ist - aber in verschiedenen Breiten.
Welche Breite ist für diese Reparatur hier denn die passendste?
Und wird das phone damit wieder genauso staubdicht wie zuvor (man wird ja puzzlen müssen, und an den Übergangsstellen hat man Stöße statt durchgehende Verklebung…)?
Mit dem Saugnapf die Rückseite anheben hilft ungemein…
Matthias Eberle - crwdns2934203:0crwdne2934203:0
Had to use blue wedge tool to wedge open bottom plate from the rim part in order to then use the tip of the blue opening pick under the back plate to then cut the glue. It’s like placing a pie server or knife under the plate once there’s a gap between the rim and the back plate.
Jane - crwdns2934203:0crwdne2934203:0
Be careful, there’s a cable to fingerprint sensor, very close to the edge (see pictures below)… It’s very easy to cut it through with the pick, as I just learned :)
dambig - crwdns2934203:0crwdne2934203:0