crwdns2933423:0crwdne2933423:0

Huawei Mate 20 Pro OLED Screen & Digitizer Replacement

crwdns2942213:0crwdne2942213:0

  1. Huawei Mate 20 Pro OLED Screen & Digitizer Replacement, Rear Glass: crwdns2935265:01crwdnd2935265:01crwdnd2935265:01crwdne2935265:0
    • Before you begin, switch off your phone.

    • Apply a heated iOpener to the back of the phone to loosen the adhesive beneath the back cover. Apply the iOpener for at least two minutes.

  2. Huawei Mate 20 Pro OLED Screen & Digitizer Replacement: crwdns2935265:02crwdnd2935265:01crwdnd2935265:03crwdne2935265:0 Huawei Mate 20 Pro OLED Screen & Digitizer Replacement: crwdns2935265:02crwdnd2935265:02crwdnd2935265:03crwdne2935265:0 Huawei Mate 20 Pro OLED Screen & Digitizer Replacement: crwdns2935265:02crwdnd2935265:03crwdnd2935265:03crwdne2935265:0
    • Secure a suction handle to the bottom of the back cover, as close to the edge as possible.

    • If the phone's rear glass is cracked, the suction handle may not stick. Try lifting it with strong tape, or superglue the suction handle in place and allow it to cure so you can proceed.

    • Lift the back cover with the suction handle to create a small gap between the cover and the frame.

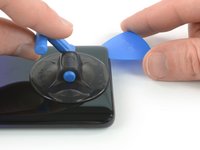
    • Insert an opening pick into the gap.

    • If you have trouble, apply more heat to further soften the adhesive. Follow the iOpener instructions to avoid overheating.

    • Slide the opening pick to the bottom right corner.

  3. Huawei Mate 20 Pro OLED Screen & Digitizer Replacement: crwdns2935265:03crwdnd2935265:01crwdnd2935265:02crwdne2935265:0 Huawei Mate 20 Pro OLED Screen & Digitizer Replacement: crwdns2935265:03crwdnd2935265:02crwdnd2935265:02crwdne2935265:0
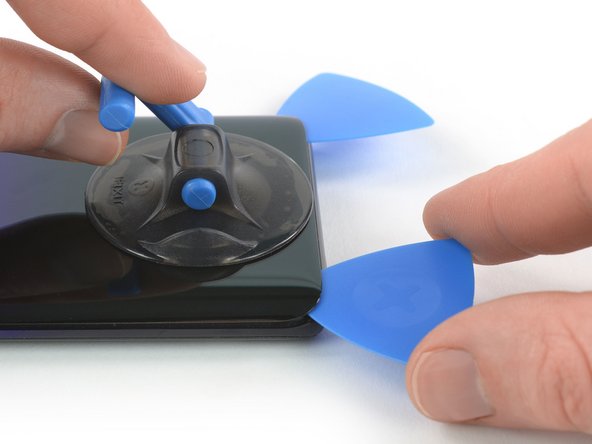
    • Insert a second opening pick and slide it to the bottom left corner to cut the adhesive.

    • Leave the opening picks in place to prevent the adhesive from resealing.

  4. Huawei Mate 20 Pro OLED Screen & Digitizer Replacement: crwdns2935265:04crwdnd2935265:01crwdnd2935265:03crwdne2935265:0 Huawei Mate 20 Pro OLED Screen & Digitizer Replacement: crwdns2935265:04crwdnd2935265:02crwdnd2935265:03crwdne2935265:0 Huawei Mate 20 Pro OLED Screen & Digitizer Replacement: crwdns2935265:04crwdnd2935265:03crwdnd2935265:03crwdne2935265:0
    • Insert a third opening pick at the bottom left corner.

    • Slide the tip of the opening pick from the bottom left corner along the side of the phone to cut the adhesive.

    • Leave the opening pick in its place at the top left corner to prevent the adhesive from resealing.

  5. Huawei Mate 20 Pro OLED Screen & Digitizer Replacement: crwdns2935265:05crwdnd2935265:01crwdnd2935265:02crwdne2935265:0 Huawei Mate 20 Pro OLED Screen & Digitizer Replacement: crwdns2935265:05crwdnd2935265:02crwdnd2935265:02crwdne2935265:0
    • If the adhesive becomes hard to cut, it has most likely cooled down. Use your iOpener to reheat it.

    • Insert a fourth opening pick under the top left corner of the back cover.

    • Slide the opening pick along the top edge of the phone to cut the adhesive.

    • Leave the opening pick in the top right corner to prevent the adhesive from resealing.

  6. Huawei Mate 20 Pro OLED Screen & Digitizer Replacement: crwdns2935265:06crwdnd2935265:01crwdnd2935265:02crwdne2935265:0 Huawei Mate 20 Pro OLED Screen & Digitizer Replacement: crwdns2935265:06crwdnd2935265:02crwdnd2935265:02crwdne2935265:0
    • Insert a fifth opening pick at the top right corner of the phone.

    • Slide the opening pick along the right side to cut the remaining adhesive.

  7. Huawei Mate 20 Pro OLED Screen & Digitizer Replacement: crwdns2935265:07crwdnd2935265:01crwdnd2935265:02crwdne2935265:0 Huawei Mate 20 Pro OLED Screen & Digitizer Replacement: crwdns2935265:07crwdnd2935265:02crwdnd2935265:02crwdne2935265:0
    • Lift and remove the back cover.

    • Before installing fresh adhesive and reassembling, remove any remaining adhesive from the phone, and clean the glued areas with isopropyl alcohol and a lint-free cloth.

    • During reassembly, this is a good point to power on your phone and test all functions before sealing it up. Be sure to power your phone back down completely before you continue working.

    • Secure the new back cover with pre-cut adhesive or double-sided adhesive tape. After installing the rear glass, apply pressure for several minutes to help the adhesive form a good bond, such as by placing it under a stack of heavy books.

  8. Huawei Mate 20 Pro OLED Screen & Digitizer Replacement, Motherboard Cover with NFC & Charging Coil: crwdns2935265:08crwdnd2935265:01crwdnd2935265:01crwdne2935265:0
    • Remove the eight Phillips #00 screws (4.3 mm length).

  9. Huawei Mate 20 Pro OLED Screen & Digitizer Replacement: crwdns2935265:09crwdnd2935265:01crwdnd2935265:03crwdne2935265:0 Huawei Mate 20 Pro OLED Screen & Digitizer Replacement: crwdns2935265:09crwdnd2935265:02crwdnd2935265:03crwdne2935265:0 Huawei Mate 20 Pro OLED Screen & Digitizer Replacement: crwdns2935265:09crwdnd2935265:03crwdnd2935265:03crwdne2935265:0
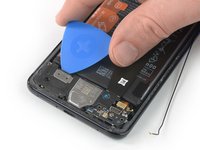
    • Slide an opening pick under the black adhesive at the bottom left of the charging coil.

    • Carefully slide the opening from the left to the right side to loosen the adhesive.

  10. Huawei Mate 20 Pro OLED Screen & Digitizer Replacement: crwdns2935265:010crwdnd2935265:01crwdnd2935265:02crwdne2935265:0 Huawei Mate 20 Pro OLED Screen & Digitizer Replacement: crwdns2935265:010crwdnd2935265:02crwdnd2935265:02crwdne2935265:0
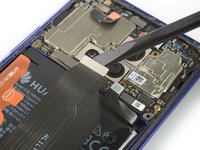
    • Insert an opening pick under the bottom left corner of the motherboard cover.

    • Use the opening pick to pry up the motherboard cover.

    • Do not try to remove the motherboard cover all the way yet. The flex cable of the flash assembly is still connected to the motherboard.

  11. Huawei Mate 20 Pro OLED Screen & Digitizer Replacement: crwdns2935265:011crwdnd2935265:01crwdnd2935265:02crwdne2935265:0 Huawei Mate 20 Pro OLED Screen & Digitizer Replacement: crwdns2935265:011crwdnd2935265:02crwdnd2935265:02crwdne2935265:0
    • Carefully fold the motherboard cover in the direction of the battery.

    • Take special care to avoid ripping the flash assembly flex cable as it is still connected to the motherboard.

  12. Huawei Mate 20 Pro OLED Screen & Digitizer Replacement: crwdns2935265:012crwdnd2935265:01crwdnd2935265:03crwdne2935265:0 Huawei Mate 20 Pro OLED Screen & Digitizer Replacement: crwdns2935265:012crwdnd2935265:02crwdnd2935265:03crwdne2935265:0 Huawei Mate 20 Pro OLED Screen & Digitizer Replacement: crwdns2935265:012crwdnd2935265:03crwdnd2935265:03crwdne2935265:0
    • Use a spudger to pry up and disconnect the flash assembly flex cable.

    • When you disconnect connectors like these, be careful not to dislodge the small surface-mounted components surrounding the socket.

    • Remove the motherboard cover including the NFC and charging coil.

  13. Huawei Mate 20 Pro OLED Screen & Digitizer Replacement, Battery Disconnect: crwdns2935265:013crwdnd2935265:01crwdnd2935265:02crwdne2935265:0 Huawei Mate 20 Pro OLED Screen & Digitizer Replacement, Battery Disconnect: crwdns2935265:013crwdnd2935265:02crwdnd2935265:02crwdne2935265:0
    • Use a spudger to pry up and disconnect the battery connector.

  14. Huawei Mate 20 Pro OLED Screen & Digitizer Replacement, Daughterboard Cover: crwdns2935265:014crwdnd2935265:01crwdnd2935265:01crwdne2935265:0
    • Remove the three Phillips #00 screws (4.3 mm length).

    • If you want to remove or replace the loudspeaker, daughterboard, battery, or the OLED screen, remove the four Phillips #00 screws (4.3 mm length) which hold down the loudspeaker assembly.

  15. Huawei Mate 20 Pro OLED Screen & Digitizer Replacement: crwdns2935265:015crwdnd2935265:01crwdnd2935265:03crwdne2935265:0 Huawei Mate 20 Pro OLED Screen & Digitizer Replacement: crwdns2935265:015crwdnd2935265:02crwdnd2935265:03crwdne2935265:0 Huawei Mate 20 Pro OLED Screen & Digitizer Replacement: crwdns2935265:015crwdnd2935265:03crwdnd2935265:03crwdne2935265:0
    • Slide an opening pick under the top right corner of the daughterboard cover.

    • Use the opening pick to pry up the daughterboard cover. Remove the daughterboard cover with tweezers.

  16. Huawei Mate 20 Pro OLED Screen & Digitizer Replacement, Loudspeaker & Daughterboard: crwdns2935265:016crwdnd2935265:01crwdnd2935265:02crwdne2935265:0 Huawei Mate 20 Pro OLED Screen & Digitizer Replacement, Loudspeaker & Daughterboard: crwdns2935265:016crwdnd2935265:02crwdnd2935265:02crwdne2935265:0
    • Use a Spudger to pry up and disconnect the interconnect flex cable from the daughterboard.

  17. Huawei Mate 20 Pro OLED Screen & Digitizer Replacement: crwdns2935265:017crwdnd2935265:01crwdnd2935265:02crwdne2935265:0 Huawei Mate 20 Pro OLED Screen & Digitizer Replacement: crwdns2935265:017crwdnd2935265:02crwdnd2935265:02crwdne2935265:0
    • Use a Spudger to pry up and disconnect the interconnect flex cable from the motherboard.

    • Remove the interconnect flex cable.

  18. Huawei Mate 20 Pro OLED Screen & Digitizer Replacement: crwdns2935265:018crwdnd2935265:01crwdnd2935265:02crwdne2935265:0 Huawei Mate 20 Pro OLED Screen & Digitizer Replacement: crwdns2935265:018crwdnd2935265:02crwdnd2935265:02crwdne2935265:0
    • Use a pair of tweezers to pry up and disconnect the connector of the black coax cable from the daughterboard.

    • Unroute the black coax cable from the metal clip on the daughterboard and fold it to the side.

  19. Huawei Mate 20 Pro OLED Screen & Digitizer Replacement: crwdns2935265:019crwdnd2935265:01crwdnd2935265:02crwdne2935265:0 Huawei Mate 20 Pro OLED Screen & Digitizer Replacement: crwdns2935265:019crwdnd2935265:02crwdnd2935265:02crwdne2935265:0
    • Slide an opening underneath the top left corner of the loudspeaker cover.

    • Use the opening pick to pry up the loudspeaker and daughterboard assembly.

  20. Huawei Mate 20 Pro OLED Screen & Digitizer Replacement: crwdns2935265:020crwdnd2935265:01crwdnd2935265:02crwdne2935265:0 Huawei Mate 20 Pro OLED Screen & Digitizer Replacement: crwdns2935265:020crwdnd2935265:02crwdnd2935265:02crwdne2935265:0
    • Remove the loudspeaker and daughterboard assembly.

  21. Huawei Mate 20 Pro OLED Screen & Digitizer Replacement, Charging Port with Main Flex Cable: crwdns2935265:021crwdnd2935265:01crwdnd2935265:02crwdne2935265:0 Huawei Mate 20 Pro OLED Screen & Digitizer Replacement, Charging Port with Main Flex Cable: crwdns2935265:021crwdnd2935265:02crwdnd2935265:02crwdne2935265:0
    • Use a spudger to pry up and disconnect the main flex cable from the motherboard.

  22. Huawei Mate 20 Pro OLED Screen & Digitizer Replacement: crwdns2935265:022crwdnd2935265:01crwdnd2935265:02crwdne2935265:0 Huawei Mate 20 Pro OLED Screen & Digitizer Replacement: crwdns2935265:022crwdnd2935265:02crwdnd2935265:02crwdne2935265:0
    • Use a spudger to pry up and disconnect the main flex cable from the left daughterboard.

  23. Huawei Mate 20 Pro OLED Screen & Digitizer Replacement: crwdns2935265:023crwdnd2935265:01crwdnd2935265:02crwdne2935265:0 Huawei Mate 20 Pro OLED Screen & Digitizer Replacement: crwdns2935265:023crwdnd2935265:02crwdnd2935265:02crwdne2935265:0
    • Slide the flat end of a spudger under the right side of the main flex cable next to the charging port.

    • Use the spudger to pry up the main flex cable and to lever the charging port out of its recess.

  24. Huawei Mate 20 Pro OLED Screen & Digitizer Replacement: crwdns2935265:024crwdnd2935265:01crwdnd2935265:02crwdne2935265:0 Huawei Mate 20 Pro OLED Screen & Digitizer Replacement: crwdns2935265:024crwdnd2935265:02crwdnd2935265:02crwdne2935265:0
    • Remove the main flex cable including the charging port by lifting it upwards and then pulling it in the direction of the motherboard.

  25. Huawei Mate 20 Pro OLED Screen & Digitizer Replacement, Battery: crwdns2935265:025crwdnd2935265:01crwdnd2935265:02crwdne2935265:0 Huawei Mate 20 Pro OLED Screen & Digitizer Replacement, Battery: crwdns2935265:025crwdnd2935265:02crwdnd2935265:02crwdne2935265:0
    • Peel the orange adhesive strip labeled with a 1 off the battery. The orange adhesive tape will rip along a small perforated line.

  26. Huawei Mate 20 Pro OLED Screen & Digitizer Replacement: crwdns2935265:026crwdnd2935265:01crwdnd2935265:02crwdne2935265:0 Huawei Mate 20 Pro OLED Screen & Digitizer Replacement: crwdns2935265:026crwdnd2935265:02crwdnd2935265:02crwdne2935265:0
    • Peel the orange adhesive strip labeled with a 2 off the battery. The orange adhesive tape will rip along a small perforated line.

  27. Huawei Mate 20 Pro OLED Screen & Digitizer Replacement: crwdns2935265:027crwdnd2935265:01crwdnd2935265:02crwdne2935265:0 Huawei Mate 20 Pro OLED Screen & Digitizer Replacement: crwdns2935265:027crwdnd2935265:02crwdnd2935265:02crwdne2935265:0
    • Peel the orange adhesive strip labeled with a 3 off the battery.

    • Pull up the orange adhesive strip to lift the battery out of its recess.

    • Although these new adhesive tabs are supposed to make the battery removal easier, these may require some force. In case you're having trouble removing the battery, you can apply a heated iOpener to the center of the display, to loosen the adhesive underneath.

  28. Huawei Mate 20 Pro OLED Screen & Digitizer Replacement: crwdns2935265:028crwdnd2935265:01crwdnd2935265:03crwdne2935265:0 Huawei Mate 20 Pro OLED Screen & Digitizer Replacement: crwdns2935265:028crwdnd2935265:02crwdnd2935265:03crwdne2935265:0 Huawei Mate 20 Pro OLED Screen & Digitizer Replacement: crwdns2935265:028crwdnd2935265:03crwdnd2935265:03crwdne2935265:0
    • Swing the battery up to an upright position.

    • Peel the battery off the remaining adhesive.

    • Remove the battery.

    • During re-assembly, temporarily re-connect the battery to the motherboard to help align it correctly. Disconnect the battery after it is seated.

  29. Huawei Mate 20 Pro OLED Screen & Digitizer Replacement: crwdns2935265:029crwdnd2935265:01crwdnd2935265:02crwdne2935265:0 Huawei Mate 20 Pro OLED Screen & Digitizer Replacement: crwdns2935265:029crwdnd2935265:02crwdnd2935265:02crwdne2935265:0
    • Peel the battery's adhesive sticker off the midframe.

    • This step is mandatory if you are replacing the screen. However it is highly recommended to use a fresh adhesive sticker as well, when installing a new battery.

    • Secure the new battery with pre-cut adhesive or double-sided adhesive tape. In order to position it correctly, apply the new adhesive into the phone at the places where the old adhesive was located, not directly onto the battery. Press the new battery firmly into place.

  30. Huawei Mate 20 Pro OLED Screen & Digitizer Replacement, OLED Screen & Digitizer: crwdns2935265:030crwdnd2935265:01crwdnd2935265:03crwdne2935265:0 Huawei Mate 20 Pro OLED Screen & Digitizer Replacement, OLED Screen & Digitizer: crwdns2935265:030crwdnd2935265:02crwdnd2935265:03crwdne2935265:0 Huawei Mate 20 Pro OLED Screen & Digitizer Replacement, OLED Screen & Digitizer: crwdns2935265:030crwdnd2935265:03crwdnd2935265:03crwdne2935265:0
    • Use a spudger to pry up and disconnect the display flex cable from the motherboard.

    • The display flex cable holds onto the midframe because of mild adhesive underneath. Use a pair of tweezers to peel the flex cable off the midframe.

  31. Huawei Mate 20 Pro OLED Screen & Digitizer Replacement: crwdns2935265:031crwdnd2935265:01crwdnd2935265:01crwdne2935265:0
    • Apply a heated iOpener to the screen and all edges of the phone for at least two minutes, to loosen the adhesive.

  32. Huawei Mate 20 Pro OLED Screen & Digitizer Replacement, OLED Screen & Digitizer: crwdns2935265:032crwdnd2935265:01crwdnd2935265:03crwdne2935265:0 Huawei Mate 20 Pro OLED Screen & Digitizer Replacement, OLED Screen & Digitizer: crwdns2935265:032crwdnd2935265:02crwdnd2935265:03crwdne2935265:0 Huawei Mate 20 Pro OLED Screen & Digitizer Replacement, OLED Screen & Digitizer: crwdns2935265:032crwdnd2935265:03crwdnd2935265:03crwdne2935265:0
    • Once the screen is warm to the touch, apply a suction cup to the bottom edge of the phone.

    • Pull the suction cup upwards and insert an opening pick in the gap between the display glass and the midframe. Start to cut the adhesive by sliding the opening pick to the bottom right corner.

  33. Huawei Mate 20 Pro OLED Screen & Digitizer Replacement: crwdns2935265:033crwdnd2935265:01crwdnd2935265:02crwdne2935265:0 Huawei Mate 20 Pro OLED Screen & Digitizer Replacement: crwdns2935265:033crwdnd2935265:02crwdnd2935265:02crwdne2935265:0
    • Insert a second opening pick and slide it to the bottom left corner of the phone to cut the adhesive.

    • Leave the picks in their place to prevent the adhesive from resealing.

  34. Huawei Mate 20 Pro OLED Screen & Digitizer Replacement: crwdns2935265:034crwdnd2935265:01crwdnd2935265:03crwdne2935265:0 Huawei Mate 20 Pro OLED Screen & Digitizer Replacement: crwdns2935265:034crwdnd2935265:02crwdnd2935265:03crwdne2935265:0 Huawei Mate 20 Pro OLED Screen & Digitizer Replacement: crwdns2935265:034crwdnd2935265:03crwdnd2935265:03crwdne2935265:0
    • Insert a third opening pick under the bottom left corner of the phone.

    • Slide the opening pick up to the top left corner to cut the adhesive. Leave it there to prevent the adhesive from resealing.

    • If cutting becomes too difficult, reheat and reapply the iOpener.

  35. Huawei Mate 20 Pro OLED Screen & Digitizer Replacement: crwdns2935265:035crwdnd2935265:01crwdnd2935265:02crwdne2935265:0 Huawei Mate 20 Pro OLED Screen & Digitizer Replacement: crwdns2935265:035crwdnd2935265:02crwdnd2935265:02crwdne2935265:0
    • Insert a fourth opening pick at the top left corner.

    • When nearing the front facing camera, only work with the tip of the opening pick to avoid damaging or smearing the camera.

    • Slide the opening pick along the top edge of the phone to cut the adhesive. Leave the pick in the top right corner of the screen to prevent the adhesive from resealing.

  36. Huawei Mate 20 Pro OLED Screen & Digitizer Replacement: crwdns2935265:036crwdnd2935265:01crwdnd2935265:02crwdne2935265:0 Huawei Mate 20 Pro OLED Screen & Digitizer Replacement: crwdns2935265:036crwdnd2935265:02crwdnd2935265:02crwdne2935265:0
    • Insert a fifth opening pick and slide it along the right edge of the phone to cut the remaining adhesive.

    • Try not to remove the display all the way yet, the display cable is still threaded through the frame and possible adhered on the inner side of the midframe.

  37. Huawei Mate 20 Pro OLED Screen & Digitizer Replacement: crwdns2935265:037crwdnd2935265:01crwdnd2935265:03crwdne2935265:0 Huawei Mate 20 Pro OLED Screen & Digitizer Replacement: crwdns2935265:037crwdnd2935265:02crwdnd2935265:03crwdne2935265:0 Huawei Mate 20 Pro OLED Screen & Digitizer Replacement: crwdns2935265:037crwdnd2935265:03crwdnd2935265:03crwdne2935265:0
    • Thread the display flex cable through the gap in the midframe and remove the display.

    • Not all replacement screens come with a new preinstalled fingerprint sensor. In case you need to transfer your old fingerprint sensor to your replacement screen you can follow this guide, to remove it.

    • Before installing a new display, remove all traces of the old adhesive from the frame, and clean the glued areas with isopropyl alcohol (>90%) and a lint-free cloth.

    • The best way to secure the new screen is with a sheet of custom-cut double-sided tape. Apply the tape to the back of the screen, then carefully feed the display cable through the frame. Align the screen and press it into place.

crwdns2915888:0crwdne2915888:0

To reassemble your device, follow these instructions in reverse order.

If possible, turn on your phone and test your repair before installing new adhesive and resealing the phone.

Take your e-waste to an R2 or e-Stewards certified recycler.

Repair didn’t go as planned? Check out our Answers community for troubleshooting help.

crwdns2935229:011crwdne2935229:0

Dominik Schnabelrauch

crwdns2935283:011/23/16crwdne2935283:0

201,012 crwdns2915208:0crwdne2915208:0

crwdns2935297:0682crwdne2935297:0

crwdns2915084:0crwdne2915084:0

iFixit crwdns2935289:0iFixitcrwdne2935289:0

Staff

crwdns2931471:0136crwdne2931471:0

crwdns2935297:016,560crwdne2935297:0

crwdns2944067:05crwdne2944067:0

Hi there.... My huawei mate 20 pro was water damaged!!! After a while its LCD was displaying green lines and in no time it went blank, but surprisingly the phone works and still receives notifications and incoming calls. I could even answer calls in a blank screen by pretending to swipe as if its on. My question before i buy a replacement screen . Is the LCD really damaged or its the logic board ? This might help me decide on how to proceed with it.

Bhekani Tshuma - crwdns2934203:0crwdne2934203:0

Hi. Did you find out what was wrong? I have the same issue

Conor D -

Hi there,my Huawei mate 20 pro fell on a hard surface,and its started showing very bright sparkling light directly were the fell the hardest rendering ur eyes unable to even see well and also for blank at times. I want to know whether the new screen I intend to buys comes with the sensor coz I believed the is also affected! Or I am going to order for the sensor separately?

Jesse Mamza Williams - crwdns2934203:0crwdne2934203:0

Where can I buy OLED Screen & Digitizer for Huawei mate 20 pro in India ?

Anu S - crwdns2934203:0crwdne2934203:0

try the Huawei app (hicare) select your country and it will show the prices for parts of mate 20 pro, usually screen is too expensive , sometimes they got discounts and promos for different parts, check it out, you can get replacement screens online on ebay or alibaba etc. but wont be good, some got resolution issues, fake sensors, mismatching screen dimensions etc, check the products properly and reviews too before purchasing

imaad whd -

crwdns2917038:0crwdne2917038:0

crwdns2936625:0crwdne2936625:0:

crwdns2936751:024crwdne2936751:0 8

crwdns2936753:07crwdne2936753:0 35

crwdns2936753:030crwdne2936753:0 165

crwdns2942667:0crwdne2942667:0 31,460