crwdns2915892:0crwdne2915892:0
This repair guide was authored by the iFixit staff and hasn’t been endorsed by Google. Learn more about our repair guides here.
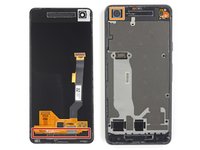
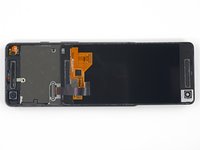
Use this guide to replace a cracked or faulty screen, including the display and digitizer, on your Google Pixel 2. There may also be small parts that need to be transferred from the original display to the replacement. Inspect both displays closely to make sure all relevant components are moved from the original display to the replacement.
crwdns2942213:0crwdne2942213:0
-
-
If your display glass is cracked, keep further breakage contained and prevent bodily harm during your repair by taping the glass. This also makes a smooth surface allowing the suction cup to bond.
-
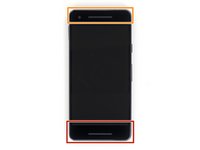
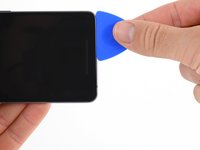
Apply a suction cup as close to the volume button edge of the phone as you can while avoiding the curved edge.
-
-
-
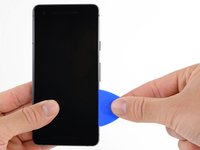
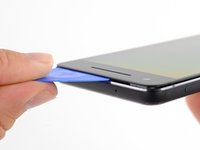
Pull up on the suction cup with firm, constant pressure and insert an opening pick between the front panel and rear case.
-
-
-
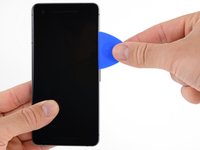
Do not insert the pick more than 9 mm into the bottom edge of the phone. If the pick contacts the folded portion of the OLED panel it can damage the display.
-
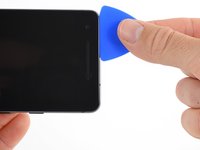
Only make very shallow cuts in the upper left corner, prying deeply can damage the front-facing camera.
-
-
-
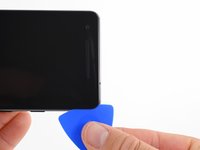
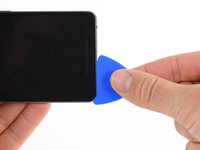
Slide the opening pick up the right side of the phone to separate the display adhesive.
-
-
-
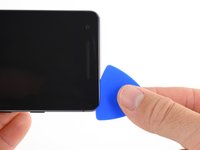
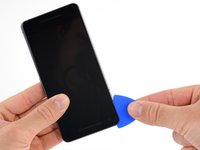
Slide the opening pick around the upper-right corner and along the top edge of the phone.
-
-
-
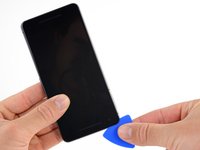
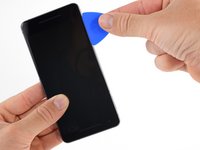
Slide the pick around the upper-left corner of the phone and down the left edge of the phone.
-
-
-
-
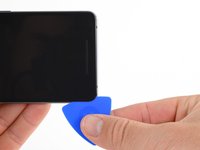
Slide the pick around the bottom-left corner and along the bottom of the phone. Keep pick at a slight angle away from the screen to avoid damage to the OLED corners.
-
-
-
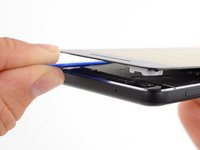
Reinsert the pick at the top edge of the phone and gently pry up the display.
-
-
crwdns2935267:0crwdne2935267:0Magnetic Project Mat$19.95
-
Carefully lay the display down on top of the rear case as shown, making sure not to crease or tear the display ribbon cable.
-
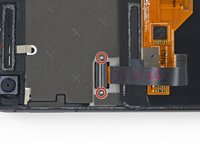
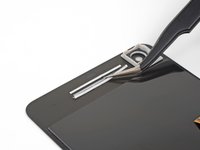
Remove the two 4.0 mm T5 Torx screws securing the display cable bracket.
-
-
-
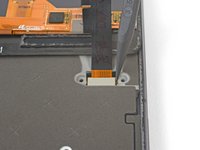
Use the point of a spudger to lift the display cable connector up and out of its socket on the motherboard.
-
-
crwdns2935267:0crwdne2935267:0Tweezers$4.99
-
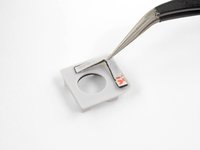
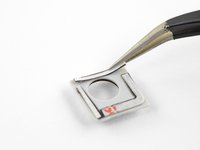
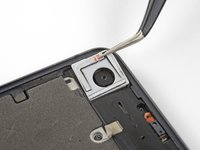
To remove the camera bracket, apply heat, then use a thin metal blade to pry the bracket away from the old screen.
-
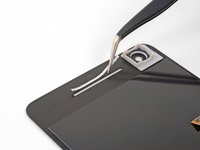
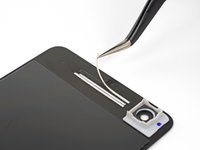
There are two layers that make up the speaker grille—the metal mesh grille, and a layer of thin fabric mesh behind it. Use tweezers to peel both layers off of the old screen together. Do your best to not separate those layers at all.
-
Cut two corners of a pre-cut adhesive card so that each side is no more than 12 mm (0.5 inches) long, or cut four 12 mm (0.5 inches) strips of double-sided adhesive.
-
Apply the adhesive strips to the edges of the flat side of the front-facing camera bracket. When you're done, there should be adhesive on all four edges of the camera bracket.
-
Gently press the adhesive into place using your finger or a spudger.
-
-
-
Place the camera bracket into its slot surrounding the front-facing camera.
-
Peel the white backing off of the adhesive strips.
-
-
-
Use your finger or the flat edge of a spudger to reconnect the new screen's display cable connector.
-
To re-attach press connectors like this one, carefully align and press down on one side until it clicks into place, then repeat on the other side. Do not press down on the middle. If the connector is misaligned, the pins can bend, causing permanent damage.
-
-
-
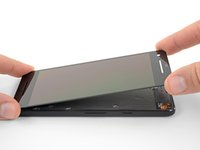
Very carefully align the lower edge of your new display with the lower edge of the phone case.
-
Set the lower edge of the screen in the case, and slowly hinge it down toward the phone case, being careful to keep it properly aligned with the case.
-
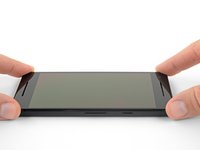
Set the screen down in the case and press down on the front-facing camera hole to ensure that the bracket is adhered to the screen.
-
Lift the screen up and away from the phone case and check that the camera bracket is adhered to the screen.
-
-
-
Cut a strip of 1 mm wide double-sided tape to be about 3 cm long (1.25 inches).
-
Lay the adhesive strip along the upper edge of the earpiece speaker slot in your new display so that it's centered over the slot and touching the upper edge.
-
Gently press the adhesive strip into place on the display with your finger or a spudger.
-
Repeat this step to apply a second, identical adhesive strip along the bottom edge of the speaker slot.
-
Peel the white backing away from both adhesive strips.
-
-
-
Lightly set the speaker grille into its slot so that the curved grille sits in the slot and the flat side faces away from the screen.
-
Before pushing the grille down against the adhesive, make sure it is centered and properly seated in the slot.
-
-
-
Use the flat end of a spudger or your finger to push the edges of the speaker grille down against the adhesive strips.
-
Repeat the previous two steps to install the lower speaker grille.
-


Compare your new replacement part to the original part—you may need to transfer remaining components or remove adhesive backings from the new part before installing.
To reassemble your device, follow the above steps in reverse order.
Take your e-waste to an R2 or e-Stewards certified recycler.
Repair didn’t go as planned? Check out our Answers community for troubleshooting help.
crwdns2935221:0crwdne2935221:0
crwdns2935229:051crwdne2935229:0

crwdns2947412:021crwdne2947412:0
I removed my screen to change the battery but unfortunately I wasn’t careful enough and nicked the display on one of the corners resulting in a dead screen now.
I can replace the screen np, but I was wondering, I should be able to still connect my phone to my PC to check it is still working right? Because I have it connected now but there seems to be no power at all and my phone isn’t connecting to my PC to do a full backup. I have double checked all connections and held the power button in to try start it up or will it not start up if the screen is broken?
Leon Cope - crwdns2934203:0crwdne2934203:0 crwdns2950251:0crwdne2950251:0
Have you gotten any further? I was doing a battery replacement and while removing the screen it cracked. Since I didn’t have a spare screen, I reassembled the phone with the cracked screen and saw some flashes of light but was dark. Upon attaching a replacement screen I get nothing on screen but can feel the vibration of the phone restarting. Tried a second replacement screen but no different.
Erik Karlin - crwdns2934203:0crwdne2934203:0 crwdns2950251:0crwdne2950251:0
I needed to back up my files and pictures from my Pixel 2 to my PC with a dead screen just yesterday. I used the “squeeze” feature and asked the Google assistant to “turn on talkback.” This allows you to blindly navigate the screen (providing the touch functions still work). You can then use this feature combined with the Google assistant and fingerprint reader to open the navigation bar and change the PC connection from “charge only” to PTP. This will allow you to transfer your files. Hope this helps.
Sarah J. - crwdns2934203:0crwdne2934203:0 crwdns2950251:0crwdne2950251:0
I recommend using a playing card instead of the plastic guitar pick to cut the adhesive once you get the side pried up a bit. It took just a moment for my hand to slip and the pick went too far in and chipped the corner of the OLED display. I also was trying to avoid using heat, but using even just a little of the low setting on my Harbor Freight heat gun really helped soften the adhesive up.
Chase Nachtmann - crwdns2934203:0crwdne2934203:0 crwdns2950251:0crwdne2950251:0
This sounds like a great idea! I just put a pack of old playing cards in my repair kit. I destroyed my OLED display with a pick too. Hopefully next time I remember to use the playing cards and don’t mess this up.
Gabriel Staples - crwdns2934203:0crwdne2934203:0 crwdns2950251:0crwdne2950251:0